|
Posted: 7/21/2014 3:36:19 PM EDT
Just joined the CZ club recently when I found a P-01 used on the EE here. It took a long time of researching before I decided I wanted to try one, and I am really glad I did. I originally became interested in the CZ when I wanted to find a decent carry gun. I have a SIG SP2022 which is fantastic gun, but felt a little top heavy and was a little large for me to conceal since I am a smaller guy. I started looking for something in a DA/SA with no safety, all metal frame. The CZ piqued my interest due to the internal rails and lower bore axis. As I started reading, I found out about all of the custom work that was available for CZ's, and as a chronic tinkerer I knew I needed one as a project gun, and if it shot well I would also carry it. I was not disappointed.
The gun felt great when it first arrived, mostly stock except it had a Cajun Gun Works enhanced firing pin. I added a CGW firing pin retaining pin, lower power firing pin block spring, reduced power firing pin spring, 13 lb mainspring, flat mainspring plug, and added VZ Frag grips immediately. At this point, the gun shot really well, and concealed very well using a homemade AIWB kydex holster. My only issue was the curve on the trigger was ridiculous. You would need really thin fingers for that thing not to hurt. One range trip and my fingernail started to separate from my finger after shooting it. I decided that more work needed to be done, and I removed the trigger, flattened it out, removed the extra material, and put it back in. While the trigger was out, I replaced the trigger return spring and trigger pin with CGW reduced power return spring and floating trigger pin (wasn't in the original plan, but things happen when you lose a spring  ). While the sear cage was out, the slave pin fell out as well, so I cleaned all of the sear cage parts very well and then put it all back together. The result is an amazingly smooth, comfortable, light (but not too light) trigger that I love for carry. ). While the sear cage was out, the slave pin fell out as well, so I cleaned all of the sear cage parts very well and then put it all back together. The result is an amazingly smooth, comfortable, light (but not too light) trigger that I love for carry.
Here she is: 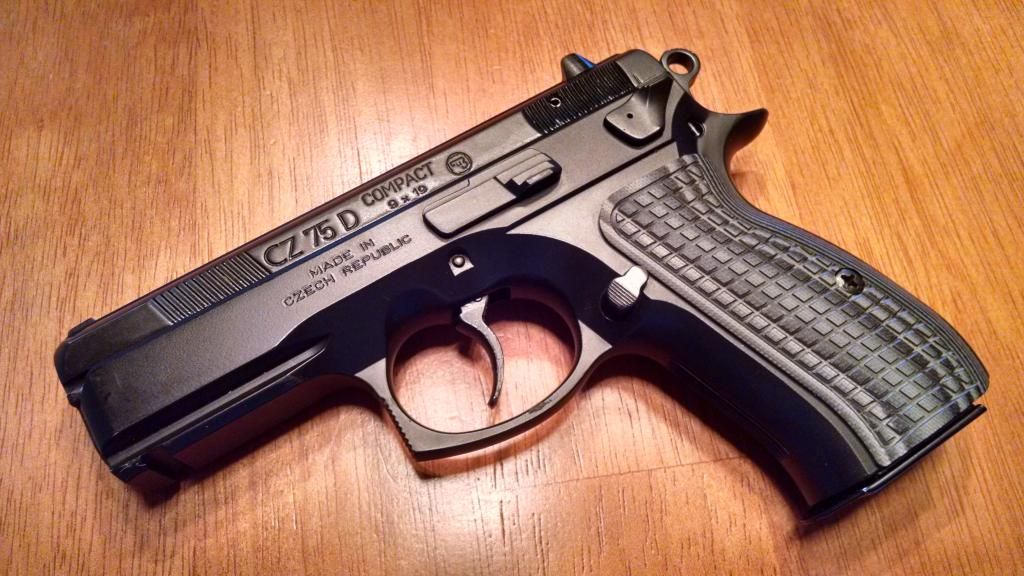
And the first 5 shots from a range trip this past weekend ended up being about a 2"group at 30ft: 
And then a 1.5" 5 shot group right after that: 
The shot to the left and the one low are from shooting at a different circle not seen in the picture during a quick draw and fire drill. Overall, I was pumped about my groups with this gun, by far the best I have ever shot with a pistol. I couldn't be happier. |
|
|
|
[#1]
Welcome to the CZ addiction. :) Now you need a High Noon Holster and belt combo to carry that eCZellent sidearm. ;)
|
|
|
|
[#2]
Quoted:
Welcome to the CZ addiction. :) Now you need a High Noon Holster and belt combo to carry that eCZellent sidearm. ;) Thanks! I actually carry in a homemade AIWB kydex holster that I really like. |
|
|
|
[#3]
How'd you flatten your trigger out? I had thought about doing it myself to my spo1
|
|
|
|
[#4]
Nice. Wish I could get that group at 30ft
Had the same issue with my cz75 compact about the pain in trigger finger. Went ahead and did the RRK from CGW. No issues now. |
|
|
|
[#5]
Nice
|
|
|
|
[#6]
Quoted:
How'd you flatten your trigger out? I had thought about doing it myself to my spo1 I actually read about the idea on a CZ forum elsewhere. It was pretty easy to do, and I figured if I screwed it up, I would just buy an old 85c trigger and replace it. First, I removed the trigger from the gun. Then, i placed it on top of a 3/4" socket for a socket wrench. I started to hammer it, which was bending it out a little bit, but didn't like how the trigger would "bounce back" to its original shape, so hammering was taking too long. Instead, I ended up placing the trigger on the socket, and then placing both in a vice and closed the vice slowly until the trigger formed around the socket. This worked much better. Once the trigger was mostly formed to the 3/4" socket, I did the same thing with a 1" socket. This gave the trigger an incredible, almost flat, feel to it. Next, I used a file to remove some material from the bottom and back of the trigger so that it would not hit the trigger guard during the pull. I only did a little bit at a time until the hammer dropped consistently. This required putting the trigger in and out of the gun quite a bit. Floating trigger pin and sear cage slave pin are HIGHLY recommended for this. Finally, I replaced the trigger and all of the parts and function tested the gun. I might still need to remove just a little bit more from the trigger, as it currently rests on the trigger guard when fully pulled, but for right now it functions and feels great. I will say that the trigger is not really pretty right now, the coating on it became cracked and fell off, and my filing is very obvious. However, I was low on funds so this saved me about $40. Someday I will probably just buy the 85c trigger. |
|
|
 Win a FREE Membership!
Sign up for the ARFCOM weekly newsletter and be entered to win a free ARFCOM membership. One new winner* is announced every week!
You will receive an email every Friday morning featuring the latest chatter from the hottest topics, breaking news surrounding legislation, as well as exclusive deals only available to ARFCOM email subscribers.

AR15.COM is the world's largest firearm community and is a gathering place for firearm enthusiasts of all types.
From hunters and military members, to competition shooters and general firearm enthusiasts, we welcome anyone who values and respects the way of the firearm.

Subscribe to our monthly Newsletter to receive firearm news, product discounts from your favorite Industry Partners, and more.
Copyright © 1996-2024 AR15.COM LLC. All Rights Reserved.
Any use of this content without express written consent is prohibited.
AR15.Com reserves the right to overwrite or replace any affiliate, commercial, or monetizable links, posted by users, with our own.


