|
[#1]
Yet another fine example...very nice work! That sucker looks like you couldn't make it slip if you tried!
|
|
|
|
[#2]
Did these awhile back, the pictures are crappy, but they turned out really well.
I did the one on the right first and liked the way it looked and it made it more grippy. Did the one on the left and it took a lot less time, and is waaaay more grippy. 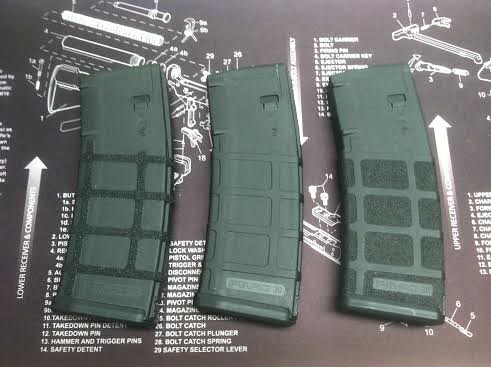 </a>" /> </a>" />
 " /> " />
|
|
|
|
[#3]
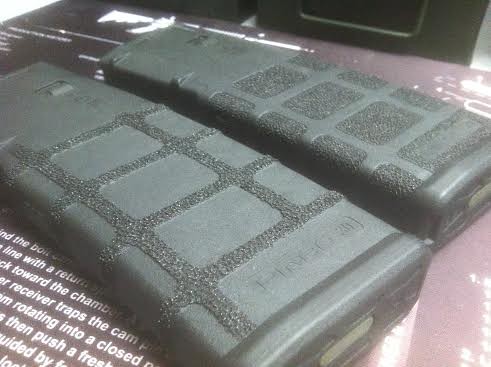
Quoted: Did these awhile back, the pictures are crappy, but they turned out really well. I did the one on the right first and liked the way it looked and it made it more grippy. Did the one on the left and it took a lot less time, and is waaaay more grippy. http://<a href=http://farm4.staticflickr.com/3805/12721625133_798273225f.jpg</a>" /> http://<a href=http://farm8.staticflickr.com/7385/12721477065_2902ee9417.jpg</a>" /> Oh now that's cool! I did some Pmags a while back too...I did inside the panels like the one on your right...but I didn't think of doing it the way you did the left one...I'm gonna do some of my others that way! I like it!
|
|
|
|
[#4]
Last 1911 I did. Provides more grip without being abrasive or aggressive.


|
|
|
|
[#5]
Quoted: Last 1911 I did. Provides more grip without being abrasive or aggressive. http://i241.photobucket.com/albums/ff35/kemays/kimber3_zps14595b9d.jpg http://i241.photobucket.com/albums/ff35/kemays/stippling2_zpseacd7710.jpg That looks really cool. That is the 2nd 1911 with that style of "stippling" that has shown up here on this thread. I give you guys credit for courage...it's one thing to stipple a polymer grip...it's easier to fix if you make a boo boo. But, taking a hammer and punch to a pretty 1911 like that...that takes some stones! Nice Work!
|
|
|
|
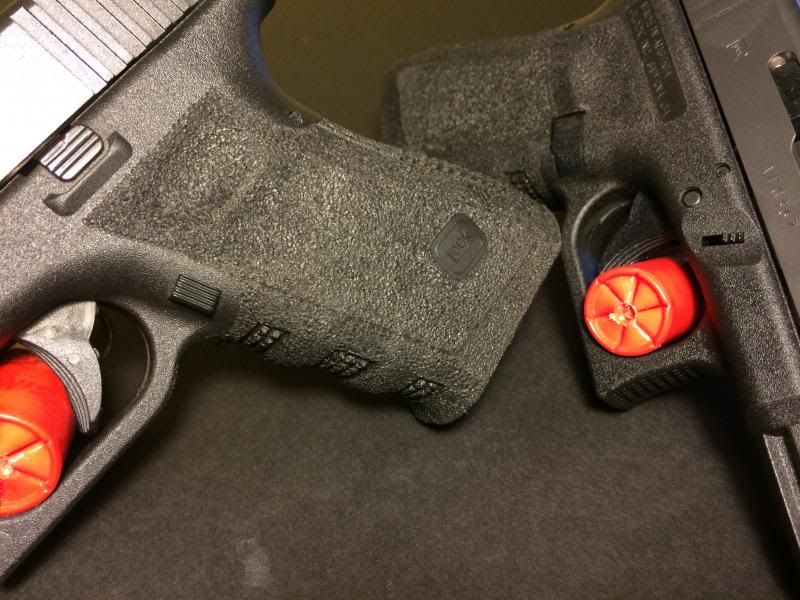
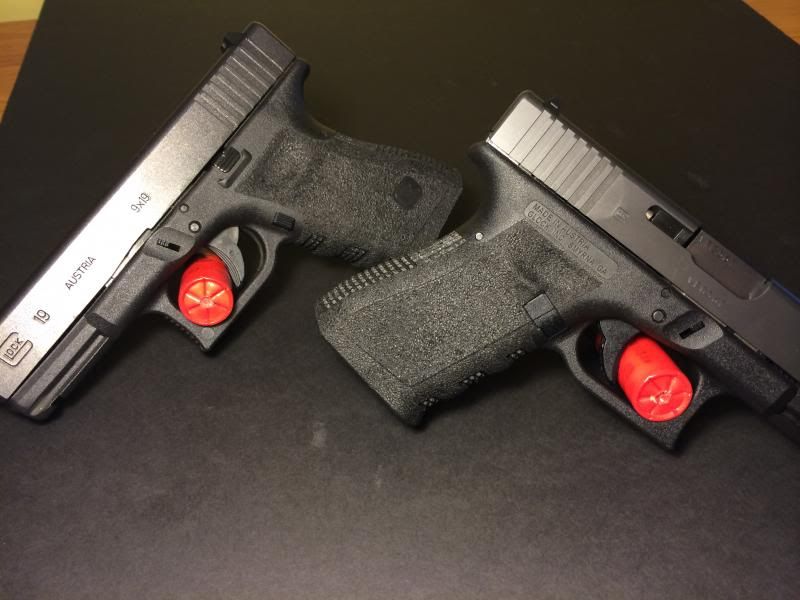
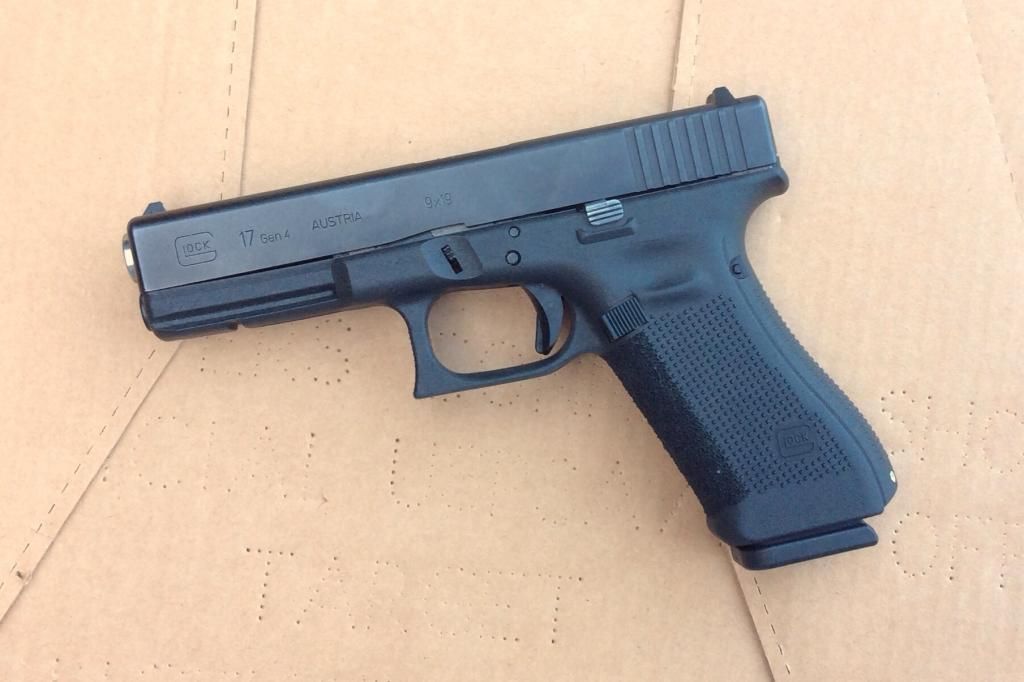
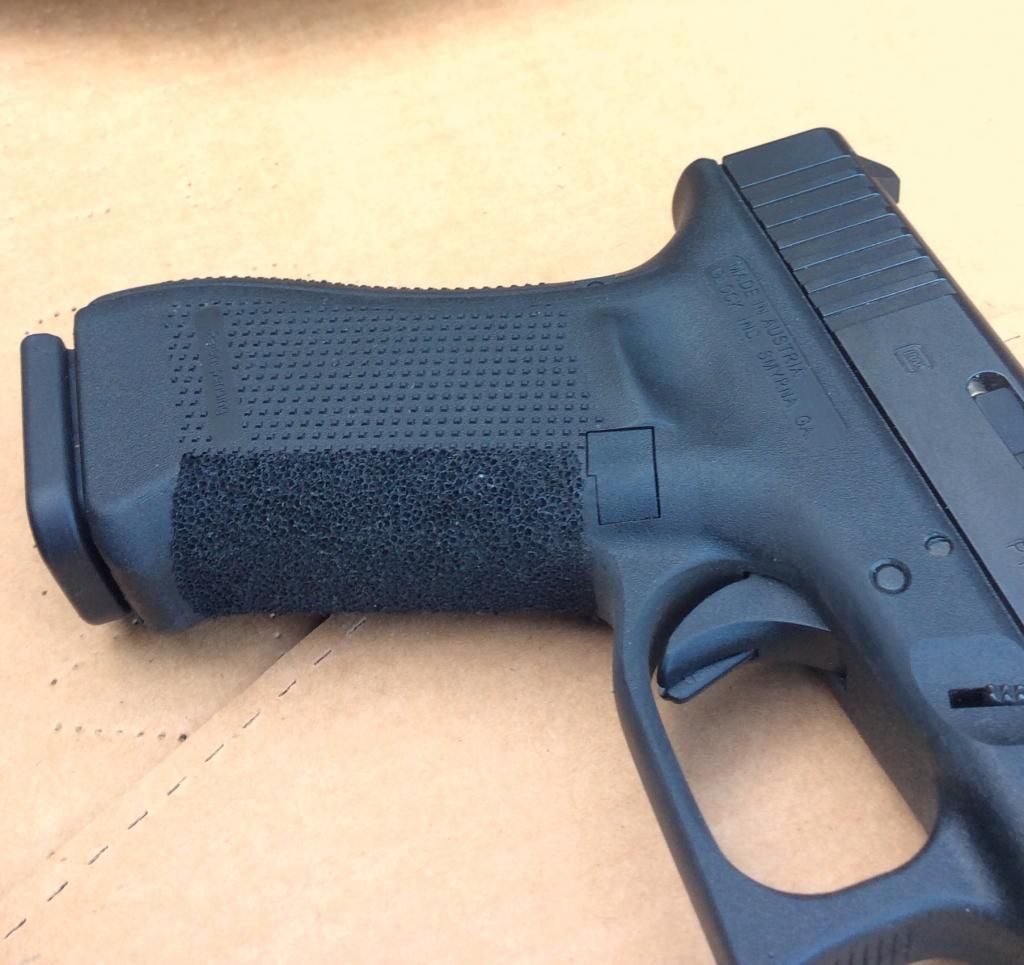
[#6]
Well I decided to stipple my Glock. I think it turned out well for my first time!

|
|
|
|
[#7]
Quoted:
That looks really cool. That is the 2nd 1911 with that style of "stippling" that has shown up here on this thread. I give you guys credit for courage...it's one thing to stipple a polymer grip...it's easier to fix if you make a boo boo. But, taking a hammer and punch to a pretty 1911 like that...that takes some stones! Nice Work! Quoted:
Quoted:
Last 1911 I did. Provides more grip without being abrasive or aggressive. http://i241.photobucket.com/albums/ff35/kemays/kimber3_zps14595b9d.jpg http://i241.photobucket.com/albums/ff35/kemays/stippling2_zpseacd7710.jpg That looks really cool. That is the 2nd 1911 with that style of "stippling" that has shown up here on this thread. I give you guys credit for courage...it's one thing to stipple a polymer grip...it's easier to fix if you make a boo boo. But, taking a hammer and punch to a pretty 1911 like that...that takes some stones! Nice Work! Thank you, it is satisfying to do it myself |
|
|
|
[#8]
M&P 9c. I only did the front/back straps for now, may do the sides later when I decide on a pattern.


|
|
|
|
[#9]

|
|
|
|
[#10]
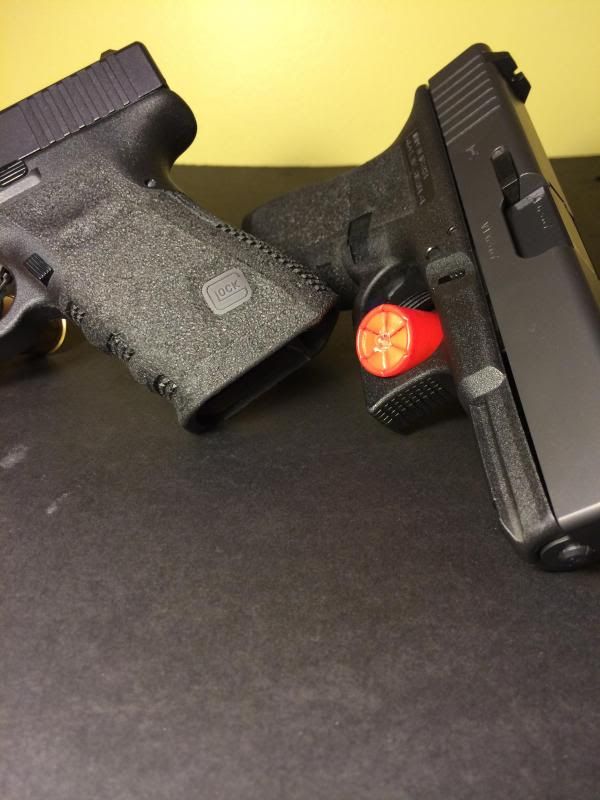
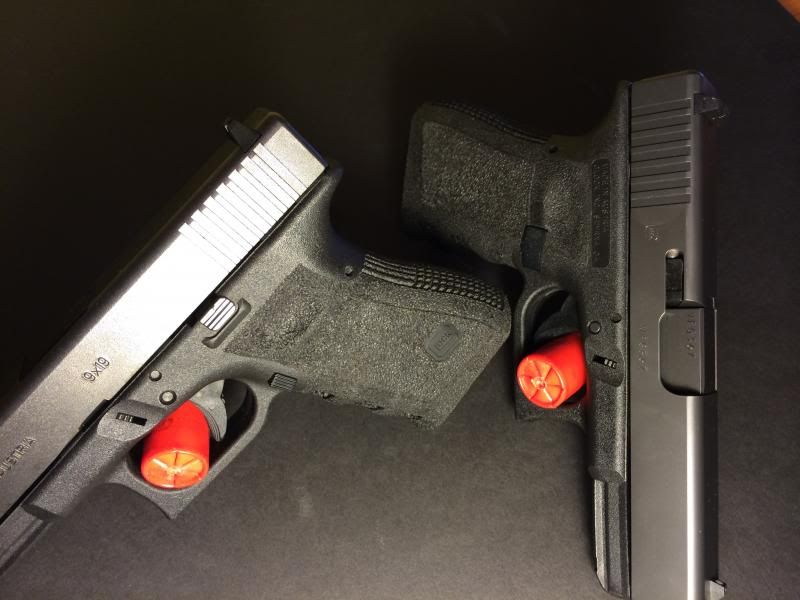
So here is my first attempt on a pistol, (tried two pmags this week).
Good, Bad, Or ugly? Any suggestions? 

|
|
|
|
[#11]
Quoted: So here is my first attempt on a pistol, (tried two pmags this week). Good, Bad, Or ugly? Any suggestions? http://i197.photobucket.com/albums/aa257/casexx6383/guns/IMG_20140320_140314_859.jpg http://i197.photobucket.com/albums/aa257/casexx6383/guns/IMG_20140320_140305_780.jpg |
|
|
|
[#12]
Quoted:
Wow! You are a patient man. That looks like it took some time and care to get that so even. Well done. How does that feel? Looks like it might be a bit more aggressive than I would care for but it is all in the "hand of the holder" so to speak. I like the overall look though. Quoted:
Quoted:
So here is my first attempt on a pistol, (tried two pmags this week). Good, Bad, Or ugly? Any suggestions? http://i197.photobucket.com/albums/aa257/casexx6383/guns/IMG_20140320_140314_859.jpg http://i197.photobucket.com/albums/aa257/casexx6383/guns/IMG_20140320_140305_780.jpg It is aggressive, but I like it. Most people who handled it say it is too aggressive, but my competition guys say it is just right. I needed the complement. thanks |
|
|
|
[#13]
Quoted: It is aggressive, but I like it. Most people who handled it say it is too aggressive, but my competition guys say it is just right. I needed the complement. thanks Quoted: Quoted: Quoted: So here is my first attempt on a pistol, (tried two pmags this week). Good, Bad, Or ugly? Any suggestions? http://i197.photobucket.com/albums/aa257/casexx6383/guns/IMG_20140320_140314_859.jpg http://i197.photobucket.com/albums/aa257/casexx6383/guns/IMG_20140320_140305_780.jpg It is aggressive, but I like it. Most people who handled it say it is too aggressive, but my competition guys say it is just right. I needed the complement. thanks I have heard that with some of the more aggressive textures you can end up with little points on the edges of each "crater". Kind of like the tip of an ice cream cone from where the plastic pulls up as you pull the iron away. I hear that if you go over the whole thing with fine sand paper to take the points off it takes some of the "bite" out of the texture but doesn't take away from the grip. If that makes sense. Over time they will probably wear off from use anyway but you might like it even more if you take them off now.
|
|
|
|
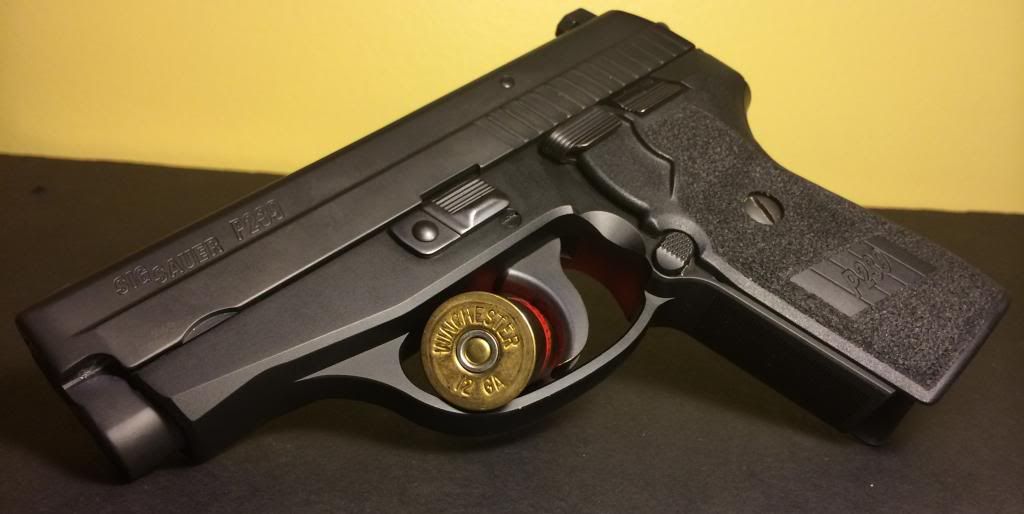
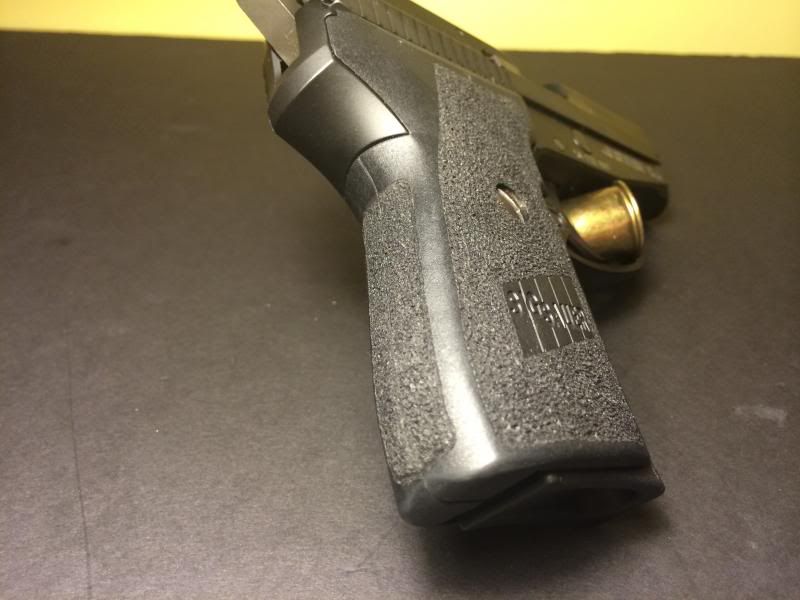
[#14]
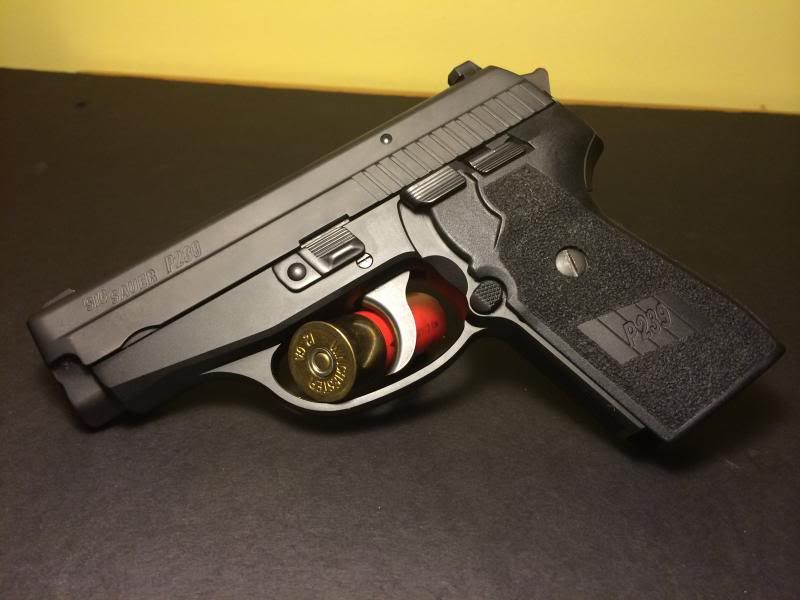
Here is a couple of G19's & sig P239 grip panels.
. 
. 

|
|
|
|
[#15]
 |
|
|
|
[#16]
Quoted: Here is a couple of G19's & sig P239 grip panels. |
|
|
|
[#17]
Thank you ,
I was pretty careful to make sure the heat iron was moving as to not burn thru & keep the look & more importantly the feel when all is said & done consistent , I was really careful following my lines that I had sketched first on the frame & also careful around the glock insignia. It works great. I had a chance to run the guns some more yesterday & I can't get over what a difference the stipple & removing finger humps did for me. . . I Like the look of your 29 , I would definitely need some stipple on 10mm , looks good. |
|
|
|
[#18]

 
|
|
|
|
[#19]


|
|
|
|
[#20]
Or you can learn how to use a checkering file.
|
|
|
|
[#21]
|
|
|
|
[#22]
Nice collection, and lots of nice stippling work. Well done. |
|
|
|
[#23]
Quoted:
Nice collection, and lots of nice stippling work. Well done. Quoted:
Nice collection, and lots of nice stippling work. Well done. Thank You |
|
|
|
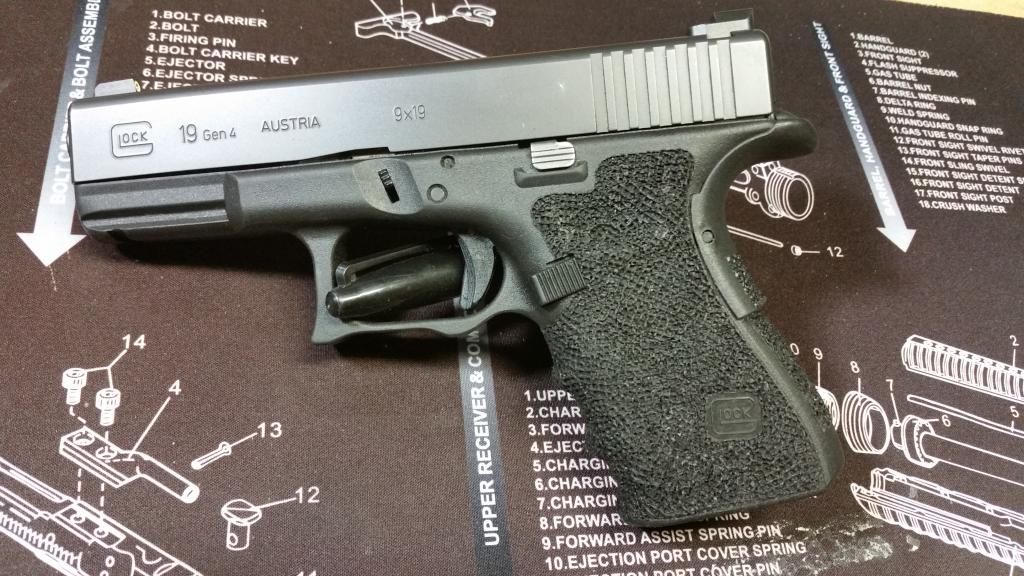
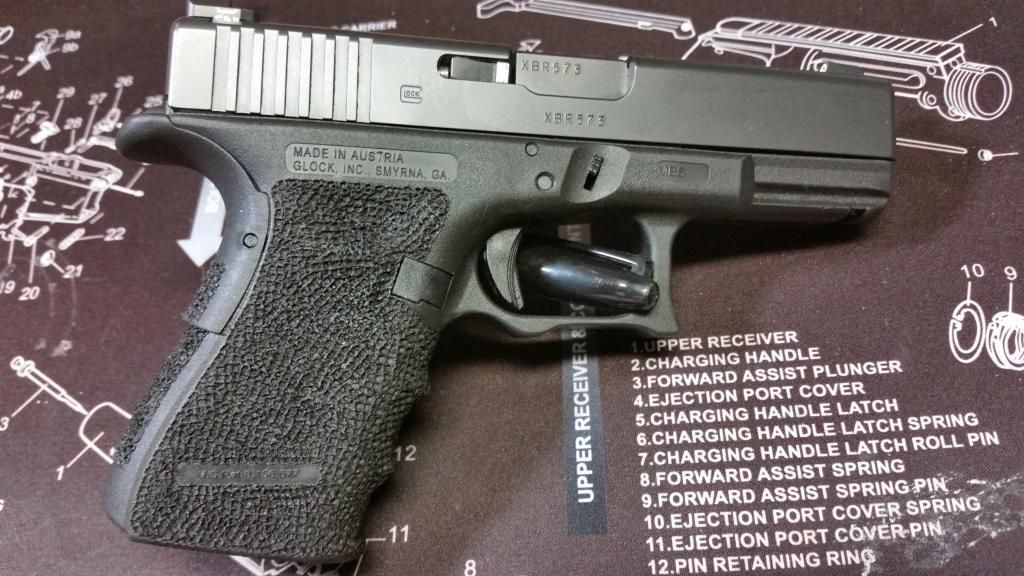
[#24]

Gen 4 G17. This was the first time I have done this. Now I got a ton of other crap I am gunna stipple. 
|
|
|
|
[#25]
Quoted: http://i.imgur.com/E760oXm.jpg?1 Gen 4 G17. This was the first time I have done this. Now I got a ton of other crap I am gunna stipple. Looks great! It can get a little addictive. Once you feel the difference it is easy to want to everything. |
|
|
|
[#26]
Quoted:
Looks great! It can get a little addictive. Once you feel the difference it is easy to want to everything. Quoted:
Quoted:
http://i.imgur.com/E760oXm.jpg?1 Gen 4 G17. This was the first time I have done this. Now I got a ton of other crap I am gunna stipple. Looks great! It can get a little addictive. Once you feel the difference it is easy to want to everything. Thanks. I went with a texture that made it easier to grip over stock, but wouldn't become uncomfortable in extended range sessions. I am quite happy as to how it came out. 
Yup, it is a bit addicting. lol. Right now I have a pile of P-mags and AFG/VFG's that are gunna get stippled. |
|
|
|
[#27]
Here's one I cerakoted and stippled, guys if you are wondering what I used to make that nice border its called a veining tool used for wood checkering, but get a good one! I asked all the top guys to give me that information and they acted like it was a secret from God. So I figured it out on my own after some experimenting.
So here's to them! 

|
|
|
|
[#28]
Quoted: Here's one I cerakoted and stippled, guys if you are wondering what I used to make that nice border its called a veining tool used for wood checkering, but get a good one! I asked all the top guys to give me that information and they acted like it was a secret from God. So I figured it out on my own after some experimenting. So here's to them! http://i81.photobucket.com/albums/j203/anibal999r/40xd.jpg |
|
|
|
[#29]
Quoted:
Thank you! I have been using a small file, I will look into that. Looks great! Quoted:
Quoted:
Here's one I cerakoted and stippled, guys if you are wondering what I used to make that nice border its called a veining tool used for wood checkering, but get a good one! I asked all the top guys to give me that information and they acted like it was a secret from God. So I figured it out on my own after some experimenting. So here's to them! http://i81.photobucket.com/albums/j203/anibal999r/40xd.jpg Thanks! And no problem this will cut your time as well, it really doesn't take too long, first make a light scratch to give you the line path you want then come back with a deeper cut to finish the groove/border. The other checkering tools work well for the straight sections too. My first attempt was using a razor blade, I made one "V" cut then another making a "V", that was a pain the ass, but it worked and took hours. lol Then I remembered cutting linoleum in art class and I tried one of those cutters, it worked well but I often had to sharpen. The good veining tools are made from hardened steel or carbide and work extremely well. |
|
|
|
[#30]
   |
|
|
|
[#31]

|
|
|
|
[#32]
|
|
|
|
[#33]
Removed the Gen 4 finger grooves and slimmed down the trigger guard.
|
|
|
|
[#34]
Stippled the M&P today.

|
|
|
|
[#35]
|
|
|
|
[#36]
|
|
|
|
[#37]
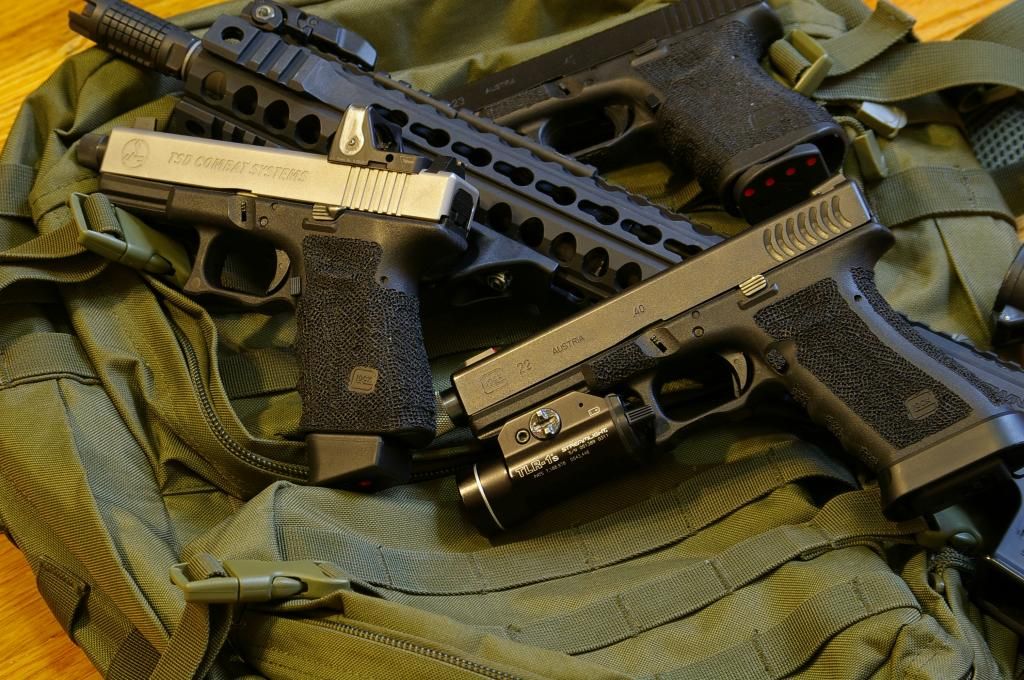
Very nice work everybody. I sold the two that I started this thread with at a gun show about a month back. Got a new Gen 3 G19 and G26. Now I have something else to stipple. Just have to decide what to do...oh who am I kidding...I'll probably go with the same texture. It was super comfortable and very grippy. |
|
|
|
[#38]
Hey, just the masking tape helped keep the line that straight?
|
|
|
|
[#39]
Quoted:
Hey, just the masking tape helped keep the line that straight? Masking tape is what I used. Seemed to work pretty well. |
|
|
|
[#40]
Just finished up a G23
  |
|
|
|
[#41]
|
|
|
|
[#42]
borders are gay. turns a tool into a barbie doll.
|
|
|
|
[#43]
Quoted:
borders are gay. turns a tool into a barbie doll. to each their own. |
|
|
|
[#44]
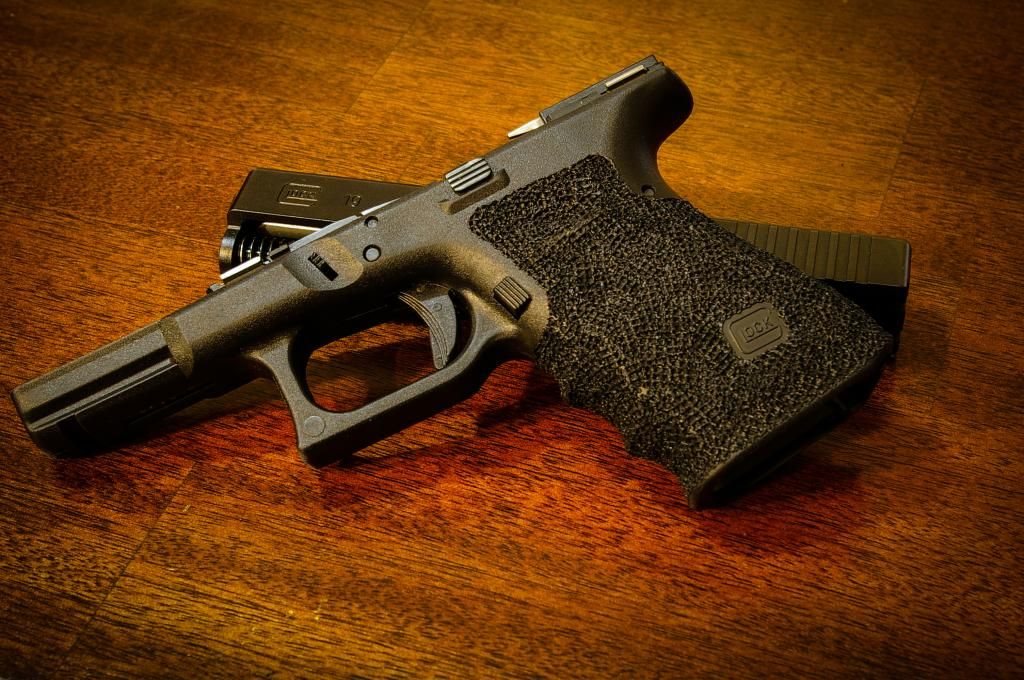
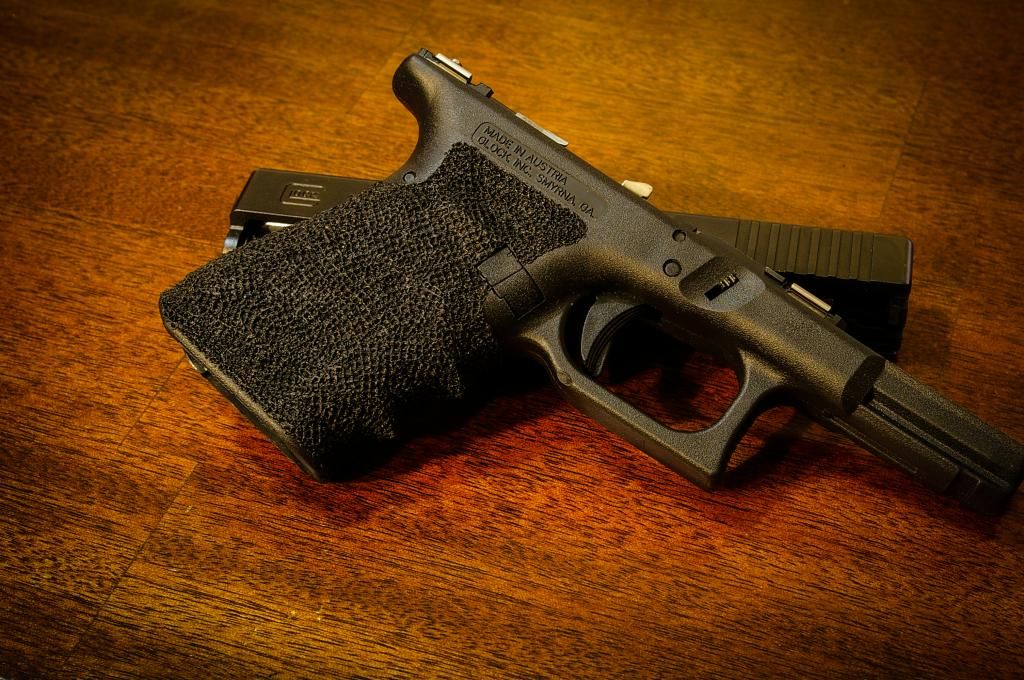
Here's a potato phone picture of my current setup-
 |
|
|
|
[#45]
Quoted:
I have heard that with some of the more aggressive textures you can end up with little points on the edges of each "crater". Kind of like the tip of an ice cream cone from where the plastic pulls up as you pull the iron away. I hear that if you go over the whole thing with fine sand paper to take the points off it takes some of the "bite" out of the texture but doesn't take away from the grip. If that makes sense. Over time they will probably wear off from use anyway but you might like it even more if you take them off now. Quoted:
Quoted:
Quoted:
Quoted:
So here is my first attempt on a pistol, (tried two pmags this week). Good, Bad, Or ugly? Any suggestions? http://i197.photobucket.com/albums/aa257/casexx6383/guns/IMG_20140320_140314_859.jpg http://i197.photobucket.com/albums/aa257/casexx6383/guns/IMG_20140320_140305_780.jpg It is aggressive, but I like it. Most people who handled it say it is too aggressive, but my competition guys say it is just right. I needed the complement. thanks I have heard that with some of the more aggressive textures you can end up with little points on the edges of each "crater". Kind of like the tip of an ice cream cone from where the plastic pulls up as you pull the iron away. I hear that if you go over the whole thing with fine sand paper to take the points off it takes some of the "bite" out of the texture but doesn't take away from the grip. If that makes sense. Over time they will probably wear off from use anyway but you might like it even more if you take them off now. This is awesome, looks great, its different and looks honeycombish. I dig it! |
|
|
|
[#46]
... uh how did you do it? I am looking to do a different pattern on my FN and this might be it. Did you draw it on first? |
|
|
|
[#47]

|
|
|
|
[#48]
I wanna know how telemarker did this as well, this is probably my favorite one
|
|
|
|
[#49]
Just got around to doing a little work on my 19 and 26. Didn't cover as much area as I had done on the 23 and 27 that started this thread. I only did the front finger grooves, the left side "thumb depression" and the spot just in front of the take down lever. I also hit the base of my 26 mag. Sorry the pics are with my phone...hope they are not to fuzzy.       |
|
|
|
[#50]
Decided to go a little further today. Put some texture on the surface of the factory texture on the backstrap. Not very noticeable visually, but what a difference it makes in the grip! Now I think I'm done with these two. Need to get out to the range and try them out! G26 before:  G26 after:  G19 after:  Edit: Here is one more of the 26 not so close up. Really don't notice it until you hold it!  |
|
|
 Win a FREE Membership!
Sign up for the ARFCOM weekly newsletter and be entered to win a free ARFCOM membership. One new winner* is announced every week!
You will receive an email every Friday morning featuring the latest chatter from the hottest topics, breaking news surrounding legislation, as well as exclusive deals only available to ARFCOM email subscribers.

AR15.COM is the world's largest firearm community and is a gathering place for firearm enthusiasts of all types.
From hunters and military members, to competition shooters and general firearm enthusiasts, we welcome anyone who values and respects the way of the firearm.

Subscribe to our monthly Newsletter to receive firearm news, product discounts from your favorite Industry Partners, and more.
Copyright © 1996-2024 AR15.COM LLC. All Rights Reserved.
Any use of this content without express written consent is prohibited.
AR15.Com reserves the right to overwrite or replace any affiliate, commercial, or monetizable links, posted by users, with our own.


