|
[#1]
Got my Tapco trigger/hammer set, and now have a questions, please, about how to get the hammer and trigger pins out of the receiver without using a sledge hammer, which is all I haven't tried yet. There's a wire (shepherd's hook?) involved with both pins, on the lower left side of the receiver,but howinhell that comes out without using another sledge hammer is beyond me ! Thanks for any insight.
********************** Never mind... found a miniature set of needlenose pliars to remove the pin-retaining wire, and the rest involved only minor blasphemy. |
|
|
|
[#2]
Quoted:
Got my Tapco trigger/hammer set, and now have a questions, please, about how to get the hammer and trigger pins out of the receiver without using a sledge hammer, which is all I haven't tried yet. There's a wire (shepherd's hook?) involved with both pins, on the lower left side of the receiver,but howinhell that comes out without using another sledge hammer is beyond me ! Thanks for any insight. ********************** Never mind... found a miniature set of needlenose pliars to remove the pin-retaining wire, and the rest involved only minor blasphemy. The hard part is getting it back in. If you want to purchase a Red Star Arms retaining plate at a cheap price from me, let me know. I got mine back in, but I think if I had to do it over again I'd use the plate. |
|
|
|
[#3]
Quoted:
Got my Tapco trigger/hammer set, and now have a questions, please, about how to get the hammer and trigger pins out of the receiver without using a sledge hammer, which is all I haven't tried yet. There's a wire (shepherd's hook?) involved with both pins, on the lower left side of the receiver,but howinhell that comes out without using another sledge hammer is beyond me ! Thanks for any insight. ********************** Never mind... found a miniature set of needlenose pliars to remove the pin-retaining wire, and the rest involved only minor blasphemy. I guess it is too late now but if you follow the link I provided on page two of this thread it would probably save a lot of frustration dealing with the shepard's crook retaining wire. In that thread I provided diagrams and instructions of how to properly remove the pins when dealing with two different common types of retaining wires. I'm not sure which type you have but on two types you don't have to remove the wire at all. This seems to be such a common source of frustration that I don't understand why someone hasn't written a decent how-to that was "sticky'd" somewhere. |
|
|
|
[#4]
Quoted:
Quoted:
Got my Tapco trigger/hammer set, and now have a questions, please, about how to get the hammer and trigger pins out of the receiver without using a sledge hammer, which is all I haven't tried yet. There's a wire (shepherd's hook?) involved with both pins, on the lower left side of the receiver,but howinhell that comes out without using another sledge hammer is beyond me ! Thanks for any insight. ********************** Never mind... found a miniature set of needlenose pliars to remove the pin-retaining wire, and the rest involved only minor blasphemy. The hard part is getting it back in. If you want to purchase a Red Star Arms retaining plate at a cheap price from me, let me know. I got mine back in, but I think if I had to do it over again I'd use the plate. Changing the trigger/hammer group is obviously another socialistic ploy from Bolshevik days, requiring at leat two armorers to hold, divert, pull, push, manipulate, and then reverse the process to re-insert two basic pins. Keeps everybody employed. But with one guy doing this ... best be a contortionist with three hands ! Had the stripped rifle under my knee, propped against my desk, pushing the "crook" down with a small screwdriver with right forefinger and thumb,, using two fingers to push the pin with the other hand and holding the rifle with the other two fingers and a thumb and using drillsergeant semantics (cerca 1967) to enforce compliance... all's well that ends well... trigger is a great improvement over the Arsenal/Izhvesk standard equipment, which is reminiscent of the drag and pull of a German HK91. |
|
|
|
[#5]
Quoted:
Quoted:
Quoted:
Got my Tapco trigger/hammer set, and now have a questions, please, about how to get the hammer and trigger pins out of the receiver without using a sledge hammer, which is all I haven't tried yet. There's a wire (shepherd's hook?) involved with both pins, on the lower left side of the receiver,but howinhell that comes out without using another sledge hammer is beyond me ! Thanks for any insight. ********************** Never mind... found a miniature set of needlenose pliars to remove the pin-retaining wire, and the rest involved only minor blasphemy. The hard part is getting it back in. If you want to purchase a Red Star Arms retaining plate at a cheap price from me, let me know. I got mine back in, but I think if I had to do it over again I'd use the plate. Changing the trigger/hammer group is obviously another socialistic ploy from Bolshevik days, requiring at leat two armorers to hold, divert, pull, push, manipulate, and then reverse the process to re-insert two basic pins. Keeps everybody employed. But with one guy doing this ... best be a contortionist with three hands ! Had the stripped rifle under my knee, propped against my desk, pushing the "crook" down with a small screwdriver with right forefinger and thumb,, using two fingers to push the pin with the other hand and holding the rifle with the other two fingers and a thumb and using drillsergeant semantics (cerca 1967) to enforce compliance... all's well that ends well... trigger is a great improvement over the Arsenal/Izhvesk standard equipment, which is reminiscent of the drag and pull of a German HK91. God! What type of wire does your rifle have? 
|
|
|
|
[#6]
Quoted:
Changing the trigger/hammer group is obviously another socialistic ploy from Bolshevik days, requiring at leat two armorers to hold, divert, pull, push, manipulate, and then reverse the process to re-insert two basic pins. Keeps everybody employed. Illiterate peasant conscripts supervised by beardless gradutes of third rate Soviet military academies were expected to (and did) detail strip the rifle. Of course, they had the advantage of stripping the rifle in its original configuration. |
|
|
|
[#7]
Quoted:
Quoted:
Quoted:
Quoted:
Got my Tapco trigger/hammer set, and now have a questions, please, about how to get the hammer and trigger pins out of the receiver without using a sledge hammer, which is all I haven't tried yet. There's a wire (shepherd's hook?) involved with both pins, on the lower left side of the receiver,but howinhell that comes out without using another sledge hammer is beyond me ! Thanks for any insight. ********************** Never mind... found a miniature set of needlenose pliars to remove the pin-retaining wire, and the rest involved only minor blasphemy. The hard part is getting it back in. If you want to purchase a Red Star Arms retaining plate at a cheap price from me, let me know. I got mine back in, but I think if I had to do it over again I'd use the plate. Changing the trigger/hammer group is obviously another socialistic ploy from Bolshevik days, requiring at leat two armorers to hold, divert, pull, push, manipulate, and then reverse the process to re-insert two basic pins. Keeps everybody employed. But with one guy doing this ... best be a contortionist with three hands ! Had the stripped rifle under my knee, propped against my desk, pushing the "crook" down with a small screwdriver with right forefinger and thumb,, using two fingers to push the pin with the other hand and holding the rifle with the other two fingers and a thumb and using drillsergeant semantics (cerca 1967) to enforce compliance... all's well that ends well... trigger is a great improvement over the Arsenal/Izhvesk standard equipment, which is reminiscent of the drag and pull of a German HK91. God! What type of wire does your rifle have?
The wire is 3/4 of a circle wrapped around the trigger pin, and runs UNDER the hammer pin. Some are routed differently, and some, apparently, slide easily back off the trigger pin, making complete removal unnecessary. If I hadn't found my miniature needlenose pliars, I wouldn't have been able to do the job. Having done it once, without a commissar showing me how the first time, it's of course easy to replicate now. Na zdaroviye ! |
|
|
|
[#8]
The wire is 3/4 of a circle wrapped around the trigger pin, and runs UNDER the hammer pin. Some are routed differently, and some, apparently, slide easily back off the trigger pin, making complete removal unnecessary. If I hadn't found my miniature needlenose pliars, I wouldn't have been able to do the job. Having done it once, without a commissar showing me how the first time, it's of course easy to replicate now. Na zdaroviye ! Is this the one you have? http://www.mississippiautoarms.com/images/TSC.jpg Apparently, it is a "Bulgarian" style. I assume you have an Arsenal SGL or something like that? Now that your FCG is back in place, do you notice some slight side-to-side movement on your trigger pin? I noticed this on mine, and I wanted to be sure I'm not the only one. There is only movement when you push on the pin with your finger. I don't really notice it when I pull the trigger. |
|
|
|
[#9]
Quoted:
Quoted:
Quoted:
Quoted:
Quoted:
Got my Tapco trigger/hammer set, and now have a questions, please, about how to get the hammer and trigger pins out of the receiver without using a sledge hammer, which is all I haven't tried yet. There's a wire (shepherd's hook?) involved with both pins, on the lower left side of the receiver,but howinhell that comes out without using another sledge hammer is beyond me ! Thanks for any insight. ********************** Never mind... found a miniature set of needlenose pliars to remove the pin-retaining wire, and the rest involved only minor blasphemy. The hard part is getting it back in. If you want to purchase a Red Star Arms retaining plate at a cheap price from me, let me know. I got mine back in, but I think if I had to do it over again I'd use the plate. Changing the trigger/hammer group is obviously another socialistic ploy from Bolshevik days, requiring at leat two armorers to hold, divert, pull, push, manipulate, and then reverse the process to re-insert two basic pins. Keeps everybody employed. But with one guy doing this ... best be a contortionist with three hands ! Had the stripped rifle under my knee, propped against my desk, pushing the "crook" down with a small screwdriver with right forefinger and thumb,, using two fingers to push the pin with the other hand and holding the rifle with the other two fingers and a thumb and using drillsergeant semantics (cerca 1967) to enforce compliance... all's well that ends well... trigger is a great improvement over the Arsenal/Izhvesk standard equipment, which is reminiscent of the drag and pull of a German HK91. God! What type of wire does your rifle have?
The wire is 3/4 of a circle wrapped around the trigger pin, and runs UNDER the hammer pin. Some are routed differently, and some, apparently, slide easily back off the trigger pin, making complete removal unnecessary. If I hadn't found my miniature needlenose pliars, I wouldn't have been able to do the job. Having done it once, without a commissar showing me how the first time, it's of course easy to replicate now. Na zdaroviye ! Well, like i said earlier I've never used a Bulgarian style retaining wire and since no one took me up on the idea of sending me their unused one so I could write a thread on the proper way of removing the FCG pins with all of the common wire types, I can only guess. Looking at the only diagram that I have that shows the routing of the Bulgarian style the first thing I would try, if I actually had one to try it on, would be to push down on the spring wire between the hammer and trigger pins so that the wire is out of the hammer pin's retaining groove, and then push the hammer pin out and remove the hammer. Once the hammer pin and hammer is out of the way, the spring wire's tension will be relieved and you'll have room, so it should then be easy to remove the wire from the trigger pin. Reinstallation would just be the reverse; put trigger and trigger pin in, install retaining wire on trigger pin, push down on the wire and install the hammer and its pin. I use a small flat blade screw driver to push the wires and a dental pick type tool for pulling them, depending on what is needed for the particular style wire in use. It's also a good idea to put the hammer spring up behind the hammer's "ears" and tie them of with something before doing anything. Here is a simple diagram that may make it more clear. 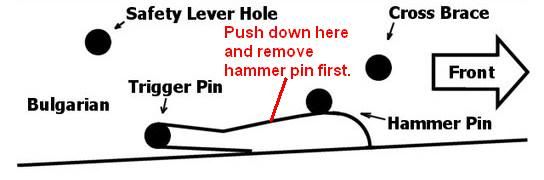
If anyone with a Bulgarian style wire would like to try this I'd like to know if this idea works. |
|
|
|
[#10]
Your diagram is exactly right, Imaposer, except the wire actually describes a 270-degree circle around the trigger pin, so requires a healthy tug with miniature needlenose pliars to pull away. Given the lighting in my garage and the fact that I was unfamiliar with the mechanics of the action, I didn't even take note of the wire at first, which I now know is called a shepherd's crook. That's where my frustration began. Thanks all for the input.
|
|
|
|
[#11]
Quoted:
The wire is 3/4 of a circle wrapped around the trigger pin, and runs UNDER the hammer pin. Some are routed differently, and some, apparently, slide easily back off the trigger pin, making complete removal unnecessary. If I hadn't found my miniature needlenose pliars, I wouldn't have been able to do the job. Having done it once, without a commissar showing me how the first time, it's of course easy to replicate now. Na zdaroviye ! Is this the one you have? http://www.mississippiautoarms.com/images/TSC.jpg Apparently, it is a "Bulgarian" style. I assume you have an Arsenal SGL or something like that? Now that your FCG is back in place, do you notice some slight side-to-side movement on your trigger pin? I noticed this on mine, and I wanted to be sure I'm not the only one. There is only movement when you push on the pin with your finger. I don't really notice it when I pull the trigger. Yes, only about one-half an RCH. Same with the hammer pin. Arsenal SGL 31, yes. |
|
|
|
[#12]
On another note, I just noticed this on Tapco's site, in regard to the G2 trigger group:
*Note: TAPCO G2 Trigger Groups are not compatible with the Saiga platform. TAPCO G2 Trigger Groups are also not compatible with NoDak Spud NDS-3 and NDS-65 "economy" receivers. In some cases, the use of these two products together can create accidental double firing of the weapon.
When they say "the Saiga platform", do they mean in their original configuration or it an issue with the Saiga recievers themselves. Has anyone experienced issues with the G2 in Arsenal's Saiga based rifles? I remember reading the warning about the NDS-3 but I didn't remember reading it about the Saigas before. |
|
|
|
[#13]
Quoted:
Has anyone experienced issues with the G2 in Arsenal's Saiga based rifles? I now have one in my SGL31-61. No issues so far - only 3 or 4 mags using it so far, but not the first issue. Well, I now have a nearly-new Arsenal two-stage trigger group in my parts bin... I guess that's an issue. |
|
|
|
[#14]
Quoted:
UPDATE: After hours of hurt fingers, frustration, and even going so far as to order a Red Star Arms retainer plate, I finally got the retaining wire in there. The secret was to install the trigger group first, then hook the crook part of the retaining wire over the trigger pin, and then install the hammer while pressing down on the retaining wire so that it would go underneath the hammer pin as you are sliding it in. This last part was really tricky. I had wound the hammer spring back around the hammer and the hammer spring kept preventing the retaining wire from going into the grrove on the hammer pin. I had to use two screwdrivers––one to press down on the retaining wire to keep it down and towards the receiver wall, and another to pry the hammer spring away from the receiver wall so the retaining wire could pop into the place in the groove on the hammer pin. After about 20 minutes, mission was a success. I had spent hours previously trying to install the hammer first, then the trigger, and then the retaining wire. I also tried hammer ––> retaining wire ––> trigger. Neither sequence worked. This is how some instructions show you to do it online, but they are apparently mistaken, at least with this kind of retaining wire. I hope the above helps those who are trying to replace their stock Arsenal trigger with a Tapco G2 in their SGL21 or 31. I now have to decide what to do with my Red Star Arms retainer plate if it turns out that it's too late to cancel my order. . Dont sell it, keep it - thats what I did. I had the same problems as you with my sgl31. It hurt to read your problems as it brought back my own flashbacks LOL. By comparison my m70 was MUCH easier to install the crook on. |
|
|
|
[#15]
The G2 is the best item Tapco sells. I think they are a great trigger for the money.
|
|
|
|
[#16]
I prefer the Arsenal to the TAPCO. Both require fitting. The Arsenal I can get a better trigger pull, and I've had far less quality control issues than with the TAPCO (holes not drilled, not drilled to dorrect depth, oversize/undersize). I've also not run into the doubling on the Arsenal that I have on unmodified TAPCO. But I've modified and installed hundreds of both and after adjusting them, have had no problems with either.
The key to the arsenal is to bevel the inside bottom edge of the flaw so it doesn't bind on the slot in the receiver, and to remove the burr from the hammer end and trigger claw (some of these Arsenal already fixed - smell the cold blue). The key to the Tapco is to make sure the disconnector spring hole is the right depth, and adjust the disconnector forward to just clear the hammer on return. Too much gap = doubling. The anti-trigger slap feature of the Arsenal only works if you have the disconnecter stop rivet as your rear trigger guard rivet. |
|
|
|
[#17]
By burr removal, are you referring to the faux second-stage?
|
|
|
|
[#18]
yep - the idea is sound - works sort-of onthe PSL, but their application was teh sux.
|
|
|
 Win a FREE Membership!
Sign up for the ARFCOM weekly newsletter and be entered to win a free ARFCOM membership. One new winner* is announced every week!
You will receive an email every Friday morning featuring the latest chatter from the hottest topics, breaking news surrounding legislation, as well as exclusive deals only available to ARFCOM email subscribers.

AR15.COM is the world's largest firearm community and is a gathering place for firearm enthusiasts of all types.
From hunters and military members, to competition shooters and general firearm enthusiasts, we welcome anyone who values and respects the way of the firearm.

Subscribe to our monthly Newsletter to receive firearm news, product discounts from your favorite Industry Partners, and more.
Copyright © 1996-2024 AR15.COM LLC. All Rights Reserved.
Any use of this content without express written consent is prohibited.
AR15.Com reserves the right to overwrite or replace any affiliate, commercial, or monetizable links, posted by users, with our own.


