|
[#1]
How much is a "Little" have you measured it?
If I had to do it and it was just barely, I would probably use a dremel sanding drum. |
|
|
|
[#2]
I assume you don't have the knowledge to edit the toolpath program; depending on how much you need to remove, one solution is to use a larger cutter that removes the amount of material using the existing toolpath. Another solution is to use cutter comp, but it will require some computation on your part as well as knowledge of how the controller implements the cutter comp mode.
|
|
|
|
[#3]
I can't get my caliper down in there, but it's just a hair. The grinding stone wasn't getting me there, but a sanding drum did, thanks.
I would have thought the CNC mill would cut a vertical wall, i.e., same width all the way from top to floor, but it doesn't. The trigger would drop in about 2/3 only. |
|
|
|
[#4]
Quoted:
I can't get my caliper down in there, but it's just a hair. The grinding stone wasn't getting me there, but a sanding drum did, thanks. I would have thought the CNC mill would cut a vertical wall, i.e., same width all the way from top to floor, but it doesn't. The trigger would drop in about 2/3 only. If your CNC is not cutting a true vertical wall, then something is wrong and it needs to be corrected, make sure your table is trammed and true. One of the most overlooked things in milling is the table. http://www.cnccookbook.com/CCMillTramming.html |
|
|
|
[#5]
Sounds like you didn't write your routine correctly. Did you write it from the AR drawings?
|
|
|
|
[#6]
Are you using new Endmills???
Another possibile cause is a worn EM!! The lower part of the EM is the working area. The upper area will see less wear. So this would give you the results you are talking about... The upper region is in tolerance... But bottom of the pocket is under-cut.... Good Luck, Ca_Longshot |
|
|
|
[#7]
You're getting some endmill flex. It's either getting dull, the program is running too fast on the finish pass, or it needs a spring pass. Easiest thing to do is to get a new sharp carbide endmill. If you've already done that, run the program a second time if you can't change speeds and feeds or add a spring pass.
|
|
|
|
[#8]
Quoted: You're getting some endmill flex. It's either getting dull, the program is running too fast on the finish pass, or it needs a spring pass. Easiest thing to do is to get a new sharp carbide endmill. If you've already done that, run the program a second time if you can't change speeds and feeds or add a spring pass. |
|
|
|
[#9]
What size of end mill were you using?
3/8", 1/4" I use a 3/8" end mill to do my major milling. I do agree that perhaps you had some deflection going on, but just to be sure, double check your table to make sure it is square and level to the machine. What type of mill is this? |
|
|
|
[#10]
|
|
|
|
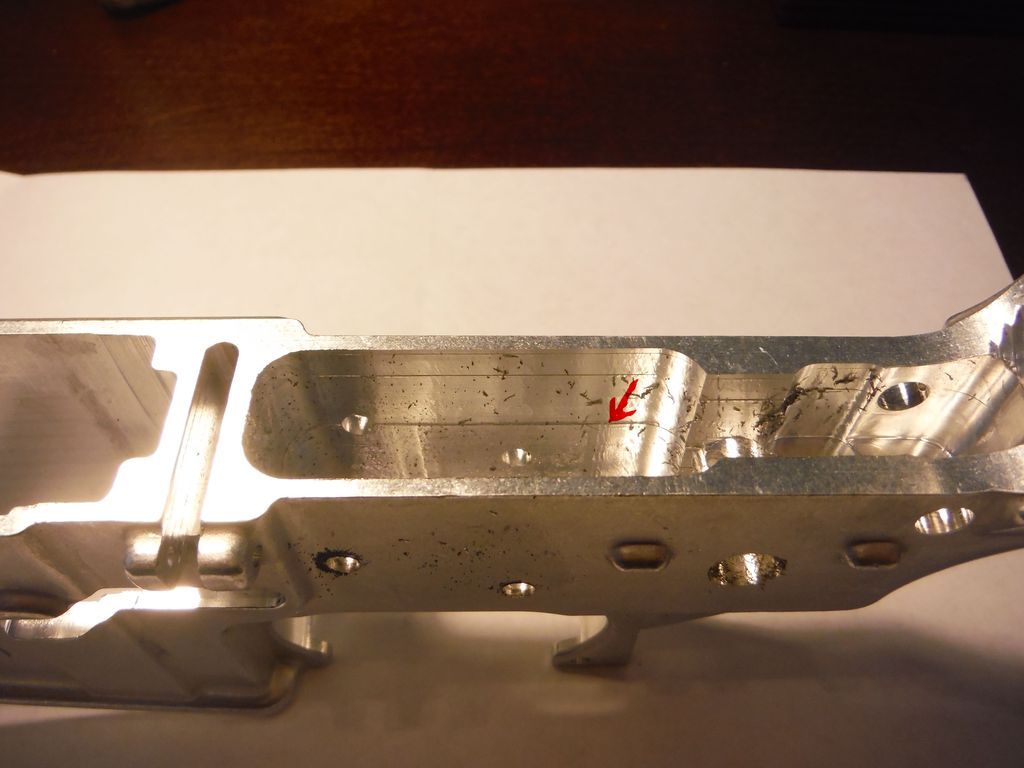
[#11]
Quoted:
It's in the cut code (which I did not generate); it's leaving a ledge (marked below). That's where the trigger stops, but the sanding drum, and switching to a plug in Dremel from a battery powered drill removed the problem. <a href="http://s150.photobucket.com/user/MMcfpd/media/Trigger%20well%20ledge_zpsdrmel5rx.jpg.html" target="_blank">http://i150.photobucket.com/albums/s95/MMcfpd/Trigger%20well%20ledge_zpsdrmel5rx.jpg</a> That would be a chip in the flutes of tour endmill. |
|
|
|
[#12]
What the cut code needs is machining individual passes undersized, and then a final pass to clean everything up. My mill does that sometimes manually, leaves a tiny ridge for some reason even through everything is level and trim. I think sometimes for whatever reason the ledge happens.
The final pass should use the sharpest end mills you have, and it should cut no more than .005" |
|
|
|
[#13]
I was having a similar problem leaving a ridge at each pass. Now I go .200 deep per pass with a .375 end mill and then a final pass at full depth with a .4375 end mill. This allows me to take out .030 on the final pass which removes all the ridges and I am still using the same X-Y coordinates for both end mills.
|
|
|
 Win a FREE Membership!
Sign up for the ARFCOM weekly newsletter and be entered to win a free ARFCOM membership. One new winner* is announced every week!
You will receive an email every Friday morning featuring the latest chatter from the hottest topics, breaking news surrounding legislation, as well as exclusive deals only available to ARFCOM email subscribers.

AR15.COM is the world's largest firearm community and is a gathering place for firearm enthusiasts of all types.
From hunters and military members, to competition shooters and general firearm enthusiasts, we welcome anyone who values and respects the way of the firearm.

Subscribe to our monthly Newsletter to receive firearm news, product discounts from your favorite Industry Partners, and more.
Copyright © 1996-2024 AR15.COM LLC. All Rights Reserved.
Any use of this content without express written consent is prohibited.
AR15.Com reserves the right to overwrite or replace any affiliate, commercial, or monetizable links, posted by users, with our own.