|
[#1]
Placed my order today, Looking forward to using the H/D Jig.
|
|
|
|
|
[#2]
Originally Posted By steelheadr: Placed my order today, Looking forward to using the H/D Jig. You'll really enjoy it. I just knocked out 2 lowers today with it. I'm really liking the 2 hole method for drilling (trigger slot hole and any other large hole) and then getting right to the milling. It's much much faster than drilling out all the holes before jumping to the milling. |
|
|
|
|
[#3]
OST
|
|
|
|
|
[#4]
These Jigs are in stock.
|
|
|
|
|
[#5]
Anyone have any tips for producing a better finish on the trigger pocket? My walls are a little ate up, maybe from the bit chattering? It doesn't look too bad but Id like it to look a little bit better. This is on a 6061 lower and I'm doing a 7075 lower next to I figure the "problem" will be greater with the harder lower. I'm using a Dewalt DWP611 router, do shallower cuts produce a better finish?
Sorry for the questions, but I'm a super noob on 80%s and have never machined anything in my life. |
|
|
|
|
[#6]
I used there jig awhile ago and mine came out clean.
Just use a router type they recommend. |
|
|
|
ME, USA
|
[#7]
Originally Posted By Dinnertime:
Anyone have any tips for producing a better finish on the trigger pocket? My walls are a little ate up, maybe from the bit chattering? It doesn't look too bad but Id like it to look a little bit better. This is on a 6061 lower and I'm doing a 7075 lower next to I figure the "problem" will be greater with the harder lower. I'm using a Dewalt DWP611 router, do shallower cuts produce a better finish? . Yes, a chattering tool will produce less than desirable results. Take a shallower cut and reduce the speed until you find a sweet spot that does not chatter. Also be sure to keep the chips cleared out and the endmill lubricated. |
|
|
|
[#8]
Originally Posted By uxo2:
I used there jig awhile ago and mine came out clean. Just use a router type they recommend. The Dewalt DWP611 is a router they recommend. I couldn't seem to find a speed in which it wouldn't chatter, some speeds just chattered less. Between 3.5 and 4.5 worked best. Mine isn't very pretty (also my first) but it should work just fine. 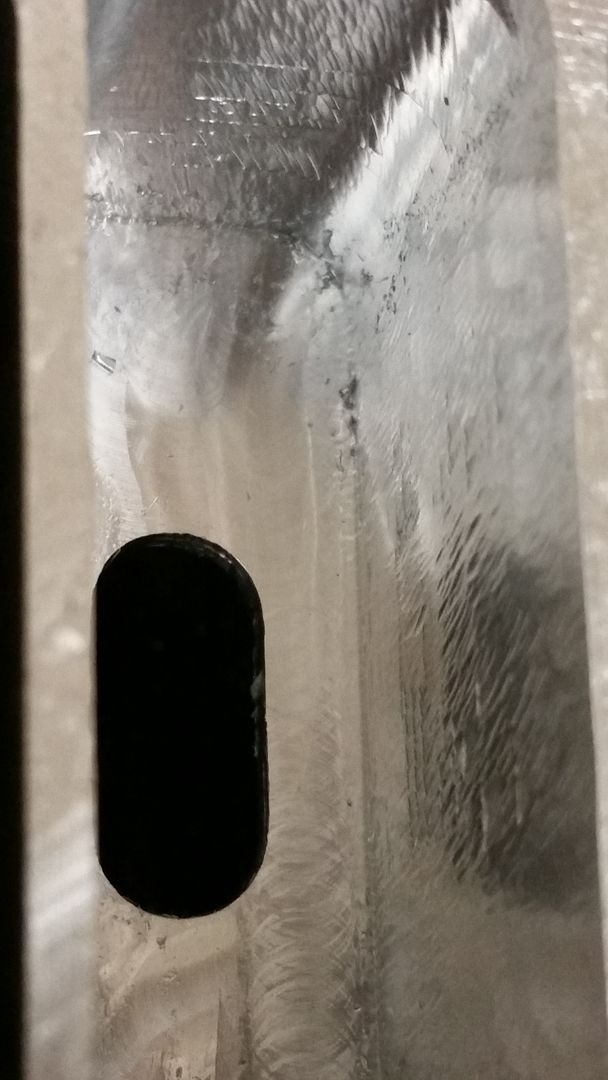
|
|
|
|
IN, USA
|
[Last Edit: GChambers]
[#9]
Edit: delete.
|
|
|
|
[#10]
There is a Memorial Day Sale on the Standard and Heavy-Duty AR-15 Jigs. You can combine a forged black anodized 80% lower receiver for $39.99. A normal value of $74.99.
|
|
|
|
|
[Last Edit: K1rodeoboater]
[#11]
Originally Posted By ModulusArms: There is a Memorial Day Sale on the Standard and Heavy-Duty AR-15 Jigs. You can combine a forged black anodized 80% lower receiver for $39.99. A normal value of $74.99. |
|
|
|
|
[Last Edit: CAmudcat]
[#12]
Originally Posted By ModulusArms:
There is a Memorial Day Sale on the Standard and Heavy-Duty AR-15 Jigs. You can combine a forged black anodized 80% lower receiver for $39.99. A normal value of $74.99. Couldn't pass up the opportunity for a few more lowers. One of these days I'll post pics of my progression lowers with the standard jig. It's definitely possible to get a nice-looking surface. For me that meant small, incremental passes, and a healthy amount of cutting fluid. |
|
|
|
|
[#13]
10 pack ?
|
|
|
|
|
[#14]
Originally Posted By AFCarbon15:
10 pack ? I'm not seeing those. |
|
|
|
|
[Last Edit: K1rodeoboater]
[#15]
Originally Posted By brich2929: I'm not seeing those. Originally Posted By brich2929: Originally Posted By AFCarbon15: 10 pack ? I'm not seeing those. Go to their website, click on the $49.99 anodized lowers, under the description on the right hand side it says 10+ $39.99, so order 10 and get that price |
|
|
|
NY, USA
|
[Last Edit: Fatboy148]
[#16]
Originally Posted By K1rodeoboater:
Go to their website, click on the $49.99 anodized lowers, under the description on the right hand side it says 10+ $39.99, so order 10 and get that price http://www.modulusarms.com/memorial-day-sale-ar-15-80-lower-receiver-forged-7075-black/ Originally Posted By K1rodeoboater:
Originally Posted By brich2929:
Originally Posted By AFCarbon15:
10 pack ? I'm not seeing those. Go to their website, click on the $49.99 anodized lowers, under the description on the right hand side it says 10+ $39.99, so order 10 and get that price http://www.modulusarms.com/memorial-day-sale-ar-15-80-lower-receiver-forged-7075-black/ I read the description and all 72 of the very positive reviews but didn't see who manufacturers them. Can that be provided? |
|
|
|
[#17]
Originally Posted By K1rodeoboater:
Go to their website, click on the $49.99 anodized lowers, under the description on the right hand side it says 10+ $39.99, so order 10 and get that price http://www.modulusarms.com/memorial-day-sale-ar-15-80-lower-receiver-forged-7075-black/ Originally Posted By K1rodeoboater:
Originally Posted By brich2929:
Originally Posted By AFCarbon15:
10 pack ? I'm not seeing those. Go to their website, click on the $49.99 anodized lowers, under the description on the right hand side it says 10+ $39.99, so order 10 and get that price http://www.modulusarms.com/memorial-day-sale-ar-15-80-lower-receiver-forged-7075-black/ That part of the description was missing from the mobile site. I put 10 in my cart, estimated shipping and updated everything, still showing at $509.85 
|
|
|
|
|
[#18]
Originally Posted By AFCarbon15:
That part of the description was missing from the mobile site. I put 10 in my cart, estimated shipping and updated everything, still showing at $509.85
Originally Posted By AFCarbon15:
Originally Posted By K1rodeoboater:
Originally Posted By brich2929:
Originally Posted By AFCarbon15:
10 pack ? I'm not seeing those. Go to their website, click on the $49.99 anodized lowers, under the description on the right hand side it says 10+ $39.99, so order 10 and get that price http://www.modulusarms.com/memorial-day-sale-ar-15-80-lower-receiver-forged-7075-black/ That part of the description was missing from the mobile site. I put 10 in my cart, estimated shipping and updated everything, still showing at $509.85
Thats a mistake. I am looking into it right now. Sorry. |
|
|
|
|
[#19]
Originally Posted By ModulusArms:
Thats a mistake. I am looking into it right now. Sorry. Originally Posted By ModulusArms:
Originally Posted By AFCarbon15:
Originally Posted By K1rodeoboater:
Originally Posted By brich2929:
Originally Posted By AFCarbon15:
10 pack ? I'm not seeing those. Go to their website, click on the $49.99 anodized lowers, under the description on the right hand side it says 10+ $39.99, so order 10 and get that price http://www.modulusarms.com/memorial-day-sale-ar-15-80-lower-receiver-forged-7075-black/ That part of the description was missing from the mobile site. I put 10 in my cart, estimated shipping and updated everything, still showing at $509.85
Thats a mistake. I am looking into it right now. Sorry. It's fixed. Sorry about that. |
|
|
|
|
[#20]
I wouldn't have bothered posting, but I knew you'd fix it! Thanks
|
|
|
|
TX, USA
|
[Last Edit: SoftwareJanitor]
[#21]
Originally Posted By Dinnertime:
The Dewalt DWP611 is a router they recommend. I couldn't seem to find a speed in which it wouldn't chatter, some speeds just chattered less. Between 3.5 and 4.5 worked best. Mine isn't very pretty (also my first) but it should work just fine. Originally Posted By Dinnertime:
Originally Posted By uxo2:
I used there jig awhile ago and mine came out clean. Just use a router type they recommend. The Dewalt DWP611 is a router they recommend. I couldn't seem to find a speed in which it wouldn't chatter, some speeds just chattered less. Between 3.5 and 4.5 worked best. Mine isn't very pretty (also my first) but it should work just fine. How fast were you moving the router, how deep of cuts are you making and what and how much cutting fluid are you using? Try moving the router a little slower or taking shallower passes and try a little more cutting fluid. if you are using something like WD40 try using some real cutting fluid, it may work better. You are correct that your lowers should get better looking as you go along as you should get a better feel for things the more experience you get. Oh... one other question... do you have your jig in something solid like a vice? How sturdy is it? I find that the more solid the whole thing is mounted the smoother things work. I also find that taking care to make sure I keep firm and consistent down pressure on the trim router to keep it perfecly level on the platform helps limit chattering to a minimum. |
|
|
|
[#22]
Originally Posted By Fatboy148:
I read the description and all 72 of the very positive reviews but didn't see who manufacturers them. Can that be provided? Originally Posted By Fatboy148:
Originally Posted By K1rodeoboater:
Originally Posted By brich2929:
Originally Posted By AFCarbon15:
10 pack ? I'm not seeing those. Go to their website, click on the $49.99 anodized lowers, under the description on the right hand side it says 10+ $39.99, so order 10 and get that price http://www.modulusarms.com/memorial-day-sale-ar-15-80-lower-receiver-forged-7075-black/ I read the description and all 72 of the very positive reviews but didn't see who manufacturers them. Can that be provided? I don't know but the photos at the start of this thread with the anodized lower is one of theirs. It's quite nice. Posted Via AR15.Com Mobile |
|
|
|
|
[#23]
Sale ending this weekend. Get the discount while you can.
|
|
|
|
|
[#24]
You can add a lower receiver to your Heavy-Duty Jig order for only $39.99 during Memorial Day Weekend. This is a $35 savings!
|
|
|
|
MS, USA
|
[#25]
Just bought the jig and bit kit.
|
|
|
FL, USA
|
[#26]
So here's my problem.
Just tried this yesterday using the HD jig, Dewalt router, Modulus supplied bits/end mill, and a Modulus 80% lower. The lower came out perfectly functional and overall pretty nice, although I did have some issues with chatter and the chuck loosening up several times until I realized that I need to torque down the chuck well beyond normal. I mean TIGHT. But my major issue is that I was unable to reach the bottom of the FCG pocket without lowering the mill bit in the chuck. Definitely not best practice! Doing this caused the bit to "walk" a bit, both up and down in the chuck. It was a little unnerving to go over an area completely, until there was no more material to be removed, and then a few seconds later the bit was removing more material from that same area. Is there a longer shank end mill available? Or am I missing something fundamental here? I don't see other guys having this same issue. How do I reach the bottom of the FCG pocket? The top of my new jig is now eaten up from contact with the router chuck. |
|
|
|
[#27]
A couple of things to try/consider
1. You don't want bottom out the endmill in the collet. It won't clamp correctly and can slip. 2. If your endmill is walking/ chattering you need to adjust your bit speed, your depth per pass, and/or your feed rate. This isn't a linear process you kind of have to go by feel. 3. How are you clearing chips? Stopping and dumping or using a shop vac while milling? Excessive chips can mess with you during the milling process. 4. You will have to drop the bit a small ammount in the collet to do the trigger slot. I don't believe I had to for the bottom of the FCG pocket though. I suspect you might have bent/damaged your collet by over tightening it which could be the cause of your waking bit. 5. Lastly when I do my last passes I take very little material, maybe half of what is on the depth adjustment tool. If you feel it chatter you have to stop and recheck your depth adjustment. |
|
|
|
TX, USA
|
[#28]
Originally Posted By K1rodeoboater:
A couple of things to try/consider 1. You don't want bottom out the endmill in the collet. It won't clamp correctly and can slip. 2. If your endmill is walking/ chattering you need to adjust your bit speed, your depth per pass, and/or your feed rate. This isn't a linear process you kind of have to go by feel. 3. How are you clearing chips? Stopping and dumping or using a shop vac while milling? Excessive chips can mess with you during the milling process. 4. You will have to drop the bit a small ammount in the collet to do the trigger slot. I don't believe I had to for the bottom of the FCG pocket though. I suspect you might have bent/damaged your collet by over tightening it which could be the cause of your waking bit. 5. Lastly when I do my last passes I take very little material, maybe half of what is on the depth adjustment tool. If you feel it chatter you have to stop and recheck your depth adjustment. Excellent post! I agree completely with all of this. Clearing chips is really critical because a buildup of chips can clog the end mill and cause a lot of problems. I always check the depth with the template on a regular basis like when I dump chips to make sure it is where it should be. I find that I need to clear chips at least a couple times during each pass. Also another thing is what kind of cutting fluid is being used? If it is something like WD40, then going to a real cutting fluid may help. Something like WD40 is better than nothing but not as good as something formulated for machining. |
|
|
FL, USA
|
[#29]
Thanks for the advice guys! I'll answer your advice in numbered order.
1. After doing some online research, just as you said, I discovered that a couple machinists specifically state to not bottom out the end mill in the collet. That makes sense and I'll do that from now on. That alone could be responsible for the bit loosening. 2. I have been using the slowest router speed setting to avoid heat build up, advancing the depth about 1/8" per pass, and feeding slowly. I have not tried to increase the router speed yet. I think I will do that on my next lower. I took a very conservative approach to my first one. I'll mix things up a bit to see if I can smooth out the process. 3. I am clearing chips every few minutes using my shop vac. Also, I am leaving the shop vac nozzle running under the top plate. Doing that seems to stop 90% of the airborne chips. Amazingly, some of the chips are so fine they actually drift slowly down to the floor. I've considered wearing a filter mask because of this. 4. I wasn't able to reach the pocket floor without dropping the bit about 0.25". It doesn't make sense to me, but I've been wondering if that is a shortcoming of the particular router I'm using (Dewalt DWP611). I will check the collet for damage. It is possible that I overtightened it. I have never needed to tighten a bit tool as much as I felt this needed. 5. Yes, on my final passes I took maybe a millimeter at a time. I was afraid the mill would walk out and remove too much material from the pocket floor. And yes, I am using copious amounts of WD40. I need to source some good cutting fluid. The good thing about this is that I had almost no heat build up. At no time did I see the WD40 smoking, nor did the mill even become more than warm to touch. And, despite the less than smooth milling process, the lower receiver actually came out pretty good. 100% functional and about 90% cosmetically perfect. Overall I'm very happy, but this process was much more difficult than I had thought. I have a few more lowers to do and I now realize that there is actually work involved in this. It's not a completely easy task. Originally Posted By SoftwareJanitor:
Excellent post! I agree completely with all of this. Clearing chips is really critical because a buildup of chips can clog the end mill and cause a lot of problems. I always check the depth with the template on a regular basis like when I dump chips to make sure it is where it should be. I find that I need to clear chips at least a couple times during each pass. Also another thing is what kind of cutting fluid is being used? If it is something like WD40, then going to a real cutting fluid may help. Something like WD40 is better than nothing but not as good as something formulated for machining. Originally Posted By SoftwareJanitor:
Originally Posted By K1rodeoboater:
A couple of things to try/consider 1. You don't want bottom out the endmill in the collet. It won't clamp correctly and can slip. 2. If your endmill is walking/ chattering you need to adjust your bit speed, your depth per pass, and/or your feed rate. This isn't a linear process you kind of have to go by feel. 3. How are you clearing chips? Stopping and dumping or using a shop vac while milling? Excessive chips can mess with you during the milling process. 4. You will have to drop the bit a small ammount in the collet to do the trigger slot. I don't believe I had to for the bottom of the FCG pocket though. I suspect you might have bent/damaged your collet by over tightening it which could be the cause of your waking bit. 5. Lastly when I do my last passes I take very little material, maybe half of what is on the depth adjustment tool. If you feel it chatter you have to stop and recheck your depth adjustment. Excellent post! I agree completely with all of this. Clearing chips is really critical because a buildup of chips can clog the end mill and cause a lot of problems. I always check the depth with the template on a regular basis like when I dump chips to make sure it is where it should be. I find that I need to clear chips at least a couple times during each pass. Also another thing is what kind of cutting fluid is being used? If it is something like WD40, then going to a real cutting fluid may help. Something like WD40 is better than nothing but not as good as something formulated for machining. |
|
|
|
[#30]
Rig up your shop vac like I have it in the pictures at the beginning of this thread. It works really well as you have noticed. I don't use any cutting fluid during the milling process, YMMV but I don't feel it is necessary. I do wear a mask when I do this because of the airborne chips.
You absolutely need to increase your routers speed setting. There no question about that. |
|
|
|
TX, USA
|
[#31]
Originally Posted By Cammer:
Thanks for the advice guys! I'll answer your advice in numbered order. 1. After doing some online research, just as you said, I discovered that a couple machinists specifically state to not bottom out the end mill in the collet. That makes sense and I'll do that from now on. That alone could be responsible for the bit loosening. 2. I have been using the slowest router speed setting to avoid heat build up, advancing the depth about 1/8" per pass, and feeding slowly. I have not tried to increase the router speed yet. I think I will do that on my next lower. I took a very conservative approach to my first one. I'll mix things up a bit to see if I can smooth out the process. 3. I am clearing chips every few minutes using my shop vac. Also, I am leaving the shop vac nozzle running under the top plate. Doing that seems to stop 90% of the airborne chips. Amazingly, some of the chips are so fine they actually drift slowly down to the floor. I've considered wearing a filter mask because of this. 4. I wasn't able to reach the pocket floor without dropping the bit about 0.25". It doesn't make sense to me, but I've been wondering if that is a shortcoming of the particular router I'm using (Dewalt DWP611). I will check the collet for damage. It is possible that I overtightened it. I have never needed to tighten a bit tool as much as I felt this needed. 5. Yes, on my final passes I took maybe a millimeter at a time. I was afraid the mill would walk out and remove too much material from the pocket floor. And yes, I am using copious amounts of WD40. I need to source some good cutting fluid. The good thing about this is that I had almost no heat build up. At no time did I see the WD40 smoking, nor did the mill even become more than warm to touch. And, despite the less than smooth milling process, the lower receiver actually came out pretty good. 100% functional and about 90% cosmetically perfect. Overall I'm very happy, but this process was much more difficult than I had thought. I have a few more lowers to do and I now realize that there is actually work involved in this. It's not a completely easy task. I've got the Makita trim router and it reaches the bottom even with the end mill is bottomed out. With the end mill located in the visible part of the collet where I think it should be it barely has enough length to mill the trigger slot, it will do it, but with basically none to spare. You should find that proper cutting fluid lubricates better than WD40 as it isn't a very good lubricant, it is mainly for Water Dispersement (WD). It is pretty good for that. If you can't easily find actual milling fluid locally then thread cutting fluid is something you should be able to find at places like Home Depot, and it is at least closer. You definitely should try adjusting your speed. My Makita is supposed to be adjustable between 10k-30k RPM. For me the speed that seems to be smoothest is just slightly below 1/2 way. The smoothness in cutting definitely depends on the speed it is at so you should be able to find a setting that will be much better than where you have been running it. |
|
|
FL, USA
|
[Last Edit: Cammer]
[#32]
Great minds think alike. I already had something similar to what you did rigged up for constant vacuum. It works pretty well for me also.
After thinking things through I came to the same conclusion that you did regarding cutting fluid - i.e. it is unnecessary. First of all, unless you stop milling literally every five seconds there is not way to keep the mill wet with fluid enough to make a difference in lubrication. So today I completed a lower with zero cutting fluid/WD40, etc. It made no difference. This lower actually came out much nicer than the first one. I'm going to say that it is because I now have more experience with handling the milling process and I also increased the router speed a bit past the halfway point. Previously I had it set on the lowest setting. I erroneously thought it would be better. Turns out that faster, but not too fast, is best. I had no issues with chatter or the bit becoming loose this time. Anyway, my second lower is done. I just completed a Nodak Spud XM16E1 I am making for a retro XM177 build. Not a cheap receiver at $135 so I didn't want to screw it up. It came out beautiful. Functions perfectly well. Thanks again for the help guys. Your assistance made this job much easier. Edit: I forgot to mention that I used the "single hole method" on both receivers. I started with the trigger well and completed the FCG pocket from that using only the end mill. It worked well for me. Originally Posted By K1rodeoboater:
Rig up your shop vac like I have it in the pictures at the beginning of this thread. It works really well as you have noticed. I don't use any cutting fluid during the milling process, YMMV but I don't feel it is necessary. I do wear a mask when I do this because of the airborne chips. You absolutely need to increase your routers speed setting. There no question about that. |
|
|
|
[#33]
Started mine yesterday before work. Did a little more today before work. Got the A and all of the B holes drilled out.
I'll try and finish it tomorrow when I'm off. |
|
|
|
|
[#34]
Anyone on the fence about 80% may want to hop over that fence. Due to recent legislation in CA and views towards gun control laws things have been very volatile. These are going fast and you if you may want to make one you should do it while you still can before they outlaw them!
|
|
|
|
|
[#35]
Originally Posted By ModulusArms: Anyone on the fence about 80% may want to hop over that fence. Due to recent legislation in CA and views towards gun control laws things have been very volatile. These are going fast and you if you may want to make one you should do it while you still can before they outlaw them! Do The proposed law changes have any affect on you guys as a vendor? |
|
|
|
|
[#36]
Originally Posted By K1rodeoboater:
Do The proposed law changes have any affect on you guys as a vendor? Originally Posted By K1rodeoboater:
Originally Posted By ModulusArms:
Anyone on the fence about 80% may want to hop over that fence. Due to recent legislation in CA and views towards gun control laws things have been very volatile. These are going fast and you if you may want to make one you should do it while you still can before they outlaw them! Do The proposed law changes have any affect on you guys as a vendor? Well, if CA bans 80% it will sting quite a bit. It won't end things though. |
|
|
|
TX, USA
|
[#37]
Originally Posted By ModulusArms:
Well, if CA bans 80% it will sting quite a bit. It won't end things though. Originally Posted By ModulusArms:
Originally Posted By K1rodeoboater:
Originally Posted By ModulusArms:
Anyone on the fence about 80% may want to hop over that fence. Due to recent legislation in CA and views towards gun control laws things have been very volatile. These are going fast and you if you may want to make one you should do it while you still can before they outlaw them! Do The proposed law changes have any affect on you guys as a vendor? Well, if CA bans 80% it will sting quite a bit. It won't end things though. It will suck for those stuck in that socialist hell hole to be sure. It will also cost a fair amount of business for 80% vendors I am sure. 80% is pretty much the best way to do an AR for CA. Luckily for 80% vendors it should remain legal to do 80% in most of the rest of the US. I think there are already issues with places like NJ. |
|
|
FL, USA
|
[#38]
Your 80% 308 jigs are compatible with tactical machining 308 lowers ?
|
|
|
VA, USA
|
[Last Edit: mneblett]
[#39]
I snagged the HD jig and lower deal from the Memorial Day sale, and have completed my first lower.
I'm not one to "gush" about stuff on the 'net, but WOW am I pleased. The HD is built like a tank**, and it enabled me to do this on my first try (only the second time I've used a router; the first was a couple days before, putting a couple grooves into a piece of plywood): 


There's one nick at the top left edge of trigger pocket because on my *first* pass I lifted the router out thinking the end mill had completely stopped. Tools were a Porter Cable floor-stand drill press from Lowe's, a DeWalt DW611 router and Modulus' bits/mill kit. Save yourself time (and likely money) -- buy the bit kit. You'll have fresh tooling, the correct tooling, and not need to waste time/effort chasing down the parts. The price is entirely reasonable given what you get and the convenience. The keys for me: router set at 4.5-5 on the 1-6 scale, and going SLOW -- no, SLOWER. Then, SLOWER than that! Tedious, but worth it to make my OCD/AR side happy. Also, having the wet/dry vac hose right at the side of the side plate opening made a huge difference in Aluminum shavings control. Very little clean-up needed in the surrounding areas after finishing. (Wear hearing protection -- the vac will be running for long periods on end, and the sound levels are hearing-damaging high over such amounts of time). The only thing I would like to see (a comment I left on the Modulus Arms site) is a couple LEDs integrated into the underside of the top plate, because it's too dark under there when the router (and its LEDs) is off and the wet/dry vac's tube is blocking light from the far side. A home run in my book, Modulus! ** When shifting from the drill press to the workbench, the WD-40- and painter's tape adhesive-slickened (is that a word??) jig slipped out of my fingers -- incredible how fast it was gone -- hit the workbench, and fell sickeningly to the concrete floor. It was hard to find even a nick in the jig's finish, and the lower did not shift in the jig or sustain damage. The only jig damage I found was one slightly bent top plate-to-side plate screw, after I disassembled the jig when I was done with the lower. I'm guessing the jig hit the floor on the corner of that side plate. Color me impressed. |
|
|
|
[#40]
Looks good, but I do have a question, what size bit did you use to drill those pin holes for the FCG, for some reason, they look large to me.
|
|
|
|
VA, USA
|
[#41]
Originally Posted By DaveP1:
Looks good, but I do have a question, what size bit did you use to drill those pin holes for the FCG, for some reason, they look large to me. The 5/32" bit in the Modulus kit. Perfect fit in the jig side plate holes. I suspect they look too big due to the angle of the picture and the shiny surface. I'll know in about 20 minutes whether they are correct, as I'll be test-fitting a FCG kit after dinner. |
|
|
|
[#42]
Originally Posted By mneblett:
The 5/32" bit in the Modulus kit. Perfect fit in the jig side plate holes. I suspect they look too big due to the angle of the picture and the shiny surface. I'll know in about 20 minutes whether they are correct, as I'll be test-fitting a FCG kit after dinner. Originally Posted By mneblett:
Originally Posted By DaveP1:
Looks good, but I do have a question, what size bit did you use to drill those pin holes for the FCG, for some reason, they look large to me. The 5/32" bit in the Modulus kit. Perfect fit in the jig side plate holes. I suspect they look too big due to the angle of the picture and the shiny surface. I'll know in about 20 minutes whether they are correct, as I'll be test-fitting a FCG kit after dinner. Okay, just looked different to me for some reason, lets us know how the build goes. |
|
|
|
VA, USA
|
[Last Edit: mneblett]
[#43]
Lower parts kit installed. No problem with the 5/32 trigger and hammer holes.
Due to user error, a **slight** amount of sanding the 3/8" safety holes was required to fit the safety. The first of the six holes I drilled (the right side safety hole) was drilled a hair off perpendicular because, even though I thought I had things aligned properly, I didn't check twice and it turned out the jig was not laying on its side on the drill press table perfectly square (before starting work, I had verified the spindle was perpendicular to the drill press table). This resulted in the right side safety hole being ~0.1-0.2 mm farther forward than it should be, i.e., it is not perfectly centered over the safety detent hole. The only functional consequence: in the Fire position the lever is pointing up at ~87-88*, not perfectly straight up at 90*. Totally user error, and a problem that I caught before drilling the other five holes. One side thought: this error suggests to me that hand-drilling these holes isn't the best choice, as it is *so* easy to not drill perfectly straight with a hand drill. Other than that, the lower fit/functioned perfectly with one of my uppers. |
|
|
TX, USA
|
[#44]
Originally Posted By mneblett:
I snagged the HD jig and lower deal from the Memorial Day sale, and have completed my first lower. I'm not one to "gush" about stuff on the 'net, but WOW am I pleased. The HD is built like a tank**, and it enabled me to do this on my first try (only the second time I've used a router; the first was a couple days before, putting a couple grooves into a piece of plywood): ... There's one nick at the top left edge of trigger pocket because on my *first* pass I lifted the router out thinking the end mill had completely stopped. Tools were a Porter Cable floor-stand drill press from Lowe's, a DeWalt DW611 router and Modulus' bits/mill kit. Save yourself time (and likely money) -- buy the bit kit. You'll have fresh tooling, the correct tooling, and not need to waste time/effort chasing down the parts. The price is entirely reasonable given what you get and the convenience. The keys for me: router set at 4.5-5 on the 1-6 scale, and going SLOW -- no, SLOWER. Then, SLOWER than that! Tedious, but worth it to make my OCD/AR side happy. Also, having the wet/dry vac hose right at the side of the side plate opening made a huge difference in Aluminum shavings control. Very little clean-up needed in the surrounding areas after finishing. (Wear hearing protection -- the vac will be running for long periods on end, and the sound levels are hearing-damaging high over such amounts of time). The only thing I would like to see (a comment I left on the Modulus Arms site) is a couple LEDs integrated into the underside of the top plate, because it's too dark under there when the router (and its LEDs) is off and the wet/dry vac's tube is blocking light from the far side. A home run in my book, Modulus! ** When shifting from the drill press to the workbench, the WD-40- and painter's tape adhesive-slickened (is that a word??) jig slipped out of my fingers -- incredible how fast it was gone -- hit the workbench, and fell sickeningly to the concrete floor. It was hard to find even a nick in the jig's finish, and the lower did not shift in the jig or sustain damage. The only jig damage I found was one slightly bent top plate-to-side plate screw, after I disassembled the jig when I was done with the lower. I'm guessing the jig hit the floor on the corner of that side plate. Color me impressed. Looks great! |
|
|
CA, USA
|
[Last Edit: ValiantThor]
[#45]
Has anyone used the Heavy Duty jig for a James Madison Tactical 80%? I just finished a JMT lower using their cheap plastic jig that comes with it. I have a Modulus jig coming in the mail and hoping to use that one for my next JMT lower.
Here is my recent AR Pistol build using only the JMT jig and a drill press. It's not bad but I think I can do a much better job with my new DeWalt router and Heavy Duty Jig 
|
|
|
TX, USA
|
[#46]
Originally Posted By ValiantThor:
Has anyone used the Heavy Duty jig for a James Madison Tactical 80%? I just finished a JMT lower using their cheap plastic jig that comes with it. I have a Modulus jig coming in the mail and hoping to use that one for my next JMT lower. Here is my recent AR Pistol build using only the JMT jig and a drill press. It's not bad but I think I can do a much better job with my new DeWalt router and Heavy Duty Jig I haven't done a JMT lower, but I did do an EP Armory 80% poly lower (zombie green) in my original Modulus Universal Jig using the Modulus tooling. The poly power cuts like warm butter... very easy. With the HD jig it would be even easier. PS: I've seen Valiant Thor back in March 2011 when they opened for Clutch and Motorhead at Stubb's BBQ Ampitheatre here in Austin and I bought their "Stranger" CD. |
|
|
CA, USA
|
[#47]
Originally Posted By SoftwareJanitor:
I haven't done a JMT lower, but I did do an EP Armory 80% poly lower (zombie green) in my original Modulus Universal Jig using the Modulus tooling. The poly power cuts like warm butter... very easy. With the HD jig it would be even easier. PS: I've seen Valiant Thor back in March 2011 when they opened for Clutch and Motorhead at Stubb's BBQ Ampitheatre here in Austin and I bought their "Stranger" CD. Originally Posted By SoftwareJanitor:
Originally Posted By ValiantThor:
Has anyone used the Heavy Duty jig for a James Madison Tactical 80%? I just finished a JMT lower using their cheap plastic jig that comes with it. I have a Modulus jig coming in the mail and hoping to use that one for my next JMT lower. Here is my recent AR Pistol build using only the JMT jig and a drill press. It's not bad but I think I can do a much better job with my new DeWalt router and Heavy Duty Jig I haven't done a JMT lower, but I did do an EP Armory 80% poly lower (zombie green) in my original Modulus Universal Jig using the Modulus tooling. The poly power cuts like warm butter... very easy. With the HD jig it would be even easier. PS: I've seen Valiant Thor back in March 2011 when they opened for Clutch and Motorhead at Stubb's BBQ Ampitheatre here in Austin and I bought their "Stranger" CD. Awesome! |
|
|
MS, USA
|
[#48]
|
|
|
TX, USA
|
[#49]
Originally Posted By edekalil:
Just finished my first lower with the hd modulus jig. It is an Anderson 80% lower. ... Put the parts in to check it and it seems to work. Nice! |
|
|
MS, USA
|
[#50]
Thanks, but it sure is mess to clean up. Working on that right now. Thinking of making it a pistol but just got to figure the laws on it here in MS.
|
|
|
 Win a FREE Membership!
Sign up for the ARFCOM weekly newsletter and be entered to win a free ARFCOM membership. One new winner* is announced every week!
You will receive an email every Friday morning featuring the latest chatter from the hottest topics, breaking news surrounding legislation, as well as exclusive deals only available to ARFCOM email subscribers.

AR15.COM is the world's largest firearm community and is a gathering place for firearm enthusiasts of all types.
From hunters and military members, to competition shooters and general firearm enthusiasts, we welcome anyone who values and respects the way of the firearm.

Subscribe to our monthly Newsletter to receive firearm news, product discounts from your favorite Industry Partners, and more.
Copyright © 1996-2024 AR15.COM LLC. All Rights Reserved.
Any use of this content without express written consent is prohibited.
AR15.Com reserves the right to overwrite or replace any affiliate, commercial, or monetizable links, posted by users, with our own.


