|
Posted: 12/24/2015 12:19:34 PM EDT
[Last Edit: K1rodeoboater]
Since Modulus Arms came out with a Heavy-Duty version of their jig as an alternative to their original jig (Reviewed here in depth by Paul) this will quickly go over the similarities and differences of the two jigs.
Overview In the picture below you will see all the components of the jig layed out on a place mat on my dinning room table (don't tell my wife  ). You will not receive a set of awesome Monster print PJ pants...if you really want a set you'll have to ask my wife. ). You will not receive a set of awesome Monster print PJ pants...if you really want a set you'll have to ask my wife.  From top Left to Right.
From bottom Left to Right
There is no commonality between the two jigs, so in short if you own the original jig you can't just replace the side plates, drill guide, and router guide to use these new components. See picture below from Paul's thread to compare the two different jigs. 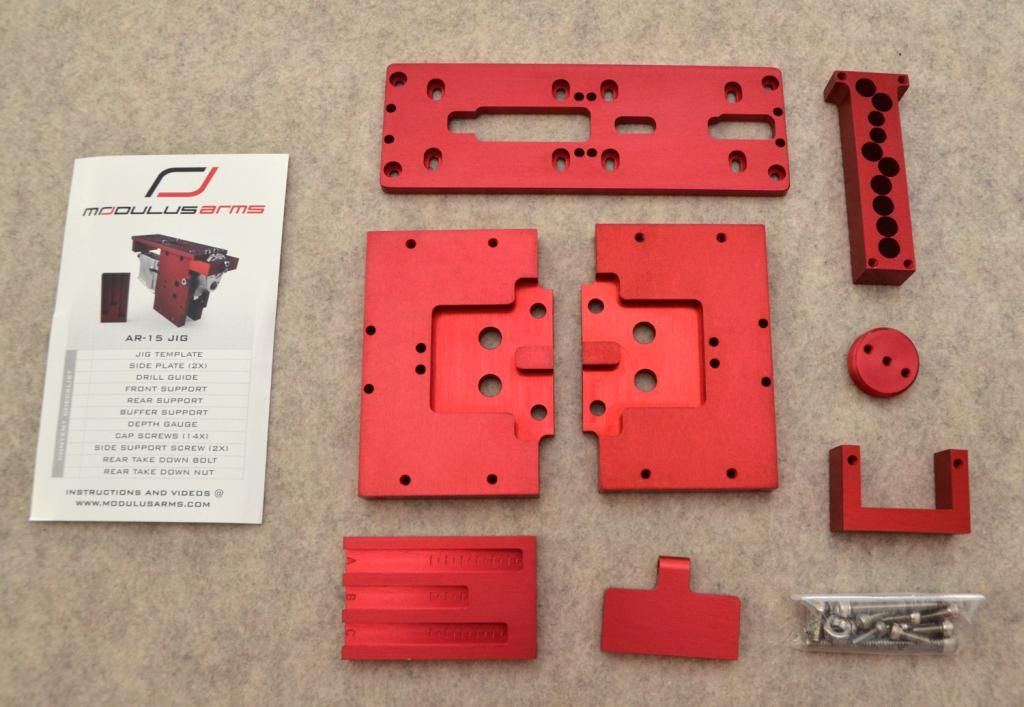 Notice that the router template in the original is also top plate for the jig. The attachment method for the rear support, front support, and drill guide is completely different than the new Heavy-Duty jig. Some things that are NOT included with the jig that you will need to complete your lower are....
The setup of the jig is relatively straight forwards. You can find the instructions on Modulus' website here. I HIGHLY recommend you read through their instructions and not just rely on mine. After all they are the manufacturer and if you screw up your jig you won't be going through me to fix it. Setup of the Jig NOTE: I took these pictures before writing this so they're not in the order listed below. The order below is the better way to go. Step 1: Using your front take down pin or alternative 1/4" diameter pin install the front support piece onto your lower.  Step 2: Install buffer support (silver threaded plug with 3 holes facing the rear) Step 3: Loosely screw on rear support piece to the buffer support using two (2) 1/2" screws  Step 4: Secure top plate to the front and rear support pieces using four (4) 1/2" screws  Step 5: Ensure all screws are torqued to 1ft lb. 1ft lb is basically snugged up a little past light finger pressure on the Allen wrench. You want your jig to be solid with no play and square. Eyeballs are rarely accurate, however with the design of this jig it should square itself up repeatably. Step 6: Put some masking/painters tape on the side of your receiver to prevent maring/scuffing/scratching your receiver. This is optional but recommended. Step 7: Install the side plates. I placed both of min on the table vertically and aligned them to the top plate. Loosely screw them in, don't tighten them down fully just yet. Step 8 Install the side plate support screw. This will ensure the plates are parallel to one another and prevents the side plates from flexing when clamped in the vise. NOTE the rear take down pin hole is NOT used   Step 9: Install drill template and secure with two (2) 1/2" screws. You CANNOT install this backwards, it is self aligning as you will see in the 2nd picture.  Seriously you CANNOT screw this up, see below, and if you do you probably shouldn't be assembling your own AR's let alone working on 80%'s  Step 10: Follow the instructions for drilling out the bulk of the material from FCG pocket Step 11: Clean out the chips, remove drill guide and install router template AS SHOWN BELOW. Follow instructions for milling.  Step 12: Clean out the chips, and rotate the guide 180 degrees to mill out the rear pocket and trigger slot AS SHOWN BELOW. Follow instructions for milling. Step 13:  Step 14: Remove the router guide, clean out the chips, and install the rear takedown screw in the side plates  Step 15: Drill the safety and trigger pin holes. DO NOT DRILL ALL THE WAY THROUGH!!! Step 16: Flip the jig over and drill the safety and trigger pin holes. Step 17: Clean up, inventory your parts, and put away your tools. Your 80% receiver is now a 100% receiver. Finish as you please be that anodize (at home type II or send out for type III), Cerakote, alumnhyde, or whatever you decide to do. Closing Thoughts All in all this is, in my opinion, the best jig on the market currently. If you're shopping for a jig, this is the one to buy. If you're wanting to cheap out and save a few bucks you could get the original jig but you're talking a small difference. Currently at the time I wrote this review the standard jig is out of stock so I can't give you an exact price difference. If you buy unanodized 80% lowers I recommend you get a hitch pin or a clevis pin to hold the front take down support in place. There's no sense in installing, and ultimately removing, a take down pin from a LPK. Mine cost a whopping budget crushing $0.54 at Lowes. I did compare the side plates to my Aero Precision M5 (308AR/AR10 receiver size) and all the holes do line up properly except the rear take down pin. I'd like to see a kit offered that contained the 308AR/AR10 top plate, drill guide, and router guide. That's honestly my ONLY complaint about this jig. When I was shopping around I was between the original Modulus jig and the Tactical Machining jig. TM's biggest plusses were the steel drill guides (1 side only though) and the ability to swap side plates so you could do an 308AR/AR10. TM's downsides were that you were stuck using forged lowers or their lowers, there being a steel drill guide on only one side of the jig, and you have to buy a router plate which drove the cost up to nearly the price of the original modulus jig. Once Modulus came out with the Heavy-Duty jig the deal was sealed as far as I was concerned. You have a truly universal 80% AR15 jig that has steel side plates which will not wear out. It's also designed from the ground up to support the use of a router and a handheld drill. As soon as I finish my laundry list of other projects I'll be ordering a New Frontier Armory AR9 (glock mag lower) 80% receiver and testing it with this jig. Looking over the dimensions I am 99.9% certain it too will work with this jig. If you have any questions post here, and if I don't respond for several days shoot me a PM. IN USE ***FULL DISCLOSURE STATEMENT*** The lower used in the following photos was provided by Modulus for the purpose of this review. I honestly like it a lot more than the $30 lowers I got from TM, but that's kind of comparing apples to oranges since those aren't anodized and this one is. Over the next year I think I will be buying several 80% lowers from different manufacturers and doing a side by side comparisons. Ok with that out of the way now with that out of the way onto the meat and potatoes. I apologize for the crappy lighting and non-stickman like photos, but hey it was 10PM and 5 degrees in my garage. First thing's first, get your lower setup in the jig. You can follow the first portion of this post for how to setup the jig. Next setup your work space.  Notice that I've cleared the area around the drill press, you're going to get chips and your lube/cutting fluid everywhere. I'm using PB blaster because I used up all my WD40, it works ok but I think I prefer the WD40. Remember to clamp down your drill press if it's not already anchored to your bench. If you look on the drill press table you'll see a combination square with a level. I don't really use the level, I'm using it to make sure that the bit is perpendicular to the table of the drill press. Here's a close up below...  See, 90 degrees! Consider the square to be at "3 o'clock" in this photo, you will want to check 12, 6, and 9 as well just to be sure. For example I know my table has a slight high spot at 9 but every where else is good. This is good to know when you clamp your work piece down to the table. I always start with the hole marked "A" on the jig. This one is simple, and it's the only one that is a different size than the rest. You will drill all the way through, no drill stop is needed.  Whenever you drill out one of the holes you'll have chips shoot out of the openings in the side plates of the jig, and some will get stuck in the jig itself like this....  I've been using a zip tie to help clear these chips, here's a blurry photo till I get a better one tomorrow...  Once you flick the majority of the chips out it should look more like this...  Then resume drilling out the holes. You will periodically need to stop, clear chips, and hit your bit with whatever fluid/lube you're using. Do this frequently, if you put your hand on the mag well you will feel the heat being generated by the bit going through the aluminum. It will get quite hot, and when it gets hot that's when you will destroy bits. Keep it cool, keep your bits happy. I'm having to go at a slow speed, about 750RPM, with my press because it's a cheap piece of crap and vibrates badly at higher RPM's. Once you finish out hole "A" I then move on to the "C" holes. Of course before you start drilling out the "C" holes you need to swap your drill bits out, use the depth gauge, and install the drill stop at the correct position. It's pretty simple, see below  One thing I do is I set the drill stop so that my drill bit doesn't actually bottom out on the depth gauge. I do it for 2 reasons; 1. my depth stop doesn't stay perfectly perpendicular to the center-line of the bit and 2. I can get a nice flat bottom of the FCG pocket with the router.  Now you just need to do this 6 more times at this depth. After you drill each hole out completely you should re-check your bit against the depth gauge to ensure it didn't move on you. Mine never did move but it's worth double checking, but it only takes a few seconds. FUN FACT!!! If you buy lowers with the rear take down pin pocket already milled you don't have to drill the "B" holes!!! Saves you a bit of time and wear on your bit. Once you've got your lower's FCG pocket drilled, remove the drill guides, remove as many of the chips as possible, and install the router guide plate.  After cleanup. You want to try to clear out as much as you can from the holes, this is what was trapped in there.  If you have a shop vac, you'll want to use it. First clean up your bench which should look like this. Leave the 3/8" drill bit in the press, you'll need it again after the milling is complete. Set your drill press aside.  Then go ahead and rig up something to be able to suck up the chips while you're milling. Added bonus, all the air moving through the jig will help cool it and your bit. See the photos below for what I did, you can do the same or come up with your own. It basically sucks all the chips right out the side of the jig and works VERY well. After routing I have VERY little in the way of chips on the bench.   Now install the router guide plate and get your palm router out! I'm using a Bosch Colt for this, so if you're using something different roll with what you've got. Take your endmill out and install it into your router. Make 110% sure that you seat the endmill properly and tighten down your collet fully. If you bottom it out it may climb out of the collet. I thought I got it tightened all the way down on my first lower and surprise surprise the endmill "climbed" up from the collet under use. As a result my 1st 80%'s FCG pocket isn't pretty but it'll be functional, I chock it up to a learning experience so learn from me and don't risk turning your lower into a paperweight. So now that you've got your endmill installed into your router, and tightened down (you double checked right???), you need to set the depth of the bit based on the depth gauge again. Start at the lowest mark and work your way deeper 1 mark at a time. When you start you'll need to put the endmill into one of the drilled out holes, see the 2nd photo. Move the router in small circles (counterclockwise in my case because of how the bit turns). DO NOT try to go in straight lines, the bit will chatter and grab if you do. SMALL circles till you "connect the dots. Then I go around in circles taking a little off at a time. You'll get the feel for it while you're doing it, practice hogging out the center and slow down and take smaller bites towards the edges of the template. You'll see a sequence of the results after the 2nd photo (1st, 2nd, and fully milled out).   1st milling  2nd milling  In the picture below I removed the router guide plate only for the purpose of the photograph. I re-installed it for the next step. Necessary, maybe but I figured why risk it when you're this close to a 100% receiver!  Once you've got everything routed out you get to drill the FCG pins and selector holes. Before you do, clean up your work area again and install the take down pin support screw.  Once that screw is installed get a chunk of scrap wood to support the other side of your jig while you drill the selector and FCG pin holes. Drill one side, then flip the jig over and drill the other. Then swap out bits and do the same with the FCG holes  And the end result (after a spray down with brake cleaner)....    And TA-DAAA!!!! You have just turned your 80% receiver into a 100% receiver. Good job! Now you can finish the lower how you wish (anodize, cerakote, or whatever). This pre-anodized lower will be getting a shot of high temp ceramic header paint (from any auto parts store) to finish the FCG pocket and holes. I'll have to do that another day as it is too cold to do it in the garage right now. I also want to take another moment to thank Wayne at Modulus for sending me this lower for the purpose of this review. Final Thoughts 2.0 Theoretically you could skip the drilling process all together and just use the router guide. HOWEVER, this will likely cause you to go through end mills at a faster rate. It's up to you to decide if this is acceptable to you or not. I will admit the router is much faster than drilling out all of the holes. I will try this theory out on a future lower by only drilling hole "A" and then just using the router to complete the FCG pocket I apparently forgot to mention it before, but this is NOT a fast process. You won't be cranking out your 80% lower in an hour. I wasn't really timing myself before but I want to say I spent about 2 hours per lower from start to finish including setup/tear down and cleanup of the work space. The drilling really is the slowest part, routing goes very quickly. If you don't already own a trim router I do not recommend getting a Bosch Colt PRV20EVSK. I recommend you read this thread about which routers are the best ones to get. It pains me to say don't get this router, because I absolutely love it for woodworking. You really have to be 110% sure you have the endmill properly seated and tightened down or it will slip on you while you are milling out the FCG pocket. The depth adjustment is great, but it does have a learning curve to it, and you don't want to be figuring that out on this project. WD40 makes a much better cutting fluid/lube than PB blaster. Get the can with the flexible metal straw, you will find this invaluable for not only hitting your bit with lube, but also spraying a little into the hole you're drilling out. If you have a shop vac you really should be using it when you're milling out the FCG pocket. I didn't do any cleanup for my photos where I was milling out the FCG pocket. If you don't rig something up you'll need to stop, pull the jig out of the vise, knock all the chips you can free, set it back into the vise and resume. That's a very tedious and time consuming process. If you do not own a shop vac DO NOT USE A HOUSE VACUUM you will likely destroy it because these chips are very fine and very sharp. Think of it kind of like sucking up shards of glass. I have a dust deputy cyclone inline with my shop vac, almost all of the chips wound up in that and virtually none in the shop vac. I'll get a picture and put it up here tomorrow. You'll also get a better idea of the volume of the chips you'll be generating. <EDITS> 24DEC15 - fixed broken image URL 3JAN16 - IN USE portion added 4JAN16 - IN USE portion finished. |
|
|
|
IA, USA
|
[#1]
I think the jig looks great. My only complaint is that those of us that bought the original jig, paid nearly as much and have a much lesser quality product. If they come out with a "previous owner discount" or "trade in program", I will have renewed faith in Modulus Arms. Yes, I understand that they owe me nothing because I'm the one that chose to buy the original, but I think a "thank you" for helping with suggestions and input on the original design, would be appreciated by all current owners.
|
|
|
ME, USA
|
[#2]
First reviews are starting to come in on the new jigs. All the feedback has been nothing short of spectacular.
HIGH QUALITY PRODUCT Posted by Nick on 23rd Dec 2015 In researching AR jigs, I found that this is probably one of the best out there. The "Heavy Duty" jig has hardened steel inserts that, if used properly, according to the instructions, will last for prolonged use. I like the included depth gauge and the fact that a router is used for the milling operation rather than a drill press as is the case with many of Modulus's competitors. A drill press is great for drilling, but does not make a good "mill". I like the fact that the jig is adaptable to any manufacturer's Mil Spec lower. The company (Modulus Arms) has great customer service and their product is very high quality. I would definitely recommend their Heavy Duty jig to anyone who desires to mill their own 80% lower receivers . THIS IS THE JIG YOU WANT! Posted by Phil in NC on 23rd Dec 2015 After doing a bit of research, I decided the Modulus Arms Heavy Duty Universal Jig was the way to go. The jig arrived one day earlier than estimated, which was great. I was impressed with the jig right out of the box. A couple of friends have jigs from other companies, and this jig is a much better design. The extra-wide top plate is the most obvious improvement over other designs, providing an extremely stable "interface" for your router. I ordered a Modulus Arms 80% AR15 lower with my jig and it fit perfectly. As a comparison, I installed a stripped lower from another company in the jig. It also fit with no issues. I have read some reviews of this jig that complained about the large amount of screws used to hold the jig together and how long it takes to change plates, etc. This may be a problem if you are trying to crank out several lowers an hour (lol), but since my "production rate" is a modest 4-5 lowers a year, I appreciate the added stability of having enough screws to properly hold the jig and lower in position. Compared to a friend's jig from another company, it probably takes five minutes longer to change plates with the Modulus. If five minutes is an issue with you, you probably should be using a program-able CNC machine instead of a jig! I was able to complete my lower in less than two hours at a very leisurely pace. I am a technical writer (and aircraft mechanic) and I found the instructional video and written instructions to be top-notch! I'm pretty sure that time will be cut in half on the next lower I do. The lower looks great. I'll review the lower once I start assembly, but so far, the results are impressive. I would definitely recommend this to anyone with a little mechanical apptitude and the ability to follow instructions. It's fun to build your own AR15. It's even more fun to build it from a lower receiver you finished yourself! Great job, Modulus! SOLID Posted by Unknown on 12th Dec 2015 Solid jig. Arrived and it looks to be quality. Haven't used it but can't wait. BEST UNIVERSAL JIG Posted by Ibbs on 12th Dec 2015 I have used both ar15 jigs they have. This jig is more durable due to the steel inserts. This jig works great if you want to use a drill press and move the mill vice instead of using a router. Well worth the money. THIS IS A REALLY GOOD JIG Posted by Jeff on 12th Dec 2015 The jig is great easy to use works perfectly. LOOKS GREAT! CAN'T WAIT TO PUT IT TO GOOD USE! Posted by Robert Taylor on 8th Dec 2015 Just received my heavy duty jig. I took advantage of the special which included the tool kit for free. Sweet! I mounted it to a known-good lower and everything lines up perfectly. The steel bushings will allow multiple uses without appreciable wear. Can't wait to put it to use. BEST JIG ON THE MARKET Posted by Mike on 2nd Dec 2015 Hands down this is THE BEST jig out on the market right now for completing an 80% lower using a handheld trim router. Prior to this jig coming out I was debating between getting the Modulus original jig or the Tactical Machining jig. The universal capability of the Modulus jig was a huge selling point, but I also liked how the TM had drill guides....but with the TM you had to buy an additional router plate which drove the cost up and narrowed the field. The ONLY critique I have on this product is that I wish there was a way to have an 308AR/AR10 conversion for this jig, but I don't see how that's possible based on its construction. |
|
|
ME, USA
|
[Last Edit: maxxx93]
[#3]
Very nice review
|
|
|
|
[#4]
Thanks to this thread, I just bought one today. Hope they ship soon. Looks like January.
Thanks for the write up ! |
|
|
|
|
[#5]
Originally Posted By maxxx93:
Very nice review Thanks. I need to get another 80% lower to do a step by step of the milling process. The lower I used in the photos belongs to a buddy of mine who is deployed. He's gonna come over and finish it and build his rifle with me when he gets home. Posted Via AR15.Com Mobile |
|
|
|
|
[#6]
Great review, K1. Thank you. Good to see detailed real-world results in addition to the instructions.
|
|
|
|
|
[#7]
Originally Posted By Hal143:
Thanks to this thread, I just bought one today. Hope they ship soon. Looks like January. Thanks for the write up ! The jigs are on schedule to ship by the January 8th date. We expect to ship them sooner but I can't commit to that just yet. You will get an email when it ships out. |
|
|
|
|
[#8]
Originally Posted By sample: Great review, K1. Thank you. Good to see detailed real-world results in addition to the instructions. In a week or so I'll be able to update this thread with a step by step of the completion of an 80% receiver. |
|
|
|
USA
|
[#9]
What is the end mill size?
|
|
|
|
[Last Edit: ModulusArms]
[#10]
Originally Posted By dmtsc:
What is the end mill size? The end mills are 1/4" diameter x 4" length with a cutting surface less than 1" End Mill Link 
|
|
|
|
TX, USA
|
[#11]
I ordered one a week or so ago... looking forward to getting it and trying it out...
|
|
|
|
[#12]
Originally Posted By SoftwareJanitor:
I ordered one a week or so ago... looking forward to getting it and trying it out... Post a review for everyone when you receive it! |
|
|
|
|
[#13]
|
|
|
|
|
[#14]
There is no Heavy-Duty AR-308 Jig. We may release one in the future but right now we do not offer one. |
|
|
|
OH, USA
|
[#15]
I've got one on order as a Christmas present from my wife. Was on the phone with Modulus yesterday to add the jig fabrication kit to my order and their customer service was stellar. Can't wait to get my builds started!
|
|
|
NY, USA
|
[#16]
Originally Posted By cbfurg:
I've got one on order as a Christmas present from my wife. Originally Posted By cbfurg:
I've got one on order as a Christmas present from my wife. She is a "keeper"! Originally Posted By cbfurg:
Was on the phone with Modulus yesterday to add the jig fabrication kit to my order and their customer service was stellar. I can't speak about their customer service BUT the jig is nothing but quality and Maxx is "stellar" too! He talked me off the ledge when I was about to jump and the purchase of the TM jig. For that, I am thankful. |
|
|
|
[#17]
Originally Posted By cbfurg:
I've got one on order as a Christmas present from my wife. Was on the phone with Modulus yesterday to add the jig fabrication kit to my order and their customer service was stellar. Can't wait to get my builds started! Max heads up the customer service. Thanks for the kind words! He is the man. |
|
|
|
NY, USA
|
[#18]
Originally Posted By ModulusArms:
Max heads up the customer service. Thanks for the kind words! He is the man. Originally Posted By ModulusArms:
Originally Posted By cbfurg:
I've got one on order as a Christmas present from my wife. Was on the phone with Modulus yesterday to add the jig fabrication kit to my order and their customer service was stellar. Can't wait to get my builds started! Max heads up the customer service. Thanks for the kind words! He is the man. That's an interesting factoid. I did not know that, I only knew him from here at AR15.com and that he worked for you guys in some role, didn't know he was responsible for your customer service. Based on my interactions with him, I have to say, you made a good choice when you hired! |
|
|
|
[#19]
Thanks. Yup, he handles the customer service. If you call our number or email us odds are he is who you will get.
|
|
|
|
|
[#20]
Thanks for the write-up. Looking forward to the details of the milling process.
|
|
|
|
|
[#21]
Originally Posted By medicmandan: Thanks for the write-up. Looking forward to the details of the milling process. |
|
|
|
|
[#22]
Originally Posted By LeonardS:
I think the jig looks great. My only complaint is that those of us that bought the original jig, paid nearly as much and have a much lesser quality product. If they come out with a "previous owner discount" or "trade in program", I will have renewed faith in Modulus Arms. Yes, I understand that they owe me nothing because I'm the one that chose to buy the original, but I think a "thank you" for helping with suggestions and input on the original design, would be appreciated by all current owners. Yeah, I bought mine around Thanksgiving, wish I knew about this jig prior to my order... Anyway, VERY satisfied with the jig I have, by far the best one I have used. I haven't tried it yet, but I am contemplating a combination of jigs to remove more material by drill press, to increase the removal of material before use the end mill and router... It seems to me that there is a lot of reliance on the endmill and router to remove material, that could be more easily removed by a drill press. Not to disparage the jig in any way, I would still recommend it, just my own ideas to improve the milling process... |
|
|
|
|
[#23]
Originally Posted By PWA_Commando:
Yeah, I bought mine around Thanksgiving, wish I knew about this jig prior to my order... Anyway, VERY satisfied with the jig I have, by far the best one I have used. I haven't tried it yet, but I am contemplating a combination of jigs to remove more material by drill press, to increase the removal of material before use the end mill and router... It seems to me that there is a lot of reliance on the endmill and router to remove material, that could be more easily removed by a drill press. Not to disparage the jig in any way, I would still recommend it, just my own ideas to improve the milling process... Originally Posted By PWA_Commando:
Originally Posted By LeonardS:
I think the jig looks great. My only complaint is that those of us that bought the original jig, paid nearly as much and have a much lesser quality product. If they come out with a "previous owner discount" or "trade in program", I will have renewed faith in Modulus Arms. Yes, I understand that they owe me nothing because I'm the one that chose to buy the original, but I think a "thank you" for helping with suggestions and input on the original design, would be appreciated by all current owners. Yeah, I bought mine around Thanksgiving, wish I knew about this jig prior to my order... Anyway, VERY satisfied with the jig I have, by far the best one I have used. I haven't tried it yet, but I am contemplating a combination of jigs to remove more material by drill press, to increase the removal of material before use the end mill and router... It seems to me that there is a lot of reliance on the endmill and router to remove material, that could be more easily removed by a drill press. Not to disparage the jig in any way, I would still recommend it, just my own ideas to improve the milling process... When I finish my lowers, I only drill one hole and remove the rest with the router. |
|
|
|
|
[#24]
Nice review. I bought this heavy duty version when Modulus had their Black Friday sale. I haven't been able to use it yet, but I have some 80% lowers itching to get machined.
|
|
|
|
|
[#25]
Originally Posted By ModulusArms: When I finish my lowers, I only drill one hole and remove the rest with the router. Interesting.....I can see how that would actually work better than drilling out all the holes and then milling. Certainly is easier to control the router than drill all the holes. |
|
|
|
|
[Last Edit: LocalGunEnthusiast]
[#26]
Originally Posted By ModulusArms: When I finish my lowers, I only drill one hole and remove the rest with the router. Are there any downsides to doing it this way (does it require more skill, have substantially more wear on the end mill, take more time)? |
|
|
|
|
[#27]
Updated the OP with some in use photos.
|
|
|
|
|
[#28]
Originally Posted By jellyman984:
Are there any downsides to doing it this way (does it require more skill, have substantially more wear on the end mill, take more time)? Would you in anyway recommend this route to someone that has a good router but only a cheap drill press? I understand that since the jig comes with the drill template that it is designed for use with a drill but as a complete noob when it comes to machining I am trying to learn before I make my first cut. Thank you. Originally Posted By jellyman984:
Originally Posted By ModulusArms:
When I finish my lowers, I only drill one hole and remove the rest with the router. Are there any downsides to doing it this way (does it require more skill, have substantially more wear on the end mill, take more time)? Would you in anyway recommend this route to someone that has a good router but only a cheap drill press? I understand that since the jig comes with the drill template that it is designed for use with a drill but as a complete noob when it comes to machining I am trying to learn before I make my first cut. Thank you. If you have a drill press it takes a little bit longer to router more. With a hand drill it is about the same. I think the router is the fun part. I don't think the chances of breaking or wearing the end mill are much higher. If you break your end mill its because you did something you weren't supposed to. The end mills can make dozens and dozens of lowers if properly used so wear isn't a major concern. |
|
|
|
|
[#29]
Any eta on when the new billet lowers are to be released and will this jig work with the NFA 9mm lower also? Thanks |
|
|
|
|
[#30]
Originally Posted By liquidflesh1349:
Any eta on when the new billet lowers are to be released and will this jig work with the NFA 9mm lower also? Thanks We are working on the billet lowers and it is taking way longer than it should. We have been buried with the Heavy-Duty Jig. We did add some awesome things to the billet that we think people are going to love. Has all the bells and whistles. The AR-9 from NFA will fit in our Jig. |
|
|
|
|
[#31]
Just finished up the lower and updated the OP with the end results.
And a big thanks goes out to Wayne at Modulus for making this a possability |
|
|
|
|
[#32]
Originally Posted By ModulusArms:
If you have a drill press it takes a little bit longer to router more. With a hand drill it is about the same. I think the router is the fun part. I don't think the chances of breaking or wearing the end mill are much higher. If you break your end mill its because you did something you weren't supposed to. The end mills can make dozens and dozens of lowers if properly used so wear isn't a major concern. Originally Posted By ModulusArms:
Originally Posted By jellyman984:
Originally Posted By ModulusArms:
When I finish my lowers, I only drill one hole and remove the rest with the router. Are there any downsides to doing it this way (does it require more skill, have substantially more wear on the end mill, take more time)? Would you in anyway recommend this route to someone that has a good router but only a cheap drill press? I understand that since the jig comes with the drill template that it is designed for use with a drill but as a complete noob when it comes to machining I am trying to learn before I make my first cut. Thank you. If you have a drill press it takes a little bit longer to router more. With a hand drill it is about the same. I think the router is the fun part. I don't think the chances of breaking or wearing the end mill are much higher. If you break your end mill its because you did something you weren't supposed to. The end mills can make dozens and dozens of lowers if properly used so wear isn't a major concern. Interesting I've been thinking about buying a drill press, I'm rethinking this now I ordered the HD Jig on the Dec 28 The web page stated ship date of Jan 8th or sooner Now the web page says Jan 18th or sooner Is there a delay now? |
|
|
|
|
[#33]
Originally Posted By K1rodeoboater:
In a week or so I'll be able to update this thread with a step by step of the completion of an 80% receiver. Originally Posted By K1rodeoboater:
Originally Posted By sample:
Great review, K1. Thank you. Good to see detailed real-world results in addition to the instructions. In a week or so I'll be able to update this thread with a step by step of the completion of an 80% receiver. The updates are great too. Thank you for documenting this so well. |
|
|
|
|
[#34]
Originally Posted By ScopeEye:
Interesting I've been thinking about buying a drill press, I'm rethinking this now I ordered the HD Jig on the Dec 28 The web page stated ship date of Jan 8th or sooner Now the web page says Jan 18th or sooner Is there a delay now? Originally Posted By ScopeEye:
Originally Posted By ModulusArms:
Originally Posted By jellyman984:
Originally Posted By ModulusArms:
When I finish my lowers, I only drill one hole and remove the rest with the router. Are there any downsides to doing it this way (does it require more skill, have substantially more wear on the end mill, take more time)? Would you in anyway recommend this route to someone that has a good router but only a cheap drill press? I understand that since the jig comes with the drill template that it is designed for use with a drill but as a complete noob when it comes to machining I am trying to learn before I make my first cut. Thank you. If you have a drill press it takes a little bit longer to router more. With a hand drill it is about the same. I think the router is the fun part. I don't think the chances of breaking or wearing the end mill are much higher. If you break your end mill its because you did something you weren't supposed to. The end mills can make dozens and dozens of lowers if properly used so wear isn't a major concern. Interesting I've been thinking about buying a drill press, I'm rethinking this now I ordered the HD Jig on the Dec 28 The web page stated ship date of Jan 8th or sooner Now the web page says Jan 18th or sooner Is there a delay now? We are still on track for Jan 8th for your order. The website is updated continually based on if you were to order right now. The date it showed when you placed your order is the accurate estimate. |
|
|
|
|
[#35]
Originally Posted By K1rodeoboater:
Just finished up the lower and updated the OP with the end results. And a big thanks goes out to Wayne at Modulus for making this a possability You did a kick ass job with your writeup, Check the bottom of the product description page! |
|
|
|
|
[#36]
That's awesome! Thanks!
|
|
|
|
|
[#37]
We are really low on stock so if anyone is on the fence on ordering you will want to order immediately or it wont be available until mid February!
|
|
|
|
|
[#38]
These are now shipping in under 4 weeks! Buy them now before the backorder moves farther out!
|
|
|
|
|
[#39]
Just ordered a NFA AR-9 (Glock mag compatible lower) and I'll update this thread when I get it regarding fitment. I doubt it'll have any issues, but some people have been asking about it.
|
|
|
|
|
[#40]
Originally Posted By K1rodeoboater:
Just ordered a NFA AR-9 (Glock mag compatible lower) and I'll update this thread when I get it regarding fitment. I doubt it'll have any issues, but some people have been asking about it. It should fit without any problems. |
|
|
|
|
[#41]
Originally Posted By ModulusArms: It should fit without any problems. Originally Posted By ModulusArms: Originally Posted By K1rodeoboater: Just ordered a NFA AR-9 (Glock mag compatible lower) and I'll update this thread when I get it regarding fitment. I doubt it'll have any issues, but some people have been asking about it. It should fit without any problems. Well now you have 100% confirmation that it does indeed fit this jig! |
|
|
|
|
[#42]
Make sure to place you orders now as the backorder list keeps getting longer.
|
|
|
|
USA
|
[#43]
Very interesting thread.
|
|
|
|
[#44]
Mine came in the mail today. Hope to make chips fly this weekend.
|
|
|
|
|
[#45]
Originally Posted By RV8guy:
Mine came in the mail today. Hope to make chips fly this weekend. Let us know how it goes! |
|
|
|
|
[#46]
Originally Posted By RV8guy:
Mine came in the mail today. Hope to make chips fly this weekend. You have a chance to take a look at ti yet? |
|
|
|
|
[#47]
Originally Posted By ModulusArms:
You have a chance to take a look at ti yet? Originally Posted By ModulusArms:
Originally Posted By RV8guy:
Mine came in the mail today. Hope to make chips fly this weekend. You have a chance to take a look at ti yet? Everything looks super nice. I like how heavy it is. So far I have a lower mounted in it with the first holes drilled. I get to use the mill this weekend. I'll takes pictures as I go and post them when I'm finished. |
|
|
|
TX, USA
|
[#48]
Originally Posted By ModulusArms:
You have a chance to take a look at ti yet? Originally Posted By ModulusArms:
Originally Posted By RV8guy:
Mine came in the mail today. Hope to make chips fly this weekend. You have a chance to take a look at ti yet? I completed my first lower with the HD jig yesterday and assembled the lower. Everything went together smoothly and the lower passes all the function tests. I hope to get it to the range over the weekend to give it a firing test. |
|
|
|
[#49]
Originally Posted By SoftwareJanitor:
I completed my first lower with the HD jig yesterday and assembled the lower. Everything went together smoothly and the lower passes all the function tests. I hope to get it to the range over the weekend to give it a firing test. Originally Posted By SoftwareJanitor:
Originally Posted By ModulusArms:
Originally Posted By RV8guy:
Mine came in the mail today. Hope to make chips fly this weekend. You have a chance to take a look at ti yet? I completed my first lower with the HD jig yesterday and assembled the lower. Everything went together smoothly and the lower passes all the function tests. I hope to get it to the range over the weekend to give it a firing test. Awesome! got some pics? |
|
|
|
|
[#50]
The next batch of Jigs is almost sold out. Order now before the backorder date is moved out.
|
|
|
|
 Win a FREE Membership!
Sign up for the ARFCOM weekly newsletter and be entered to win a free ARFCOM membership. One new winner* is announced every week!
You will receive an email every Friday morning featuring the latest chatter from the hottest topics, breaking news surrounding legislation, as well as exclusive deals only available to ARFCOM email subscribers.

AR15.COM is the world's largest firearm community and is a gathering place for firearm enthusiasts of all types.
From hunters and military members, to competition shooters and general firearm enthusiasts, we welcome anyone who values and respects the way of the firearm.

Subscribe to our monthly Newsletter to receive firearm news, product discounts from your favorite Industry Partners, and more.
Copyright © 1996-2024 AR15.COM LLC. All Rights Reserved.
Any use of this content without express written consent is prohibited.
AR15.Com reserves the right to overwrite or replace any affiliate, commercial, or monetizable links, posted by users, with our own.


