|
[#1]
Quoted: Impressive.
Boris, I have one question. Seeing as you close a very thin plastic to minimize bubbles and since the remaining bubbles tend to rise in the liquid plastic, do you think making the mold and casting the receiver upside down would improve the relative strength of the receiver? The receiver is cast upside down. Look @ the Lego "cruicible". I'm estimating the center magazine well sprue is 7 bricks high, w/ a row of 6x2 tiles on top. The "crucible" is complete. Missed one plate step in the receiver extension boss well, but think it should work fine. |
|
|
|
[#2]
Quoted:
The receiver is cast upside down. Look @ the Lego "cruicible". I'm estimating the center magazine well sprue is 7 bricks high, w/ a row of 6x2 tiles on top. The "crucible" is complete. Missed one plate step in the receiver extension boss well, but think it should work fine. Quoted:
Quoted: Impressive.
and casting the receiver upside down? The receiver is cast upside down. Look @ the Lego "cruicible". I'm estimating the center magazine well sprue is 7 bricks high, w/ a row of 6x2 tiles on top. The "crucible" is complete. Missed one plate step in the receiver extension boss well, but think it should work fine. Ah yes. Now I see it. Thanks. |
|
|
|
[#3]
Best "how to" thread ever! Been a big fan of yours ever since reading the shovel thread on another site.
|
|
|
|
[#4]
Quoted:
Impressive. Boris, I have one question. Seeing as you close a very thin plastic to minimize bubbles and since the remaining bubbles tend to rise in the liquid plastic, do you think making the mold and casting the receiver upside down would improve the relative strength of the receiver? I don't think so, if I google "broken AR receiver" 95% of images look like this: 
There is little material over rear take down holes. Once that bridge goea, you got large pivoting force around the rear piece and it just goes. I looked at the plastic receiver that I broke and that portion is solid, no bubbles what so ever. Again, if there is any reinforcement, those guys at MEAN arms did it perfect. That's exactly how you need to re-inforce it. |
|
|
|
[#5]
Quoted:
or possibly designing the mold so it fills from the bottom to the top when you pour the resin in. I.E. having a funnel next to the molded item with burp holes for the air to escape the mold. ETA: How'd that Roto281 lower fare? Quoted:
Quoted:
Impressive. Boris, I have one question. Seeing as you close a very thin plastic to minimize bubbles and since the remaining bubbles tend to rise in the liquid plastic, do you think making the mold and casting the receiver upside down would improve the relative strength of the receiver? or possibly designing the mold so it fills from the bottom to the top when you pour the resin in. I.E. having a funnel next to the molded item with burp holes for the air to escape the mold. ETA: How'd that Roto281 lower fare? I have not shot it yet because I was getting an upscale billet lower and wanted to make another mold of that one. I'm actually going to mold it tonight and hopefully shoot by weekend. (day job get in the way of things) |
|
|
|
[#6]
I didnt see it mentioned. But have you tried cold casting? Not sure how much extra strength adding metal powder to the resin adds vs cost added.
|
|
|
|
[#7]
Quoted:
I don't think so, if I google "broken AR receiver" 95% of images look like this: http://i44.tinypic.com/2d6tqd.jpg There is little material over rear take down holes. Once that bridge goea, you got large pivoting force around the rear piece and it just goes. I looked at the plastic receiver that I broke and that portion is solid, no bubbles what so ever. Again, if there is any reinforcement, those guys at MEAN arms did it perfect. That's exactly how you need to re-inforce it. Quoted:
Quoted:
Impressive. Boris, I have one question. Seeing as you close a very thin plastic to minimize bubbles and since the remaining bubbles tend to rise in the liquid plastic, do you think making the mold and casting the receiver upside down would improve the relative strength of the receiver? I don't think so, if I google "broken AR receiver" 95% of images look like this: http://i44.tinypic.com/2d6tqd.jpg There is little material over rear take down holes. Once that bridge goea, you got large pivoting force around the rear piece and it just goes. I looked at the plastic receiver that I broke and that portion is solid, no bubbles what so ever. Again, if there is any reinforcement, those guys at MEAN arms did it perfect. That's exactly how you need to re-inforce it. Looking at the picture makes me think they missed a chance during the transition from A1 to A2 lower receiver. The area in the crease of the receiver extension boss was beefed up, but it stops short of that line from the takedown hole to the curve of the grip area. |
|
|
|
[#8]
The more I read this thread the more I want to try this. Seems like it could be fun.
|
|
|
|
[#9]
Amazing thread. Next time Seattle has a gun buy back I'm going to fund some night vision with this.

|
|
|
|
[#10]
Quoted: I don't think so, if I google "broken AR receiver" 95% of images look like this: http://i44.tinypic.com/2d6tqd.jpg There is little material over rear take down holes. Once that bridge goea, you got large pivoting force around the rear piece and it just goes. I looked at the plastic receiver that I broke and that portion is solid, no bubbles what so ever. Again, if there is any reinforcement, those guys at MEAN arms did it perfect. That's exactly how you need to re-inforce it. Quoted: Quoted: Impressive. Boris, I have one question. Seeing as you close a very thin plastic to minimize bubbles and since the remaining bubbles tend to rise in the liquid plastic, do you think making the mold and casting the receiver upside down would improve the relative strength of the receiver? I don't think so, if I google "broken AR receiver" 95% of images look like this: http://i44.tinypic.com/2d6tqd.jpg There is little material over rear take down holes. Once that bridge goea, you got large pivoting force around the rear piece and it just goes. I looked at the plastic receiver that I broke and that portion is solid, no bubbles what so ever. Again, if there is any reinforcement, those guys at MEAN arms did it perfect. That's exactly how you need to re-inforce it. |
|
|
|
[#11]
Quoted:
Would it be possible to strengthen the plastic by adding metal fibers to the plastic while it is liquid? Maybe add in some steel wool pieces or something like that? Yes, but I imagine you'd have to get more aggressive with the vibration of the mold, and a vacuum chamber etc, since any kind of fiber additive is going to interfere with the ability to do a smooth pour and fill the mold. Boris-Build... Do you think that Smooth-Cast 380 would be too hard/brittle? It seems like it would have better wear attributes around the pin-holes... |
|
|
|
[#12]
Quoted: Yes, but I imagine you'd have to get more aggressive with the vibration of the mold, and a vacuum chamber etc, since any kind of fiber additive is going to interfere with the ability to do a smooth pour and fill the mold. Boris-Build... Do you think that Smooth-Cast 380 would be too hard/brittle? It seems like it would have better wear attributes around the pin-holes... Quoted: Quoted: Would it be possible to strengthen the plastic by adding metal fibers to the plastic while it is liquid? Maybe add in some steel wool pieces or something like that? Yes, but I imagine you'd have to get more aggressive with the vibration of the mold, and a vacuum chamber etc, since any kind of fiber additive is going to interfere with the ability to do a smooth pour and fill the mold. Boris-Build... Do you think that Smooth-Cast 380 would be too hard/brittle? It seems like it would have better wear attributes around the pin-holes... Task9 would possibly be pourable as well. |
|
|
|
[#13]
So, would there be a suitable bronze casting alloy that could be made by melting, say, small metal disks composed of 95Cu/5Zn, 95Ni/5Cu, 99.5Zn/0.5Cu, and maybe Al in the form of beer cans?
|
|
|
|
[#14]
I just realized that I'm going to decorate one of the magwell flats with a flat Lego baseplate so that goes into the mold too, and then I can decorate the receiver with Legos as I see fit.
|
|
|
|
[#15]
Quoted:
I just realized that I'm going to decorate one of the magwell flats with a flat Lego baseplate so that goes into the mold too, and then I can decorate the receiver with Legos as I see fit. Genius! |
|
|
|
[#16]
Quoted:
I just realized that I'm going to decorate one of the magwell flats with a flat Lego baseplate so that goes into the mold too, and then I can decorate the receiver with Legos as I see fit. Give this man a medal. $100 for the first person that casts mlok-> Lego adapters |
|
|
|
[#17]
Quoted:
Give this man a medal. $100 for the first person that casts mlok-> Lego adapters Quoted:
Quoted:
I just realized that I'm going to decorate one of the magwell flats with a flat Lego baseplate so that goes into the mold too, and then I can decorate the receiver with Legos as I see fit. Give this man a medal. $100 for the first person that casts mlok-> Lego adapters Genius! Forget rails, we need Lego compatible uppers and optic mounts! |
|
|
|
[#18]
Quoted:
I just realized that I'm going to decorate one of the magwell flats with a flat Lego baseplate so that goes into the mold too, and then I can decorate the receiver with Legos as I see fit. that would be more hilarious than comrade Kruschev eating his shoe! go for it! |
|
|
|
[#19]
Quoted:
So, would there be a suitable bronze casting alloy that could be made by melting, say, small metal disks composed of 95Cu/5Zn, 95Ni/5Cu, 99.5Zn/0.5Cu, and maybe Al in the form of beer cans? I don't normally cast zink, it's close to aluminum in melting temp and aluminum is considerably easier to get and better overall properties. A bunch of "Canadien" pennies are zink 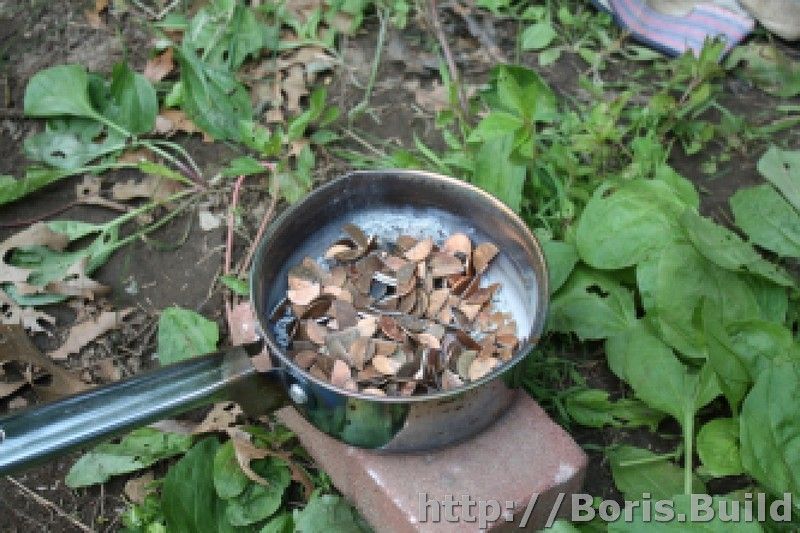 lower temp means you can easily melt it propane torch in a kitchen thing  the temp is so low that mold does not even smoke   the big problem I had it breaking the mold too early, so zink did not completely solidified and it just broke apart  but quiet honestly, I don't see the reason to go with zink or aluminum or bronze. Billet aluminum receiver - 10.75 oz (305 gm) Plastic reinforced receiver - 4.65 oz (133 gm) basically you got a receiver that's less than half the weight and potentially stronger than the aluminum receiver. |
|
|
|
[#20]
Quoted:
Yes, but I imagine you'd have to get more aggressive with the vibration of the mold, and a vacuum chamber etc, since any kind of fiber additive is going to interfere with the ability to do a smooth pour and fill the mold. Boris-Build... Do you think that Smooth-Cast 380 would be too hard/brittle? It seems like it would have better wear attributes around the pin-holes... Quoted:
Quoted:
Would it be possible to strengthen the plastic by adding metal fibers to the plastic while it is liquid? Maybe add in some steel wool pieces or something like that? Yes, but I imagine you'd have to get more aggressive with the vibration of the mold, and a vacuum chamber etc, since any kind of fiber additive is going to interfere with the ability to do a smooth pour and fill the mold. Boris-Build... Do you think that Smooth-Cast 380 would be too hard/brittle? It seems like it would have better wear attributes around the pin-holes... In terms of vibration, mixing next to high powered boombox playing Red Army Choir (anything patriotic) should provide enough vibration Cast 380 looks like viscosity is 1100 cps. I just poured Task 9 which was viscosity 300 and it was getting a little scary slow, even with pot life being longer. Smoothcast 300 is 80cps viscosity, it's pretty much like water. When I was casting last mold, the receiver was hung by a thin thread which left tiny pinhole in the mold. The smoothcast 300 actually filled that pinhole so I pulled a perfect copy of the thread in plastic The holes will walk, just like they do on older aluminum receivers. They will wear out. The best thing here is either small plate reinforcement or just use drop-in box FCG. Quoted:
Quoted:
Quoted:
Would it be possible to strengthen the plastic by adding metal fibers to the plastic while it is liquid? Maybe add in some steel wool pieces or something like that? Yes, but I imagine you'd have to get more aggressive with the vibration of the mold, and a vacuum chamber etc, since any kind of fiber additive is going to interfere with the ability to do a smooth pour and fill the mold. Boris-Build... Do you think that Smooth-Cast 380 would be too hard/brittle? It seems like it would have better wear attributes around the pin-holes... you gotta factor in the viscosity as well. You would have to mold it differently if you use that I bet. ONYX might be a better alternative since it's slightly thicker than 300 Task9 would possibly be pourable as well. Yes, so it looks like I actually had some on hand. I don't know why. It suppose to be clear amber, so may be cool factor. I just poured it, so I check in morning. Onyx is fairly brittle and really really fast setting. I think that I used Onyx slow to get a black receiver, because colorant alone was not getting deep color enough. |
|
|
|
[#21]
Quoted:
I didnt see it mentioned. But have you tried cold casting? Not sure how much extra strength adding metal powder to the resin adds vs cost added. Quoted:
I didnt see it mentioned. But have you tried cold casting? Not sure how much extra strength adding metal powder to the resin adds vs cost added. Quoted:
Would it be possible to strengthen the plastic by adding metal fibers to the plastic while it is liquid? Maybe add in some steel wool pieces or something like that? Kevlar thread would probably be the best bet because it's flexible and about similar density to urethane plastics (I think) The fundamental problem is that back portion of receiver. Unless that's strong, receiver is not strong. If mag well brakes, then we deal with it, but it's not break, nothing breaks but the back piece. Here is the reinforcement: 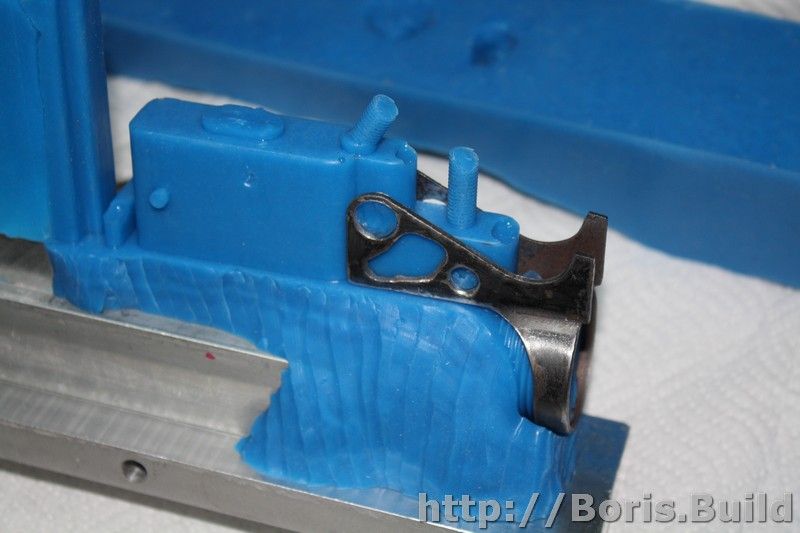 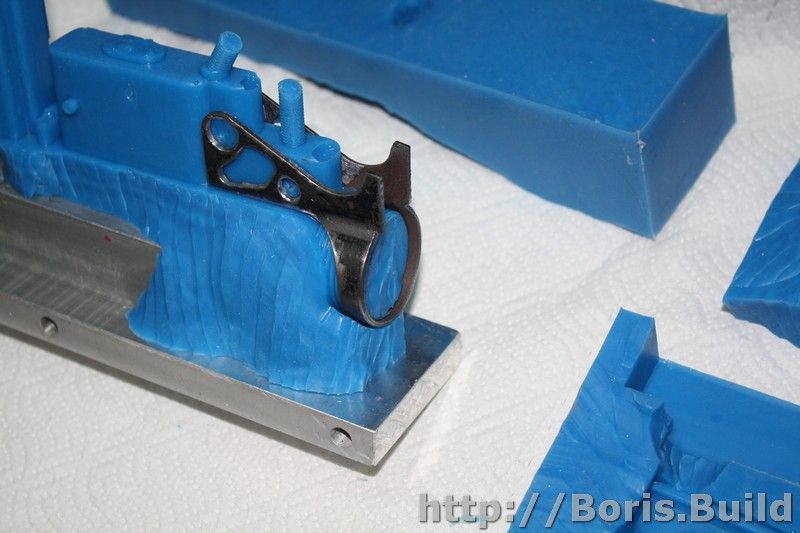 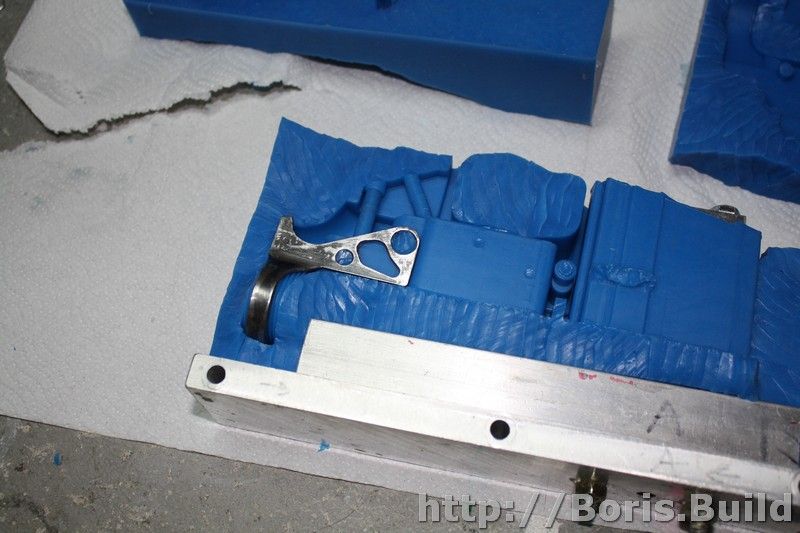 when out, you kind of see it, need to trim or make smaller, but take down whole is 1.5mm steel  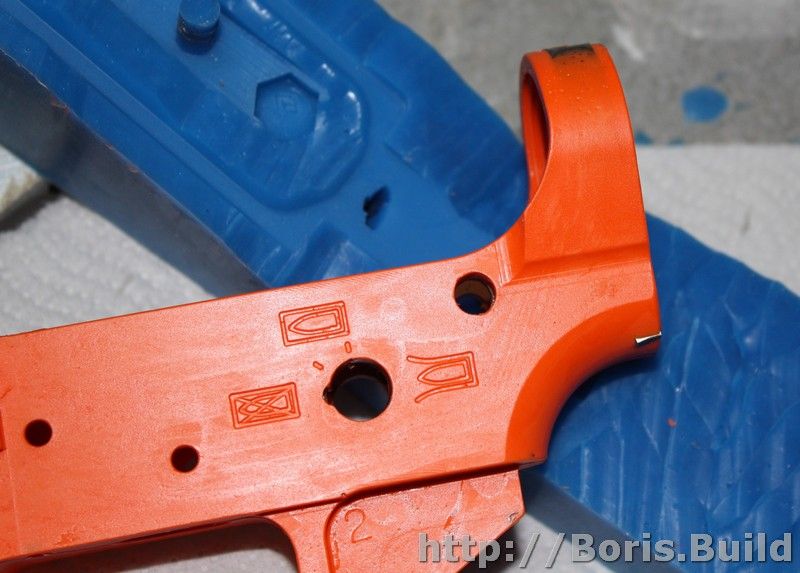 Here is MEAN receiver lifting 1600 pound load. Guess what really holds that plastic receiver and 1600 pounds together? ... that back strap that they make out of aluminum also, here last receiver mold that I made from a billet receiver. The receiver is being held up by striings. It has to be suspended in "mid-air" so subber goes well around it. 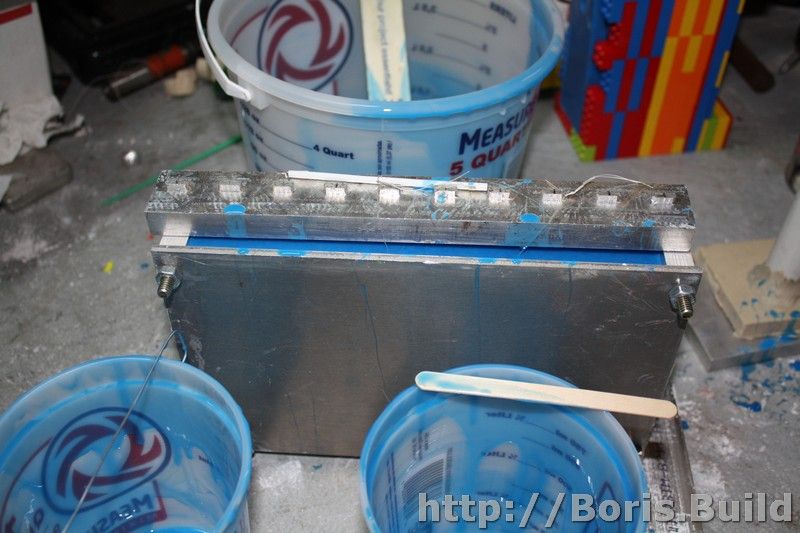 |
|
|
|
[#22]
I wonder how the buffer tube threads will fare.
I also wonder if you were to drop a bushing over the FCG pins if that would eliminate the walking issue since it would disperse the forces over a wider area. |
|
|
|
[#23]
Quoted:
So, would there be a suitable bronze casting alloy that could be made by melting, say, small metal disks composed of 95Cu/5Zn, 95Ni/5Cu, 99.5Zn/0.5Cu, and maybe Al in the form of beer cans? You can buy commercial bronze casting grain (or cubes) pretty cheaply, and in the color you want. The problems with bronze are: It is really heavy compared to aluminum, three to four times heavier. It is too soft. The melt temperature for bronze is as high as 1950*F, some alloys are as low as 1600*F. Those are melt temps, not casting temps. Casting temps are about 300* higher than melt. Versus aluminum that has a melt temp of 1220*F. |
|
|
|
[#24]
Quoted:
I don't normally cast zink, it's close to aluminum in melting temp and aluminum is considerably easier to get and better overall properties. A bunch of "Canadien" pennies are zink lower temp means you can easily melt it propane torch in a kitchen thing the temp is so low that mold does not even smoke the big problem I had it breaking the mold too early, so zink did not completely solidified and it just broke apart but quiet honestly, I don't see the reason to go with zink or aluminum or bronze. Billet aluminum receiver - 10.75 oz (305 gm) Plastic reinforced receiver - 4.65 oz (133 gm) basically you got a receiver that's less than half the weight and potentially stronger than the aluminum receiver. Quoted:
Quoted:
So, would there be a suitable bronze casting alloy that could be made by melting, say, small metal disks composed of 95Cu/5Zn, 95Ni/5Cu, 99.5Zn/0.5Cu, and maybe Al in the form of beer cans? I don't normally cast zink, it's close to aluminum in melting temp and aluminum is considerably easier to get and better overall properties. A bunch of "Canadien" pennies are zink lower temp means you can easily melt it propane torch in a kitchen thing the temp is so low that mold does not even smoke the big problem I had it breaking the mold too early, so zink did not completely solidified and it just broke apart but quiet honestly, I don't see the reason to go with zink or aluminum or bronze. Billet aluminum receiver - 10.75 oz (305 gm) Plastic reinforced receiver - 4.65 oz (133 gm) basically you got a receiver that's less than half the weight and potentially stronger than the aluminum receiver. I was going more for the idea of using coinage in different proportions to make a decent bronze casting alloy. As for the why? Just to be different. And show those steampunkers a thing or two. |
|
|
|
[#25]
love this thread...look forward to some time off and I might just try this myself
|
|
|
|
[#26]
Fantastic thread here! Been wanting to do this myself, but I honestly have been too lazy to think about shore hardness or pot life. Just might have to pour one in FDE to match up this lonely upper i have.
|
|
|
|
[#27]
Boris, did you make that metal reinforcing deal yourself?
|
|
|
|
[#28]
If you're rereading this post, please note my correction highlighted in red below.
First, I need to thank Boris for introducing this new and intriguing way to create a lower. Over the past week, I’ve fallen down a bit of a rabbit hole trying to replicate his success, and while I so far have fallen far short, I’ve learned a few things through my mistakes which I will share here. Advice to those who try this: If you are not already a molding and casting guru, realize that what Boris makes look easy is not straightforward if you're not used to working with these materials. I made a first mold a few nights ago using the Lego mold box which backbencher and his assistant built over the weekend, and while I've eventually cast something that looks mostly like an AR receiver and which I believe would hold the fire control parts long enough to go bang (backbencher will post a photo later), it has significant problems and needs to be redone from scratch. Several points to note: If you use Legos for your mold and have not already found some way to seal them, you will get significant seepage of the molding rubber into your Lego blocks, especially around the wires or threads by which you suspend the template receiver. The volume will likely be enough that you will not be able to complete a mold with a single trial size on Moldstar, so I would highly recommend if you are using Moldstar that you lay in at least two trial kits if not the larger gallon size, which you will need in any case if you end up running through a few molds getting things right, reinforcing various sections, etc. The good news if you use Legos is that if you leave all of the mold rubber that seeps into the walls more or less in place, you probably won’t get much if any seepage in a second mold. Sadly I wasn’t thinking on my toes and stripped most of this rubber out, and then lost track of how the mold walls had been constructed in the first place. One more note about Legos: it takes considerable time to take the walls apart and rebuild them if they interlock, and I failed every time I tried to remove them in large sections. When I redo the mold, I will start with the mold box, and I will build the walls into non-interlocking sections which can be more easily peeled away and replaced. For one thing, this should make reinserting the mold much cleaner, as it means the mold can be placed intact against one or two walls with the others subsequently built around. Regarding the mold, be sure to have a good plan of where you are going to section it after you pull it from the box. I had only vague ideas and ended up with several significant problems as a result. Next time I will prepare a cutting diagram in advance which I will transfer to the outside mold surface with a sharpie before I start cutting. Three areas which caused me particular trouble: 1) Magazine release void, which I inadvertently trimmed from both side pieces of the mold, forgetting that unlike the fire control and rear take down holes, the catch doesn’t pass through the central void of the mold. Don’t do this. I’d recommend pulling the left side mold out a bit and slicing through the left side of the small round peg of the molded void, then push the remainder through the template receiver as you peel the right side mold away. (Correction: I'd originally written this wrong and am editing this post 2015-07-09 to correct my mistake; if you trim from the right side of the void as I'd originally written, you won't be able to get the void for the mag release button back through your template receiver or casting. Apologies if my original post led anyone into the same mistakes I've made.) In my case, I tried to pin the mold back together, and for my first abortive casting, that partially worked, but part of the repaired mold did break away. Since the second casting I tried was simply proof of concept before starting over, I didn’t bother. It’s probable I could clear this space out with a dremel, but for many other reasons, the better path is a new mold. 2) Front take-down pin holes, the space between which I failed to cut in a way both sides could be extracted. For each side, you’ll want to make sure you put a slice through the void pin that’s created when you mold this, so that you don’t end up having to tear the mold randomly later to remove the casting, as I did. (In the end, that part worked out, but it was haphazard and messy.) 3) Rear receiver boss. I didn’t have a clear plan of what volumes I would leave to each side of the mold and what volumes I would leave with the center section. In the end, I cut and tore this section of the mold into five pieces instead of three, largely by accident but also as corrections to an incomplete plan. This resulted in some undiagnosed problems reassembling this end of the mold. Although the resultant threads were good and take a receiver extension just fine (and hold it), one half of the mold ended up supported differently than the other, so there is a step on the top of the boss between one side and the other. Have a clear plan for what volumes of this section will belong to which part of the mold. Other notes: Pistol grip threads are correct and intact but strip at the first sign of a steel screw. I’m not sure what the solution to this might be and am very interested to know if Boris had this problem. Magazine well is very tight, probably due to shrinkage. While it should work, magazines don't have a prayer of dropping free. Again, I don't know of an immediate solution, though future generation molds could be made from a template receiver in which the magwell has been sanded more open. The hole for the buffer retainer plunger is inverted when the mold is created and perhaps for this reason did not mold cleanly for me. This may be inevitable, and as backbencher pointed out to me, may actually be desirable in that the weak part of the receiver is stronger if there is no hole here. Since the trigger guard is the highest part of the inverted receiver - and therefore of the mold - you will want to use a nice curved one like Boris did to make the top extra peaky as a pour duct. Don’t do as I did and try to build a thin, flat guard up with modeling clay. Most of the clay broke away in the mold, but it still managed to deny some amount of space to the mold rubber, with the result that I get a large amount of flashing here when I cast it. Allow plenty of time to cure, especially for your first casting. I was in a bit of a hurry (always a warning sign) when I made my first casting, and I pulled it after about twenty minutes. It was still soft enough that it pulled out of the mold limp, but due to the mold box being too fiddly to take down and rebuild, I wasn’t able to assemble the mold correctly, so I was forced to pull it anyway, limp and in some places stretched. When it eventually did harden, it was of course entirely out of shape. The second casting was pulled after six hours, and it appears to be reasonably solid I have been using Smooth Cast 325 instead of the Smooth Cast 300 Boris used. I plan to try some Smooth Cast 300 next week and will see if it cures faster for me, but I’m going to continue to err on the long side until I gain experience. I used the 325 because it is translucent and would give me a better idea of what was going on inside the receiver as I worked with it and molded future potentially reinforced generations. From what I read when I selected it, it appeared to be of similar strength to the 300. My second casting may harden more over the next day or so, but at this point I’m thinking these plastic castings will need considerable reinforcement to stay in spec, not only in the rear and the fire-control pins but throughout the whole receiver. (If this casting hardens further, I will update this note.) An interesting side effect of working with a translucent plastic is that I can clearly see thousands upon thousands of tiny bubbles in the plastic (more in the second casting than in the first). This makes me wonder what I can do to degass better before casting. Can a vacuum can be set up inexpensively? Are there other techniques I can try? Is the bubbling worth worrying about at all? You will see from the above that many of my mistakes were the result of haste and muddy thinking. The haste problem has probably been solved by rude experience. The thinking is a little harder. After a lifetime of considering objects in 3D space, I’m finding it peculiar and difficult to picture them in negative space. Again, many thanks to Boris for the inspiration and ideas, and to backbencher and his sidekick for the mold box. Please let me know if you have any questions, or if you have any tips or advice to give. |
|
|
|
[#29]
Sample's 2nd cast:

I'm thinking all that needs is a CMC trigger, a couple of KNS pins, and a Magpul. |
|
|
|
[#30]
Quoted:
An interesting side effect of working with a translucent plastic is that I can clearly see thousands upon thousands of tiny bubbles in the plastic (more in the second casting than in the first). This makes me wonder what I can do to degass better before casting. Can a vacuum can be set up inexpensively? Are there other techniques I can try? Is the bubbling worth worrying about at all? Define cheap. The problem you may have is finding one large enough to hold your mould frame. I've seen used ones pretty cheap on craigslist or fleabay. I would avoid trying to make your own but you could probably find a cheap pump. Also you could try a dental vibrator table to remove bubbles, I think you can pick up a small one for under $40. |
|
|
|
[#31]
Quoted:
Define cheap. Quoted:
Quoted:
An interesting side effect of working with a translucent plastic is that I can clearly see thousands upon thousands of tiny bubbles in the plastic (more in the second casting than in the first). This makes me wonder what I can do to degass better before casting. Can a vacuum can be set up inexpensively? Are there other techniques I can try? Is the bubbling worth worrying about at all? Define cheap. Thanks for the answer. Good point. Under $100, I suppose. More if necessary, but I don't want to go too far into cost creep. The problem you may have is finding one large enough to hold your mould frame. I've seen used ones pretty cheap on craigslist or fleabay. I would avoid trying to make your own but you could probably find a cheap pump. Also you could try a dental vibrator table to remove bubbles, I think you can pick up a small one for under $40.
I have mainly been thinking to degas the urethane before pouring, and I'll never be pouring much at a time, so I wouldn't think I'd need a large vacuum chamber, only one large enough to hold a six or eight ounce cup. Think I need to degas the whole mold after pouring? If so, then I would indeed need a much larger chamber. Perhaps it would be feasible to degas the urethane and then vibrate the mold. |
|
|
|
[#32]
I'm not an expert, but a lot of the impact to the lower receiver comes from the buffer slamming into the buffer retainer pin.
Every time the weapon cycles, the buffer is slamming into that pin, which then distributes the force toward the receiver. I'd wager that is what is causing these plastic lowers to crack on that rear portion. I'd suggest running a plastic lower without the buffer retainer pin, so that the buffer sits up against the rear of the bolt and no force is distributed into the lower to see if it lasts any longer. Cool thread. |
|
|
|
[#33]
Quoted:
Thanks for the answer. Good point. Under $100, I suppose. More if necessary, but I don't want to go too far into cost creep. I have mainly been thinking to degas the urethane before pouring, and I'll never be pouring much at a time, so I wouldn't think I'd need a large vacuum chamber, only one large enough to hold a six or eight ounce cup. Think I need to degas the whole mold after pouring? If so, then I would indeed need a much larger chamber. Perhaps it would be feasible to degas the urethane and then vibrate the mold. Quoted:
Quoted:
Quoted:
An interesting side effect of working with a translucent plastic is that I can clearly see thousands upon thousands of tiny bubbles in the plastic (more in the second casting than in the first). This makes me wonder what I can do to degass better before casting. Can a vacuum can be set up inexpensively? Are there other techniques I can try? Is the bubbling worth worrying about at all? Define cheap. Thanks for the answer. Good point. Under $100, I suppose. More if necessary, but I don't want to go too far into cost creep. The problem you may have is finding one large enough to hold your mould frame. I've seen used ones pretty cheap on craigslist or fleabay. I would avoid trying to make your own but you could probably find a cheap pump. Also you could try a dental vibrator table to remove bubbles, I think you can pick up a small one for under $40.
I have mainly been thinking to degas the urethane before pouring, and I'll never be pouring much at a time, so I wouldn't think I'd need a large vacuum chamber, only one large enough to hold a six or eight ounce cup. Think I need to degas the whole mold after pouring? If so, then I would indeed need a much larger chamber. Perhaps it would be feasible to degas the urethane and then vibrate the mold. You can probably pick up a vacuum chamber for around $100, its the pump that kills you. When I vacuum I degas the mixture, whether it is mould rubber or investment or whatever, in the bowl as you suggest, then vacuum again after it is poured. |
|
|
|
[#34]
Quoted:
You can probably pick up a vacuum chamber for around $100, its the pump that kills you. When I vacuum I degas the mixture, whether it is mould rubber or investment or whatever, in the bowl as you suggest, then vacuum again after it is poured. Thanks. I'll mull my options and may try this if/when I get some of my other bugs worked out. An angled mold box might fit into some of the larger paint can degassers. I like the idea. Even if the bubbles aren't compromising strength as I fear, I would like to be able to produce a more translucent receiver. I'd really love a translucent molding rubber too, so that I could see what I was doing better when cutting a new mold off a template receiver. Had I not already acquired a gallon of Mold Star 30, I might be trying Sorta Clear 37 instead, though the viscosity might be too high for this application. |
|
|
|
[#35]
Thought the plastic was curing too quickly for effective degassing?
|
|
|
|
[#36]
Depends on what kind of plastic you are using. The investment I use has a working time of around 9 minutes. I run it through a vacuum twice in about five minutes.
Don't discount vacuum tables with bell jars. These are pretty common in the jewelry making world. They are generally more expensive than other types but can be found used sometimes. |
|
|
|
[#37]
Quoted:
Thought the plastic was curing too quickly for effective degassing? Maybe, but if so, Smooth-On has other plastics with longer pot life. (It's pot life which concerns me most right now. In these big molds, I don't think curing time is as much of an issue, though Boris had a different experience with 300 than I had with 325.) Re. the hardness of the casting, there are two interesting notes in the technical bulletin for the Smooth-On "Color Match" urethanes, like Smooth Cast 325:
The former may partially explain why my first casting was too limp to support the magazine well or fire control cavity at the time that I pulled it, which was at twice the supposed cure time. (The other explanation would involve the volume of the mold I used.) The latter means I'll use an oven to post-cure future castings. It will be interesting to see if that makes the receiver a bit stiffer. As is, I can flex the mag well and fire-control cavities of my second casting by hand, though I can no longer easily bend the receiver end to end as I could even a few hours after I pulled it last night. Could be when post-cured properly these receivers won't need as much reinforcement end-to-end as I had thought and may instead need only the rear reinforced. |
|
|
|
[#38]
Quoted:
You can probably pick up a vacuum chamber for around $100, its the pump that kills you. When I vacuum I degas the mixture, whether it is mould rubber or investment or whatever, in the bowl as you suggest, then vacuum again after it is poured. Quoted:
Quoted:
Quoted:
Quoted:
An interesting side effect of working with a translucent plastic is that I can clearly see thousands upon thousands of tiny bubbles in the plastic (more in the second casting than in the first). This makes me wonder what I can do to degass better before casting. Can a vacuum can be set up inexpensively? Are there other techniques I can try? Is the bubbling worth worrying about at all? Define cheap. Thanks for the answer. Good point. Under $100, I suppose. More if necessary, but I don't want to go too far into cost creep. The problem you may have is finding one large enough to hold your mould frame. I've seen used ones pretty cheap on craigslist or fleabay. I would avoid trying to make your own but you could probably find a cheap pump. Also you could try a dental vibrator table to remove bubbles, I think you can pick up a small one for under $40.
I have mainly been thinking to degas the urethane before pouring, and I'll never be pouring much at a time, so I wouldn't think I'd need a large vacuum chamber, only one large enough to hold a six or eight ounce cup. Think I need to degas the whole mold after pouring? If so, then I would indeed need a much larger chamber. Perhaps it would be feasible to degas the urethane and then vibrate the mold. You can probably pick up a vacuum chamber for around $100, its the pump that kills you. When I vacuum I degas the mixture, whether it is mould rubber or investment or whatever, in the bowl as you suggest, then vacuum again after it is poured. AC Vacuum pump from Harbor Freight? |
|
|
|
[#39]
|
|
|
|
[#40]
Where do I get the pink pigment |
|
|
|
[#41]
Quoted:
First, I need to thank Boris for introducing this new and intriguing way to create a lower. Over the past week, I’ve fallen down a bit of a rabbit hole trying to replicate his success, and while I so far have fallen far short, I’ve learned a few things through my mistakes which I will share here. Advice to those who try this:... Thanks for the info. I'm going to take it all to heart as I try it this weekend. I'm awash in Legos, so gluing or sealing the walls beforehand won't be a problem. ) |
|
|
|
[#42]
AC Vacuum pump from Harbor Freight? Maybe, if it pulls 25-30 inches Hg in about 30 seconds it should work. Edit to add: You need to be able to see into the chamber so it will at least need a clear lid. Therefore the painter's pressure bucket pictured in this thread won't work. |
|
|
|
[#43]
Quoted:
Maybe, if it pulls 25-30 inches Hg in about 30 seconds it should work. Edit to add: You need to be able to see into the chamber so it will at least need a clear lid. Therefore the painter's pressure bucket pictured in this thread won't work. Quoted:
AC Vacuum pump from Harbor Freight? Maybe, if it pulls 25-30 inches Hg in about 30 seconds it should work. Edit to add: You need to be able to see into the chamber so it will at least need a clear lid. Therefore the painter's pressure bucket pictured in this thread won't work. Sounds like a 2 stage approach might work - use a pneumatic vacuum pump to draw down fast, then a positive displacement pump to take it from there. |
|
|
|
[#44]
Quoted:
I'm going to take it all to heart as I try it this weekend. I'm awash in Legos, so gluing or sealing the walls beforehand won't be a problem. ) Quoted:
I'm going to take it all to heart as I try it this weekend. I'm awash in Legos, so gluing or sealing the walls beforehand won't be a problem. ) I'd recommend sealing with something a little soft just so you can change the configuration as your plans evolve. If you do have the box well sealed, it's possible the $30 trial kit of Mold Star will be enough, but I'm not 100% sure of that. Might be best to have two trial kits on hand just in case. After I initially ran out, I drove immediately to our local Smooth-On dealer for a gallon then straight back home to pour more about 90 minutes later. I cannot find any seam in the mold between the two layers. In retrospect, I should have simply bought a second trial kit, since I'm now a little concerned about using the rest of the gallon before it goes off. The product literature says it has a limited shelf life, but doesn't specify how limited (probably varies a lot by storage temperature). Boris, et al., any experience on shelf life of Mold Star 30, especially once opened? Quoted:
Edit to add: You need to be able to see into the chamber so it will at least need a clear lid. Therefore the painter's pressure bucket pictured in this thread won't work. As I'm new to all of this, could you elaborate on the reason why you need to be able to see? I'm not in any way doubting you, just curious and needing to learn. Edit to add: I just weighed the second casting on my coffee scale, and it comes in at 3.26 oz / 92.5 g (two measurements on different scales, not unit conversion on my part). Considering my Aero lower weighs 8.35 oz., a Balios Lite weighs 6.5, and a Mag Tactical weighs 5.88, I agree with Boris that there is a lot of reinforcement which can be done before approaching the weight of an aluminum casting. The trick will be to reinforcing the right parts the right amount. I have a tendency towards overkill in my armchair engineering, so I may be the first chap ever to cast a 9 oz. polymer lower. |
|
|
|
[#45]
You have to watch as you vacuum. Once you are drawing enough pressure you will see bubbles rise. The boiling will become more violent and your resin will rise and continue to boil. At some point the resin will drop. It isn't much, for instance when I'm vacuuming 2 lbs of investment it may drop about 1/2". But you will see it, when this happens its time to release the valve and turn off the pump. That is the point when the air bubbles have been removed, beyond that you are boiling investment and drawing water from it. Different chemicals react differently (you aren't removing water from plastic) but I can't think of anything good happening after you have removed all bubbles in your resin.
|
|
|
|
[#46]
Great info and explanation! Thank you.
|
|
|
|
[#47]
Quoted:
I'm not an expert, but a lot of the impact to the lower receiver comes from the buffer slamming into the buffer retainer pin. Every time the weapon cycles, the buffer is slamming into that pin, which then distributes the force toward the receiver. I'd wager that is what is causing these plastic lowers to crack on that rear portion. In a properly dimensioned receiver this never happens. The back of the bolt carrier pushes the buffer back off the retainer as the two halves close and the retainer is only there to make reopening the two halves easier and less messy. |
|
|
|
[#48]
Quoted:
In a properly dimensioned receiver this never happens. The back of the bolt carrier pushes the buffer back off the retainer as the two halves close and the retainer is only there to make reopening the two halves easier and less messy. Quoted:
Quoted:
I'm not an expert, but a lot of the impact to the lower receiver comes from the buffer slamming into the buffer retainer pin. Every time the weapon cycles, the buffer is slamming into that pin, which then distributes the force toward the receiver. I'd wager that is what is causing these plastic lowers to crack on that rear portion. In a properly dimensioned receiver this never happens. The back of the bolt carrier pushes the buffer back off the retainer as the two halves close and the retainer is only there to make reopening the two halves easier and less messy. This^^^^^ However, you also hit another good point. "Less messy" certainly not required though. My Bushy branded Carbon-15 does not have a buffer retainer. That could be the difference between breaking the lower in under 400 rounds and pushing past 4000. |
|
|
|
[#49]
Yes, removing every point of failure is good. I'm going with adjustable 1/4" clevis pins so I don't need those two detent holes. Also, I'm going to build up those areas with clay to make them deeper so they're less likely to fracture there so the longer pins will help with that too. I'm also trying to figure out doing away with the selector detent too. Maybe nubs the lever rides over? (Yeah. They'll wear...)
How did Cav Arms handle the selector detent when the stock and grip was all one piece? Also, I'd like to remind everyone that making your own blue guns is even easier than an AR receiver, for training or holster making. Especially since certain makers decided that they won't sell them to us mere peons. http://www.blueguns.com/shopdisplayproducts.asp?id=37&cat=Glock |
|
|
|
[#50]
Quoted:
How did Cav Arms handle the selector detent when the stock and grip was all one piece? They drilled the hole from the top of the receiver down past the selector. You drop in the spring and then the plunger. |
|
|
 Win a FREE Membership!
Sign up for the ARFCOM weekly newsletter and be entered to win a free ARFCOM membership. One new winner* is announced every week!
You will receive an email every Friday morning featuring the latest chatter from the hottest topics, breaking news surrounding legislation, as well as exclusive deals only available to ARFCOM email subscribers.

AR15.COM is the world's largest firearm community and is a gathering place for firearm enthusiasts of all types.
From hunters and military members, to competition shooters and general firearm enthusiasts, we welcome anyone who values and respects the way of the firearm.

Subscribe to our monthly Newsletter to receive firearm news, product discounts from your favorite Industry Partners, and more.
Copyright © 1996-2024 AR15.COM LLC. All Rights Reserved.
Any use of this content without express written consent is prohibited.
AR15.Com reserves the right to overwrite or replace any affiliate, commercial, or monetizable links, posted by users, with our own.


