|
[#1]
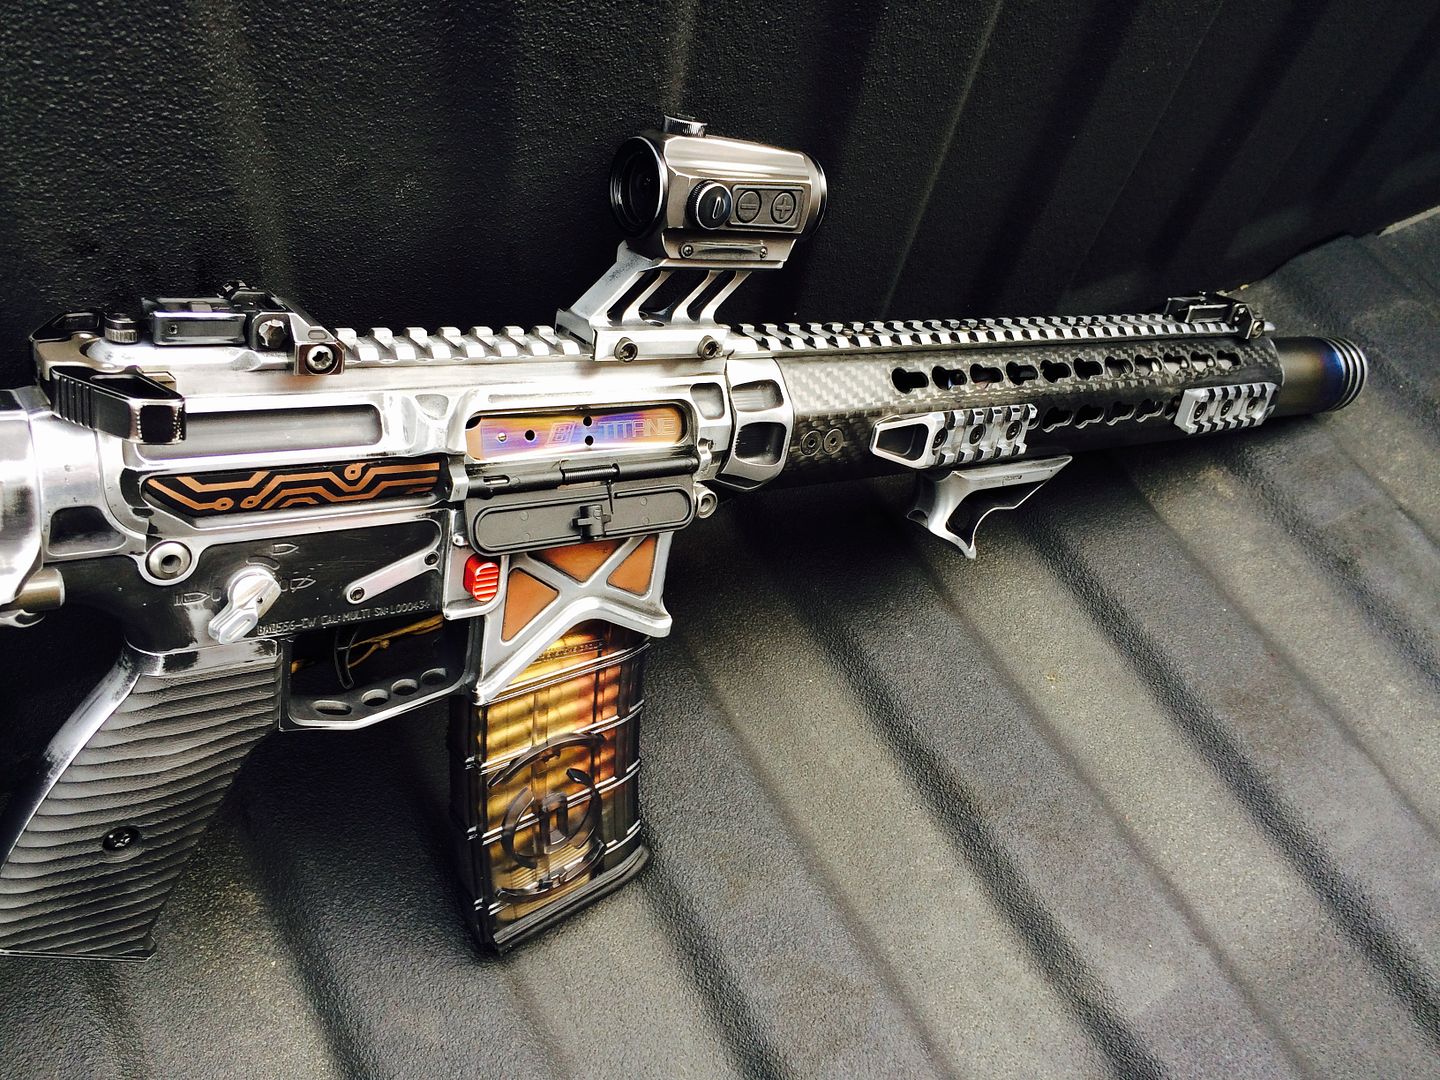
What is the best way to get the aluminum that faded/worn on the edges?
|
|
|
|
[#2]
Nice job.
|
|
|
|
[#3]
Quoted:
What is the best way to get the aluminum that faded/worn on the edges? Know anyone with a gravel driveway? 
Scotch Brite works well. |
|
|
|
[#4]
Quoted:
What is the best way to get the aluminum that faded/worn on the edges? The best way is to sand it after flashing the cerakote for 15 min. It's not fully hardened and will allow you to sand it easier. I start with red scotch brite the heavy use areas then move on to 400 grt all the way to 1000 grt. |
|
|
|
[#5]
Excellent work!
OST |
|
|
|
[#6]
So freak in cool. Wish I was that creative!
|
|
|
|
[#7]
Quoted:
Love it ! I think the mag looks too new , with all the finish work you put into the rest of it , maybe a distressed gi mag is in order . I agree, something is in the works. |
|
|
|
[#8]
Thanks. I like the sight and charging handle look. The whole thing is ridiculously kick ass. Great job
|
|
|
|
[#9]
Pretty sweet!
Amazing work. |
|
|
|
[#10]
Amazing! As a star wars fan this is a dangerous thread for me... Gives me ideas...
|
|
|
|
[#11]
Love it! One of the coolest builds I have seen in years. Ok, I have to ask how much does it weight?
|
|
|
|
[#12]
Beautiful work...

|
|
|
|
[#13]
Quoted:
Love it! One of the coolest builds I have seen in years. Ok, I have to ask how much does it weight? I have not weighed it yet, but i dont expect it to break any records with the heavy pdw stock. I'll get a weight this afternoon |
|
|
|
[#14]
|
|
|
|
[#15]
Quoted:
Pretty sweet! Amazing work. Thank you Sir, and thanks again for your help! |
|
|
|
[#16]
Quoted:
Thank you Sir, and thanks again for your help! Quoted:
Quoted:
Pretty sweet! Amazing work. Thank you Sir, and thanks again for your help! Any time! |
|
|
|
[#17]
Quoted:
Love it! One of the coolest builds I have seen in years. Ok, I have to ask how much does it weight? Weight without suppressor is: 5 lbs - 15 oz with suppressor: 7 lbs |
|
|
|
[#18]
This is badass!!
|
|
|
|
[#19]

|
|
|
|
[#20]
Beautiful. Absolutely beautiful.
|
|
|
|
[#21]
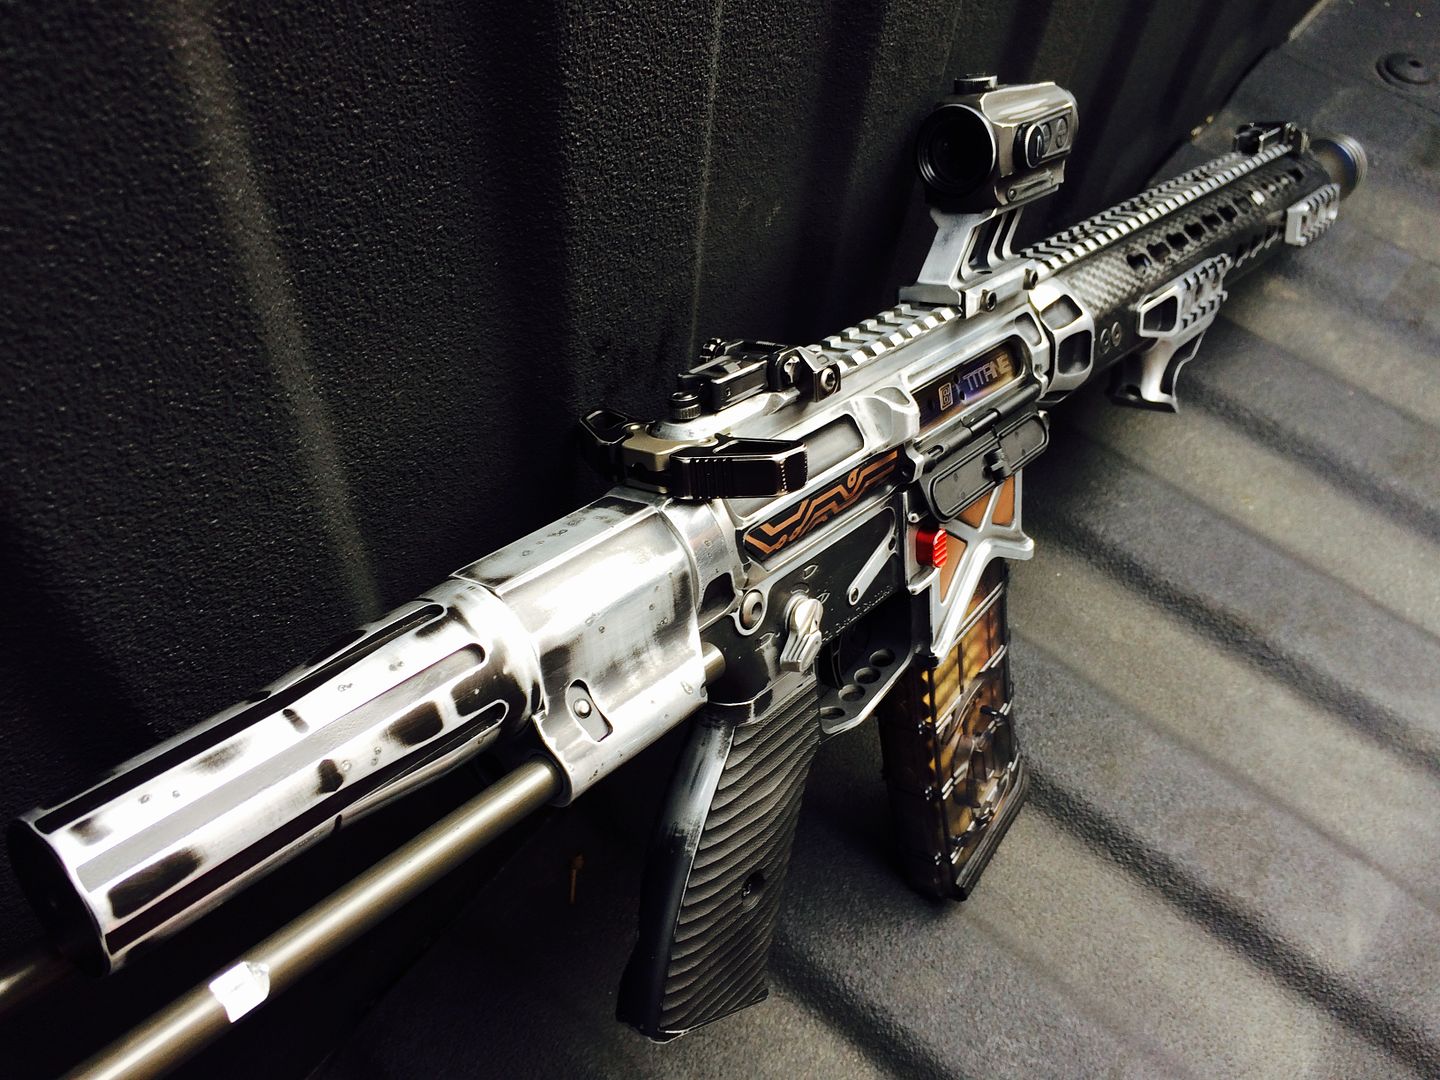
Scarr, work of art! Love all the subtle detail right down to the worn charge handle, while it should be behind glass, I bet it shoots good and is reliable.
You mentioned not being able to capture the polished parts with your camera, try a white sheet over it and a tripod. A sorta "soft box". Product photogs use these.you can then open the ISO on the camera to capture the right light without being blurred. I made a frame out of pvc and laid a sheet over it and used a small/short tripod once with good results. |
|
|
|
[#22]
This thread needs video of it being fired. I love this build.
|
|
|
|
[#23]
Cool Tie fighter mag. I would either use that, or this one for a Darth Vader rifle.

|
|
|
|
[#24]
WOW!!!! That turned out awesome
How many hours did you spend customizing that work of art? Cheers Shannon |
|
|
|
[#25]
Sorry if it was posted, but is that a cover over the ejection port or what the heck did you use/do for a BCG?
|
|
|
|
[#26]
Quoted:
Sorry if it was posted, but is that a cover over the ejection port or what the heck did you use/do for a BCG? Looks like heat-anodized titanium. |
|
|
|
[#27]
I love how you modded the rail on top of the hand guard. That pretty much the only thing holding me back right now on buying this set. I just don't think I could have the rail on the receiver and the hand guard not match. Because of that I'm leaning more towards the 2A set.
|
|
|
|
[#28]
Quoted:
Looks like heat-anodized titanium. Quoted:
Quoted:
Sorry if it was posted, but is that a cover over the ejection port or what the heck did you use/do for a BCG? Looks like heat-anodized titanium. It does and if that is the case, I would still like to know what carrier was used since I've never seen one that is so flat-sided. Edit: After closer inspection, to me it seems as if he has a very thin plate fastened inside the upper receiver with the gas ports drilled in to match the carrier. |
|
|
|
[#29]
Boomfab Titane carrier .
|
|
|
|
[#30]
Quoted:
Boomfab Titane carrier . Awesome thanks! |
|
|
|
[#31]
Quoted:
Scarr, work of art! Love all the subtle detail right down to the worn charge handle, while it should be behind glass, I bet it shoots good and is reliable. You mentioned not being able to capture the polished parts with your camera, try a white sheet over it and a tripod. A sorta "soft box". Product photogs use these.you can then open the ISO on the camera to capture the right light without being blurred. I made a frame out of pvc and laid a sheet over it and used a small/short tripod once with good results. Thanks, it is a great shooter. I'll take your advise on the lighting box. I have been wanting to build something to take better pictures. Thanks for the help, Scarr |
|
|
|
[#32]
Quoted:
I love how you modded the rail on top of the hand guard. That pretty much the only thing holding me back right now on buying this set. I just don't think I could have the rail on the receiver and the hand guard not match. Because of that I'm leaning more towards the 2A set. Thanks, i made a matching rail for my 2A build a while back. 
|
|
|
|
[#33]
Quoted:
Awesome thanks! Quoted:
Quoted:
Boomfab Titane carrier . Awesome thanks! You will have to polish the area of the dust port first before heat anodizing the Titane to get this effect. And let me tell you its a pain in the ass! The coating is ridiculously hard. |
|
|
|
[#34]
Quoted:
WOW!!!! That turned out awesome How many hours did you spend customizing that work of art? Cheers Shannon Thank you! I have no idea but its a lot! lol i should of kept track of it just to get a idea of how long something like this takes. I'll be building a Jedi version next and i'll keep track of that one. I cant even guess on this one, there are so many modifications. |
|
|
|
[#35]
Quoted:
Thanks, i made a matching rail for my 2A build a while back. <a href="http://s81.photobucket.com/user/anibal999r/media/lw-5.jpg.html" target="_blank">http://i81.photobucket.com/albums/j203/anibal999r/lw-5.jpg</a> Quoted:
Quoted:
I love how you modded the rail on top of the hand guard. That pretty much the only thing holding me back right now on buying this set. I just don't think I could have the rail on the receiver and the hand guard not match. Because of that I'm leaning more towards the 2A set. Thanks, i made a matching rail for my 2A build a while back. <a href="http://s81.photobucket.com/user/anibal999r/media/lw-5.jpg.html" target="_blank">http://i81.photobucket.com/albums/j203/anibal999r/lw-5.jpg</a> You dirty dog you! Looks great! |
|
|
|
[#36]
Quoted:
Thanks, i made a matching rail for my 2A build a while back. <a href="http://s81.photobucket.com/user/anibal999r/media/lw-5.jpg.html" target="_blank">http://i81.photobucket.com/albums/j203/anibal999r/lw-5.jpg</a> Quoted:
Quoted:
I love how you modded the rail on top of the hand guard. That pretty much the only thing holding me back right now on buying this set. I just don't think I could have the rail on the receiver and the hand guard not match. Because of that I'm leaning more towards the 2A set. Thanks, i made a matching rail for my 2A build a while back. <a href="http://s81.photobucket.com/user/anibal999r/media/lw-5.jpg.html" target="_blank">http://i81.photobucket.com/albums/j203/anibal999r/lw-5.jpg</a> Did you mill down the rail on a KMR handguard? Looks nice, and probably the only way to make that even lighter! |
|
|
|
[#37]
Quoted:
Did you mill down the rail on a KMR handguard? Looks nice, and probably the only way to make that even lighter! Quoted:
Quoted:
Quoted:
I love how you modded the rail on top of the hand guard. That pretty much the only thing holding me back right now on buying this set. I just don't think I could have the rail on the receiver and the hand guard not match. Because of that I'm leaning more towards the 2A set. Thanks, i made a matching rail for my 2A build a while back. <a href="http://s81.photobucket.com/user/anibal999r/media/lw-5.jpg.html" target="_blank">http://i81.photobucket.com/albums/j203/anibal999r/lw-5.jpg</a> Did you mill down the rail on a KMR handguard? Looks nice, and probably the only way to make that even lighter! Thanks, yeah I milled it down. The rifle it went on ended up weighing 3 lbs 9 oz with iron sights and red dot. |
|
|
|
[#38]
You, sir, have much skill.
|
|
|
|
[#39]
this looks like it has a lot of potential out of the box:


http://www.ar15news.com/2015/07/22/head-turning-ars-cobalt-kinetics/ |
|
|
|
[#40]
Quoted:
this looks like it has a lot of potential out of the box: http://www.ar15news.com/wp-content/uploads/2015/07/10467013_741724565933846_5638000382566092863_o.jpg http://www.ar15news.com/wp-content/uploads/2015/07/Cobalt-Kinetics-BAMF-AR-Rifle-2.jpg http://www.ar15news.com/wp-content/uploads/2015/07/Cobalt-Kinetics-BAMF-AR-Rifle-3.jpg http://www.ar15news.com/wp-content/uploads/2015/07/Cobalt-Kinetics-BAMF-AR-Rifle-5.jpg http://www.ar15news.com/wp-content/uploads/2015/07/Cobalt-Kinetics-BAMF-AR-Rifle-6.jpg http://www.ar15news.com/2015/07/22/head-turning-ars-cobalt-kinetics/ Yes it does, some cool grafix and it's pretty much done. I've seen the gold one on instagram |
|
|
|
[#41]
just caught up to the current posts on this and realized I was replying to last month, your very first photos of the ar. LOL
-- even in it's current condition, this is one of the coolest things I've seen done to an AR. I really like how you mostly cleaned off all the black but didn't just buff and polish but left it looking "used" and slightly battered. (top pic). Lower pic appears to be all polished on the other hand. very cool and really looking forward to the finished product. :) |
|
|
|
[#42]
Quoted:
So i played with it some more, this is just a mock up assembly i'm still missing some aluminum rail panels. I also still need to age the rail, iron sights, aimpoint and mount. Please excuse the dirty gun bench, it gets this way with every build then i clean it up. <a href="http://s81.photobucket.com/user/anibal999r/media/FullSizeRender%203.jpg.html" target="_blank">http://i81.photobucket.com/albums/j203/anibal999r/FullSizeRender%203.jpg</a> <a href="http://s81.photobucket.com/user/anibal999r/media/FullSizeRender%204_1.jpg.html" target="_blank">http://i81.photobucket.com/albums/j203/anibal999r/FullSizeRender%204_1.jpg</a> WOW this is awesome. excellent work. what a beautiful ar. and the glare that will come off that thing will resemble the actual lighted part of the light saber. LOL |
|
|
|
[#43]
Quoted:
Quoted:
I just need to throw in some random circuitry for decoration and the crystal chamber will be complete. I cant figure out how to post a youtube video if anyone can help that would be awesome. Thanks, I believe you would make the link like this (without the quotes) : ["youtube]pDnyM--HgoY[/youtube"] which is cut down from the actual youtube link https://www.youtube.com/watch?v=pDnyM--HgoY  Crystal chamber apparently this won't post yet either till I hit the magic number of 50 posts. :) take the last link above this and post it from yourself and I believe it should do the trick for you. |
|
|
 Win a FREE Membership!
Sign up for the ARFCOM weekly newsletter and be entered to win a free ARFCOM membership. One new winner* is announced every week!
You will receive an email every Friday morning featuring the latest chatter from the hottest topics, breaking news surrounding legislation, as well as exclusive deals only available to ARFCOM email subscribers.

AR15.COM is the world's largest firearm community and is a gathering place for firearm enthusiasts of all types.
From hunters and military members, to competition shooters and general firearm enthusiasts, we welcome anyone who values and respects the way of the firearm.

Subscribe to our monthly Newsletter to receive firearm news, product discounts from your favorite Industry Partners, and more.
Copyright © 1996-2024 AR15.COM LLC. All Rights Reserved.
Any use of this content without express written consent is prohibited.
AR15.Com reserves the right to overwrite or replace any affiliate, commercial, or monetizable links, posted by users, with our own.