|
[Last Edit: AFCarbon15]
[#1]
I got it cheap and it's hard to find a cheap lathe with that long of a bed and swing. It's good enough for most barrel work. I have a smaller older lathe too.
ETA: I used it last night to cut, crown and rethread a 16" barrel to 14.7. Came out right at 16.1" with the pinned standard A2. I did chip the carbide on my last pass threading. Not sure what happened there. I had just threaded 2 old barrel cut offs just testing the feed rates and tooling. It cleaned up rather well and I welded the A2 anyway. Not like I am going to be direct attaching a suppressor daily. I'll try some different inserts next time. Hopefully by then I'll have the DROs installed. |
|
|
|
|
[Last Edit: AFCarbon15]
[#2]
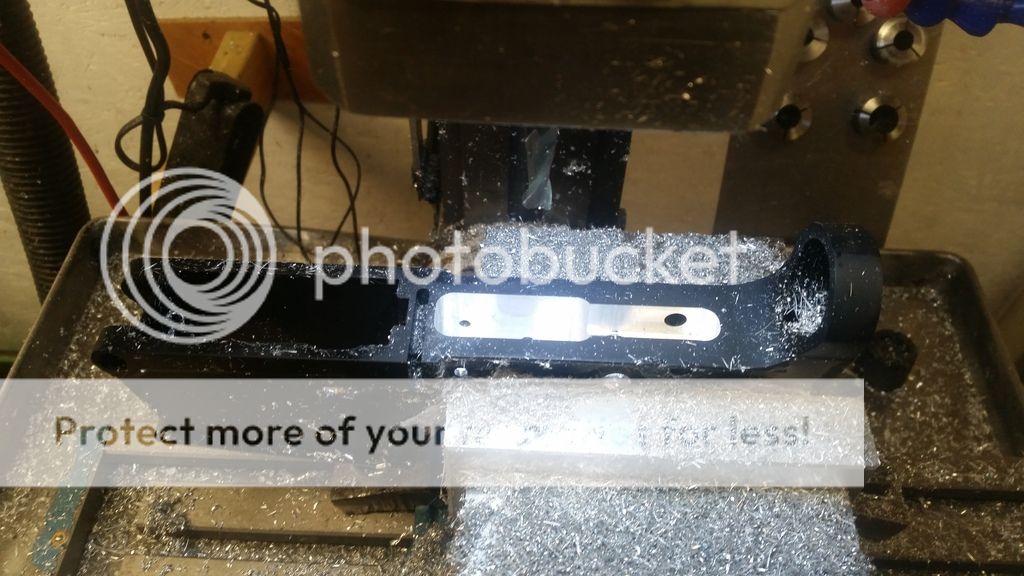
Some times I get carried away and forget to take pics...
Already been in and out of the lathe, in and out of the mill, and back into the lathe. 
A few lines just because 
I got a deal on this steel, supposed to be 1018, but it seems to machine a little better than 1018. I can't even tell you why I tried it, but something I made with it a while ago, I heated to around 400f, then quenched in used synthetic. Yes, the dirty oil from my truck. Sounds crazy I know, but the finish is better than anything else I'd have to spend a lot more time doing, not to mention it's free. I wish I had the light for taking pictures of small black gun parts. 
A little better angle 
Wasn't sure what I was going to do with it, I just wanted to make one. Luckily it has found a home, for now. 
|
|
|
|
GA, USA
|
[#3]
Well Sir , you do have some talent .
I , on the other hand have none. Keep up the good works . 
gd |
|
|
|
[Last Edit: AFCarbon15]
[#4]
Finally setting up the new lathe with some DRO's. Gonna take me a while to get it all set up as there is nothing designed for these machines and anything you attach to them stands a pretty good chance of being in the way or getting damaged at some point.
Here's some of the work in progress: 


|
|
|
|
TX, USA
|
[#5]
Very cool.
|
|
|
OH, USA
|
[#6]
I wonder of there are any plans on making a broach on line. It can't be that hard. Make it cut one corner at a time.
|
|
|
|
[Last Edit: AFCarbon15]
[#7]
Originally Posted By batmanacw: I wonder of there are any plans on making a broach on line. It can't be that hard. Make it cut one corner at a time. Yes there are. But I haven't seen any specifically for doing magwells. Also my mini mill is not solid enough for broaching large areas. |
|
|
|
|
[Last Edit: AFCarbon15]
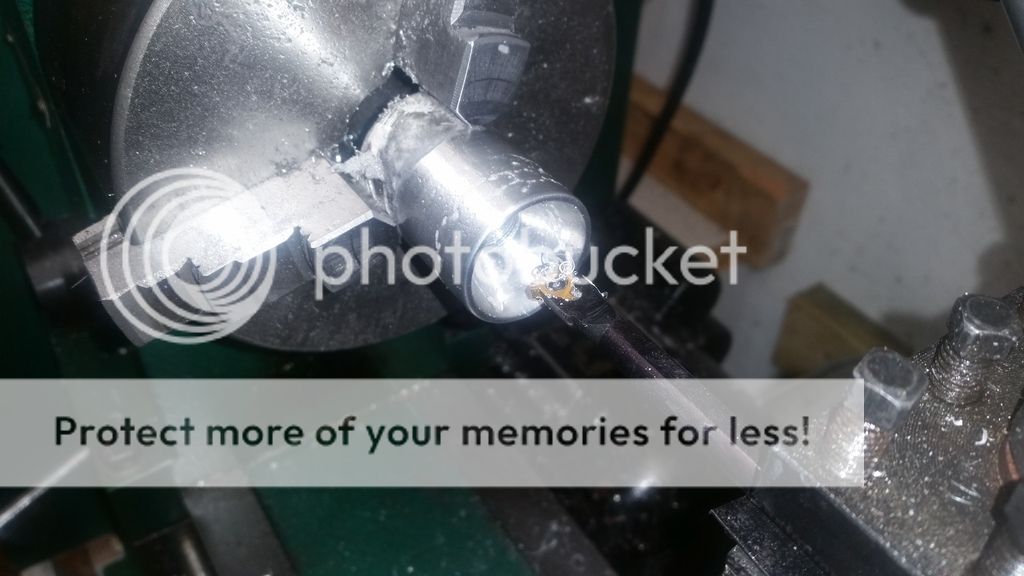
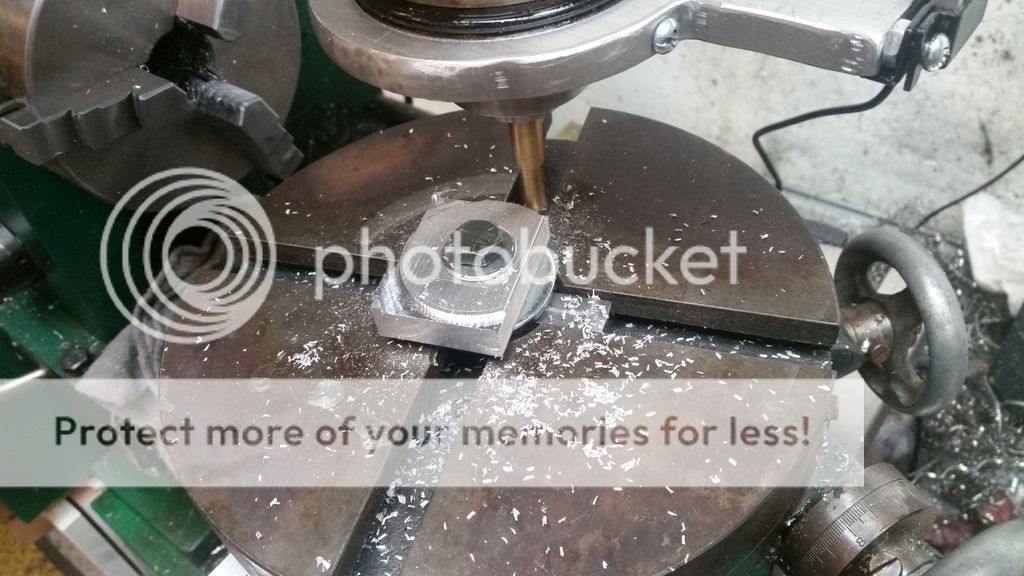
[#8]
I took a break from the DRO's on the multi machine.

It's an Alexandria Pro-Fab upper. Hoping to be impressed, but for sub $500 for a complete 308 upper, I can't imagine being very disappointed. I haven't decided for sure yet, but I am leaning toward a PRS stock. |
|
|
|
|
[Last Edit: AFCarbon15]
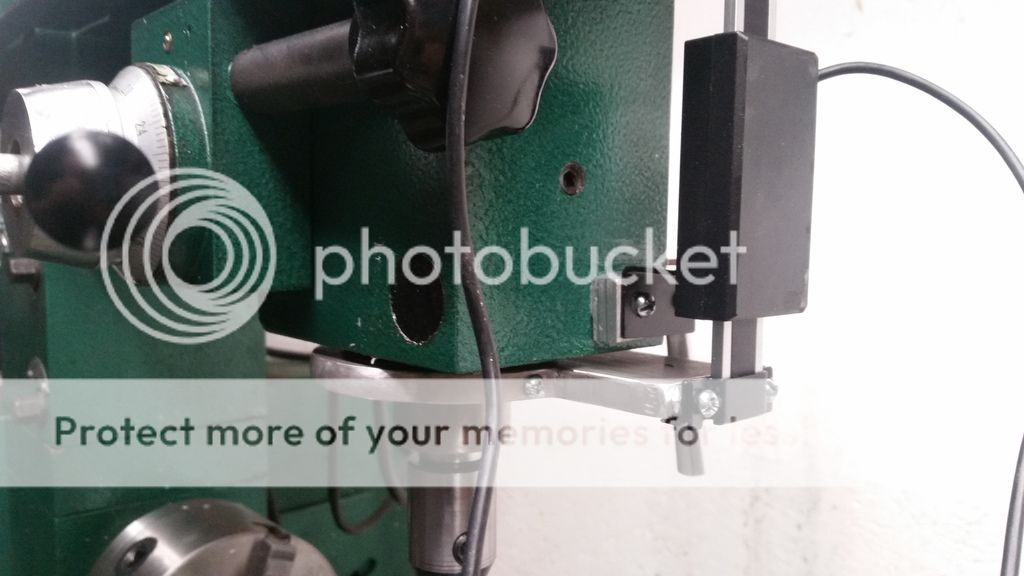
[#9]
Then more work on the 3 in 1.
Z axis DRO spindle mount. Again, I am not a machinist. I forgot to lock down the older than me palmgren, oh well, didn't néed to be pretty. 
|
|
|
|
|
[#10]
Very cool stuff. Thank You.
What brand / source DRO's are you using for the lathe? I have a iGaging for length on the bed, but cannot find one for the cross slide that will do a dia instead of a radius. Just cannot wrap my head around mentally dividing by 2 all the time, 'cause I are teh stupidz. |
|
|
|
|
[Last Edit: AFCarbon15]
[#11]
I'm using the igaging too. Guess I never really thought about it. Do such read outs exist? The dials are radius (actual travel) I just assumed all the DRO's were too.
|
|
|
|
MI, USA
|
[#12]
Originally Posted By AFCarbon15:
I'm using the igaging too. Guess I never tlreally thought about it. Do such read outs exist? The dials are radius (actual travel) I just assumed all the DRO's were too. The dials on my Cincinnati are diameter. You'd have to divide everything by two. Most lathes I've worked on are diameter, but a few have been radial. It can get confusing. If I'm new to a lathe I'll do a test cut to see what it's taking off. |
|
|
TX, USA
|
[#13]
I am outfitting my G0704 with DRO.
I thought of iGaging but honestly I just don't know how good they are. I heard mixed reviews and that the Absolute DRO is worth the money, but for the cost of the Absolute DRO I felt it was better getting a Chinese DRO with glass scales... so that's what I got: http://www.ebay.com/itm/262055711047?_trksid=p2057872.m2749.l2649&ssPageName=STRK%3AMEBIDX%3AIT I'm not sure but I read those DRO units can actually do things like bolt hole pattern (basically get it so that it gives you a waypoint to go to, and all you have to do is move it until it reads zero, and it gives you a perfect pattern that is as accurate as your scales will allow). I also read they can do arc machining (same thing, move your mill to its waypoint and it gives you an arc). I even read units like this can accept data connections via USB or something, and you could essentially feed waypoint data from your computer into it... If so I could think of it as a manual CNC machine... machine out complex shape without CNC by giving me waypoints.... Definitely tedious but for one off production, maybe not so much... |
|
|
CO, USA
|
[#14]
Originally Posted By AFCarbon15:
Let me start by saying I'm no machinist, but I bought my LMS Mini Mill last year. Been learning from my mistakes ever since. . Where did you get the mill from? |
|
|
|
[#15]
Originally Posted By Inej:
Where did you get the mill from? Originally Posted By Inej:
Originally Posted By AFCarbon15:
Let me start by saying I'm no machinist, but I bought my LMS Mini Mill last year. Been learning from my mistakes ever since. . Where did you get the mill from? I bought the little machine shop mini-mill directly from LMS. The Grizzly 3 in 1, I snagged from craigslist. |
|
|
|
OH, USA
|
[#16]
Originally Posted By AFCarbon15:
Yes there are. But I haven't seen any specifically for doing magwells. Also my many mill is not solid enough for broaching large areas. Originally Posted By AFCarbon15:
Originally Posted By batmanacw:
I wonder of there are any plans on making a broach on line. It can't be that hard. Make it cut one corner at a time. Yes there are. But I haven't seen any specifically for doing magwells. Also my many mill is not solid enough for broaching large areas. I was thinking a self guiding broach you could press through with a press. |
|
|
|
[#17]
Originally Posted By taiwanluthiers:
I am outfitting my G0704 with DRO. I thought of iGaging but honestly I just don't know how good they are. I heard mixed reviews and that the Absolute DRO is worth the money, but for the cost of the Absolute DRO I felt it was better getting a Chinese DRO with glass scales... so that's what I got: http://www.ebay.com/itm/262055711047?_trksid=p2057872.m2749.l2649&ssPageName=STRK%3AMEBIDX%3AIT I'm not sure but I read those DRO units can actually do things like bolt hole pattern (basically get it so that it gives you a waypoint to go to, and all you have to do is move it until it reads zero, and it gives you a perfect pattern that is as accurate as your scales will allow). I also read they can do arc machining (same thing, move your mill to its waypoint and it gives you an arc). I even read units like this can accept data connections via USB or something, and you could essentially feed waypoint data from your computer into it... If so I could think of it as a manual CNC machine... machine out complex shape without CNC by giving me waypoints.... Definitely tedious but for one off production, maybe not so much... I think that would be a great choice. They appear to be pretty user friendly. The complete package would be a much better setup over all compared to the igaging. I'll get some more pics up in a few days, nothing will happen overnnight, but I have a lot of plans in the works. 
|
|
|
|
|
[Last Edit: AFCarbon15]
[#18]
|
|
|
|
CA, USA
|
[#19]
A while ago, I pursued the TouchDRO project. While I was able to make it work fairly easily with the mill off, I was unable to get stable display readings when I turned the mill on.
Readings would jump around on all 3 axes. I assumed it was noise induced from the mini-mill motor, but haven't had the time to really figure out a solution. 
|
|
|
|
[Last Edit: AFCarbon15]
[#20]
Finally got around to making a case. I scored some acrylic from a sale at work a few years ago, this is the first I've used it. It machines rather well. I didn't polish anything as it's on the back of the mill anyway. Maybe one day I'll move it out to show it off and polish the case then.
I messed up and cut the relief for the power connection in the top half on the wrong end. Oh well. |
|
|
|
|
[#21]
Originally Posted By BroadSideOfADime:
A while ago, I pursued the TouchDRO project. While I was able to make it work fairly easily with the mill off, I was unable to get stable display readings when I turned the mill on. Readings would jump around on all 3 axes. I assumed it was noise induced from the mini-mill motor, but haven't had the time to really figure out a solution. http://i64.tinypic.com/11i214i.jpg Looks like you might have the exact same mill. I only get the ten thousandths position jumping around. And only + or - .0003 when it does. Not on all 3 axes though. So like you, I'm assuming it's noise. I haven't really tried isolating anything yet. I have only moved the wires a little. Next move it to completely re-route the wires. Then separate the power supplies. Replace the usb leads from igaging. (I hear they are basically garbage) If I'm still having issues worth investing time into, I'll play with grounding. But honestly, what I have now is usable. |
|
|
|
TX, USA
|
[#22]
I finally finished installing my DRO unit...


It isn't straightforward, there are no instruction of any kind, and I felt like I should have thought about the DRO scale choice a little better, for example choosing slim scale for the X as well as the Y. The slim scale is much smaller than the normal scale and would have been easier to install. Once in though, the unit performs flawlessly. It's a 5um scale so it's accurate by at least that much, meaning I can position the table accurately to the 5th decimal place if I really want to (it means tightening the gibs and moving the handwheel ever so slightly). There is no jumping around or anything that I heard the igaging scale has been known to do. One serious benefit it has over igaging scale is that the display screen is a computer as well (not just a display screen) and can do things like arc machining (machine a rounded corner or curve without CNC), series of holes in a straight line at an angle, without repositioning the vise and therefore having to indicate it again, bolt hole circle, find center, etc. It's not quite as complete as DRO Pros/Easson but DRO Pros also costs a lot more. |
|
|
|
[#23]
Originally Posted By taiwanluthiers:
It isn't straightforward, there are no instruction of any kind Originally Posted By taiwanluthiers:
It isn't straightforward, there are no instruction of any kind It can be quite intimidating drilling holes in your brand new $1000 mill. Originally Posted By taiwanluthiers:
One serious benefit it has over igaging scale is that the display screen is a computer as well (not just a display screen) and can do things like arc machining (machine a rounded corner or curve without CNC), series of holes in a straight line at an angle, without repositioning the vise and therefore having to indicate it again, bolt hole circle, find center, etc. That's exactly what the TouchDRO does with the igaging DRO's. So you have it up and running completely now? What projects do you have planned? I have a 1911 frame, some 10/22 parts, some ruger MkIII parts and a couple of oldies, scouts, favorites and rolling blocks. I need to make a few parts for those and want to make a complete rolling block from scratch. I'll buy a barrel, and some screws, but that's it, make the rest. |
|
|
|
TX, USA
|
[#24]
I like some ideas but it seems most projects I see involve CNC so unless I'm making objects that's completely square I don't know how to do it.
I like to do a 1911 assuming I can find a frame for under 150 dollars. That's the biggest barrier because the high cost means if I mess up it's that much out the door. |
|
|
|
[#25]
Looks like I'm going to be doing more 308's before I get into anything else.
I think I have the TouchDRO running well now. Just a few more quick tests. Pics to follow. |
|
|
|
|
[#26]
just to add some info and say thanks for the thread.
The igaging DROs you can cut the length of the track down if you need it to fit somewhere and its too long. |
|
|
|
|
[#27]
Originally Posted By nottooslow:
just to add some info and say thanks for the thread. The igaging DROs you can cut the length of the track down if you need it to fit somewhere and its too long. Yes they are easily cut. You can even drll and tap them for mounting. Easy to work with them. I do however want to try some better scales just for comparison purposes. |
|
|
|
|
[#29]
Nice. Be careful - work like that, and the Retro-heads will have you making them original carbine stock mechanisms and dummy XM177 suppressors and grenade rings.
|
|
|
|
MI, USA
|
[#30]
Looks good! That stuff is fun to work with isn't it... Did you get any sparking? Careful with the pile of thin chips you have. Don't want to burn the shop down.
|
|
|
MI, USA
|
[#31]
I saw your comment in gunsmithing about the threads taking forever. Did you turn them in there, or use a tap?
|
|
|
|
[Last Edit: AFCarbon15]
[#32]
Originally Posted By Gordo81:
I saw your comment in gunsmithing about the threads taking forever. Did you turn them in there, or use a tap? I used a tap. I don't have a boring bar small enough to do a 1/2" hole. Although, the time it took to thread it with the tap, I could have made a boring bar and threaded it on the lathe. And yeah, I had fun with the chips. Lit some up on purpose just to see how well it burns. Damn near blinding. Pretty cool to play with it though. |
|
|
|
|
[Last Edit: AFCarbon15]
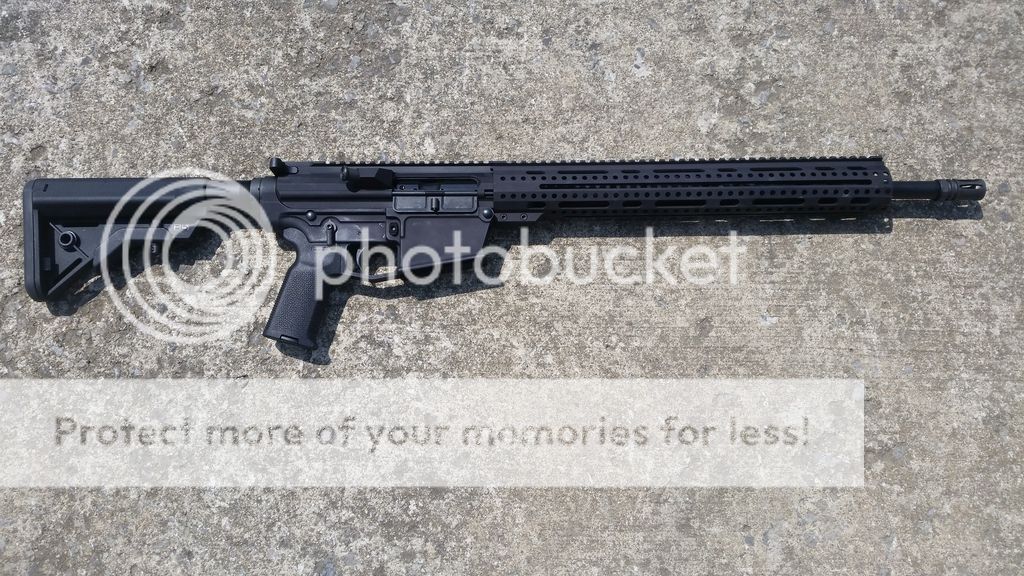
[#33]
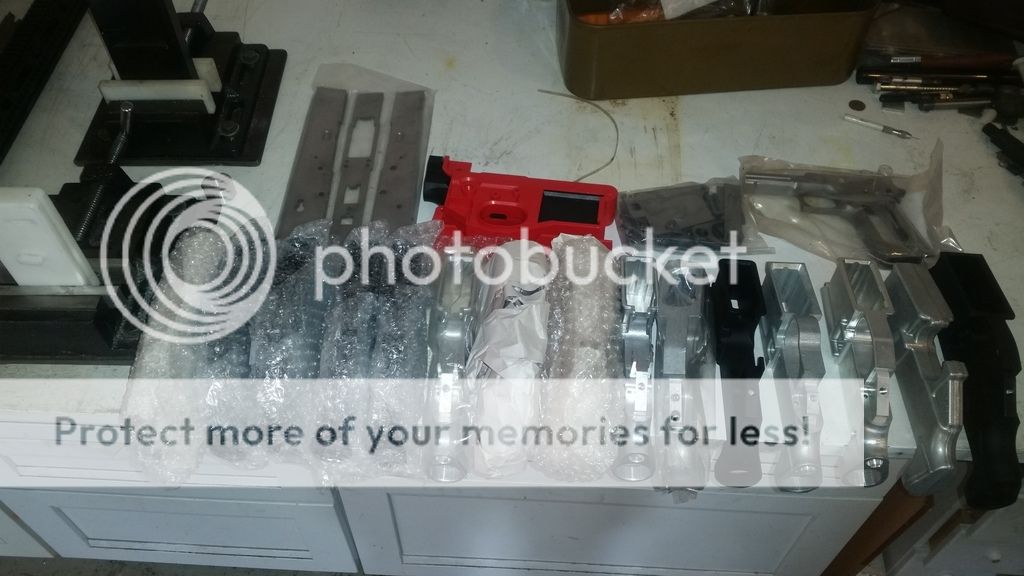
Got to spend a little time in the shop today. Had these parts waiting around long enough I had to get to them. I'm sure it will change a lot, but as is she ran just fine. 100 rds with only 2 failure to fires on an uncocked hammer. I did have a couple of inadvertent bump fires. At first I thought the disconnector was slipping and slam firing, but with the added bolt and buffer weights, the cycling mass makes bump firing doubles and triples fairly easy. Even playing with that, all of the mags worked great. Glock factory G19, G17 & G18, KCI G19 & G18 and the Korean drums.
NFA Glock mag 80% billet lower 
I had to trim the jig a bit in the magwell area 
Got it all ready, from here it's the same as any other 80%'er 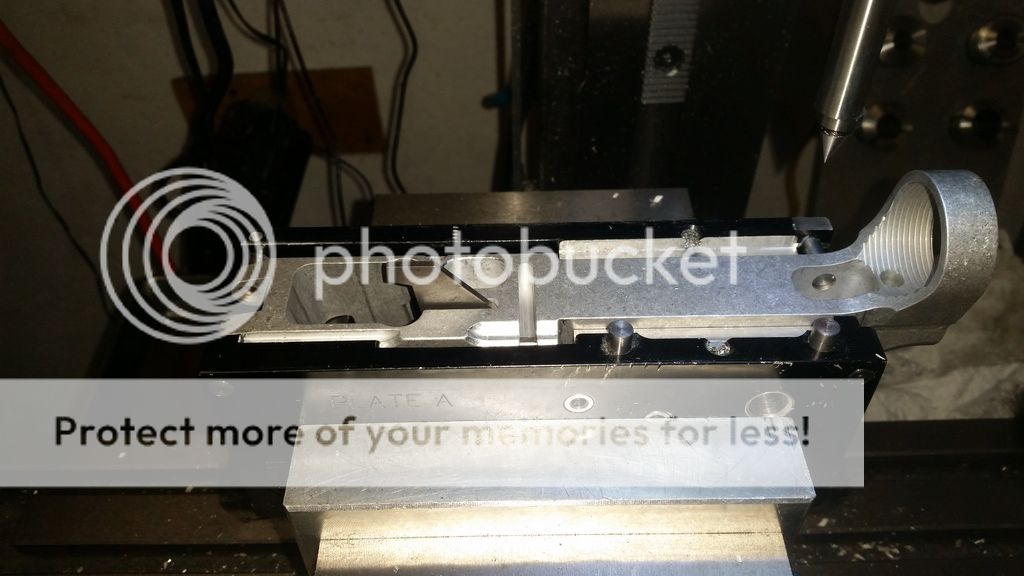
All roughed out. 
Finish pass complete 
Last hole 
Stick mags. That's a 11" BA barrel, 12" Chicom rail and a KAK flask can. Package deal from Schuyler. 
I'm happy with the drums, but they are pretty heavy even when empty. They are easy to load and so far have functioned flawlessly. They don't drop free, but I'm not sure you'd want them to. I imagine they wouldn't take a hit on concrete too well. Oh, and I wish they were 75 rounds. 
After the first couple of mags, I pulled it apart to inspect. Turns out I had some over travel. Nothing a couple of quarters couldn't fix. 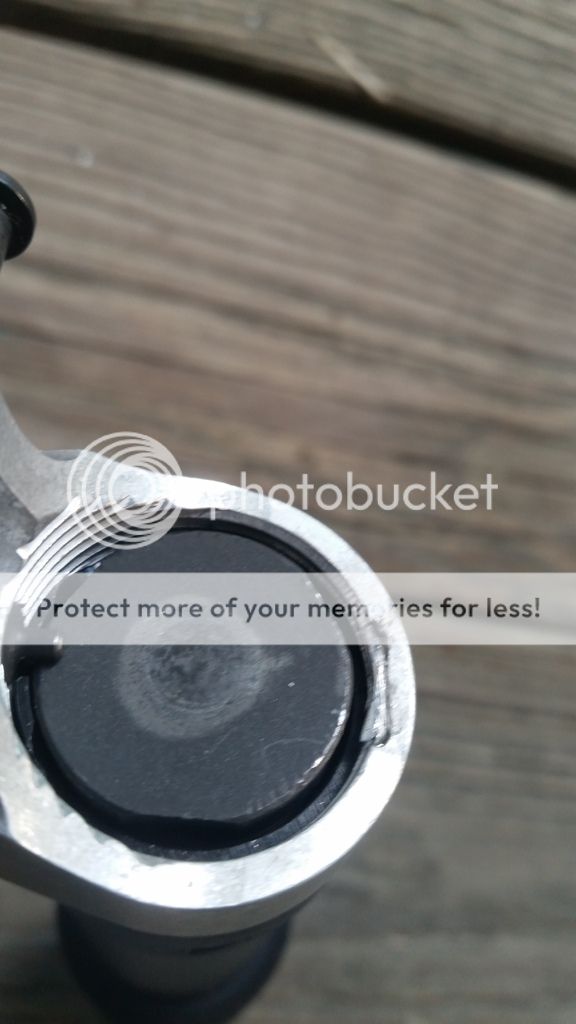
4.5" barrel. Doesn't look right with the 4" rail. Looking for other options. 
|
|
|
|
USA
|
[#34]
Very nice. Did the bolt hold open work?
|
|
|
|
[Last Edit: Sixtysixdeuce]
[#35]
Although, the time it took to thread it with the tap, I could have made a boring bar and threaded it on the lathe. 1/2-28 calls for a 15/32 drill (.469"). That works fine in steels and most other metals, but I've had a much easier time taking minor diameter up to .575"-.577" in Ti for tapping. The stuff closes up on your tap (as I'm sure you discovered); a little bigger minor diameter will save your taps and your sanity. At that diameter, using spiral 4 flute bottoming taps, I can thread a Ti piece 3/4" deep in just a few minutes without smoking taps. Plenty of thread: 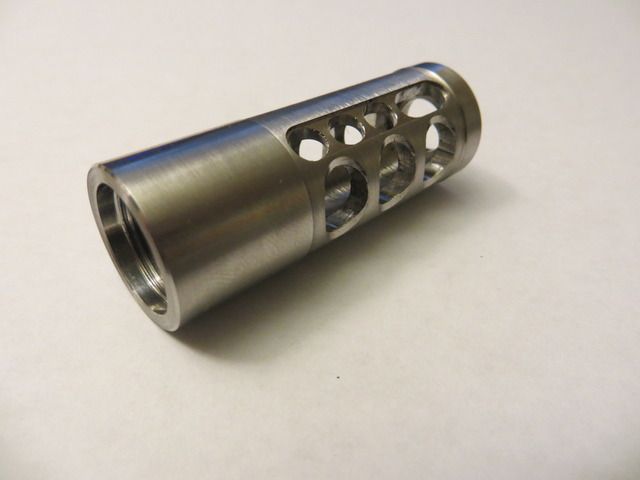

|
|
|
|
|
[Last Edit: AFCarbon15]
[#36]
Yeah, I was about half way done when I decided I should have bored a larger hole. I didn't trash the tap, so the only thing I wasted was time. The whole thing was a good learning experience.
I have enough stock to make one more, so I'll try to improve on my technique. |
|
|
|
|
[#37]
Originally Posted By kaotic504:
Very nice. Did the bolt hold open work? No LRBHO on this upper. Although, I may attempt to make one. It's not too complicated, but there isn't much room to work. |
|
|
|
|
[Last Edit: AFCarbon15]
[#38]
I got a new boring bar and some inserts, as winter sets in and I'm not in the woods, I'm gonna have to try making some 1/2-36 flash hiders.
|
|
|
|
|
[#39]
|
|
|
|
|
[#40]
Originally Posted By AFCarbon15:
Ohio weather is turning to crap. Spent the evening cleaning and organizing in the shop. Somehow I ended up milling another 308 Lower. <a href="http://s1023.photobucket.com/user/ligaf2000/media/Mobile%20Uploads/20161027_175110_zps1mbd4tpz.jpg.html" target="_blank">http://i1023.photobucket.com/albums/af357/ligaf2000/Mobile%20Uploads/20161027_175110_zps1mbd4tpz.jpg</a> Hell, you are just as bad as I am, I have been trying to get 250 .300 black shells ready for reloading this week and I keep ending up milling something, and I really need to get the shop cleaned up as well before the snow sets in! 
|
|
|
|
|
[#42]
|
|
|
|
|
[#44]
Spent a little time in the shop working on a Christmas gift.
And it's a brake... 


|
|
|
|
|
[Last Edit: AFCarbon15]
[#45]
Finally got some more shop time!
|
|
|
|
WA, USA
|
[#46]
I really don't have much of worth to add, but just wanted to say I am loving your work. Wish I had a shop to be able to learn this craft. Keep the posts coming!
|
|
|
|
[#47]
Nice work. You definitely have some skills.
|
|
|
|
|
[#48]
Thanks for the positive comments guys. I usually do a lot more browsing and reading than I do posting, but I enjoy these projects and I hope to inspire others to take the plunge too. I've only been doing this for a couple of years. Most of these projects I use as a learning experience. Each accomplishment makes the next challenge easier. Hopefully I'll get around to bigger projects soon.
|
|
|
|
|
[#49]
Well done my friend!!
|
|
|
|
WV, USA
|
[#50]
Originally Posted By AFCarbon15:
...Waiting on delivery of the tap for the receiver extension. Then a little Cerakoat and she's ready to rock. You have a machine...make one! My Dad did this when he did a 0%. He figured it would only have to be hard enough to cut aluminum, so he didn't have to do any hardening to it or mill it out of anything exotic. Just cut the threads to the correct size then milled the fluting into it. Worked just fine! |
|
|
 Win a FREE Membership!
Sign up for the ARFCOM weekly newsletter and be entered to win a free ARFCOM membership. One new winner* is announced every week!
You will receive an email every Friday morning featuring the latest chatter from the hottest topics, breaking news surrounding legislation, as well as exclusive deals only available to ARFCOM email subscribers.

AR15.COM is the world's largest firearm community and is a gathering place for firearm enthusiasts of all types.
From hunters and military members, to competition shooters and general firearm enthusiasts, we welcome anyone who values and respects the way of the firearm.

Subscribe to our monthly Newsletter to receive firearm news, product discounts from your favorite Industry Partners, and more.
Copyright © 1996-2024 AR15.COM LLC. All Rights Reserved.
Any use of this content without express written consent is prohibited.
AR15.Com reserves the right to overwrite or replace any affiliate, commercial, or monetizable links, posted by users, with our own.