|
[#1]
Before I knew anything about milling, I bought a jig to complete my first 80. After a few trial and error runs and learning a lot about milling, I still use a jig from time to time. I have made my own holding fixtures to clamp lowers in the vise, but since I have the jig, it gets used too. For completing 80%'ers, you won't run out of Z travel even using a jig in a vise.
When you get going, feel free to IM me if you have any questions. I'd be more than happy to help. I'm still no machinist, but I've come a long way. About 70% through a 0% I started earlier this week. |
|
|
|
[#2]
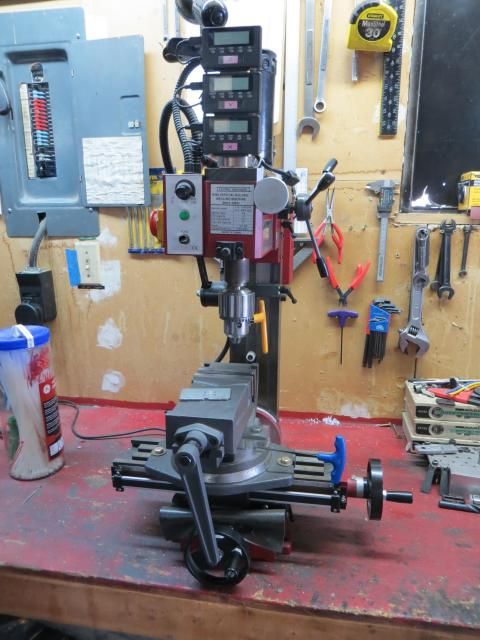
Here is what I did with my small CNC Taig Mill. Kurt D40 works
Perfectly.... Peck Drilling the Selector, Hammer/Trigger Pins 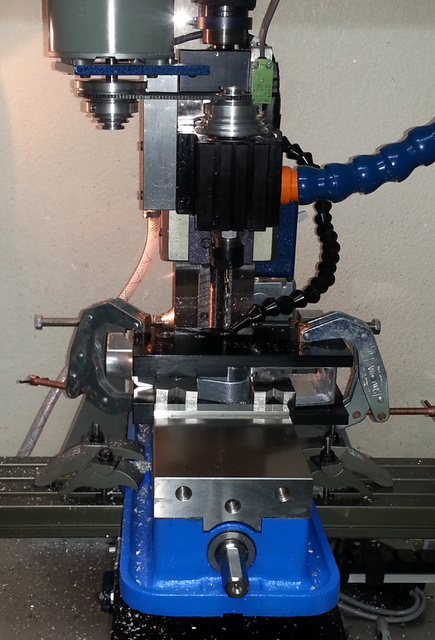
Milling the FCG Pocket 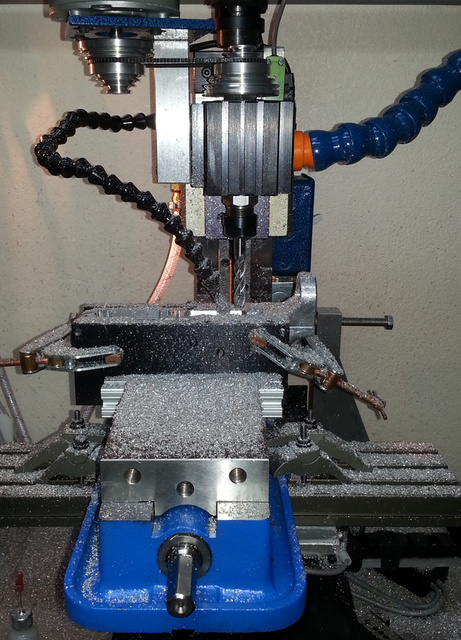
Ca_Longshot |
|
|
|
[#3]
You should be fine unless you have a really tall vise, but remember that you can also remove the quill stop to gain a little more. If you're using collets, you should have plenty of room. And, if necessary, you can reposition the gear rack on the column to raise everything up. That's what I did with mine after I set it up with a rather tall tilt/swivel vise:
I have a full size Lagun knee mill now, but I did a lot on that little HF mini. |
|
|
|
[#4]
Thanks for the information guys, it is extremely encouraging!
I have a couple of Tactical Machining 80's on the way, as well as their jig set up. From what I have been reading it sounds like a 5/16" 2 flute center cutting end mill can be used for the machining operations? It sounds like one 4" long is necessary? I assume if I use a 5/16" end mill that I need to get a 5/16" R8 collet to use it? Thanks again for the help, and I will definitely take advantage of the PM offer after I get set up. |
|
|
|
[#5]
The cutter length need a minimum of 1.250 "Length of Cut", longer if you use it to cut the trigger slot from the top.
A 5/16 cutter does not always have 5/16 shank |
|
|
|
[#6]
Quoted:
The cutter length need a minimum of 1.250 "Length of Cut", longer if you use it to cut the trigger slot from the top. A 5/16 cutter does not always have 5/16 shank I have read elsewhere that a 1" length of cut is adequate, is that not the case? Forgive my ignorance as I know very little about matching, but especially with a small mill, its going to involve a lot of passes to get to the finished depth anyway isn't it? I have read that some folks use a roughing in end mill and then a finishing end mill. I assume the roughing end mill is just more aggressive but doesn't leave as smooth of a finish? I realize that not all end mills have a shaft the same diameter as the cutter. No matter what the shaft diameter I will need a collet that diameter to hold it, right? I have a 15" floor standing drill press. Would it be easier/better to do any of the operations that don't create a side load on it? I appreciate the help. |
|
|
|
[#7]
I have tried drilling first then milling, it saves wear and tear on the mill, but doesn't really seem to save much time. I do the majority of the work with a 3/8 course rougher. Then follow up with a 7/16x1-1/2loc carbide 4 flute that doesn't get used for anything else. It makes for a decent finish. Could he better if I took a little less in my final pass. The only thing I use a 5/16 EM for is the trigger slot. It can be done with a 1/4, but you have to jog both axis, the 5/16 is just faster. I use a 5/32 solid carbide EM for the pin holes. I have tried stepping with several drill bits to the correct size then finishing with a reamer but the EM gets me right there in one pass. I usually follow up with the reamer anyway, but it hardly does anything. I have does the same with the safety hole, same results. But the reamer does help true up that hole a little.
Get some DROs. They can be had for ~$120 and save a TON of time. I usually start with .010-.020 pass for the first go, gives me nice lines to follow for each subsequent pass. That way I can watch what I'm cutting instead of just staring at the DROs the whole time. The depth of subsequent passes does slow down the feed rates but it all equals out for me, faster shallow passes vs slower deeper passes. It's addicting... Part of why I enjoy helping others. Again, let me know if you have any questions. |
|
|
|
[#8]
Thanks AFCarbon15.
Do you prefer to do the holes before or after the milling? I have read it recommended both ways. I appreciate the information on the tooling. I will get those same endmills. |
|
|
|
[#9]
Quoted:
Thanks AFCarbon15. Do you prefer to do the holes before or after the milling? I have read it recommended both ways. I appreciate the information on the tooling. I will get those same endmills. After for sure. On a smaller mill it makes for a lot of chatter if you drill first. And if you drill after, there's little to no chance of the bit walking. I do drill from both sides. Lot less of any chance to be angled that way if you aren't perfectly level. Again, after I drill, I always follow up with a reamer. Usually by hand and backwards, as in pull the reamer through so its lines up on both holes before it even starts to cut. If that makes sense. I have a set path I follow with the 3/8 rougher. It's the same path I use for the 7/16 finisher. That way, the numbers stay the same in my head and the first several passes with the rougher, that also leaves about .031 extra room for the occasional "oops". In the end, .031 is more than I'd like to have for a final pass so I have another set of numbers I use to get me a little closer before changing to the 7/16 finisher. I tried using a 7/16 rougher, but the only ones I could find are not center cutting or don't have the LOC I need and since they are usually 1/2" shank, you can't plunge much past the LOC. I'm sure there are some out there, but the 3/8 roughers are cheap enough and work very well. I've done probably 15 or so and I don't think I've done two the same. The process is ever evolving. But again, I knew NOTHING about machining before I started cutting on my first 80. So I may not have the best answer. I just know what has worked for me and what didn't. I've also walked about a dozen others through cutting their own 80's on my mill. None of them knew anything about milling before starting, but all still left with a functional lower. |
|
|
|
[#10]
I genuinely appreciate the help AFCarbon15. My 15 year old son is very excited about us milling some 80's and it will be a great father/son project. We have built AR's, but I think building on a lower receiver that we finished will be extra satisfying.
I will get a set of something like the iGage DRO's for sure. We are heading down to the big gun show in Reno next weekend. Hoping the mill might be here when we get back. I am going to print your replies and have no doubt I will have more questions before we start making any chips. |
|
|
|
[#11]
I genuinely appreciate the help AFCarbon15. My 15 year old son is very excited about us milling some 80's and it will be a great father/son project. We have built AR's, but I think building on a lower receiver that we finished will be extra satisfying.
I will get a set of something like the iGage DRO's for sure. We are heading down to the big gun show in Reno next weekend. Hoping the mill might be here when we get back. I am going to print your replies and have no doubt I will have more questions before we start making any chips. |
|
|
|
[#12]
One more tip regarding TM jig plates:
If your vice has shallow jaws, clamping the plates will cause them to spread at the top. Notice in one of the pictures above there are Kant Twist clamps holding the tops of the plates from spreading. What I did to cure this was to make a pair of spacers I place between the plates. One goes in the trigger-guard area and the other in the pistol-grip area. This allows the vice to bear down on the plates and still keep them parallel. |
|
|
|
[#13]
DRO's are great. Can't imagine working without them anymore but they are challenging to mount. You will spend way more time mounting them than you will doing a couple 80's but it is worth it and then you will always have them, and you have the mill so making your mounting brackets is easy, just a lot of hand drilling and tapping to the sides of the ways for mounting the brackets.
I do the same process as AFCarbon15, I use 3/8 4 flute and walk it around on a tool path going .150 deeper each pass. I then put in the 7/16 4 flute (Carbide would be nice but haven't picked one up yet) and follow the same path but at full depth, works for me and leaves a nice finish. Previously I only used the 7/16 and did the .150 each pass but it left a stepped looking finish and I am still not sure why. I trammed in the head to the vice and it is right on so something must be flexing in the spindle I guess, it is used mill I purchased. I first did a test run on a piece of aluminum (or wood would work for getting used to the dials) before I clamped up my first 80, I am glad I did. You will develop your own technique. |
|
|
|
[#14]
It's archived now or I would have added a lot more to it, but here's my LMS Mini Mill thread.
|
|
|
|
[#15]
5/32 solid carbide end mill for trigger and hammer pin Enco
5/16 solid carbide end mill for trigger slot (should be long enough even with a jig) Enco 3/8 HSS Roughing end mill long LOC for hogging FCG pocket Enco 7/16 solid carbide end mill long LOC for finish milling Enco DRO's 6" 12" and 24" I think I only cut one of them. Work very well. Ebay Extras: Kant Twist clamps like others posted above, I use them the same holds the jig solid and square. Obviously I use them for other stuff too. Enco 3/8 chucking reamer, you could probably find a better deal, but this is what you're looking for. get one in 5/32 too ebay LED lights, I mounted these around the spindle, very bright. I LOVE them so much I bought a bigger set to go around them, I think the second set is 90mm but I could be wrong. Ebay Air nozzle for compressed air, not necessary, but nice. Ebay 7/16 HSS roughing end mill (not center cutting, otherwise it works well) Enco Hope all this helps. If I come up with more, I'll be sure to add it. |
|
|
|
[#16]
Wow! You guys are amazingly helpful. I can't thank you enough.
That makes sense about shallow vice jaws causing the jig to open up at the top. I need to start ordering tooling and the DRO's. Thanks for the list. This is going to be a fun learning experience. Your help is so appreciated |
|
|
|
[#17]
Question on the LED ring lights. Are you using a 12V power supply to run them? Looks like a really nice setup.
|
|
|
|
[#18]
Yes, I used an extra laptop power supply to run them. But they are VERY low amperage just about ny 12v source would run them. I had the power supply laying around and figured it wouldn't be long before I added more lights or something else 12v. Looking at options of running the DROs off another source than their individual batteries. But a year later I'm still running the original batteries in two of them. Some how I left one on for a few days.
|
|
|
|
[#19]
AFCarbon15 I have a couple questions.
I received the mill and am still in the process of getting it cleaned up and I need to order a holder and dial indicator to tram the unit. Any particular holder you would recommend? On Amazon they have one that clamps around the quill and has arms that extend to hold the dial indicator. Is that adequate? Also, I received the jig from Tactical Machining. From what I have read, most folks drill the holes from both sides. The jig I received from TM only has the drill bushings on "Plate A" and none in Plate B. Do you think their intention is that I drill all thre way through from the one side? Thanks for your help. |
|
|
|
[#20]
It depends on how much you're going to use the holder and indicator. I really like my Noga magnetic base and either starret or mitutoyo .0005 graduated indicators. They're pretty expensive but if you're using them every week for a living its worth it.
|
|
|
|
[#21]
http://www.amazon.com/NOGA-Dial-Gage-Holder-Magnetic/dp/B002K07CTK
I have this exact base and I really like it. |
|
|
|
[#22]
Quoted:
AFCarbon15 I have a couple questions. I received the mill and am still in the process of getting it cleaned up and I need to order a holder and dial indicator to tram the unit. Any particular holder you would recommend? On Amazon they have one that clamps around the quill and has arms that extend to hold the dial indicator. Is that adequate? Also, I received the jig from Tactical Machining. From what I have read, most folks drill the holes from both sides. The jig I received from TM only has the drill bushings on "Plate A" and none in Plate B. Do you think their intention is that I drill all thre way through from the one side? Thanks for your help. The one that clamps to the quill like this Indicator Holder works well if you have patience. It's not professional quality, but it will get the job done. I put a collet in so I can use the draw bar to turn the indicator rather than man handling the holder. Just about any indicator will work. I have a cheap-o from HF, but I have a Forster that's older than I am too. Speaking of tramming, I just finished tramming mine after doing a mod similar to this eliminating Column Flex mod. Took a while to tram it out, but I'm actually better than I was prior. Still have some flex though. I'll have to see what else I can do about that. As for the plates, yes, the ones with drill bushings on one side, they expect you to drill through from one side only. If you have DRO's you don't need the plates for drilling. They are a good peace of mind to double check if you are uneasy or second guessing, but not required by any means. I spent a good deal of time setting up my mill. Seemed like forever when all I wanted to do was cut into an 80. In the end, I didn't spend anywhere near enough time. I've torn it apart 4 or 5 times since. So take your time and don't rush it. Every minute you spend setting it up to be more accurate will pay off with every project you attempt. Even prior to the column mod I gave a solid attempt at a 0% Paperweight Forging. I just got the tap in today, I'll have to make time for that tomorrow. |
|
|
|
[#23]
Thanks. I'm in no hurry and want to get the little mill set up well. I have the jig and some 80's and they won't rot.
Are the magnetic holders okay when stuck on a quill? I really only need a decent holder. Like you, I have some Forster stuff with quality indicators already. I use Forster equipment for checking neck concentricity, case neck turning, and bullet runout for our precision reloads. Just got back from the big gun show in Reno. There were a bunch of folks selling 80% AR15, AR10 and 1911 stuff. Was good to see. I figure I will get the mill modified a bit with the air spring, the igaging DRO's, etc and trammed and get a decent vice. My son and I make custom knives and we have a new knife grinder and attachments to play with too. |
|
|
|
[#24]
I've never used a magnetic holder on the quill, I've used one on the table to check the runout on the quill, but that was it.
|
|
|
|
[#25]
It sounds like Gordo was talking about using a magnetic one on the quill. I know some of them have a v groove in the bottom for placement on round things. I wonder if it would work well enough?
I assume a rod sized to go in to a collet that the indicator mounted to would be best? Would using the drill chuck introduce too much potential play or variance? |
|
|
|
[#26]
That latest build of your was ambitious! Looks great though.
On my Z axis fine feed knob, I only get a bit over one full turn with it, or about .095. Is that all the movement there is supposed to be with that knob? |
|
|
|
[#27]
Quoted:
That latest build of your was ambitious! Looks great though. On my Z axis fine feed knob, I only get a bit over one full turn with it, or about .095. Is that all the movement there is supposed to be with that knob? No, the fine feed knob should keep turning through the entire travel of the Z axis. I haven't had that apart on mine, so I'm not sure I could be of any help troubleshooting. With everything turned off. Try running the Z axis up and down, see if its binding anywhere. Engage and disengage the fine feed. Spin the fine feed with it disengaged see if its binding anywhere. Good luck. |
|
|
|
[#28]
Thanks, I guess I just wasn't using enough force. It's very easy for the first rotation of the knob, and then requires more effort to turn it. I rant if up and down with the coarse unit and it doesn't seem to be binding.
|
|
|
|
[#29]
Quoted:
That latest build of your was ambitious! Looks great though. On my Z axis fine feed knob, I only get a bit over one full turn with it, or about .095. Is that all the movement there is supposed to be with that knob? Are you sure that you have the course feed totally disengaged? If you try to use the fine feed with the course feed still engaged you will experience this. My adventures with the HF mini mill. http://www.gunco.net/forums/183-tool-shed/71891-sieg-x2-mini-mill.html |
|
|
|
[#30]
The handlle is pushed all the way in and the gears are fully engaged. I tried bumping it with a soft faced mallet to see if it would go in at all, and it didn't. The fine feed knob is very easy to turn in either direction for about one full turn. After that it takes considerable effort to turn it, more effort than it seems like it should. It's enough effort that it's difficult to move it with much precision. Anything else I should check?
Beginning to wish I would have gone with the LMS mill instead. |
|
|
|
[#31]
The fine feed will turn pretty easily for a little more than one complete revolution, and then it gets very difficult. It's the same in reverse, it will turn a bit more than one full revolution and then gets very difficult.
I am going to return this mill. I am willing to spend more money to get something better now that I have seen this mill in person. I am somewhat torn between the LMS 3990 with the solid column and air spring and something like the Grizzly G0759 that already has DRO's. The DRO packages for sale on LMS are the DRO Pro units and are fairly expensive. I could probably put the igaging DRO's on the LMS through, right? The price of the LMS unit would be about $1,070 after shipping, and then about $120 for DRO's, so about $1,190. The Grizzly G0759 would be about $1,760 delivered to my place after I use my 5% off coupon. The G0759 has a solid column, but the head tilts left and right. From what I have been able to read, tramming it isn't too difficult. The LMS unit is solid, which I know is better. The B0759 has a 3 axis DRO plus a DRO for just the quill (just like the G0704, which is basically the same mill without the additional DRO's). I would appreciate anyone's thoughts or advice on which way to go. I don't mind some fiddling, but quickly realized that the little HF mill was going to take a lot of time and tweaking, and I would be better off starting with something a bit better to begin with. ON EDIT: Another option would be to go with a G0704 and add the igagin DRO's, but the G0759 that already has the DRO's seems like a pretty sweet deal. I am not sure if the DRO on the 0759 is cumulative of the head and spindle movement, or is only for the head. Reading the online manual for the Grizzly mills they say to use the machine for milling with the quill retracted as much as possible. I think the fine feed works on the quill and not the head though. Not sure if that is better or worse than the way the X2 series of mills work? |
|
|
|
[#32]
If I had to do it over I would spend more money and get the biggest machine I could afford and have room for. I would have bought a full size Bridgeport if I had the room for it. There's a ton of flex in these smaller machines which limits how fast you cat cut and cut well. In the end, I'm amazed at what can be done with these lil mills, but I can see there's a lot of room for improvement.
|
|
|
|
[#33]
If I lived in your area, where Bridgeports are plentiful and fairly inexpensive, that's the route I would go for sure. Here in the west they aren't nearly as plentiful, and the few that come up for sale are usually several times what you see them advertised for back east. I have one friend with a Bridgeport, and another with a Bridgeport sized knee mill from Grizzly, and for sure you can do little stuff with a big mill, but not big stuff with a little mill. I have thought about getting a quote from someplace like U-ship to see how much it would cost to get something like a Bridgeport or Clausing shipped to WA from the east a bit.
It's a bit disgusting to get something brand new, even from China, and have it not function right out of the gate. I'm tempted to take the cover off the fine feed area but don't feel like I should have to start taking it apart just to get a basic function to at least work somewhat. The coarse adjustment wheels turns things great when it's engaged, but of course it offers a bit more leverage. The knob is easy to turn, about what I would expect as probably normal, until a bit past a full revolution either way, then it gets very difficult to turn, and impossible to do it with any accuracy. Obviously something is binding. |
|
|
|
[#34]
I didn't really want to let this mill get the best of me, so I tore in to it a bit this morning. After cleaning some type of very thick mixture (much thicker than just cosmoline) from the worm gear area, the z axis fine control is tolerable. I am going to make a go of it with this thing, knowing I can sell it if I decide to upgrade later or come across a deal on a larger mill.
Carbon15, do you use the same roughing 3/8" endmill for the fire selector holes in the sides of the receiver or do you use a 4 flute or something for that? |
|
|
|
[#35]
O! Don't use a roughing EM for any sort of finish work. I use a 4-flute carbide, but any decent HSS should do just as well. From my experience, I get a lot better finish work from carbide than HSS, which is opposite to what I've read should be the case. I mark it up to the fact most of my HSS toiling is JUNK chicom or at best Italian. Maybe q7ality USA HSS would yield better results than US carbide. Again, I'm no pro, I only "know" what I have tried and what worked or didn't work for me.
|
|
|
|
[#36]
Quoted:
O! Don't use a roughing EM for any sort of finish work. I use a 4-flute carbide, but any decent HSS should do just as well. From my experience, I get a lot better finish work from carbide than HSS, which is opposite to what I've read should be the case. I mark it up to the fact most of my HSS toiling is JUNK chicom or at best Italian. Maybe q7ality USA HSS would yield better results than US carbide. Again, I'm no pro, I only "know" what I have tried and what worked or didn't work for me. Thanks, I was just going from the list, that I very much appreciate you providing, and didn't see a 3/8" endmill other than the roughing one. I figured it was an omission and that you didn't use the roughing bit for the fire selector hole. I emailed Tactical Machining and they told me to drill through the one side with the drill bushings. From everything I've read, that isn't a great idea, especially with a small mill. Since the other side just has a hole with no bushings, I assume I can use some type of center finder to position the piece for drilling through that side? I know the position can be found with the DRO's, but it seems like it might be simpler for me to use the jig, or at least use the jig to make sure it looks like I'm in the right spot. If I go really slow and peck drill with a 3/8 endmill, would it be okay to drill through from the one side with the drill bushings? I can make sure the jig is flat/level relative to the mill I think. Just thinking ahead, I have some obvious work to do before I am ready to try one of the 80's. |
|
|
|
[#37]
I've done both, but feel using the jig alone vs the DROs alone, the DROs win out every time. The first couple i did, I drilled all threes holes from one side. They work, so I don't even lone if they are off since working, I never had reason to measure.
As far as trying to use the jig on the mill to actually drill, my experience says usually a 3/8 end mill will not fit through a 3/8 drill bushing. Using drill bits you will find that if you drill through with a 3/8 twist drill bit you will not get the same size hole you will with a 3/8 end mill. Even the hammer/trigger pin holes, if you step drill from a small center bit and step up to a #31(I think) drill bit drilling incrementally bigger holes by say 1/64, you will not get the same size hole you will by drilling with a 5/32 drill bit alone, you will end up with two different sized holes. Not by enough that will make or break functionality, but still different. Twist drill bits as a general rule do not drill their measured sized hole. Incremental drilling using the drill bushings as a guide will be troublesome or at least very time consuming. Do like I did, grab a scrap piece of 1/8 aluminum and drill some holes in it and test fit the hammer pins or the safety. Drill a few different steps or with end mills alone testing each. You will find what works for you. |
|
|
|
[#38]
Quoted:
I didn't really want to let this mill get the best of me, so I tore in to it a bit this morning. After cleaning some type of very thick mixture (much thicker than just cosmoline) from the worm gear area, the z axis fine control is tolerable. I am going to make a go of it with this thing, knowing I can sell it if I decide to upgrade later or come across a deal on a larger mill. Did you follow any of the links in the link I provided? There is a ton of mini mill resources in there. http://www.gunco.net/forums/183-tool-shed/71891-sieg-x2-mini-mill.html |
|
|
|
[#39]
Quoted:
Did you follow any of the links in the link I provided? There is a ton of mini mill resources in there. http://www.gunco.net/forums/183-tool-shed/71891-sieg-x2-mini-mill.html Quoted:
Quoted:
I didn't really want to let this mill get the best of me, so I tore in to it a bit this morning. After cleaning some type of very thick mixture (much thicker than just cosmoline) from the worm gear area, the z axis fine control is tolerable. I am going to make a go of it with this thing, knowing I can sell it if I decide to upgrade later or come across a deal on a larger mill. Did you follow any of the links in the link I provided? There is a ton of mini mill resources in there. http://www.gunco.net/forums/183-tool-shed/71891-sieg-x2-mini-mill.html Yes, I have read that thread and gone to most of the links and looked at the pics. Thanks for posting that, there is some good info and great ideas there. |
|
|
|
[#40]
I decided to take the mill apart further for cleaning and to get more familiar with it. I have disassembled the X & Y stuff completely and have the saddle and screws off the mill. Its really a pretty simple device. Everything will get cleaned really well and I will lube bearing surfaces. Looking forward to doing some upgrades.
|
|
|
|
[#41]
You guys may want to try out 2 flute carbide endmills. They do a much better job on aluminum than 4 flute.
The way I finish out a fire control pocket is to start with standard jobber twist drills (they are cheap and easily replaced), then I use a 7/16 endmill and rough out the opening by plunge cutting. This is especially helpful in the corners to help with the chatter that can develop from using 1/4 of the surface area of the cutter. Once that is completed I run a roughing pass that takes off the high points of the plunging process Then a finish pass to get a nice clean pass around the entire pocket. I use a full size bridgeport though, so take the limitations of your machine into consideration Also WD-40 is a great cutting fluid for aluminum, if you don't have a coolant system. |
|
|
|
[#42]
Quoted:
Yes, I have read that thread and gone to most of the links and looked at the pics. Thanks for posting that, there is some good info and great ideas there. Thanks, That is my thread. (I am 7.62x39 on most of the forums) The X2s take a little tuning up, but they are great little hobby mills once you do it. |
|
|
|
[#43]
Thanks to everyone for contributing to this thread.
I recently got a mini mill and find this thread and the links within to be extremely helpful in answering just about all of my questions! |
|
|
|
[#44]
Quoted:
Thanks, That is my thread. (I am 7.62x39 on most of the forums) The X2s take a little tuning up, but they are great little hobby mills once you do it. Quoted:
Quoted:
Yes, I have read that thread and gone to most of the links and looked at the pics. Thanks for posting that, there is some good info and great ideas there. Thanks, That is my thread. (I am 7.62x39 on most of the forums) The X2s take a little tuning up, but they are great little hobby mills once you do it. Hot Link |
|
|
|
[#45]
Any updates? A few new 80%'er threads. More info to share.
|
|
|
|
[#46]
One last bump for updates...
|
|
|
 Win a FREE Membership!
Sign up for the ARFCOM weekly newsletter and be entered to win a free ARFCOM membership. One new winner* is announced every week!
You will receive an email every Friday morning featuring the latest chatter from the hottest topics, breaking news surrounding legislation, as well as exclusive deals only available to ARFCOM email subscribers.

AR15.COM is the world's largest firearm community and is a gathering place for firearm enthusiasts of all types.
From hunters and military members, to competition shooters and general firearm enthusiasts, we welcome anyone who values and respects the way of the firearm.

Subscribe to our monthly Newsletter to receive firearm news, product discounts from your favorite Industry Partners, and more.
Copyright © 1996-2024 AR15.COM LLC. All Rights Reserved.
Any use of this content without express written consent is prohibited.
AR15.Com reserves the right to overwrite or replace any affiliate, commercial, or monetizable links, posted by users, with our own.


