|
[#1]
Quoted:
Quoted:
How long till they release an Aluminum one? I have some Gorilla glue.  http://i147.photobucket.com/albums/r291/atfsux/boltTogetherAR15.gif http://www.guns.com/wp-content/uploads/2013/12/screw-together-lower.jpg http://www.guns.com/wp-content/uploads/2013/12/scratch-built-ar-15-lower-receiver.jpg Where can I order one? That may be a build that is more in line with my skill level. |
|
|
|
[#2]
Quoted:
Where can I order one? That may be a build that is more in line with my skill level. Quoted:
Quoted:
Quoted:
How long till they release an Aluminum one? I have some Gorilla glue. http://i147.photobucket.com/albums/r291/atfsux/boltTogetherAR15.gif http://www.guns.com/wp-content/uploads/2013/12/screw-together-lower.jpg http://www.guns.com/wp-content/uploads/2013/12/scratch-built-ar-15-lower-receiver.jpg Where can I order one? That may be a build that is more in line with my skill level. This is as close as I've found to a bolt together, but you could buy a drill press, a jig, & a normal 80% lower for the cost, and you still have to do some drilling on this: http://www.ktordnance.com/kto/order.php The all aluminum bolt together you mill yourself from an aluminum sheet. If you have a mill, it's probably much faster to mill a normal 80% lower. I believe this is the .PDF you're looking for: http://www.feinsteinproject.org/loes/effortbloomberg/2007-10-17_131429_AR_15_Scratch_Built_Receiver.pdf |
|
|
|
[#3]
for 25 bucks thats awesome. ordering one! I wish they had a "matching" upper. It would be pretty cool to have that along with the shovel ak from the interwebs
|
|
|
|
[#4]
This is one of the cooler things I have seen in a while
I want |
|
|
|
[#5]
I for one, like it.
|
|
|
|
[#6]
Quoted:
I for one, like it. http://www.theflatspot.net/ar-15-receiver-flat.html $25 per + $6 flat rate shipping. |
|
|
|
[#7]
OP, can you please expand a little more on the mig welding set up that you used? ie, .030 or .035 wire? 75/25 gas mix?, and not that it really matters, what mig welder do you have?
|
|
|
|
[#8]
Quoted:
Where can I order one? That may be a build that is more in line with my skill level. Quoted:
Quoted:
Quoted:
How long till they release an Aluminum one? I have some Gorilla glue. http://i147.photobucket.com/albums/r291/atfsux/boltTogetherAR15.gif http://www.guns.com/wp-content/uploads/2013/12/screw-together-lower.jpg http://www.guns.com/wp-content/uploads/2013/12/scratch-built-ar-15-lower-receiver.jpg Where can I order one? That may be a build that is more in line with my skill level. I don't think it's being sold anymore. Looks fairly simple though. |
|
|
|
[#9]
Quoted:
OP, can you please expand a little more on the mig welding set up that you used? ie, .030 or .035 wire? 75/25 gas mix?, and not that it really matters, what mig welder do you have? I used a Hobart Handler 140 with .030" diameter solid wire (I believe it was ER70S-6) and 75% argon 25% carbon dioxide shielding gas. I don't recall exactly what voltage and feed settings I used, just figured that out by trial and error. |
|
|
|
[#10]
I obtained a set of laser cut pieces from the Flat Spot. Looked like a fun variation from finishing aluminum or polymer 80%ers. Here's what comes in the package. There are a few little gussets and front pivot pin bosses not shown here. The laser cutting is very clean and hole locations (on centers at least) are quite accurate. I wish the FC holes were a few thousandths smaller so I could ream or precision drill to the correct sizes. They are a bit oversize but amazingly accurate for a laser cut. Far more accurate than water jet cutting. I am impressed. It will function just fine, however, once completed.

I do not have a TIG or MIG welder so I elected to use my oxy/acet torch set to silver braze the thing together. Heat required is much less than torch welding the thing together which means less overall distortion. Here's my favorite alloy and flux. Leaves a really nice small fillet radius at each joint, has much more than adequate strength in this application, and has great capillary action when the heat and flux are just right. 
I did use conventional small tack welds with the torch to temporarily join some of the major sub assemblies before brazing. Here is the trigger guard (4 pieces), the rear fire control cavity/pistol grip boss (4 pieces), and the two pieces of the receiver extension ring. 
Here are the major parts clamped-up on a surface plate to assure alignment and takedown/pivot pin center dimensions. 
More pics and discussion tomorrow. I copied a couple of mods that had been noted by another builder above. On the inside of the left front magwell plate I machined a .040" deep slot to accommodate the latching lug on the side of all mags. Now all mags drop free when released. 
Here's another .060" slot I machined in the left rear fire control pocket plate to allow the mag catch to drop deeper into the receiver and correctly catch the mag. A builder above achieved this same objective by building up the catch with a weld bead. 
To verify alignment of the flats before brazing, I pinned a known good factory receiver next to the steel one to assure all pin holes aligned properly before clamping tightly. 
Ready to braze everything up. 
Final "rough" braze job before my oxy regulator took a shit. Not quite done yet. 
Another partially finished shot with a few of the lower parts and a mag installed. Anxious to get my welding rig up and running again and finish this thing. It's been a fun project so far. More later. 
|
|
|
|
[#11]
Quoted:
I obtained a set of laser cut pieces from the Flat Spot. Looked like a fun variation from aluminum or polymer 80%ers. Here's what comes in the package. There are a few little gussets and front pivot pin bosses not shown here. The laser cutting is very clean and hole locations (on centers at least) are quite accurate. I wish the FC holes were a few thousandths smaller so I could ream or precision drill to the correct sizes. They are a bit oversize but amazingly accurate for a laser cut. Far more accurate than water jet cutting. I am impressed. It will function just fine however once completed http://www.hunt101.com/data/500/medium/IMG_73771.JPG I do not have a TIG or MIG welder so I elected to use my oxy/acet torch set to silver braze the thing together. Heat required is much less than torch welding the thing together which means less overall distortion. Here's my favorite alloy and flux. Leaves a really nice small fillet radius at each joint, has much more than adequate strength in this application, and has great capillary action when the heat and flux are just right. http://www.hunt101.com/data/500/medium/IMG_7386.JPG I did use conventional small tack welds with the torch to temporarily join some of the major sub assemblies before brazing. Here is the trigger guard (4 pieces), the rear fire control cavity/pistol grip boss (4 pieces), and the two pieces of the receiver extension ring. http://www.hunt101.com/data/500/medium/IMG_73841.JPG Here are the major parts clamped-up on a surface plate to assure alignment and takedown/pivot pin center dimensions. http://www.hunt101.com/data/500/medium/IMG_73901.JPG More pics and discussion tomorrow. Looking good Russ! I was curious about how one would look with proper brazing. What type of torch setup do you have? Would this method work with MAPP gas? If I get crazy and buy a .308 kit, that would probably be my preferred route. |
|
|
|
[#12]
I actually brazed about 90% of my lower on Saturday before my oxy regulator took a dump so not quite done. So far it looks really clean with nice joints with pretty small fillets. The 45% silver brazing rod flows really nicely so long as the operator has good control of heat flow and flux distribution. Its been a few years since I have brazed such a complex assembly as this, but I am relearning quickly. I use a Victor SR5 light duty torch set with a "0" tip. Acetylene pressure is 5 psi and oxy at 10 psi with a dead neutral flame. Biggest trick is to heat the part or area slowly. Beyond 1800 F it burns the flux and the silver flow becomes non-uniform. I would expect that MAPP would work OK, just not as much rapid heat available as when using acetylene as the fuel.
I'll post some more pics tonight to show the brazing results so far. I sure wish I had a TIG welder. See my post above for more pics. Not quite finished yet. |
|
|
|
[#13]
Quoted:
Looking good Russ! I was curious about how one would look with proper brazing. What type of torch setup do you have? Would this method work with MAPP gas? If I get crazy and buy a .308 kit, that would probably be my preferred route. Quoted:
Quoted:
I obtained a set of laser cut pieces from the Flat Spot. Looked like a fun variation from aluminum or polymer 80%ers. Here's what comes in the package. There are a few little gussets and front pivot pin bosses not shown here. The laser cutting is very clean and hole locations (on centers at least) are quite accurate. I wish the FC holes were a few thousandths smaller so I could ream or precision drill to the correct sizes. They are a bit oversize but amazingly accurate for a laser cut. Far more accurate than water jet cutting. I am impressed. It will function just fine however once completed http://www.hunt101.com/data/500/medium/IMG_73771.JPG I do not have a TIG or MIG welder so I elected to use my oxy/acet torch set to silver braze the thing together. Heat required is much less than torch welding the thing together which means less overall distortion. Here's my favorite alloy and flux. Leaves a really nice small fillet radius at each joint, has much more than adequate strength in this application, and has great capillary action when the heat and flux are just right. http://www.hunt101.com/data/500/medium/IMG_7386.JPG I did use conventional small tack welds with the torch to temporarily join some of the major sub assemblies before brazing. Here is the trigger guard (4 pieces), the rear fire control cavity/pistol grip boss (4 pieces), and the two pieces of the receiver extension ring. http://www.hunt101.com/data/500/medium/IMG_73841.JPG Here are the major parts clamped-up on a surface plate to assure alignment and takedown/pivot pin center dimensions. http://www.hunt101.com/data/500/medium/IMG_73901.JPG More pics and discussion tomorrow. Looking good Russ! I was curious about how one would look with proper brazing. What type of torch setup do you have? Would this method work with MAPP gas? If I get crazy and buy a .308 kit, that would probably be my preferred route. Nice work both of you. You guys are going to make me tig a lower, aren't you?  |
|
|
|
[#14]
I wish I had a TIG, I may just MIG one together and then later if I score a TIG, well that will be just enough excuse to make another, two or three

|
|
|
|
[#15]
Well, I can't recommend super glue for this build, as much as I love the stuff. The following pics are in order. I used the very finest Harbor Freight Chinese super glue:
The receiver extension boss glued together, w/ an Entry tube to check concentricity: 


Will it fit? 

Holding the magwell in place: 


The mag catch will have to be built up - JB Weld? 


Looking good, ain't it? 

Next time, mount the front takedown pin inserts to the inside of the mag well FIRST: 


And we have an A2 pistol grip permanently attached: 


Ooops. The superglue didn't hold when I ran a drill through it... 
Filing off the sharp bits just above the pistol grip. May I suggest filing these BEFORE you glue on the pistol grip? 

We've got a little angle in the magazine well here: 
Ok, we'll reglue this ONE piece that fell off: 
We'll put a clamp on it, and throw in the forward mag well wall to line everything up: 
Well, crap: 
Well, what about the other side, then? Oh, great... 
Ooooops. The side fell off... 
Well, so sand it down & reglue... 


And now the other side falls off... 

At least the pistol grip is still on there: 

And now the other side has completely come off... 

Clamping to the counter to sand (and file) the glue off... 

|
|
|
|
[#16]
Haha!!! You really used superglue! Nice write up. Sorry it didn't turn out so well for you
Perhaps an expensive metal bonding cyanocrylate next time? On a related note, I just got the rear takedown pin working and some paint on mine. Pics coming after it cures/bakes. |
|
|
|
[#17]
If I have time tomorrow, I'll try super glue again. Otherwise, if I was doing it from scratch, 2-part epoxy would probably work better, as the parts are not entirely smooth, or even completely flat. I probably would've done better had I put the front wall of the magazine well in, b/c there's very little surface area btwn the mag well & the rear of the receiver. I was hoping to end up w/ an AR I could rock magazines into.
Super glue is cyanocrylate. Other than the major categories (2-part epoxies, super glue, horses, etc) I'm not sure there's a significant difference in the bonding strength of consumer glues. |
|
|
|
[#18]
I did a quick paint job with alumahyde yesterday. Nothing professional. Just something to keep the rust off. I'll keep the black finish on until I come up with the resources to do something more creative.
Almost looks like the real deal until you look closely 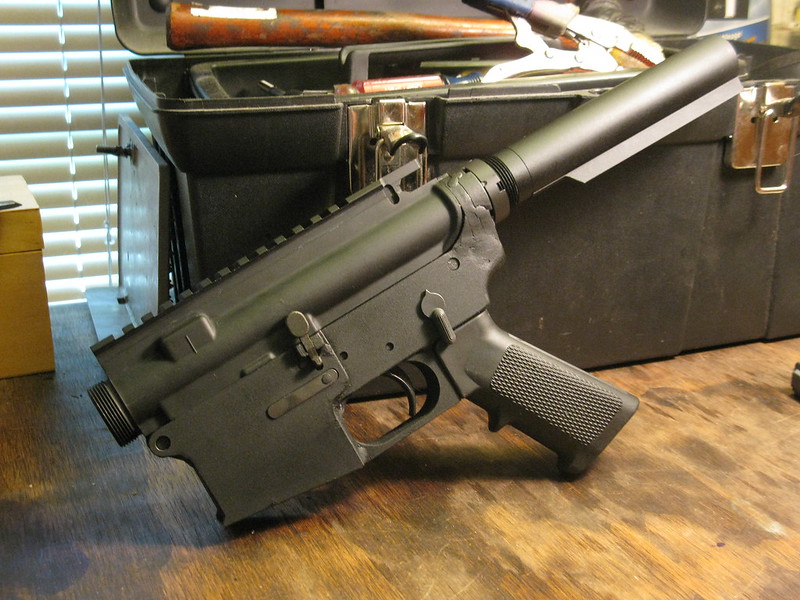
And here is my last weld and drilling. It is hard to see in this pic, but I weded in a small "U" shaped piece of metal around the back wall of the FCG pocket. This was needed mainly to hold the upper in the middle of the rear pin so that there is no side to side movement. Also it gives more real estate for drilling the rear pin detente hole. I can elaborate further when I get home tonight... 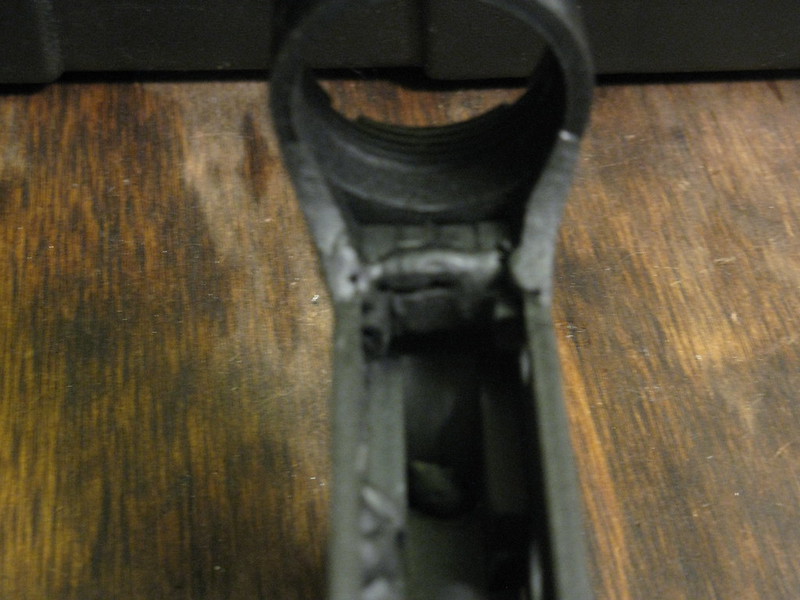
I did drill the rear detent hole. I'll probably end up tapping it and holding it in place with a set screw. This isn't one of my prettiest home built receivers, but it has been a pretty damn fun project. From here I plan on chambering it in 7.62x39 and somehow rigging a fore end that will cycle the action like a pump shotgun. FU Cuomo. I'll keep the posts coming if there is any interest. It may be a while until I end up buying new parts. I'm in the process of buying my first home and the S.O. would be pretty upset if I wasted my money on gun parts instead of furniture and appliances. Thanks for following guys! and keep posting your builds. I love this shit! |
|
|
|
[#19]
I'm really enjoying the progress pics of the various methods that are being used. Brazing seems like a very clean method coupled with strategic tack welds. I've posted some of my progress pics in the other thread. Other Flat Spot Thread
|
|
|
|
[#20]
Quoted:
Quoted:
How long till they release an Aluminum one? I have some Gorilla glue. http://i147.photobucket.com/albums/r291/atfsux/boltTogetherAR15.gif http://www.guns.com/wp-content/uploads/2013/12/screw-together-lower.jpg http://www.guns.com/wp-content/uploads/2013/12/scratch-built-ar-15-lower-receiver.jpg If your going to post pics we need a link so I can buy one. |
|
|
|
[#21]
I want to go on record and tell the OP that I hate him. I went on the site and found not only the steel plate lower, but a kit to make a PPSH-41 magwell. I have 2 ppsh41 drum mags, a shipload of 7.62x25, and I could never figure out a way to get my lower to use them with my Ron Williams upper.
And now it's all there in front of me. |
|
|
|
[#22]
Quoted:
I want to go on record and tell the OP that I hate him. I went on the site and found not only the steel plate lower, but a kit to make a PPSH-41 magwell. I have 2 ppsh41 drum mags, a shipload of 7.62x25, and I could never figure out a way to get my lower to use them with my Ron Williams upper. And now it's all there in front of me. Stuff like that is why I'm trying to find a good reason to give the wife when FedEx delivers my night vision scope Wednesday |
|
|
|
[#23]
Tinkerers and ham radio operators: the two types of people that will take over the world when the SHTF.
|
|
|
|
[#24]
bump.
|
|
|
|
[#25]
Anyone else do one yet. Seems dead in here.
|
|
|
|
[#26]
Progress Report:
Well finally got the thing all Silver/Cu brazed together. Came out pretty well. Function checks perfectly and fits up well to all my uppers and mag combinations. Here's some pics before final sand blast and Moly Resin application. Final weight is 1 lb 5 oz. About twice the weight of an aluminum lower but a hell of a lot stronger. I have pounded on this thing with a big ball peen hammer to make minor "corrections" due to welding distortion with not the slightest evidence of braze joint failure. The 45% silver brazing alloy has a tensile strength of over 40k psi. Slightly less than half the steel plates. Right Side - Made the mag button fence smaller for more of the slick-sided look 
Left Side 
Fire control pocket with additional small plates added to bring interior width at rear lug to match uppers and to provide more material to drill detent passages. Also milled a small amount out of the floor to provide more clearance for trigger travel behind trigger opening. 
Lower left side. Trigger guard looked too massive so I cut a slot in it 
Lower right side 
Mag catch / bolt release area 
Going to apply the Norrell's Moly Resin one night this week. Will post some more pics of the completed lower. |
|
|
|
[#27]
Quoted:
Progress Report: Well finally got the thing all Silver/Cu brazed together. Came out pretty well. Function checks perfectly and fits up well to all my uppers and mag combinations. Here's some pics before final sand blast and Moly Resin application. Final weight is 1 lb 5 oz. About twice the weight of an aluminum lower but a hell of a lot stronger. I have pounded on this thing with a big ball peen hammer to make minor "corrections" due to welding distortion with not the slightest evidence of braze joint failure. The 45% silver brazing alloy has a tensile strength of over 40k psi. Slightly less than half the steel plates. Right Side - Made the mag button fence smaller for more of the slick-sided look http://www.hunt101.com/data/500/medium/IMG_7431.JPG Left Side http://www.hunt101.com/data/500/medium/IMG_7420.JPG Fire control pocket with additional small plates added to bring interior width at rear lug to match uppers and to provide more material to drill detent passages. Also milled a small amount out of the floor to provide more clearance for trigger travel behind trigger opening. http://www.hunt101.com/data/500/medium/IMG_7438.JPG Lower left side. Trigger guard looked too massive so I cut a slot in it http://www.hunt101.com/data/500/medium/IMG_74232.JPG Lower right side http://www.hunt101.com/data/500/medium/IMG_74241.JPG Mag catch / bolt release area http://www.hunt101.com/data/500/medium/IMG_74271.JPG Going to apply the Norrell's Moly Resin one night this week. Will post some more pics of the completed lower. Fantastic! |
|
|
|
[#28]
A nice solid bead blasting and then some Cerakote and your golden...!
|
|
|
|
[#29]
That looks really good! It's hard to believe that your lower started out as a bunch of flat pieces of metal.
|
|
|
|
[#30]
Quoted:
A nice solid bead blasting and then some Cerakote and your golden...! Sand blast then Norrell's Moly Resin. Better mechanical finish adhesion with sand. Glass beards are too round and just peen the surface. Quartz sand or aluminum oxide are best. |
|
|
|
[#31]
Quoted:
That looks really good! It's hard to believe that your lower started out as a bunch of flat pieces of metal. Thanks. I am pleased with the results but I'll never do another steel one. Too much hand work. Much rather do a traditional aluminum 80%er. |
|
|
|
[#32]
Quoted:
Sand blast then Norrell's Moly Resin. Better mechanical finish adhesion with sand. Glass beards are too round and just peen the surface. Quartz sand or aluminum oxide are best. Quoted:
Quoted:
A nice solid bead blasting and then some Cerakote and your golden...! Sand blast then Norrell's Moly Resin. Better mechanical finish adhesion with sand. Glass beards are too round and just peen the surface. Quartz sand or aluminum oxide are best. You would be correct in that Al-Ox (80 to 120 grit) media or cleaned Sand would likely work best, I should of been more specific...Thanks. |
|
|
|
[#33]
Quoted:
You would be correct in that Al-Ox (80 to 120 grit) media or cleaned Sand would likely work best, I should of been more specific...Thanks. Quoted:
Quoted:
Quoted:
A nice solid bead blasting and then some Cerakote and your golden...! Sand blast then Norrell's Moly Resin. Better mechanical finish adhesion with sand. Glass beards are too round and just peen the surface. Quartz sand or aluminum oxide are best. You would be correct in that Al-Ox (80 to 120 grit) media or cleaned Sand would likely work best, I should of been more specific...Thanks. I will post some more pics tonight after I blast and coat the receiver this evening. Should turn out pretty nice for a 1.3 pound slab of welded steel!! |
|
|
|
[#34]
Quoted: I will post some more pics tonight after I blast and coat the receiver this evening. Should turn out pretty nice for a 1.3 pound slab of welded steel!! Methinks it would be rather expensive for you to make the under 6 lb thread w/ that receiver.
|
|
|
|
[#35]
That's amazing your determination perseverance and diligence is to be rewarded. Me I have a milling machine and know how to use it. I avoid welding like the plague I think I have been out of Argon for 4 months.
|
|
|
|
[#36]
Quoted:
Methinks it would be rather expensive for you to make the under 6 lb thread w/ that receiver. Quoted:
Quoted: I will post some more pics tonight after I blast and coat the receiver this evening. Should turn out pretty nice for a 1.3 pound slab of welded steel!! Methinks it would be rather expensive for you to make the under 6 lb thread w/ that receiver. LOL. Maybe with a 6.5" light profile pistol barrel with no muzzle device, no stock, and with a plastic flip-up sight. Might just make it. |
|
|
|
[#37]
Quoted:
LOL. Maybe with a 6.5" light profile pistol barrel with no muzzle device, no stock, and with a plastic flip-up sight. Might just make it. Quoted:
Quoted:
Quoted: I will post some more pics tonight after I blast and coat the receiver this evening. Should turn out pretty nice for a 1.3 pound slab of welded steel!! Methinks it would be rather expensive for you to make the under 6 lb thread w/ that receiver. LOL. Maybe with a 6.5" light profile pistol barrel with no muzzle device, no stock, and with a plastic flip-up sight. Might just make it. You could make all the Service Match shooters jealous w/ your 25 lb rifle, however.
|
|
|
|
[#38]
Quoted:
Progress Report: Well finally got the thing all Silver/Cu brazed together. Came out pretty well. Function checks perfectly and fits up well to all my uppers and mag combinations. Here's some pics before final sand blast and Moly Resin application. Final weight is 1 lb 5 oz. About twice the weight of an aluminum lower but a hell of a lot stronger. I have pounded on this thing with a big ball peen hammer to make minor "corrections" due to welding distortion with not the slightest evidence of braze joint failure. The 45% silver brazing alloy has a tensile strength of over 40k psi. Slightly less than half the steel plates. Right Side - Made the mag button fence smaller for more of the slick-sided look http://www.hunt101.com/data/500/medium/IMG_7431.JPG Left Side http://www.hunt101.com/data/500/medium/IMG_7420.JPG Fire control pocket with additional small plates added to bring interior width at rear lug to match uppers and to provide more material to drill detent passages. Also milled a small amount out of the floor to provide more clearance for trigger travel behind trigger opening. http://www.hunt101.com/data/500/medium/IMG_7438.JPG Lower left side. Trigger guard looked too massive so I cut a slot in it http://www.hunt101.com/data/500/medium/IMG_74232.JPG Lower right side http://www.hunt101.com/data/500/medium/IMG_74241.JPG Mag catch / bolt release area http://www.hunt101.com/data/500/medium/IMG_74271.JPG Going to apply the Norrell's Moly Resin one night this week. Will post some more pics of the completed lower. Very impressive! Looks great! I'm going to have to get an oxy-acetylene setup when I have some extra cash. Funds are pretty low right now. |
|
|
|
[#39]
Final Progress Report:
Well, I blasted and applied the Norrell's Moly Resin tonight. It turned out pretty nice. From arms length it looks just like an aluminum receiver, just a little heavier but almost unbreakable. 


|
|
|
|
[#40]
Quoted:
Final Progress Report: Well, I blasted and applied the Norrell's Moly Resin tonight. It turned out pretty nice. From arms length it looks just like an aluminum receiver, just a little heavier but almost unbreakable. http://www.hunt101.com/data/500/medium/IMG_7443.JPG http://www.hunt101.com/data/500/medium/IMG_7445.JPG http://www.hunt101.com/data/500/medium/IMG_74481.JPG http://www.hunt101.com/data/500/medium/IMG_7447.JPG Wow, excellent work! I want it! |
|
|
|
[#41]
And the best part is you won't break it when you butt-stroke someone.
|
|
|
|
[#42]
Quoted:
And the best part is you won't break it when you butt-stroke someone. Roger that!! |
|
|
|
[#43]
to add a bit of info, to mount the buffer tower at a true 90 degree to the center line of the receiver,
I used a 1 inch tube and an upper receiver to hold the buffer tube tower and buffer tube for welding. 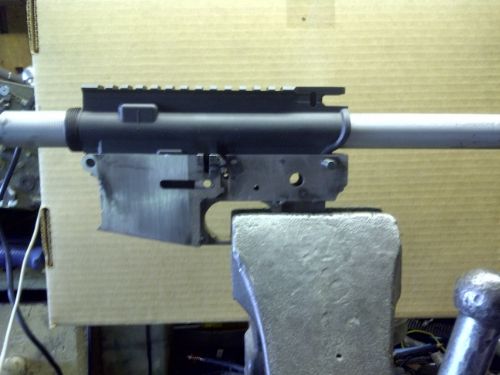
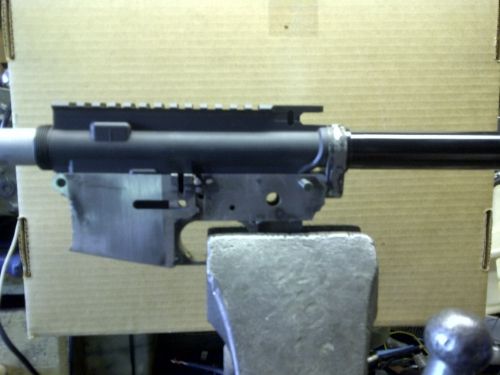
100% with no adjustments. |
|
|
|
[#44]
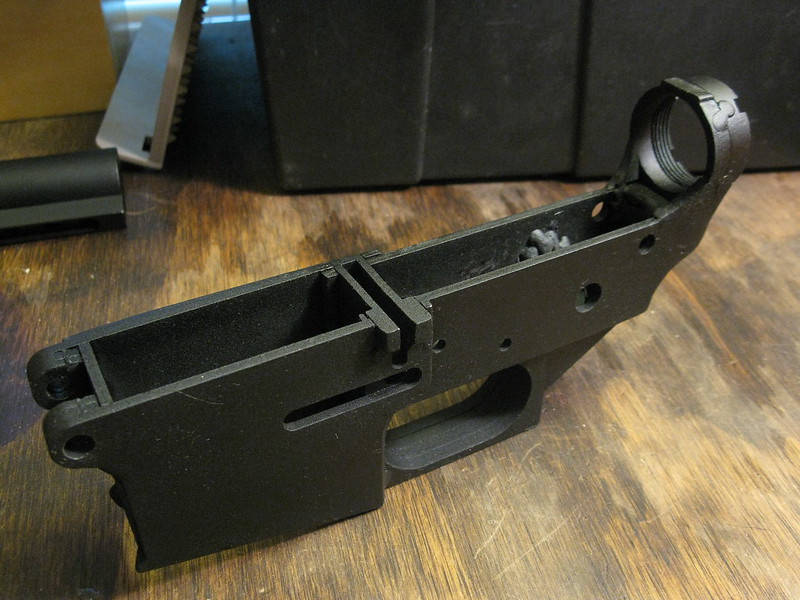
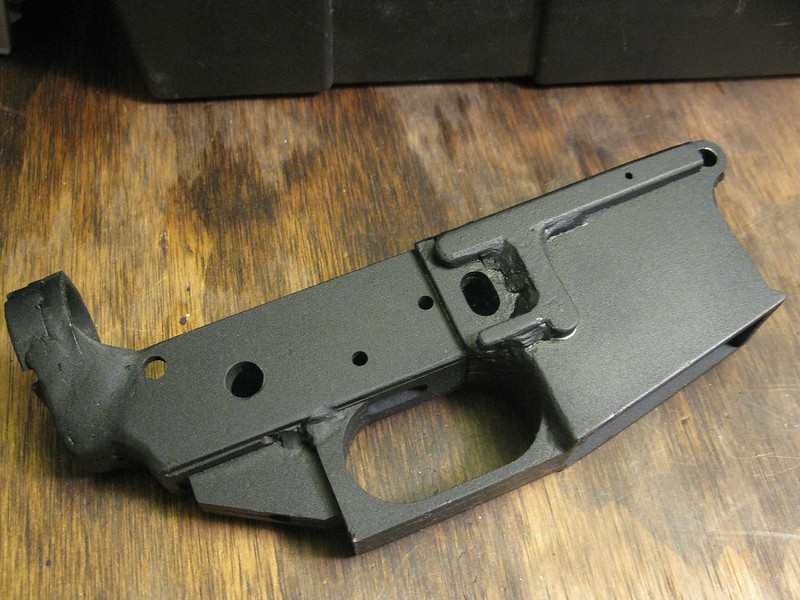
I picked up one of these kits as well. After many hours of fitting, milling, measuring, welding, and sanding. I am about ready for paint. I tried to make it as close to a factory steel made lower as I could so I could use a standard lower parts kit.


I milled out around the rear takedown pin and added some steel to the inzide od the lower so I could drill for the saftey and rear takedown detent. 

I also milled a slot in the magazine well for the lump on ar15 magazines. Along with this, I beveled the magazine well and milled a small area so that I can use a standard magazine catch. 


Instead of threading the rear of the reciever for the buffer tube, I welded the two pieces from the kit then milled out an area just barely deep enough for a standard buffer tube castle nut to slide inside. Then I welded the nut in place. Then I installed the buffer tube. At this point I inserted a .998 diameter bar into the buffer and upper reciever to line everything up. Then I welded everything together. Once complete, I drilled the hole for the rear takedown pin detent. I also milled a hole for the buffer retainer pin and spring to finish it up. 
I forgot to mention earlier, before anything was welded I used a machining center to do some engraving. I put the simple Safe/Semi/Auto markings on each side. Then on the right side of the mag well I engraved "Restricted: for civilian or militia use only". 
I have a spare buffer tube and grips, but I still need to install a lower parts kit. The ones I used for testing were for another build. If anyone has a stupid cheap lower parts kit, buffer, and buffer spring, just let me know. I plan to duracoat this within the next week or so and would like to have some fully assembled pics for everyone following this thread. Hopefully a week or so after that I will have a video for everyone to see it in action. This project has been a blast to build, but it is definetly something that one would need a decent fab shop to bring to this level. Just a simple welder and a dremel tool will get it together, but there is a lot of small things that are much better suited for a machining center than your typical garage tools. |
|
|
|
[#45]
Forgot to include a pic of the hole drilled for the front pivot pin detent

|
|
|
|
[#46]
Looks very nice!
|
|
|
|
[#47]
So as it comes the rear take down pin area is to wide? You had to shim it up? I'm definately going to buy a few of these.
|
|
|
|
[#48]
Yes and no. The rear takedown pin made it through both sides. However, not by much in my opinion. Also, since I wanted to use a standard detent/spring setup; I had to recess the right plate a bit (forged lowers come this way too). Along with that, I made a small plate that thickened up the inside so I could drill the necessary hole. The FCG side plates alone are not wide enough to do so.
|
|
|
|
[#49]
Another thing I was going to do was convert the grip thread to 1/4x20 so bolts would be easier to locate. But instead I stayed true to spec and ordered up the correct drill bit to thread a 1/4x28 bolt in. I recently ordered a bunch of stainless buttonheads to keep as backups anyways.
|
|
|
|
[#50]
Glad to see the interest in these. Great seeing the builds. Mine has languished after I decided I needed a drill press and a better work area. I was getting frustrated by my lack of precision.
|
|
|
 Win a FREE Membership!
Sign up for the ARFCOM weekly newsletter and be entered to win a free ARFCOM membership. One new winner* is announced every week!
You will receive an email every Friday morning featuring the latest chatter from the hottest topics, breaking news surrounding legislation, as well as exclusive deals only available to ARFCOM email subscribers.

AR15.COM is the world's largest firearm community and is a gathering place for firearm enthusiasts of all types.
From hunters and military members, to competition shooters and general firearm enthusiasts, we welcome anyone who values and respects the way of the firearm.

Subscribe to our monthly Newsletter to receive firearm news, product discounts from your favorite Industry Partners, and more.
Copyright © 1996-2024 AR15.COM LLC. All Rights Reserved.
Any use of this content without express written consent is prohibited.
AR15.Com reserves the right to overwrite or replace any affiliate, commercial, or monetizable links, posted by users, with our own.


