NV, USA
|
[#1]
following vaderspade's directions:


I printed a shit load of adhesive vinyl logos for this acid etch process if anyone's interested. Still have the ar15 logo, punisher/ar logo, magpul and skull logos, autobots, decepticon, FN, ying and yang, dragons, and others that are all pre-cut, sized, and ready to use for the magwell acid etch. very easy to do while watching tv. be sure to switch out q-tips often if it stops bubbling and your qtip turns black I |
|
|
|
[#2]
 Originally Posted By tenchi:
following vaderspade's directions: http://i1268.photobucket.com/albums/jj566/cbob19111/DSCF6631_zps6e8cef9a.jpg http://i1268.photobucket.com/albums/jj566/cbob19111/DSCF6623_zps4f96d4f5.jpg I printed a shit load of adhesive vinyl logos for this acid etch process if anyone's interested. Still have the ar15 logo, punisher/ar logo, magpul and skull logos, autobots, decepticon, FN, ying and yang, dragons, and others that are all pre-cut, sized, and ready to use for the magwell acid etch. very easy to do while watching tv. be sure to switch out q-tips often if it stops bubbling and your qtip turns black I I knew when I did it, there's NO WAY I'm the first to do a BFL. Yours looks better than mine too....
|
|
|
|
|
[#3]
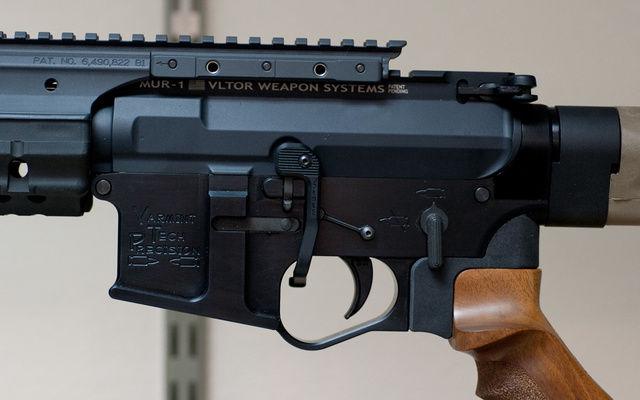
Originally Posted By tenchi:
following vaderspade's directions: http://i1268.photobucket.com/albums/jj566/cbob19111/DSCF6631_zps6e8cef9a.jpg http://i1268.photobucket.com/albums/jj566/cbob19111/DSCF6623_zps4f96d4f5.jpg I printed a shit load of adhesive vinyl logos for this acid etch process if anyone's interested. Still have the ar15 logo, punisher/ar logo, magpul and skull logos, autobots, decepticon, FN, ying and yang, dragons, and others that are all pre-cut, sized, and ready to use for the magwell acid etch. very easy to do while watching tv. be sure to switch out q-tips often if it stops bubbling and your qtip turns black I Yours were done with lowers that were NOT already anodized though correct? The top one appears to be raw, but the bottom one is coated for sure. Did you etch and then coat? I have a couple 308 80% lowers that are already anodized. I would like to put some custom marks on them, but don't really want to pay to ship them off somewhere to get engraved. |
|
|
|
|
[#4]
Originally Posted By Tomtbo:
I don't see why a block of hardwood would not work as a lower, if one made a plate to hold the buffer/stock assembly, and installed metal inserts for all the pins... orions_hammer 
|
|
|
|
NV, USA
|
[#5]
Originally Posted By jclaypool:
Yours were done with lowers that were NOT already anodized though correct? The top one appears to be raw, but the bottom one is coated for sure. Did you etch and then coat? I have a couple 308 80% lowers that are already anodized. I would like to put some custom marks on them, but don't really want to pay to ship them off somewhere to get engraved. Originally Posted By jclaypool:
Originally Posted By tenchi:
following vaderspade's directions: http://i1268.photobucket.com/albums/jj566/cbob19111/DSCF6631_zps6e8cef9a.jpg http://i1268.photobucket.com/albums/jj566/cbob19111/DSCF6623_zps4f96d4f5.jpg I printed a shit load of adhesive vinyl logos for this acid etch process if anyone's interested. Still have the ar15 logo, punisher/ar logo, magpul and skull logos, autobots, decepticon, FN, ying and yang, dragons, and others that are all pre-cut, sized, and ready to use for the magwell acid etch. very easy to do while watching tv. be sure to switch out q-tips often if it stops bubbling and your qtip turns black I Yours were done with lowers that were NOT already anodized though correct? The top one appears to be raw, but the bottom one is coated for sure. Did you etch and then coat? I have a couple 308 80% lowers that are already anodized. I would like to put some custom marks on them, but don't really want to pay to ship them off somewhere to get engraved. That is correct. these are 80% lowers and etching was done prior to alumahyde 2 coating. |
|
|
|
[#6]
Lets keep this going! This is very interesting, great work here guys. More pictures!
|
|
|
|
|
[#7]
Working on my engraving. No pics for this one.
 CHRIS |
|
|
|
|
[#8]
Many have seen this before....
This how I engrave my Lowers... this will work on Anodized Lowers.. CNC Engraving on my Mill. 
here is the end results... 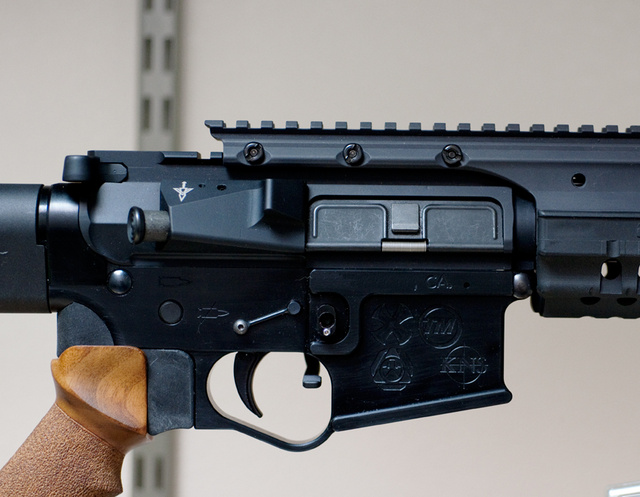
just a different way of doing it... Good Luck, Ca_Longshot |
|
|
|
CA, USA
|
[#9]
I have also moved to CNC engraving, but electro etching is still a great way for those without a CNC mill.
www.VaderTactical.com |
|
|
|
[#10]
Originally Posted By monsterjeep:
I have been looking into the MicroMill 2000, would anyone here be willing to share their programming for the fire control group pocket??? Im unfamiliar with CNC programming and will need some help to get started LOL Originally Posted By monsterjeep:
I have been looking into the MicroMill 2000, would anyone here be willing to share their programming for the fire control group pocket??? Im unfamiliar with CNC programming and will need some help to get started LOL The best little CAM program out there is CAMBAM Great program. Easy to use and learn. Inexpensive but Very Powerful!! This will get you started drafting your design and converting it to G-code!! They also have a great site, Getting start Videos, and Forum... If you need any help let me know... Ca_Longshot Originally Posted By VaderSpade:
I have also moved to CNC engraving, but electro etching is still a great way for those without a CNC mill. www.VaderTactical.com VaderSpade, I have referred many getting start in milling their 80% lower to your post... A great resource !! I went to CNC Engraving just because I already had my Mill! Ca_Longshot |
|
|
|
|
[Last Edit: Cixelsyd]
[#11]
Found some freeware that works pretty good for engraving g-code. F-Engrave. I'm not pleased with how MeshCam ran the symbol that I used. I'll use the F-engrave program from here on out for the engraving.
I also made a dog tag for one of our Corgis. He lost his jingle in the yard and wanted some more bling. CHRIS EDIT: Here's the text. I think it turned out pretty good. That F-engrave software is pretty easy to set up.  The medicine wheel symbol programmed up with MechCam. Edges looked ok, but the z-axis pulsed some on the finishing pass for some reason. It also did it's run on each line of the x-axis for the entire run. IE, bottom left to bottom right...up one row, left to right, etc. F-engrave will be doing my shape engraving from now on too.  |
|
|
|
OH, USA
|
[#12]
Vaderspade, do you remember what the name of the green dye was that you used for your green lower? It is the perfect green and I want to do the same color for mine.
Jim |
|
|
CA, USA
|
[#13]
Originally Posted By gomlin:
Vaderspade, do you remember what the name of the green dye was that you used for your green lower? It is the perfect green and I want to do the same color for mine. Jim It was from a kit I bought from Moonlite anodizing. I may be able to find the paperwork? |
|
|
CA, USA
|
[#14]
Following Vaderspade's lead with a few modifications:
- Instead of a Q-tip used a piece of Al rod wrapped the ends with a makeup pad from the wife's supplies and tied it with thread. - Increased the amount of salt in the vinegar mix and used a 4amp battery charger in 12v or 6v. Large areas 12v, small areas 6v (like the safety symbols). - Used a lot more salt/vinegar solution on the piece. - Cleaned the area to be etched with dish soap then acetone to remove any grease. - masked the area with painter's tape and used liquid tape in the corners to keep the solution from finding it's way to the substrate. Obtained nice deep etching this way. Sorry for all the pics. I just learn better by seeing what others have rather than just reading it. 


|
|
|
OH, USA
|
[#15]
Don't worry about it. The Moonlite materials are no longer available anyway. I was looking at the color swatches online from the other suppliers but it's hard to imagine what an upper and lower would look like. I like your forest green color and was going to order that shade if I could find it. The one called "Green B" is the one I'm leaning towards. Thanks anyway,
Jim |
|
|
CA, USA
|
[#16]
I don't know which of Caswell's dyes might be close but I have found them to be far better dyes. Maybe that's why moonlite is no longer around?
http://www.caswellplating.com/electroplating-anodizing/anodizing-products/anodizing-dyes.html |
|
|
|
[#17]
Originally Posted By Blowout:
Following Vaderspade's lead with a few modifications: - Instead of a Q-tip used a piece of Al rod wrapped the ends with a makeup pad from the wife's supplies and tied it with thread. - Increased the amount of salt in the vinegar mix and used a 4amp battery charger in 12v or 6v. Large areas 12v, small areas 6v (like the safety symbols). - Used a lot more salt/vinegar solution on the piece. - Cleaned the area to be etched with dish soap then acetone to remove any grease. - masked the area with painter's tape and used liquid tape in the corners to keep the solution from finding it's way to the substrate. Obtained nice deep etching this way. Sorry for all the pics. I just learn better by seeing what others have rather than just reading it. https://farm8.staticflickr.com/7360/14193273241_1c67445acb_b.jpg https://farm8.staticflickr.com/7407/14180136342_9887bcce56_b.jpg https://farm3.staticflickr.com/2908/13996107928_4cc27a6119_b.jpg https://farm3.staticflickr.com/2939/13996129307_9a9c71d430_b.jpg https://farm6.staticflickr.com/5549/13996098209_f8fc236ebb_b.jpg https://farm3.staticflickr.com/2925/14009922878_5d87386f0d_b.jpg https://farm8.staticflickr.com/7340/14173443996_9fedfba226_b.jpg https://farm3.staticflickr.com/2900/13963215220_3c6fde0c4e_b.jpg https://farm4.staticflickr.com/3863/14973463326_6e42591d2a_b.jpg https://farm4.staticflickr.com/3912/14809792960_1f81bc3d01_b.jpg Great etching!! What did you coat with? It all turned out really well. |
|
|
|
ND, USA
|
[Last Edit: Bison9]
[#18]
BUMP
I recently finished the last 20% on a couple lower receivers and am looking to etch them (using the vinyl stencil process in this thread) and then anodize them. Well, I have some questions on the process. I have put about 15 hours alone into studying etching and anodizing and cannot find the answers to these questions so here goes: Anodizing: 1.) So, I am looking at the Anodizing kit from Caswell's and have scoured the Net to learn up on this stuff. In general, a lot of guys are cleaning, then Bead Blasting, then doing another clean, degrease, de oxidize/deSMUT, and then anodizing/dying/sealing. But! instead of bead blasting, I saw that the process used here in this thread is the overall etch solution by dipping the whole lower in the etch solution before anodizing. Would this be done instead of bead blasting then? I ask because I have a couple of the super shiny/tool mark ridden lowers from billet80.com that are the 7075 Aluminum and I am unsure if I should bead blast or just do the etch solution prior to anodizing them? I am wondering if that etch solution will remove the tooling marks from billet80.com on the surface of those lowers? 2.) I am wondering what material was used for the hanger to connect to the lower receiver for suspending the lower into the anodize bath? I am going to try and possibly go with Titanium for the material on the hanger, but I was wondering what diameter of material is being used here in this thread? I have read a lot of unfavorable articles about guys using hangers that are not solid Aluminum and containing other alloys giving a bad anodization for them. I am wondering the company and brand of the hangers that are being used in this thread and basically where you get them. 3.) What is the best way to connect your hanger to the lower receiver? Was the hanger threaded into the handle hole on the bottom of the lower receiver? I think those threads are 10-24 but have no Idea :facepalm: 4.) **I still am very unsure as to the exact dilution for the Anodize bath. I have read a lot of people going for a 1:10 acid:distilled water mix but it is all over the board... Also, do I do the dilution by weight or by volume? This is very key to know I think. I am wondering how you prep the anodize bath really... 5.) ***Do any of you know roughly the total square inches of surface area that gets anodized on a typical AR15 lower receiver? What current to set on the power source for anodizing depends squarely on this number. 6.) For testing the temperature of the anodize bath, what is to be used for a thermometor? What material is it? I have been reading that putting any alloy other than lead, Aluminum, or Titanium in an Anodize bath will contaminate it.. Nobody covers this and I have been scratching my head on this one... Anyhow, sorry for the long winded message - this thread has been by far the best one I have seen on the web so far on this stuff so I thought I would go right to the source with some of my questions . Thanks in advance for any help any of you can give me! |
|
|
CO, USA
|
[#19]
Very nice job
|
|
|
|
[#20]
Good job -- looks good. Just a couple of questions 1) Please confirm what exactly you are using for the vinyl stencil 2) are you printing on a regular inkjet / lazer
As a comment --- plain old fashioned battery chargers are not easy to find --- you can use a battery to etch and then recharge as needed. Yours came out better than my copper sulfate etch. (I did not have a battery available and yes the new battery charges do NOT work) 
Great post! |
|
|
|
CA, USA
|
[#21]
Originally Posted By jclaypool:
Great etching!! What did you coat with? It all turned out really well. Thanks, GunKote. I screwed up the first time and didn't degrease with acetone after anodizing and the GunKote didn't stick. Had to AL blast the coating off and do it again. Nothing else would take the cured GK off. I called KG and they recommended soaking in acetone for 30 minutes and cook the acetone off before coating. That added step was the answer. |
|
|
CA, USA
|
[#22]
Originally Posted By Bison9:
BUMP I recently finished the last 20% on a couple lower receivers and am looking to etch them (using the vinyl stencil process in this thread) and then anodize them. Well, I have some questions on the process. I have put about 15 hours alone into studying etching and anodizing and cannot find the answers to these questions so here goes: Anodizing: 1.) So, I am looking at the Anodizing kit from Caswell's and have scoured the Net to learn up on this stuff. In general, a lot of guys are cleaning, then Bead Blasting, then doing another clean, degrease, de oxidize/deSMUT, and then anodizing/dying/sealing. But! instead of bead blasting, I saw that the process used here in this thread is the overall etch solution by dipping the whole lower in the etch solution before anodizing. Would this be done instead of bead blasting then? I ask because I have a couple of the super shiny/tool mark ridden lowers from billet80.com that are the 7075 Aluminum and I am unsure if I should bead blast or just do the etch solution prior to anodizing them? I am wondering if that etch solution will remove the tooling marks from billet80.com on the surface of those lowers? The longer it sits in the etching solution (NaOH) the more Al will be dissolved and machining marks will be softened. Not sure how bad the tooling marks are. You don't want to keep the lower in the NaOH too long because your pin holes will get enlarged. Try it and see if it looks good enough after the desmut to meet your needs 2.) I am wondering what material was used for the hanger to connect to the lower receiver for suspending the lower into the anodize bath? I am going to try and possibly go with Titanium for the material on the hanger, but I was wondering what diameter of material is being used here in this thread? I have read a lot of unfavorable articles about guys using hangers that are not solid Aluminum and containing other alloys giving a bad anodization for them. I am wondering the company and brand of the hangers that are being used in this thread and basically where you get them. I bought a 36" of 1/4" AL rod from Ace and cut a length about 15" and threaded one end 1/4-28 to thread into the pistol grip screw hole. After bending the Al rod the way I wanted it so the lower was suspended between the lead cathods, it was clamped to the bucket. 3.) What is the best way to connect your hanger to the lower receiver? Was the hanger threaded into the handle hole on the bottom of the lower receiver? I think those threads are 10-24 but have no Idea :facepalm: See #2 4.) **I still am very unsure as to the exact dilution for the Anodize bath. I have read a lot of people going for a 1:10 acid:distilled water mix but it is all over the board... Also, do I do the dilution by weight or by volume? This is very key to know I think. I am wondering how you prep the anodize bath really... Refer to procedure below 5.) ***Do any of you know roughly the total square inches of surface area that gets anodized on a typical AR15 lower receiver? What current to set on the power source for anodizing depends squarely on this number. See procedure below 6.) For testing the temperature of the anodize bath, what is to be used for a thermometor? What material is it? I have been reading that putting any alloy other than lead, Aluminum, or Titanium in an Anodize bath will contaminate it.. Nobody covers this and I have been scratching my head on this one... I tried using a meat thermometer with the probe wrapped in Al foil. Didn't work too well and the H2SO4 leaked through to the SS probe and began to blacken the solution. Use a fish tank thermometer...the glass type with the thermometer sealed inside Anyhow, sorry for the long winded message - this thread has been by far the best one I have seen on the web so far on this stuff so I thought I would go right to the source with some of my questions . Thanks in advance for any help any of you can give me! Here is the procedure I put together for the anodizing: I sourced everything separately It took a good deal of research from various sources, but the results were good and worth the effort. Shopping list: ¼” aluminum rod 36” from Ace. I used a die set to put ¼-28 thread on one end so it could be screwed into the pistol grip screw hole on the lower. This rod can be reused since there is no anodizing build up at the threads. Snug with pliers prior to anodizing. Also cut shorter 4” pieces off the rod and thread to use as handles when doing other steps so the part is not touched. Drill a hole in a piece of wood and insert rod and use as a stand when doing the K-Phos/Gunkote steps. Battery charger - I used an older 4 amp 6/12V. I was trying without success to find a reasonably priced rheostat for adjusting voltage and then gave up and just started at 6V for 5 minutes then switched to 12V for the remainder of time. In my case the amp gauge pins at max for a few seconds when first turned on, then settled down to rest at 2A @ 6V and about 3.5A @12V. H2SO4 - Sulfuric Acid - Autozone had QT size and O'Rielly's had Liter. Same price but the QT is slightly larger. Mix 2 QT's into 1 ½ gal DIH2O. HNO3 - Nitric acid - pH down by Tetraflora – bought this from a local hydroponics store for $9/QT. After a lot of research, it was the cheapest way to get nitric acid. Nitric Acid was the most difficult chemical for me to find at a reasonable price. You only need 10% for the desmut step. You can also wash/scrub the lower again in dish soap and get most of the smut off, but if you want to do textbook, use HNO3. Lower anodizing procedure: Do not let part dry anytime during the anodizing process steps 1-4. 1. Degrease – Purple power or Greased Lightening Rinse in tap water, dish soap and water, rinse again 2.Etch – Red Devil Lye 2 tablespoons per gallon DI water. 120g/L -Attach AL rod to lower to use as a handle. -NaOH bath 2-5 minutes, agitate every so often until a greyed/blk. -Spray DI water to rinse off over NaOH bath. -DI water bath covering lower, agitate, pour off and change water let soak for a few minutes. 3.Desmut – 10% Nitric Acid bath (Techniflora pH down) -3-5 minute turns white. Agitate in bath. -Spray bottle with DI water -DI water bath covering lower, agitate 4.Anodize -One day prior to anodizing - Add 1 part battery acid to 3 parts DI water. Slowly add acid to H2O. 2 qts battery acid, 1 ½ gal DI water. The solution needs to cool down before anodizing. Always add acid to water! -69 - 72°F, use glass aquarium thermometer. - use an air stone and air pump for a fish tank to circulate the H2SO4 solution during anodizing. It helps cool the solution and moving. -Replace short AL rod on lower with longer rod for anodizing. -Battery charger - Negative (cathode) to lead/AL in bath, Positive (anode) to AR lower AL rod. Start at 6V for 5 minutes (mine held at 2A). Switch to 12V for remainder of time (mine held at 3.5A). Read amperage and calculate time. If power supply reads 3.5A: 720/3.5 = 206 amp min 81 sq in/144 in/ft = .5625 sq ft (81 sq in is the lower surface area) 206 x 0.5625 = 116 min in tank @ 3.5A Spray bottle with DI water over tank Soak in DI water, change water soak several minutes Dry several days before Gunkote process 
|
|
|
CA, USA
|
[#23]
Originally Posted By Ravenn22:
Good job -- looks good. Just a couple of questions 1) Please confirm what exactly you are using for the vinyl stencil 2) are you printing on a regular inkjet / lazer As a comment --- plain old fashioned battery chargers are not easy to find --- you can use a battery to etch and then recharge as needed. Yours came out better than my copper sulfate etch. (I did not have a battery available and yes the new battery charges do NOT work)
Great post! I used a vinyl cutter made by Silhouette Bought the Portrait on line for about $120 new. I had good results with outdoor rated vinyl sheets. They stuck pretty good even when wet. |
|
|
|
[#24]
Good info in here
|
|
|
|
TX, USA
|
[#25]
Originally Posted By backbencher:
orions_hammer http://www.weaponeer.net/forum/uploads/orionshammer/images/2008-10-04_173145_04_uppermounted.jpg Originally Posted By backbencher:
Originally Posted By Tomtbo:
I don't see why a block of hardwood would not work as a lower, if one made a plate to hold the buffer/stock assembly, and installed metal inserts for all the pins... orions_hammer http://www.weaponeer.net/forum/uploads/orionshammer/images/2008-10-04_173145_04_uppermounted.jpg That looks "evil" enough... Shh... next thing you know someone's going to try to ban wood. |
|
|
OR, USA
|
[#26]
I didn't read all 11 pages, yet, but the etching is what I'm interested in. So I can use any 12v car battery? Just salt and vinegar, no water? My big question is: is there any place I can buy the stencils made to order? I'd like, for example, colt M16 repro lettering. Also maybe something custom like military logo, ect.
|
|
|
|
[Last Edit: AFCarbon15]
[#27]
Originally Posted By AASG:
I didn't read all 11 pages, yet, but the etching is what I'm interested in. So I can use any 12v car battery? Just salt and vinegar, no water? My big question is: is there any place I can buy the stencils made to order? I'd like, for example, colt M16 repro lettering. Also maybe something custom like military logo, ect. Yes a car battery will do just fine. I use an old more cycle battery wile connected to a trickle charger. As for stencils, and vinyl graphics shop should be able to hook you up with cheap sldecals to use. Suggest outdoor grade vinyl as it will stick a little longer while wet. I'm no pro, but I've done a few with varying techniques and varying solutions ect, all worked about the same in the end. My first 
This one was a gift. 
|
|
|
|
USA
|
[Last Edit: smith505]
[#28]
I've been using the electro-etching process outlined by VaderSpade for a while now to complete my 80% lowers. I think this one is probably the best one yet.


Changes I made to the process: Instead of using cotton balls or q-tips, I build a little pool around the area I'm going to etch using rope caulking (http://www.walmart.com/ip/Duck-Brand...White/16879752) then fill it up with the vinegar/salt solution. At that point, all I do is submerge an electrode (I use a small steel rod) that is clipped in the negative lead of the battery charger. Much quicker, more even etching, etc. Sorry there's not pictures of the pool... Also, I cut masks out that match up with known references on the lower, for example, the selector etching mask has a cut out for the selector hole and the top of the lower is the top of the mask: 
|
|
|
|
[#29]
That turned out great.
CHRIS |
|
|
|
|
[#30]
Looks great smith505...
|
|
|
|
TX, USA
|
[#31]
I got a K40 laser, I use it to cut sheet vinyl to the design I want...
Good idea on the caulking... |
|
|
WV, USA
|
[#32]
Originally Posted By Bison9:
BUMP I recently finished the last 20% on a couple lower receivers and am looking to etch them (using the vinyl stencil process in this thread) and then anodize them. Well, I have some questions on the process. I have put about 15 hours alone into studying etching and anodizing and cannot find the answers to these questions so here goes: Anodizing: 1.) So, I am looking at the Anodizing kit from Caswell's and have scoured the Net to learn up on this stuff. In general, a lot of guys are cleaning, then Bead Blasting, then doing another clean, degrease, de oxidize/deSMUT, and then anodizing/dying/sealing. But! instead of bead blasting, I saw that the process used here in this thread is the overall etch solution by dipping the whole lower in the etch solution before anodizing. Would this be done instead of bead blasting then? I ask because I have a couple of the super shiny/tool mark ridden lowers from billet80.com that are the 7075 Aluminum and I am unsure if I should bead blast or just do the etch solution prior to anodizing them? I am wondering if that etch solution will remove the tooling marks from billet80.com on the surface of those lowers? 2.) I am wondering what material was used for the hanger to connect to the lower receiver for suspending the lower into the anodize bath? I am going to try and possibly go with Titanium for the material on the hanger, but I was wondering what diameter of material is being used here in this thread? I have read a lot of unfavorable articles about guys using hangers that are not solid Aluminum and containing other alloys giving a bad anodization for them. I am wondering the company and brand of the hangers that are being used in this thread and basically where you get them. 3.) What is the best way to connect your hanger to the lower receiver? Was the hanger threaded into the handle hole on the bottom of the lower receiver? I think those threads are 10-24 but have no Idea :facepalm: 4.) **I still am very unsure as to the exact dilution for the Anodize bath. I have read a lot of people going for a 1:10 acid:distilled water mix but it is all over the board... Also, do I do the dilution by weight or by volume? This is very key to know I think. I am wondering how you prep the anodize bath really... 5.) ***Do any of you know roughly the total square inches of surface area that gets anodized on a typical AR15 lower receiver? What current to set on the power source for anodizing depends squarely on this number. 6.) For testing the temperature of the anodize bath, what is to be used for a thermometor? What material is it? I have been reading that putting any alloy other than lead, Aluminum, or Titanium in an Anodize bath will contaminate it.. Nobody covers this and I have been scratching my head on this one... Anyhow, sorry for the long winded message - this thread has been by far the best one I have seen on the web so far on this stuff so I thought I would go right to the source with some of my questions . Thanks in advance for any help any of you can give me! Answer for #2 a titanium rod threaded for the pistol grip screw hole would make a good contact. 1/4" rod would be needed I have seen a guy who makes fishing reels use this method Answer for #3 the grip screw is 1/4-28 Answer for #6 I just got a infrared thermometer with laser pointer from harbor freight for 25.00 (reg 70.00) Answer for #4 from what I have read battery acid and water 1-1 is correct.I will be doing a test run soon Questions I would like answered, # 1,5 |
|
|
USA
|
[#33]
so your saying use about an 1/8 of the tetraflora powder to a gallon of water?
|
|
|
|
[#34]
Super impressive work.
|
|
|
|
USA
|
[#35]
Have you guys anodized 7075 aluminum with this method? I understand it's not as easy as 6061.
|
|
|
CA, USA
|
[#36]
Originally Posted By BlackWeapon:
Have you guys anodized 7075 aluminum with this method? I understand it's not as easy as 6061. 7075 is no harder to anodize but the results may not be as uniform. This is mostly true on forged lowers. Billets in 6061 or 7075 always come out cleaner. You can sometimes see the grain lines in forged 7075. More of a problem in colors as black covers most everything. |
|
|
USA
|
[#37]
Can I use a 6061 rod hanger on a 7075 billet lower to anodize. Over heard you should use the same metal but I can't find a 7075 rod.
|
|
|
CA, USA
|
[#38]
Originally Posted By BlackWeapon:
Can I use a 6061 rod hanger on a 7075 billet lower to anodize. Over heard you should use the same metal but I can't find a 7075 rod. I use cheap soft aluminum wire for 6061 & 7075 with no issues. A good connection is very important. |
|
|
|
[#39]
What's everyone using to cut the vinyl currently?
Thanks Wes |
|
|
|
|
[#40]
Originally Posted By BlackWeapon:
Can I use a 6061 rod hanger on a 7075 billet lower to anodize. Over heard you should use the same metal but I can't find a 7075 rod. http://www.mcmaster.com/#standard-aluminum-rods/=120tp62 Aluminum rod. They have 7075 |
|
|
|
USA
|
[#41]
Thanks for the help guys. Got it anodized. It took a lot longer than I thought for the current to start to drop about 2:20 and it never turned the goldish color I here other people talk about but more of a satin nickel. I had it at 12V and it settled to around 7 amps when the acid bath was 72 degrees.
I used black Rit and it absorbed it well. The only problem is the finish as shiny areas and areas that are a little dull. If I scrub it a little brownish/black color will come off. Do you guys polish it with something to even the shine? I tried a microfiber cloth and that doesn't do it. I lightly scrubbed with a blue dish sponge with the scrub side and it helped a little bit but not enough. I don't want to scratch the finish. |
|
|
|
[Last Edit: LVDesert]
[#42]
Excellent thread, there is a lot of great info here. Any chance I could pay one of you, that is capable, to cut some vinyl stencils for me?
|
|
|
|
AL, USA
|
[#43]
Thanks to Vader Spade's guidance from his posts.
|
|
|
|
[#44]
VaderSpade et al,
great thread with a lot of good information. Thanks! |
|
|
|
|
[#45]
Bump!
|
|
|
|
TX, USA
|
[#46]
Man I'm so confused on the anodizing.
What type, or particular power supply should I be looking for? I've seen people say a variable, some say constant, some say 12vdc, some say as high as 30vdc. What actually works at home? |
|
|
OR, USA
|
[#47]
Can someone recommend the best anodizing dye for someone who just wants black, and doesn't want to put a different coating on after?
|
|
|
|
[Last Edit: A-Aargh15]
[#48]
Originally Posted By LVDesert:
Excellent thread, there is a lot of great info here. Any chance I could pay one of you, that is capable, to cut some vinyl stencils for me? Pricing is very fair and the turnaround time is often less than a week. Depending on the workload they've had on hand, I've had some of my work done in less than a day - placed order at 9am, got a call before lunch to stop back by and pick it up. I reckon you could order over the phone or via email and pay by c/c and they'd ship to you, with a small shipping & handling fee tacked on. A-Aargh15 |
|
|
|
|
[#49]
Originally Posted By VaderSpade:
I don't know which of Caswell's dyes might be close but I have found them to be far better dyes. Maybe that's why moonlite is no longer around? http://www.caswellplating.com/electroplating-anodizing/anodizing-products/anodizing-dyes.html |
|
|
|
|
[#50]
I have read almost all of this entire (now six pages) thread. The fiancee' is down on Bourbon Street with her girlfriends visiting from out of town tonite and I'm left minding the store so I'm using the time to research, research, research my FrankensteinGuntm DIY project. They say measure twice, cut once. In my case I like to research three times, measure twice, cut once.
VaderSpade deserves a Nobel Prize for this thread! That's a lot more than some "community organizer" did to get a freakin' Nobel. Anyway, maybe I overlooked it elsewhere on here but I didn't find his website address to his engraving business until I got to Page Four.... www.VaderSpade.com .....so I thought I'd help a brutha out and post it here again on Page Six, at the end of the thread. |
|
|
|
 Win a FREE Membership!
Sign up for the ARFCOM weekly newsletter and be entered to win a free ARFCOM membership. One new winner* is announced every week!
You will receive an email every Friday morning featuring the latest chatter from the hottest topics, breaking news surrounding legislation, as well as exclusive deals only available to ARFCOM email subscribers.

AR15.COM is the world's largest firearm community and is a gathering place for firearm enthusiasts of all types.
From hunters and military members, to competition shooters and general firearm enthusiasts, we welcome anyone who values and respects the way of the firearm.

Subscribe to our monthly Newsletter to receive firearm news, product discounts from your favorite Industry Partners, and more.
Copyright © 1996-2024 AR15.COM LLC. All Rights Reserved.
Any use of this content without express written consent is prohibited.
AR15.Com reserves the right to overwrite or replace any affiliate, commercial, or monetizable links, posted by users, with our own.


