|
Posted: 12/20/2016 7:21:04 PM EDT
I've always had a thing for pistol caliber AR's but I'm also a big fan of HK's. Being one of those relentless tinkerers who always has to tweak/change/modify, I thought it'd be fun to make a PCC that's part AR, part HK. Enter the Rock River PDS pistol:
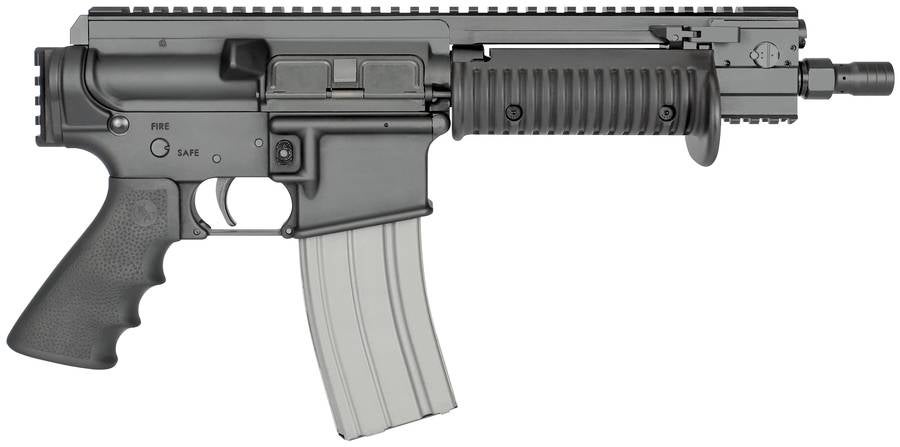
(photo from thefirearmblog.com) After looking one over, I decided it would be a great base for my project. An AR with 'bufferless' recoil system and forward side-charging handle; both very HK-ish. Because I already own a few blowback 9mm AR's I thought it'd be fun to try my hand at a gas operated version. Reading about the issues with direct impingement versions made me second guess my decision but I wanted to try anyway since I thought a short-stroke piston might be a little more forgiving than DI. So began the research. The obvious challenge was the gas system itself. The stock gas port is located 5.875" from the torque shoulder - definitely too far for 9mm pressure. My initial wag for the port was around .5" from the shoulder. However, I couldn't simply move the piston housing rearward since it also supports the front of the receiver rail. What to do? Tap into the gas near the chamber then plumb it forward to the piston housing of course. After a few modifications & fabrications, I came up with this: 

|
|
|
|
[#1]
-Barrel was made from an old blowback one. It was turned & threaded for a barrel extension and had a .125" port drilled .5" from the shoulder.
-Bolt is an unmodified 5.45x39mm (perfect fit for 9mm) -Cut down mainspring (removed about 25%) -Custom gas block with gas tube -Custom "gas regulator" (initially made from a 7mm hex bolt but later a drill rod) -Colt-style mag block with Uzi mags -Reduced power trigger spring I did some initial tests both unsuppressed and suppressed with 115g, 124g, 147g, and 158g bullets of various manufacture. The results? Well the gun functioned. Not great, but it did work. So the system was getting gas but the anemic ejection of spent casings was something to be desired. It coughed them out maybe 2-3 feet and in a manner reminiscent of a toddler learning how to throw a baseball. But at least they were ejecting. Chambering new rounds was 50/50. Some short-stroking and not quite picking up fresh ones with any consistency. I thought I'd get the best results with heavier bullets shot suppressed (idea being more dwell time in barrel & increased back pressure = more usable gas). Surprisingly, Armscor 124g cycled the most times before jamming. |
|
|
|
[#2]
After taking it apart for inspection, I noticed a lot of soot/scorching around the back & front of the gas block and around the gas regulator. This led me to believe a lot of gas was escaping that otherwise could be used to cycle the action. The other issue I noticed (and expected) was the large amount of crud built up in the piston housing after only ~30 rounds. More disconcerting, chunks of copper were getting shaved from the bullet and collecting on the piston housing plug face. This also was expected as others who have worked with DI 9mm's mentioned something similar (specifically Rudy at Macon Armory)


To remedy the gas leak, I silver soldered the tube into the block and machined a new regulator from a 7mm drill blank (Much tighter fit in the housing). 
Another thing I changed is magazine position. Before I was using a Colt-style mag block that put the mag in the middle of the magwell. Here's my new test magazine: 
Cut up junk steel 10-round AR mag tack-welded onto the back of an Uzi mag. This puts the mag full forward in the well which I hope helps the short-stroking. I was concerned about feeding issues but so far it doesn't seem to jam with dummy rounds so we'll see. |
|
|
|
[#3]
Now this is where I should've tested it again. But instead I decided to relocate the gas port. I did this hoping to alleviate bullet shaving and also allow the bullet more time to properly "seat" into the rifling lands to provide a better seal. My thought is this will allow the gas to expand in the barrel a little before being ported off versus almost immediately after unseating from the casing. The new port is 1" from the shoulder and smaller this time; .094". Yeah I'm kind of working backwards now. I'm fully expecting more short-stroking and require opening the port back to .125". But easier to open a little at a time versus going the other way. If the gun still doesn't cycle, the port will be moved to .75" from the shoulder and start all over again.
When it's all said and done, if I can't get it to cycle with any kind of reliability I'll consider the project closed and the parts will go into the parts box. For me it's the tinkering I really enjoy so I still consider it a win. Besides, I'm sure I'll start reloading one of these days and try again with slower burning powders. That seems to be the trick for gas 9mm's. I'm hoping to get back to the range this week and try it out again. Report to follow of course. PS - Yes I know I can just go buy an MPX or MP5 and be done with it. Believe me I've thought about that many times while frustrated with this project! |
|
|
|
[#4]
I hope you are successful......and you are correct that the blowback mags sit too high....nothing I love more than a Garage build to make something work....Holler if I can be of assistance.
|
|
|
|
[#5]
Awesome Rudy thanks. Sadly I'm not even finished with this thing yet and already daydreaming about redoing it in 45!
|
|
|
|
[#6]
Wish you were closer....we could have a build party .......come to the shop on a Friday and we could whip that puppy out over the weekend....
Guess I'm gonna have to buy one or get off my ass and design an upper myself....to damn many projects 
|
|
|
|
[#7]
Funny you mention that. About a year ago I was >this< close to moving to Robins and may still someday. If I ever do make it out there you can expect a call!
|
|
|
|
[#8]
Well you have me watching. I hope it all works out.
I still want a bufferless 9mm ar |
|
|
|
[#9]
Quoted:
....to damn many projects Yup. My workbench is a disaster since I suffer from a condition where I start new projects before finishing old ones. Uggh... |
|
|
|
[#10]
Quoted:
I hope it all works out. That makes two of us! My backup plan is to make it a blowback if it doesn't work out. An overly complicated one, but a blowback none the less. |
|
|
|
[#11]
Hooray! Looks like my pics are finally showing up and not just the photobucket links. Guess I have some street cred now.
|
|
|
|
[#12]
Quoted:
Yup. My workbench is a disaster since I suffer from a condition where I start new projects before finishing old ones. Uggh... Quoted:
Quoted:
....to damn many projects Yup. My workbench is a disaster since I suffer from a condition where I start new projects before finishing old ones. Uggh... ha, is your condition worse then having three different calibers on 3 different platforms worth of parts scattered about on same said work bench? |
|
|
|
[#13]
Quoted:
ha, is your condition worse then having three different calibers on 3 different platforms worth of parts scattered about on same said work bench? You might have me there! Sadly I was literally sifting through parts on the bench trying to find a barrel nut when I realized it was right in front of me the whole time. I'm convinced some of my guns have had parts from others installed accidentally at some point. 
|
|
|
|
[#14]
Keep at it. It's getting interesting.
Steve/RRA |
|
|
|
[#15]
So I took it back out for more tests today with the re-worked gas system. I tried the same variety of bullets and also tried three magazine configurations:
-Sterling from front of magwell -Uzi from front of magwell -Uzi & Promag from middle of magwell 


The good news is there are no more gas leaks. Even with the now smaller gas port being further from the chamber, the bolt "seemed" to cycle the same as before. But after a few rounds, it was apparent it was not operating the same. On a positive note, I was fully expecting the bolt to barely move but it was in fact ejecting brass! |
|
|
|
[#16]
The biggest issue was feeding however, especially with the Uzi mag in front of the well. Most of the bullets were getting jammed up nose first into the top of the chamber:

Of ~50 rounds fired, I had at most a string of three shots before jamming. It didn't look as bad when I previously tested it with dummy rounds but alas, it's a problem. Additionally, rounds were getting half-stripped from the magazine and stopping. The bolt obviously wasn't going back far enough to create momentum and I thought the cut down action spring also had something to do with it (too weak to strip). This issue was especially prevalent in the Uzi mag since rounds are held in there tightly. I tried swapping springs, between a stock and cut-down one. Stock spring helped a little with stripping but was counterproductive to the flaccid bolt movement since more energy is required to work against it. Sigh....
The Sterling mag stripped SOOO much easier (even with the cut spring) but rounds kept binding in front of the magazine; they would come forward but instead of angling up into the chamber, they'd hit the lip on the bottom of the feed ramp and stop. Trying it multiple times with the same round ended up pushing the bullet into the case: 
|
|
|
|
[#17]
For comparison, rounds are angled up more in the Uzi compared to the Sterling. Not sure if I can tweak the lips of either to help with feeding.
Uzi: 
Sterling: 
I also tried the traditional Colt-style mag block which didn't help much. Matter of fact, I could absolutely tell the bolt wasn't going back as far as before since it wasn't stripping rounds every time and would close on an empty chamber. As for ejection issues, I had lots of stovepipes and sometimes the case rim would stick on the extractor. I assume it's from being under-gassed and the bolt just isn't traveling with enough velocity to properly eject. I took it apart on the bench and inspected everything. As mentioned, the leaks were gone just some gas marks on the barrel (rear hole is port; forward hole is a dimple for another idea I had): 
|
|
|
|
[#18]
One thing I found curious was there seemed to be a lot more crud/copper/etc built up on the piston than before, especially on the gas relief hole on top of the piston housing:

I didn't seem to notice that as much before when the gas port was .5" from the chamber. I absolutely thought there'd be less copper bits this time. Plus there seems to be lots of blue residue (sorta see it in the pic). Wondering if it's patina'd copper? What's next? Well needless to say I think the gas port needs to be opened up to .125". But first I need to fix the feeding. Having the mag in front of the well is also a must. My preference is to make the Sterling mag work since it requires the least effort to strip rounds. Once I can reliably feed dummy rounds, I'll test again and evaluate the gas port. |
|
|
|
[#19]
A little tidbit I have discovered over the years is the top of the case rim on a single feed mag needs to be flush with the bottom of the bolt pocket......the nose up jam is often caused by the mag being too low......also....can you show a pic of your feed ramp.....?
|
|
|
|
[#20]
Good to know Rudy thanks! I've been pushing the mag all the way up until the top of the lips are almost touching the bottom of the bolt carrier. Never paid much attention to where the case rim is in relation to the bolt. Although Uzi & Sterling mags are both double-stack/double-feed. Would it be causing the same issues you think?
I'll post an update with the feed ramp pic... |
|
|
|
[#21]
Man I need to do a better job with the before and after pictures. I never thought to take a photo of the barrel extension before I went crazy with the dremel. It was basically somewhere between this and an untouched extension. I originally left some of the locking lug intact but felt it was contributing to the misfeeding so off it went. I really should've put it in the mill to make a cleaner cut but I had the dremel already out and was feeling froggy. After the sanding drum, I used a polishing wheel to smooth it out:

So to update, this little chop job has GREATLY improved feeding when hand cycling. Uzi mags however, continue to be a problem. I polished the inside of the feed lips but it's still holding rounds way too tight. When I release the bolt, it's still only stripping rounds half way. I began to wonder how the blowback seems to strip rounds but then remember how much mass there is with the bolt & buffer. Onto the Sterling mags. The ramping helped with the feed angle but there was still some binding. |
|
|
|
[#22]
So this is where I started to 'cross the streams' with all the project guns I have sitting on my bench. Rather than continue to work with Sterling mags in the RRA lower, I though "what if I tilted the magazine forward a little like an HK? That would surely help with the feed angle right??"
Well I grabbed a project lower I've been working on to try it out: 
This started life as an Anderson 80% lower. I cut two slits up the front of the magwell, bent it forward to a 10* angle, then used some aluminum braze (HTS-2000) to bond it back together. I was going to tig weld it but was concerned with cracking & warpage. But after seeing how nasty my braze job was, I prob could've done a better with the tig: 
Anyway, I cut the metal from the Sterling magazine and re-tacked a different piece in order to fit it into the magwell an angle. I must've been drinking that day because I swore it was feeding when I held the mag up against the front of the magwell and tried cycling. But after tacking the rear piece on, it didn't work. A 10* angle was dropping the rear of the magazine too low which prevented the bolt lugs from picking up a round. |
|
|
|
[#23]
I started playing around with the angle until I got it in the sweet spot where the lugs would contact the back of the case rim. (I think it was about 5* but I'd already thrown my protractor across the garage). I tacked the rear piece in and tried it out. Ohhhh baby. Feeds like butter! Plus it looks BA in the gun!

New tacked magazine: 
Rounds strip super easy: 
Forward canted magazine + new feed ramp = no more binding: 
(note: the gas block/tube is removed) 

|
|
|
|
[#24]
Ejection has also greatly improved but hard to say for sure when cycling dummy rounds; they're much longer/heavier than empty cases. Most of them do eject onto the workbench but sometimes they just fall off the extractor and out of the lower. When pulling rounds out more slowly, sometimes they stay hooked on the extractor. I read others having this issue with DI 9's and a light polishing of the extractor lip I think helped. Another mod on the list is to press fit a dowel pin into the barrel extension/cut off the lug on the extractor. I think this will definitely help with keeping the casings pressed against ejector and allow them to eject further.
Now the biggest problem. Manually feeds? Yes. Looks cool? Sure. Able to use the PDS upper with a "standard" lower? Meh, not so much. I've considered sticking a delrin rod in the buffer tube to serve as a temporary spacer/buffer but I'm paranoid about damaging the upper. Not sure the bolt is even cycling back far enough to really be an issue but I'd rather play it safe. I can hear Steve scolding me already... So I'm going to re-try the Sterling in the RRA lower. It's a pure vertical presentation of the round but the new feed ramp will help alot. I'm hoping to test it this weekend. |
|
|
|
[#25]
Great, I moved the photos into a new folder on Photobucket and now it reset them to links only.

|
|
|
|
[#26]
Quoted:
Great, I moved the photos into a new folder on Photobucket and now it reset them to links only. They show up fine for me, but need to be approved by enough team members to show up for general pop. Looks like a hell of a project, I'm following with great interest |
|
|
|
[#27]
More interesting.
You're taking a significantly different route than we did when we looked at it previously. Steve/RRA |
|
|
|
[#28]
Thanks Steve didn't know you guys even went down the road of a pistol caliber PDS!
|
|
|
|
[#29]
Kinda curious. What is the diameter of the piston used on it?
--Dan |
|
|
|
[#30]
I'll measure it this weekend (out of town) but I'd say it's around 3/8". Ok for rifle cartridges but prob a little small for 9mm.
|
|
|
|
[#31]
Thx. I don't have my 9mm completed yet. I've been putting off completing the upper trying to decide if I want to try something similar to what you're doing with a piston setup, or maybe even the MP5 upper conversion.
I have a 7" PWS Diablo I've considered doing pretty much what you are with & see if it'll work. The piston on that is 3/8". I also have a Sup Arms piston kit for another build. Was thinking of trying that one instead, but the piston in it is quite a bit smaller. Around .300" or .310" IIRC. This is making me want to give it a go with the PWS though... --Dan |
|
|
|
[#32]
Quoted:
Thx. I don't have my 9mm completed yet. I've been putting off completing the upper trying to decide if I want to try something similar to what you're doing with a piston setup, or maybe even the MP5 upper conversion. I have a 7" PWS Diablo I've considered doing pretty much what you are with & see if it'll work. The piston on that is 3/8". I also have a Sup Arms piston kit for another build. Was thinking of trying that one instead, but the piston in it is quite a bit smaller. Around .300" or .310" IIRC. This is making me want to give it a go with the PWS though... --Dan That's funny...using a Sup Arms piston was my backup plan! Basically this: 
But after tinkering with the PDS I have serious doubt it would work. The gas port would be 1.625" from the shoulder. That + the small piston probably wouldn't allow enough gas pressure & volume. I did measure the PDS piston and it's a little bigger than previously thought: .4785" As for the Diablo, unless you're planning on plumbing the gas forward like I did, I don't think it'll work. There was a guy here (scheirere) who tried a DI 9mm with a pistol-length gas system and said it was short-cycling with a .125" port: can a 9mm be gas operated? No idea what ever came out of it though. Now that MP5 upper conversion would be absolutely perfect! Doubt it'll ever be produced but it would be the best of both worlds for sure. If I started my collection all over again, I get a few HK's from the start. But as it is, I have way too many tax stamps tied up in AR's so the conversion is absolutely something I'd be interested in. On an unrelated note, I just did some training this week using a 7" Diablo upper on my M4. Loved that thing! Not a single hiccup through 1000 rds of M855 with about 150 full auto. Pure awesomeness. |
|
|
|
[#33]
Still haven't gotten a chance to take it back out to the range. However I had some time this weekend so I did the dowel-pin mod to help with extraction/ejection:
.125" hole drilled half way between inside edge of locking lugs and chamber mouth. Used a .125" OD x .25" long pin 
Pin press fit into barrel extension: 
Extractor lug was shaved off with an endmill then rounded & finished with a jeweler's file: 
I tried cycling some dummy rounds and the pin didn't seem to make any difference. However when I tried it with an empty case, the brass ejected smartly to the 4 o'clock with no issues. Looks promising! |
|
|
|
[#34]
Went back to the range this week. Feeding & ejecting issues look to be resolved for the most part. There were a few stovepipes but I attribute those to the weaker ammo loads I've been testing (the strongest loads still only eject a few feet).
A new issue came up though; the bolt was not fully seating. It would come forward, strip a round, then come to a stop with the bullet in the chamber but the extractor not hooked over the case rim. I thought it was just a lack of bolt carrier momentum but after taking it apart I realized the dowel pin was pressed in a little too far and blocking the extractor from snapping over the rim. It was just barely too much too since the bolt would fully close if I hand loaded a round then let the bolt slam forward. I shortened the pin about 1/16", pulled the bolt back only 1/2" and let it close on a round. It easily snapped onto the rim and fully seated. Lack of gas pressure continues to be an issue. With the port at .110" and 1" from the shoulder, it's still only ejecting brass ~2 feet. Rather than just opening the port yet again, I got lazy and relocated it .75" from the shoulder and went straight to .125" ID. If it's over-gassed (highly doubt it ) then I can work on making the port smaller. I also bought some 124g NATO to try out; curious to see if the extra pressure will make any difference.
Next test fire will be Monday and think it'll be the final go at this project. I've done just about all I can to get this gun to function given the limitations of the 9mm cartridge and gas system itself. It's been fun but if it still doesn't work, I'll call this experiment complete and move on to the next thing! |
|
|
|
[#35]
I shot around 50 rounds yesterday. Feeding & ejecting was still good (bolt now completely seats forward) but the stovepipes continue. The brass was staying hooked on the extractor then lodging between the bolt & port when the bolt came forward with a fresh round. I could maybe try tweaking the ejector & extractor but I think the lack of bolt velocity is the main cause; it's just doesn't have enough rearward "umph" to toss the brass out regardless of the ammo used. I was hoping the new gas port arrangement would've helped this but sad to say, it didn't make any noticeable difference. Even with the NATO rounds, it still cycled the same as before (or at least it seemed to). I could get a few shots off before it would jam but the brass was still only ejecting a foot or two. Also, it seemed like the amount of crap/carbon/etc was more compared to when the port was closer to the chamber.
All this experimenting pretty much tells me 9mm is just beyond the capability of this current gas system. It "might" work if the piston housing was closer to the gas block, had a larger diameter piston, etc. Obviously all things well outside the scope of this modification. But before I wrap it up and put it in the parts bin, I wanted to try one last thing - hand loads with slow burning powder. A friend offered to make a batch for me and I wanted to give him a good recipe that others have used successfully in DI 9mm guns. Any suggestions? Rudy? |
|
|
|
[#36]
I think that we over-complicated it the first time we gave it a sold looking-at a couple years ago. Now that it's a side, as we get time, project, there's no real pressure on us or expectations from the relook...more of a learning experience for now. That said, work load and time allowing, I think we should have something this summer (winter in the Midwest isn't a great time for working on something that requires a lot of test-firing, which we do outside).
Steve/RRA |
|
|
|
[#37]
Quoted:
I think that we over-complicated it the first time we gave it a sold looking-at a couple years ago. Now that it's a side, as we get time, project, there's no real pressure on us or expectations from the relook...more of a learning experience for now. That said, work load and time allowing, I think we should have something this summer (winter in the Midwest isn't a great time for working on something that requires a lot of test-firing, which we do outside). Steve/RRA Steve, When you say you're working on 'something' are you talking about a 9mm version of the PDS??? Or the long awaited suppressor-friendly gas regulator? I swear if you say a pistol cal version of this thing, I can finally put down my hammer and stop pounding square pegs into round holes! |
|
|
|
[#38]
Quoted:
Steve, When you say you're working on 'something' are you talking about a 9mm version of the PDS??? Or the long awaited suppressor-friendly gas regulator? I swear if you say a pistol cal version of this thing, I can finally put down my hammer and stop pounding square pegs into round holes! Stop pounding square pegs. We looked at a 9mm PDS a couple years ago, but from a different angle than we are now. It is promising at this point, but a lot still needs to happen. Again, this is a side project, not a primary, gotta get done, thing...so probably this summer if everything goes well. we've done a lot with the PDS...some of it has been integrated, some of it will be. Some will be available as an add-on. Unfortunately, others will probably never see the light of day. Steve/RRA |
|
|
|
[#39]
OP, fascinating project. I had the same idea in regards to a 9x19mm piston AR - tap the gas close to the chamber, run it via gas tube to a piston system.
I wonder if the Osprey piston system would be more suited? They only have a carbine-length kit, albeit you could cut the op-rod to length. Trying to convert the RRA bufferless system is an extra complication - I'm only interested in converting a stock PCC AR from blowback to gas operation, and a gas piston would seem to solve the dirty powder deposits issue. |
|
|
|
[#40]
How did I miss this until now?

|
|
|
|
[#41]
Quoted:
How did I miss this until now? You are more interested in that adorable wife of yours....as well you should be..... |
|
|
|
[#42]
Quoted:
Stop pounding square pegs. We looked at a 9mm PDS a couple years ago, but from a different angle than we are now. It is promising at this point, but a lot still needs to happen. Again, this is a side project, not a primary, gotta get done, thing...so probably this summer if everything goes well. we've done a lot with the PDS...some of it has been integrated, some of it will be. Some will be available as an add-on. Unfortunately, others will probably never see the light of day. Steve/RRA Well now, that is interesting!! Looking forward to seeing what you guys come up with. Any more details you can share? |
|
|
|
[#43]
Quoted:
OP, fascinating project. I had the same idea in regards to a 9x19mm piston AR - tap the gas close to the chamber, run it via gas tube to a piston system. I wonder if the Osprey piston system would be more suited? They only have a carbine-length kit, albeit you could cut the op-rod to length. Trying to convert the RRA bufferless system is an extra complication - I'm only interested in converting a stock PCC AR from blowback to gas operation, and a gas piston would seem to solve the dirty powder deposits issue. Thank you sir. I never really looked much at the Osprey but after you mentioned it, I researched it. Interesting idea how they got more piston surface area using a wrap-around kidney shape. Even more interesting is it seems to be offset from the center line axis of the op rod. I would think that would cause some lateral offset/side loading issues. I duuno, maybe there's not enough force at play to be an problem. After playing around with this thing I'm not so sure any piston system would be able to handle all the dirt of commercial 9mm. I read once the PDS piston has a 'self cleaning function' so regular disassembly & cleaning isn't necessary. Maybe true with 5.56 but after ~50 rounds of 9mm that thing is filthy. Like about-to-stop-moving-back-and-forth filthy. |
|
|
|
[#44]
I'm still waiting to test some hand loads but since looking at the Osprey I've been thinking about the possibility of using a bigger piston to get more usable surface area for the gas to act upon (similar to a Saiga). The problem is the lack of space under the extended rail with the existing gas regulator housing. I played around with an idea and came up with this:
In order to fit under the existing rail, the center line of the piston would have to be offset between the piston face and 'plunger': So here's a hypothetical question for the really smart folks...without really knowing the amount of force imparted onto the piston face, do you think this offset axis would cause a problem when cycling back? Similar to carrier tilt? |
|
|
|
[#45]
Quoted:
So here's a hypothetical question for the really smart folks...without really knowing the amount of force imparted onto the piston face, do you think this offset axis would cause a problem when cycling back? Similar to carrier tilt? I think you'd have trouble keeping an offset piston aligned vertically unless it was pinned onto the op-rod. The Osprey works because there is only one short bearing surface so a small bit of misalignment won't make it bind up. |
|
|
|
[#46]
Quoted:
You are more interested in that adorable wife of yours....as well you should be..... Quoted:
Quoted:
How did I miss this until now? You are more interested in that adorable wife of yours....as well you should be..... Mayyyybe... 
I'm still going to build something in 9 and/or 10mm eventually. I had some thoughts and might get back on that PDR as well. |
|
|
|
[#47]
Quoted:
I think you'd have trouble keeping an offset piston aligned vertically unless it was pinned onto the op-rod. The Osprey works because there is only one short bearing surface so a small bit of misalignment won't make it bind up. Yep I think a simple rib along the bottom of the plunger that indexed into the existing vent/groove would do a pretty good job of keeping it aligned. A little more work but hey, why not at this point! |
|
|
|
[#48]
I was able to try some hand loads today. A mix of 124g, 147g, and 165g bullets with varying COLs & charges of Winchester AutoComp powder. In total I had 120 rounds. WAC powder was chosen because of it's slower burn and supposed larger gas volume (designed for compensated race guns).
In short, none of the recipes really "worked". The bolt did seem to be going further back since I began to see a new malfunction - the brass was catching on the back of the mag feed lips: 
But overall it was the same issues I saw with commercial ammo; lots of stovepipes and general FTE's. When I removed the plug from the piston housing, I noticed a large amount of unburnt powder that began forming a wall between the piston face and plug: 

I think I was expecting alot less crud compared to commercial rounds but then realized slower powders are going to do that since they're still burning when the bullet leaves the barrel. The malfunctions also got me wondering if the real cause of the FTE's is from an extractor/ejector issue and not so much from a lack of bolt velocity? The brass is definitely hanging onto the bolt and riding it forward. I did the dowel-pin mod in the barrel extension but does anyone know other tricks to try out? Stretching the ejector spring, honing the edge of the ejector, etc? |
|
|
|
[#49]
Take the bolt out and put a piece of brass into it and see if it hangs under the extractor instead of falling out freely.
If it hangs up, you probably need to stone down the sharp corners of the claw a bit to keep it from binding. The longer rifle cases have enough rotational inertia from the ejector to flick on out of the bolt because it still has the ejector compressed until it's free of the barrel extension. The stubby 9mm brass can rotate a good bit as soon as it leaves the chamber and may not have enough ejector travel left to push it on out once it clears the extension. |
|
|
|
[#50]
As I was removing the sharp edges on the extractor I started taking a closer look at it to see if there was something else I was missing. And I think I found it.
When I first got the 5.45x39 bolt, I put a 9mm round in, saw it fit "perfect" and went forward with testing. What I failed to realize is the 5.45 cartridge rim is thicker than a 9mm. As a result, the extractor allows alot of freeplay with a 9mm case. You can't really tell by holding a round in the bolt and the ejector applying pressure (which is why I never caught it). But when you pull the ejector and sit a case in the bolt with just the extractor, the sloppiness is VERY apparent. For comparison, I tried a 5.56 extractor. The difference was amazing. It held the brass perfectly with zero slop. I compared the two side by side. Doesn't sound like much but there's a ~0.009" difference in the gaps. 5.45 on left; 5.56 on right: 
Pretty sure that excessive slop was playing a part in all those malfunctions. But when I chambered a dummy round with a 5.56 extractor, I found a new problem. The bolt will close on the cartridge but the extractor is not snapping over the case rim. I stuck a rod down the barrel to add a little pressure to the front of the cartridge and heard the audible snap of the extractor. It's almost like the bolt's not going far enough forward. But it rotates freely to the locked position so that's not it. I filed a little bit of the hook but didn't want to go too much otherwise I'd just recreate the excessive space like the 5.45 extractor. I removed the ejector to see if that had something to do with it. And bingo, it worked. The bolt closes and the extractor snaps over the rim. So now what? Obviously I need the ejector. It's like it's applying too much force to the case and preventing it from seating into the bolt. I thought about cutting the spring so it wouldn't apply as much pressure but that could affect ejection.
Any ideas? |
|
|
 Win a FREE Membership!
Sign up for the ARFCOM weekly newsletter and be entered to win a free ARFCOM membership. One new winner* is announced every week!
You will receive an email every Friday morning featuring the latest chatter from the hottest topics, breaking news surrounding legislation, as well as exclusive deals only available to ARFCOM email subscribers.

AR15.COM is the world's largest firearm community and is a gathering place for firearm enthusiasts of all types.
From hunters and military members, to competition shooters and general firearm enthusiasts, we welcome anyone who values and respects the way of the firearm.

Subscribe to our monthly Newsletter to receive firearm news, product discounts from your favorite Industry Partners, and more.
Copyright © 1996-2024 AR15.COM LLC. All Rights Reserved.
Any use of this content without express written consent is prohibited.
AR15.Com reserves the right to overwrite or replace any affiliate, commercial, or monetizable links, posted by users, with our own.


