|
[#1]
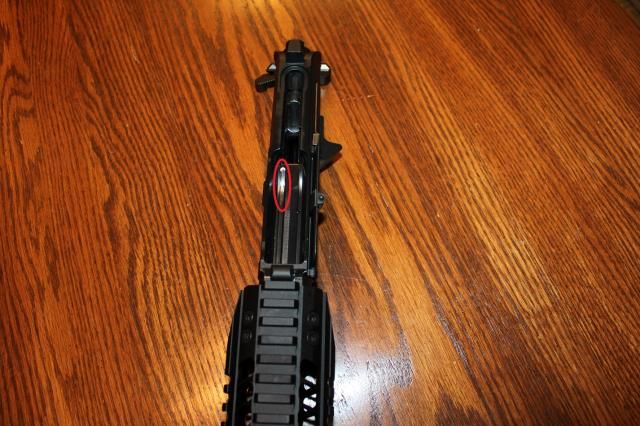
The ejector is hitting the bolt. You will need to modify the bolt for a little extra clearance. Dremel makes quick work of it.
|
|
|
|
[#2]
Thanks, I have the same problem.
I can get the pins in if I put the pivot pin in first, push the upper as far into position as possible, then pull the bolt back into the receiver extension with the charging handle where it clears the ejector. Once the take down pin is in, the bolt does slide back into battery. Once the upper is pinned down, the rifle cycles ok. I think your suggestion is probably the right way to handle this issue. |
|
|
|
[#3]
Quoted:
The ejector is hitting the bolt. You will need to modify the bolt for a little extra clearance. Dremel makes quick work of it. I changed my CMMG Bolt for my ADCO RRA bolt and my pins now go in and out easily. I'll try to do a little work on the CMMG bolt. |
|
|
|
[#4]
Quoted:
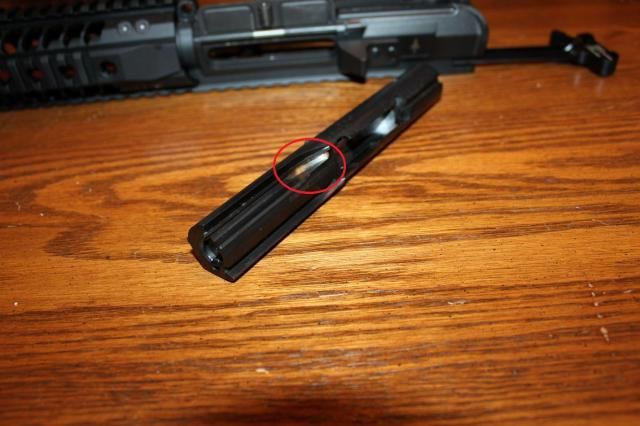
Thanks, I have the same problem. I can get the pins in if I put the pivot pin in first, push the upper as far into position as possible, then pull the bolt back into the receiver extension with the charging handle where it clears the ejector. Once the take down pin is in, the bolt does slide back into battery. Once the upper is pinned down, the rifle cycles ok. I think your suggestion is probably the right way to handle this issue. Just be careful cycling it before you modify the bolt as it will be pushing against the ejector when it closes. I think there is a thread here somewhere about this issue. If either if you have problems figuring it out let me know and I'll post a pic of my bolt after taking the dremel to it. That channel the ejector rides in on the bolt curves down to match the profile of the ejector. On the cmmg bolt the curve is just a little too far forward, if that makes sense... |
|
|
|
[#5]
I understand what you mean. When I look at the channel in the bolt, I can see where the ejector is rubbing. It is right where the channel curves to accommodate the ejector, and its just a very small area of interference. It doesn't seem like I will need to remove a lot of material. If you have a chance, I would appreciate seeing your bolt and how much you had to grind out.
Thanks. |
|
|
|
[#6]
Quoted:
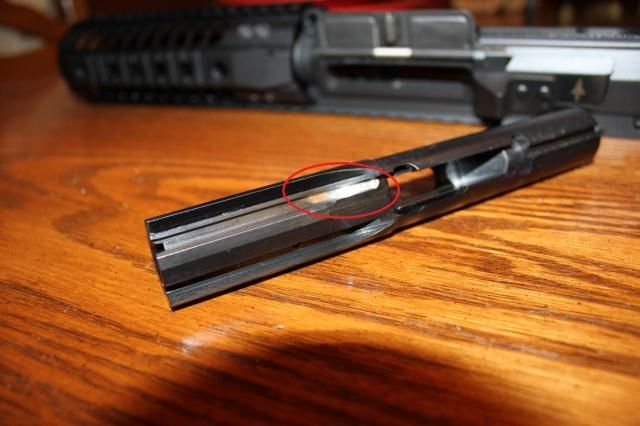
I understand what you mean. When I look at the channel in the bolt, I can see where the ejector is rubbing. It is right where the channel curves to accommodate the ejector, and its just a very small area of interference. It doesn't seem like I will need to remove a lot of material. If you have a chance, I would appreciate seeing your bolt and how much you had to grind out. Thanks. You are looking at the right spot. I barely took anything off. It just looks like the black finish is removed. I went a little at a time, test fitting in between. Out of town on business at the moment, but I can snap a pic when I get home. |
|
|
|
[#7]
Quoted:
You are looking at the right spot. I barely took anything off. It just looks like the black finish is removed. I went a little at a time, test fitting in between. Out of town on business at the moment, but I can snap a pic when I get home. Quoted:
Quoted:
I understand what you mean. When I look at the channel in the bolt, I can see where the ejector is rubbing. It is right where the channel curves to accommodate the ejector, and its just a very small area of interference. It doesn't seem like I will need to remove a lot of material. If you have a chance, I would appreciate seeing your bolt and how much you had to grind out. Thanks. You are looking at the right spot. I barely took anything off. It just looks like the black finish is removed. I went a little at a time, test fitting in between. Out of town on business at the moment, but I can snap a pic when I get home. Great, I'd like to see a pic also. |
|
|
|
[#8]
Hey Bank80 - Thanks again. I found the thread about this in the archives. Most people seemed to dremel a little off the ejector rather than the bolt. So I just took the small sanding drum and on low speed applied light pressure to the elbow and back of the ejector for about 10 seconds. Voila! The upper closed and the takedown pin went in, still a bit tighter than I wanted. So I deremeled another 3 seconds or so and the take down pin now goes in great. Still snug, but the same as when the bolt is not in the upper. I was surprised how little material I had to remove to get it to fit.
Slogoat - probably this is the easiest fix. Just make sure you tape off all the little openings and nooks in the lower so you don't get the grit down into the lower. More sanding grit than metal for sure. |
|
|
|
[#9]
Quoted:
Hey Bank80 - Thanks again. I found the thread about this in the archives. Most people seemed to dremel a little off the ejector rather than the bolt. So I just took the small sanding drum and on low speed applied light pressure to the elbow and back of the ejector for about 10 seconds. Voila! The upper closed and the takedown pin went in, still a bit tighter than I wanted. So I deremeled another 3 seconds or so and the take down pin now goes in great. Still snug, but the same as when the bolt is not in the upper. I was surprised how little material I had to remove to get it to fit. Slogoat - probably this is the easiest fix. Just make sure you tape off all the little openings and nooks in the lower so you don't get the grit down into the lower. More sanding grit than metal for sure. I think you have me and bank80 confused. I modified my bolt long ago (actually the second one I've done). Bank is the one having the same issue as you. I opted to modify the bolt because: A) At the time a replacement ejector from ddles may have been a task to get (see the 80 page ddles thread about Jon Beaudry) B) There was a lot more material to take off the bolt without affecting it vs the thin ejector. Either method will give the same result, it's whatever you are more comfortable with. Now that "qc10" is around, spare parts like the ejector may be easier to acquire. |
|
|
|
[#10]
Oh Sorry! You're right I did get you mixed up. Thanks to you, I'm all fixed up.
Thanks again! |
|
|
|
[#11]
Hope these help someone out.
|
|
|
|
[#12]
I just went through the exact same thing with my 9mm build this week. QC10 lower and VLTOR upper. Upper was way too tight and causing the bolt to actually stick. I tried another upper and it was fine. Eventually just took a file to the ejector and took a little bit off the "curve" until everything fit nice and cycled with out issue. Have not put and live rounds through it yet but it seems to cycle snap caps fine.
|
|
|
|
[#13]
Spammer...VA-gunnut
|
|
|
 Win a FREE Membership!
Sign up for the ARFCOM weekly newsletter and be entered to win a free ARFCOM membership. One new winner* is announced every week!
You will receive an email every Friday morning featuring the latest chatter from the hottest topics, breaking news surrounding legislation, as well as exclusive deals only available to ARFCOM email subscribers.

AR15.COM is the world's largest firearm community and is a gathering place for firearm enthusiasts of all types.
From hunters and military members, to competition shooters and general firearm enthusiasts, we welcome anyone who values and respects the way of the firearm.

Subscribe to our monthly Newsletter to receive firearm news, product discounts from your favorite Industry Partners, and more.
Copyright © 1996-2024 AR15.COM LLC. All Rights Reserved.
Any use of this content without express written consent is prohibited.
AR15.Com reserves the right to overwrite or replace any affiliate, commercial, or monetizable links, posted by users, with our own.


