|
Posted: 7/6/2015 10:14:35 PM EDT
Yes I changed my subject line ; ) This thread will be full of questions and hopefully results.
Ok, Im new to the site. Been lurking around for about a month. Im building a Model 603. Ive started with an 80% lower. Ive looked all over and I find lots of photos of turning an A2 lower into a A1 603. But no one gives dimensions. So If someone out there can direct me to where I can find dimensions of the following photos that would be great. Or...Can someone take the time to measure them and post them here on the site. Face buffer tube mount to back of rib ? 
Length of buffer tube rib ? 
Width of flat on top of buffer tube mount ? 
Cross section thickness of buffer tube mount ? . 
|
|
|
|
[#1]
I know it may sound silly but I've reprofiled two a2 to a1 and eyeballed it. No measurements taken or used. I can tell your top pic reinforcement is tad wide.
|
|
|
|
[#2]
Extension tube thread boss reinforcement rib is .265" long.
Extension tube boss flat is .612" on 2 of my samples. Extension tube boss wall thickness from peaks of threads inside to exterior is .111" - .125" at the 9 and 6 o'clock positions as seen from the rear. The original forgings are pretty rough, so data points will vary. |
|
|
|
[#3]
KYGun - Believe me. No one I know will know the difference between an A2 or an A1. : ) Ive got plenty of material left to remove. I just stopped because I new someone out there had to have this info.
LRRPF52 - Excellent ! Thank you very much !! |
|
|
|
[#4]
Quoted:
KYGun - Believe me. No one I know will know the difference between an A2 or an A1. : ) Ive got plenty of material left to remove. I just stopped because I new someone out there had to have this info. LRRPF52 - Excellent ! Thank you very much !! You need some new friends then,  , sorry couldn't help but say it, haha! , sorry couldn't help but say it, haha!
|
|
|
|
[#5]
OP, the work you have done so far looks very good, are you using a mill, dremel, hand tools? I'm always looking for tips & tricks for doing this operation better/cleaner/easier.
|
|
|
|
[#6]
Those dremels with cut off wheels are worth the weight in gold.
|
|
|
|
[#7]
Quoted:
OP, the work you have done so far looks very good, are you using a mill, dremel, hand tools? I'm always looking for tips & tricks for doing this operation better/cleaner/easier. Thank you for the kind words. And to answer your questions. Yes. Yes and yes. : ) I did most of the ruffing out with a milling machine. I used an 11/64 flat end mill to help create the detent rib. Then ruffed out everything else with an 1/8 ball nose end mill. I may have buggered up the opposite side while ruffing out. I'll see what happens now that I've got dimensions. Some dremal work. But not a lot. Mostly hand files. I actually ground a flat sharp square edge on a Swiss file and used it to "Scrape" the sharp inside corners. |
|
|
|
[#8]
just remove all the bulging surface of the buffer tube and follow the smooth suface just on either side of the bulge. Dont worry about thickness as this will all work out by following the smooth surface on the buffer tube. This is were the old contour meets the reenforcement. Once all that is removed machine the side profiles back until they look close to the photos of a A1 contour. I hope this helps
|
|
|
|
[#9]
NOW ya gotta do a partial fence OP!
Or on your NEXT lower anyway! You KNOW you can't just have one! It's against the Retro Way! |
|
|
|
[#10]
Quoted:
NOW ya gotta do a partial fence OP! Or on your NEXT lower anyway! You KNOW you can't just have one! It's against the Retro Way! Ha Ha! I keep telling myself and everyone I know. "This is the last AR I'm going to build for myself " |
|
|
|
[#11]
Quoted:
Ha Ha! I keep telling myself and everyone I know. "This is the last AR I'm going to build for myself " Quoted:
Quoted:
NOW ya gotta do a partial fence OP! Or on your NEXT lower anyway! You KNOW you can't just have one! It's against the Retro Way! Ha Ha! I keep telling myself and everyone I know. "This is the last AR I'm going to build for myself " Famous last words! Be careful though, because that implies that all of the future builds will be for others, and that very quickly leaves you with NO TIME for yourself or your projects. |
|
|
|
[#12]
So here is the small file that I lightly ground the tip flat. When done right it makes for sharp square edges. This actually scrapes
the inside corners square. 
. 
I also have this little sanding tool that holds this band of sand paper. Its very handy. 
|
|
|
|
[#13]
For what it's worth.......the rib that you are working to get to a very sharp corner.......Colt's aer not consistent in that aspect. Some Colt's have the rib wall angled and some are relatively squared.......with and without a good sharp inner corner.
Not saying yours should be one way or the other, just that they do vary considerably. I will say that the earlier the sample the sharper the detail will be. (in my experience) |
|
|
|
[#14]
Quoted:
For what it's worth.......the rib that you are working to get to a very sharp corner.......Colt's aer not consistent in that aspect. Some Colt's have the rib wall angled and some are relatively squared.......with and without a good sharp inner corner. Not saying yours should be one way or the other, just that they do vary considerably. I will say that the earlier the sample the sharper the detail will be. (in my experience) Gotcha ! Im happy to receive any advice. At this point that rib is going to get narrowed down another .050" So I guess I wont sweat the small stuff. Thanks for the input. |
|
|
|
[#15]
Quoted:
I know it may sound silly but I've reprofiled two a2 to a1 and eyeballed it. Not silly at all. That's the way I do it. If you don't have an actual receiver to use as a 'go-by', just find some good photos of a real A1, then just carve away what doesn't look right. As for the extension tube area, don't worry much about dimensions, just contour it to match the profile of the upper. Also, since these things will tend to vary a bit, I wouldn't get too anal about measurements. Just keep things in relative proportion to where it looks right. You're on the right track. I've also found it easy to make sanding 'tools' from pieces of wood (or whatever) for use as a backing, to shape certain areas. With 120 grit, these will often work better than a file. |
|
|
|
[#16]
Ok Im ready for some more constructive criticism : )
How does this look? Good enough? If so then its on to engraving. 

|
|
|
|
[#17]
Quoted:
Ok Im ready for some more constructive criticism : ) How does this look? Good enough? If so then its on to engraving. <a href="http://s1283.photobucket.com/user/andyd_7/media/IMG_0411_zps1aa89c8d.jpg.html" target="_blank">http://i1283.photobucket.com/albums/a553/andyd_7/IMG_0411_zps1aa89c8d.jpg</a> <a href="http://s1283.photobucket.com/user/andyd_7/media/IMG_0410_zps35fdbf2a.jpg.html" target="_blank">http://i1283.photobucket.com/albums/a553/andyd_7/IMG_0410_zps35fdbf2a.jpg</a> Two thumbs up. |
|
|
|
[#18]
|
|
|
|
[#19]
Quoted:
Looks great! Did you square up under the pivot pin holes/magwell too? or are you leaving that as is? <a href="http://s223.photobucket.com/user/magalops_2007/media/prodjanthirty-48-3_2_7%20copy_zpsv3dur55l.jpg.html" target="_blank">http://i223.photobucket.com/albums/dd250/magalops_2007/prodjanthirty-48-3_2_7%20copy_zpsv3dur55l.jpg</a> Absolutely ! But I did not take a photo of that. Because that takes no skill or more importantly, patience. |
|
|
|
[#20]
That turned out really nice. To get it smoother, I drag the "nose" of a small fine tooth file on every surface I can get it on and then follow up with steel wool. Are you planing on anodizing this lower?
Quoted:
Ok Im ready for some more constructive criticism : ) How does this look? Good enough? If so then its on to engraving. <a href="http://s1283.photobucket.com/user/andyd_7/media/IMG_0411_zps1aa89c8d.jpg.html" target="_blank">http://i1283.photobucket.com/albums/a553/andyd_7/IMG_0411_zps1aa89c8d.jpg</a> <a href="http://s1283.photobucket.com/user/andyd_7/media/IMG_0410_zps35fdbf2a.jpg.html" target="_blank">http://i1283.photobucket.com/albums/a553/andyd_7/IMG_0410_zps35fdbf2a.jpg</a> |
|
|
|
[#21]
Ok thanks. I'm going to be painting it. I have used a Header coat paint (for car exhaust pipes ) on a few other projects.
So I might use that. |
|
|
|
[#22]
So Im pleased with the results of A2 to A1 mod's. Now Im onto the next challenge. Engraving.
My time frame is 1988 to 1993. Branch of service (if it maters) US Navy SeaBees. I found these two photos. Which if any of the two would be correct? I all so want to say thanks to all the great folks on this site. You guys actually Build $h!t. I love it! I am learning a lot. Ok now for the photos. 

|
|
|
|
[#23]
Quoted:
Ok Im ready for some more constructive criticism : ) How does this look? Good enough? If so then its on to engraving. <a href="http://s1283.photobucket.com/user/andyd_7/media/IMG_0411_zps1aa89c8d.jpg.html" target="_blank">http://i1283.photobucket.com/albums/a553/andyd_7/IMG_0411_zps1aa89c8d.jpg</a> <a href="http://s1283.photobucket.com/user/andyd_7/media/IMG_0410_zps35fdbf2a.jpg.html" target="_blank">http://i1283.photobucket.com/albums/a553/andyd_7/IMG_0410_zps35fdbf2a.jpg</a> Tremendous file and detail work. Our compliments. |
|
|
|
[#24]
Quoted:
Tremendous file and detail work. Our compliments. Thanks, I actually spent a few hours today polishing with 1500 grt sand paper. So it looks better but Im sure paint is not going to stick LOL. I found some info on prep work for a finish on here today so a media blast is in the near future. |
|
|
|
[#25]
Looks like you're off to a great start OP. I've learned over the years to NEVER underestimate the talent of the members in this forum.
|
|
|
|
[#26]
Looks great I sold one I tried to Sergio. I used a dremel to do mine. Didn't look as good as your though. Great job.
|
|
|
|
[#27]
Looks good, some lite bead blast would nicely blend it all up. If you anodize it that will cover up lots too.many of the older Colts had machining marks and flaws in the forgings but had no ill effect on performance.
|
|
|
|
[#28]
Quoted:
Looks good, some lite bead blast would nicely blend it all up. If you anodize it that will cover up lots too.many of the older Colts had machining marks and flaws in the forgings but had no ill effect on performance. Thanks. So should I media blast befor or after I engrave ? I'm on the fence about anodizing. For now it just depends on how this whole Thing turns out. Then there is the cost. And finding someone to do it for me. |
|
|
|
[#29]
From my experience its best to engrave last, i engraved a 80% but once it was blasted and anodized the engraving was shallow.unless its done very deep.
|
|
|
|
[#30]
Survivor, are you going to engrave it yourself, or send it out? ........and very nice job on the reprofile!
|
|
|
|
[#31]
Quoted:
Survivor, are you going to engrave it yourself, or send it out? ........and very nice job on the reprofile! I will be engraving it myself. With the help of my co-worker who will do the solidworks/mastercam programming. He is new on the job so it will be a test for us both. Oh and I will be running the CNC. That's the easy part : ) |
|
|
|
[#32]
Quoted:
I will be engraving it myself. With the help of my co-worker who will do the solidworks/mastercam programming. He is new on the job so it will be a test for us both. Oh and I will be running the CNC. That's the easy part : ) Quoted:
Quoted:
Survivor, are you going to engrave it yourself, or send it out? ........and very nice job on the reprofile! I will be engraving it myself. With the help of my co-worker who will do the solidworks/mastercam programming. He is new on the job so it will be a test for us both. Oh and I will be running the CNC. That's the easy part : ) Can't wait to see how the engraving turns out for you, and maybe I can learn something along the way. I've engraved several, and have generally been happy with the results. I do mine on a Bridgeport EZTrak. Will you have use of a 2 axis or 3? My first two were done on a 2 axis, and my last one, an XM177E2 was done on a 3 axis. For what it's worth, I used an 1/8" carbide burr as a cutter. Not sure what the included angle is, but it went to a dead point. I like the way it pushed material in addition to cutting. Sort of pushes a ridge around the cut, which resembles a roll die. I've seen some that were cut with "D" bits and I think they cut too cleanly........just my opinion though, and you know what they're like. Stoner |
|
|
|
[#33]
Can't wait to see how the engraving turns out for you, and maybe I can learn something along the way. I've engraved several, and have generally been happy with the results. I do mine on a Bridgeport EZTrak. Will you have use of a 2 axis or 3? My first two were done on a 2 axis, and my last one, an XM177E2 was done on a 3 axis. For what it's worth, I used an 1/8" carbide burr as a cutter. Not sure what the included angle is, but it went to a dead point. I like the way it pushed material in addition to cutting. Sort of pushes a ridge around the cut, which resembles a roll die. I've seen some that were cut with "D" bits and I think they cut too cleanly........just my opinion though, and you know what they're like. Stoner I will be using a 3 axis, Hurco VM1. My thoughts where to use a split end conical point 60* engraving end mill. But I totally get what you mean by "pushes the material ". I'm not too clear on what you mean "Carbide Burr" I'll have to look into that. I work with plastic all day not metal this is a bit different for me. |
|
|
|
[#34]
Quoted:
I will be using a 3 axis, Hurco VM1. My thoughts where to use a split end conical point 60* engraving end mill. But I totally get what you mean by "pushes the material ". I'm not too clear on what you mean "Carbide Burr" I'll have to look into that. I work with plastic all day not metal this is a bit different for me. Quoted:
Can't wait to see how the engraving turns out for you, and maybe I can learn something along the way. I've engraved several, and have generally been happy with the results. I do mine on a Bridgeport EZTrak. Will you have use of a 2 axis or 3? My first two were done on a 2 axis, and my last one, an XM177E2 was done on a 3 axis. For what it's worth, I used an 1/8" carbide burr as a cutter. Not sure what the included angle is, but it went to a dead point. I like the way it pushed material in addition to cutting. Sort of pushes a ridge around the cut, which resembles a roll die. I've seen some that were cut with "D" bits and I think they cut too cleanly........just my opinion though, and you know what they're like. Stoner I will be using a 3 axis, Hurco VM1. My thoughts where to use a split end conical point 60* engraving end mill. But I totally get what you mean by "pushes the material ". I'm not too clear on what you mean "Carbide Burr" I'll have to look into that. I work with plastic all day not metal this is a bit different for me. Carbide burr. The conical "bits" that you would normally use in a die grinder. |
|
|
|
[#35]
Quoted:
Carbide burr. The conical "bits" that you would normally use in a die grinder. Quoted:
Quoted:
Can't wait to see how the engraving turns out for you, and maybe I can learn something along the way. I've engraved several, and have generally been happy with the results. I do mine on a Bridgeport EZTrak. Will you have use of a 2 axis or 3? My first two were done on a 2 axis, and my last one, an XM177E2 was done on a 3 axis. For what it's worth, I used an 1/8" carbide burr as a cutter. Not sure what the included angle is, but it went to a dead point. I like the way it pushed material in addition to cutting. Sort of pushes a ridge around the cut, which resembles a roll die. I've seen some that were cut with "D" bits and I think they cut too cleanly........just my opinion though, and you know what they're like. Stoner I will be using a 3 axis, Hurco VM1. My thoughts where to use a split end conical point 60* engraving end mill. But I totally get what you mean by "pushes the material ". I'm not too clear on what you mean "Carbide Burr" I'll have to look into that. I work with plastic all day not metal this is a bit different for me. Carbide burr. The conical "bits" that you would normally use in a die grinder. That's what first came to mind.....but never thought of engraving with one. I will certainly try it out once I get a program. Thanks for the info. |
|
|
|
[#36]
Stoner24- I found that tool, Carbide Miniture Burr.
Part # SM-42 for around 6 bucks. Thanks man ! |
|
|
|
[#37]
I few new photos


|
|
|
|
[#38]
Still looking for input on which one of these would be correct for my build.
Thanks Quoted:
So Im pleased with the results of A2 to A1 mod's. Now Im onto the next challenge. Engraving. My time frame is 1988 to 1993. Branch of service (if it maters) US Navy SeaBees. I found these two photos. Which if any of the two would be correct? I all so want to say thanks to all the great folks on this site. You guys actually Build $h!t. I love it! I am learning a lot. Ok now for the photos. <a href="http://s1283.photobucket.com/user/andyd_7/media/m16a1a_zpsvicrtqzo.jpg.html" target="_blank">http://i1283.photobucket.com/albums/a553/andyd_7/m16a1a_zpsvicrtqzo.jpg</a> <a href="http://s1283.photobucket.com/user/andyd_7/media/1289112531_zps3c7lzvtz.jpg.html" target="_blank">http://i1283.photobucket.com/albums/a553/andyd_7/1289112531_zps3c7lzvtz.jpg</a> |
|
|
|
[#39]
Quoted:
Still looking for input on which one of these would be correct for my build. Thanks Quoted:
Still looking for input on which one of these would be correct for my build. Thanks Quoted:
So Im pleased with the results of A2 to A1 mod's. Now Im onto the next challenge. Engraving. My time frame is 1988 to 1993. Branch of service (if it maters) US Navy SeaBees. I found these two photos. Which if any of the two would be correct? I all so want to say thanks to all the great folks on this site. You guys actually Build $h!t. I love it! I am learning a lot. Ok now for the photos. <a href="http://s1283.photobucket.com/user/andyd_7/media/m16a1a_zpsvicrtqzo.jpg.html" target="_blank">http://i1283.photobucket.com/albums/a553/andyd_7/m16a1a_zpsvicrtqzo.jpg</a> <a href="http://s1283.photobucket.com/user/andyd_7/media/1289112531_zps3c7lzvtz.jpg.html" target="_blank">http://i1283.photobucket.com/albums/a553/andyd_7/1289112531_zps3c7lzvtz.jpg</a> I'm not knowledgeable of A1's, as I've always been interested in the older models, but I have to ask.......aren't your two pics the same? I know they're not two pics of the same rifle, but two of the same thing. I believe that the A1 lowers were used well into the 2000's, so your pic should be "correct". Surprised someone that really knows A1's hasn't chimed in. |
|
|
|
[#40]
The bottom photo to the right of the Colt logo says " Colt AR-15"
The top photo does not say AR-15 at all If i had to guess id say the top one is the one. |
|
|
|
[#41]
Great work. I do, however, have one suggestion - a low temp aluminum brazing rod would fill in that gap at the back of the receiver. Then it would look PERFECT.
|
|
|
|
[#42]
Quoted:
Great work. I do, however, have one suggestion - a low temp aluminum brazing rod would fill in that gap at the back of the receiver. Then it would look PERFECT. Oh Reeeally ???? Im listening..... Can you tell me what the width of the web should be? |
|
|
|
[#43]
Quoted:
The bottom photo to the right of the Colt logo says " Colt AR-15" The top photo does not say AR-15 at all If i had to guess id say the top one is the one. Geez...........talk about not seeing the forest for the trees, lol Well.....hopefully, someone that knows the history of A1 rollmarks will clue us in. I'd venture a guess, and it is only a guess, that the SeaBees didn't get the latest and greatest but the "hand me downs". I'm not sure when the AR-15 was omitted from the rollmark, but knowing the earlier ones had the AR-15 on them I might be inclined to think that they would have had the AR-15 marked models. This is all just a guess, so that that for what it's worth. |
|
|
|
[#44]
Quoted:
Oh Reeeally ???? Im listening..... Can you tell me what the width of the web should be? Quoted:
Quoted:
Great work. I do, however, have one suggestion - a low temp aluminum brazing rod would fill in that gap at the back of the receiver. Then it would look PERFECT. Oh Reeeally ???? Im listening..... Can you tell me what the width of the web should be? What gap are we talking about.........behind the reinforcing ribs? I'll add that any welding I've done on any of the 7075 forged receivers was done with Tig, using 40XX (I think) filler rod. I'd have to check over at the shop what filler I have tagged for AR use. The thing about welding on 7075 is without the correct filler the anodizing will be different on that weld. Edit: survivor, one other thing, OK, two things. On an A1 lower, the area between the front ears (for the front pin) should be cut differently than what the A2 80%'ers are. If you look at the tooling marks on your lower you will notice that it was cut with a straight endmill. You can see the circular cut marks. The old ones were milled with a milling cutter, not an end mill. I have a couple front halves from M16A1's......I'll snap a couple pics and post them up. Two......the 80% lowers today have the forge line machined off, or nearly machined off. Old A1's did not have the forge line cut at all. They were left very pronounced. NoDaks 80% lowers are left with the forge line intact. That alone makes them worth the extra cost to me. Oh...........three things. Old A1 lowers have much different bosses for the bolt catch pin. They are very rounded. I'll try to get a pic of those too. Stoner |
|
|
|
[#45]
Stoner25
Ha Ha Ha you know all our $h!t was old. Hell our uniforms where "Greens". How long have the Marines been wearing camo? Average age of our 5 ton dumps and deuce & half's was 1978. |
|
|
|
[#46]
Quoted:
What gap are we talking about.........behind the reinforcing ribs? I'll add that any welding I've done on any of the 7075 forged receivers was done with Tig, using 40XX (I think) filler rod. I'd have to check over at the shop what filler I have tagged for AR use. The thing about welding on 7075 is without the correct filler the anodizing will be different on that weld. Quoted:
Quoted:
Quoted:
Great work. I do, however, have one suggestion - a low temp aluminum brazing rod would fill in that gap at the back of the receiver. Then it would look PERFECT. Oh Reeeally ???? Im listening..... Can you tell me what the width of the web should be? What gap are we talking about.........behind the reinforcing ribs? I'll add that any welding I've done on any of the 7075 forged receivers was done with Tig, using 40XX (I think) filler rod. I'd have to check over at the shop what filler I have tagged for AR use. The thing about welding on 7075 is without the correct filler the anodizing will be different on that weld. As of right now Im leaning towards a spray on finish. I believe M16indiana is suggesting fill in the only gap that show that it was an A2 mod. The gap between the reviver and but stock |
|
|
|
[#47]
Quoted: What gap are we talking about.........behind the reinforcing ribs? I'll add that any welding I've done on any of the 7075 forged receivers was done with Tig, using 40XX (I think) filler rod. I'd have to check over at the shop what filler I have tagged for AR use. The thing about welding on 7075 is without the correct filler the anodizing will be different on that weld. Quoted: Quoted: Quoted: Great work. I do, however, have one suggestion - a low temp aluminum brazing rod would fill in that gap at the back of the receiver. Then it would look PERFECT. Oh Reeeally ???? Im listening..... Can you tell me what the width of the web should be? What gap are we talking about.........behind the reinforcing ribs? I'll add that any welding I've done on any of the 7075 forged receivers was done with Tig, using 40XX (I think) filler rod. I'd have to check over at the shop what filler I have tagged for AR use. The thing about welding on 7075 is without the correct filler the anodizing will be different on that weld.  |
|
|
|
[#48]
Quoted:
As of right now Im leaning towards a spray on finish. I believe M16indiana is suggesting fill in the only gap that show that it was an A2 mod. The gap between the reviver and but stock Quoted:
Quoted:
Quoted:
Quoted:
Great work. I do, however, have one suggestion - a low temp aluminum brazing rod would fill in that gap at the back of the receiver. Then it would look PERFECT. Oh Reeeally ???? Im listening..... Can you tell me what the width of the web should be? What gap are we talking about.........behind the reinforcing ribs? I'll add that any welding I've done on any of the 7075 forged receivers was done with Tig, using 40XX (I think) filler rod. I'd have to check over at the shop what filler I have tagged for AR use. The thing about welding on 7075 is without the correct filler the anodizing will be different on that weld. As of right now Im leaning towards a spray on finish. I believe M16indiana is suggesting fill in the only gap that show that it was an A2 mod. The gap between the reviver and but stock BINGO The end should not look like this: 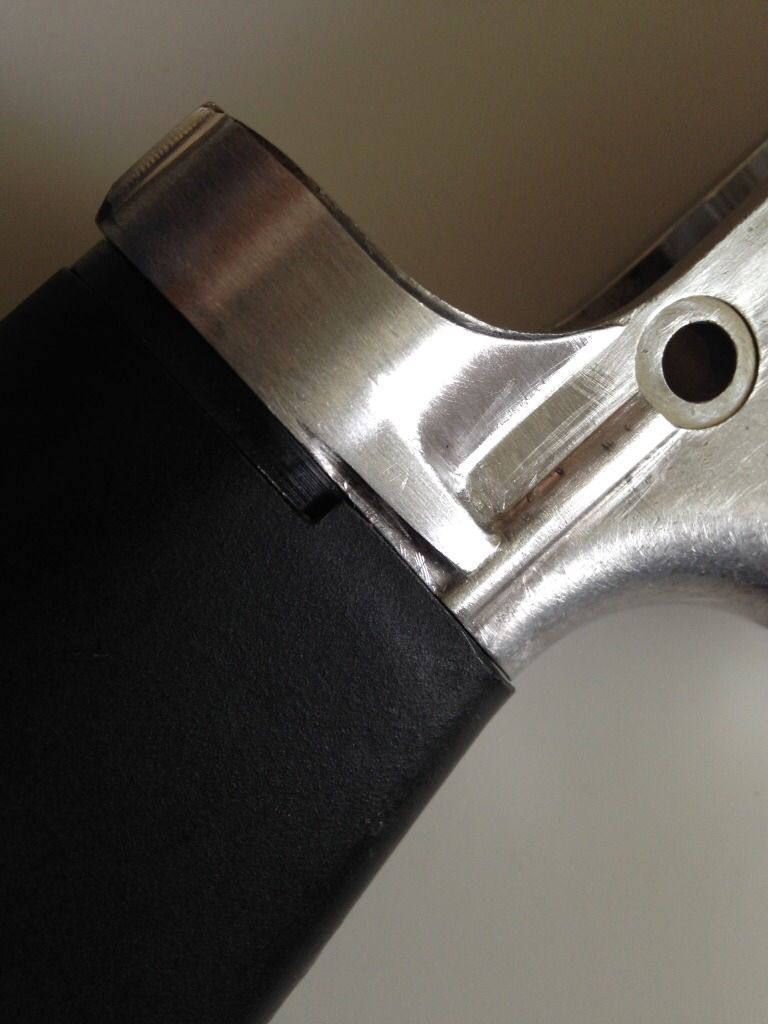
It should look like this: 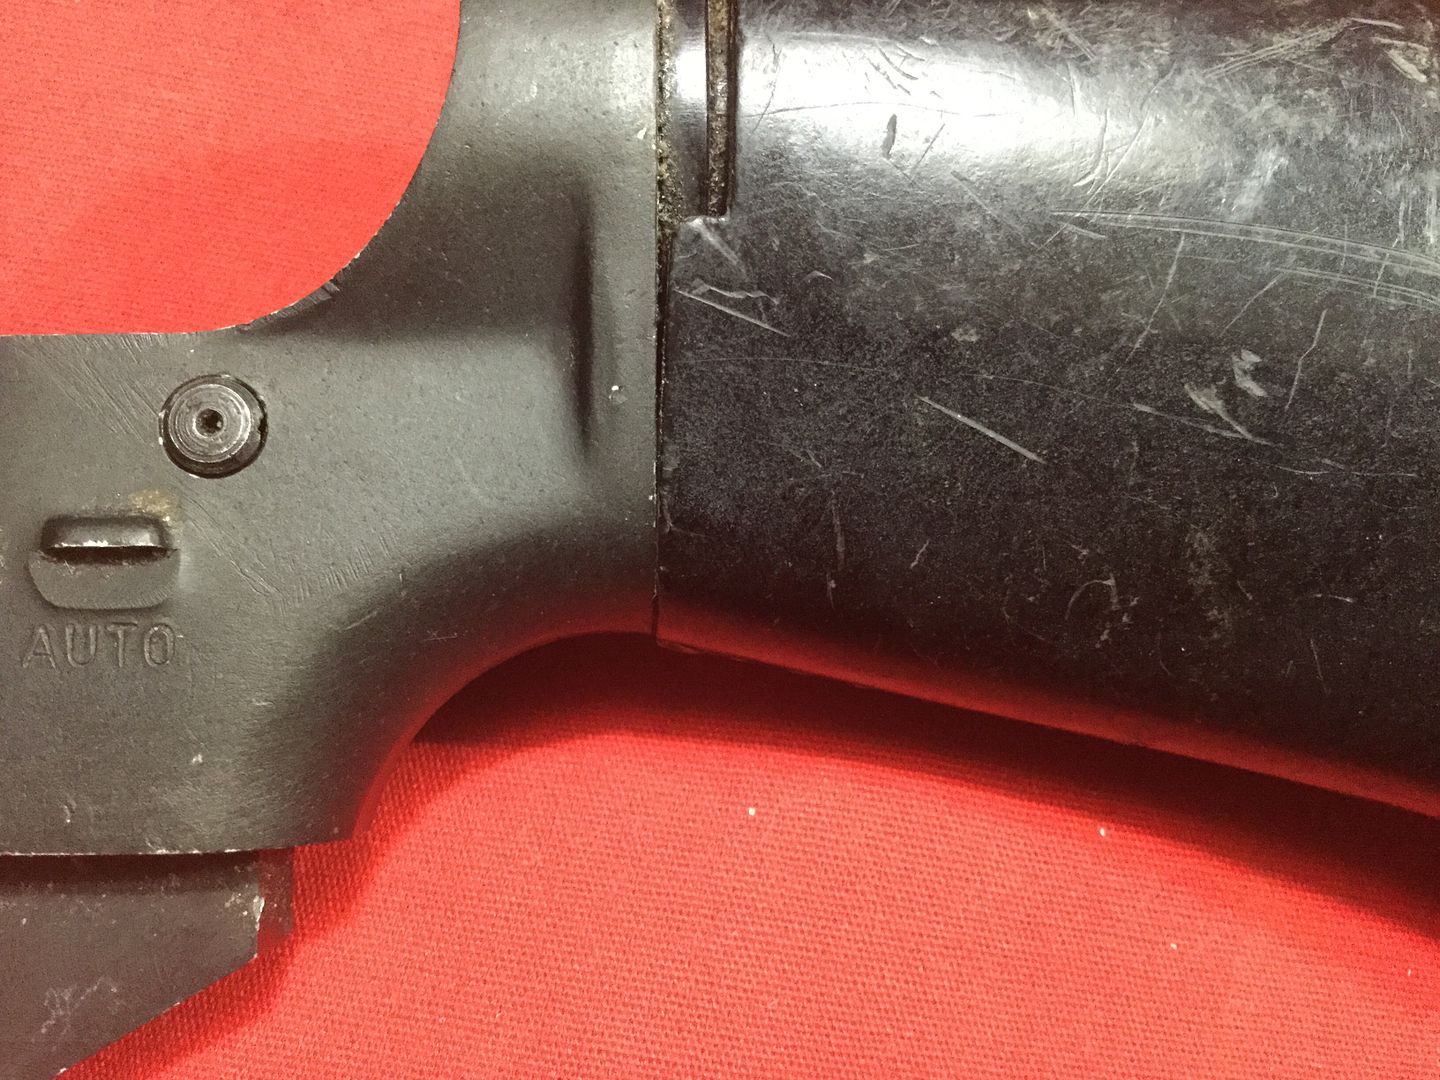
|
|
|
|
[#49]
Quoted:
What gap are we talking about.........behind the reinforcing ribs? I'll add that any welding I've done on any of the 7075 forged receivers was done with Tig, using 40XX (I think) filler rod. I'd have to check over at the shop what filler I have tagged for AR use. The thing about welding on 7075 is without the correct filler the anodizing will be different on that weld. Edit: survivor, one other thing, OK, two things. On an A1 lower, the area between the front ears (for the front pin) should be cut differently than what the A2 80%'ers are. If you look at the tooling marks on your lower you will notice that it was cut with a straight endmill. You can see the circular cut marks. The old ones were milled with a milling cutter, not an end mill. I have a couple front halves from M16A1's......I'll snap a couple pics and post them up. Two......the 80% lowers today have the forge line machined off, or nearly machined off. Old A1's did not have the forge line cut at all. They were left very pronounced. NoDaks 80% lowers are left with the forge line intact. That alone makes them worth the extra cost to me. Oh...........three things. Old A1 lowers have much different bosses for the bolt catch pin. They are very rounded. I'll try to get a pic of those too. Stoner Quoted:
Quoted:
Quoted:
Great work. I do, however, have one suggestion - a low temp aluminum brazing rod would fill in that gap at the back of the receiver. Then it would look PERFECT. Oh Reeeally ???? Im listening..... Can you tell me what the width of the web should be? What gap are we talking about.........behind the reinforcing ribs? I'll add that any welding I've done on any of the 7075 forged receivers was done with Tig, using 40XX (I think) filler rod. I'd have to check over at the shop what filler I have tagged for AR use. The thing about welding on 7075 is without the correct filler the anodizing will be different on that weld. Edit: survivor, one other thing, OK, two things. On an A1 lower, the area between the front ears (for the front pin) should be cut differently than what the A2 80%'ers are. If you look at the tooling marks on your lower you will notice that it was cut with a straight endmill. You can see the circular cut marks. The old ones were milled with a milling cutter, not an end mill. I have a couple front halves from M16A1's......I'll snap a couple pics and post them up. Two......the 80% lowers today have the forge line machined off, or nearly machined off. Old A1's did not have the forge line cut at all. They were left very pronounced. NoDaks 80% lowers are left with the forge line intact. That alone makes them worth the extra cost to me. Oh...........three things. Old A1 lowers have much different bosses for the bolt catch pin. They are very rounded. I'll try to get a pic of those too. Stoner Damn Stoner25... I thought I was almost done with this thing! LOL Im in luck. This lower still has the forge line. |
|
|
|
[#50]
M16indiana Exactly !
So from the forward edge of the rib to the face where the butt stock mounts. That dimension. Looks like maybe .200" |
|
|
 Win a FREE Membership!
Sign up for the ARFCOM weekly newsletter and be entered to win a free ARFCOM membership. One new winner* is announced every week!
You will receive an email every Friday morning featuring the latest chatter from the hottest topics, breaking news surrounding legislation, as well as exclusive deals only available to ARFCOM email subscribers.

AR15.COM is the world's largest firearm community and is a gathering place for firearm enthusiasts of all types.
From hunters and military members, to competition shooters and general firearm enthusiasts, we welcome anyone who values and respects the way of the firearm.

Subscribe to our monthly Newsletter to receive firearm news, product discounts from your favorite Industry Partners, and more.
Copyright © 1996-2024 AR15.COM LLC. All Rights Reserved.
Any use of this content without express written consent is prohibited.
AR15.Com reserves the right to overwrite or replace any affiliate, commercial, or monetizable links, posted by users, with our own.


