|
[#1]
Quoted:
It would have been easier to buy one. Yeah, well, it's easier for me to spank it than it is to get my wife to help but some things really are worth the effort. |
|
|
|
[#2]
Ok, that's pretty bad ass. Neat build OP.
|
|
|
|
[#3]
sweet OP!
|
|
|
|
[#4]
Man, i cant get this build out of my head.
What size is the trailer you built? |
|
|
|
[#5]
May need to try this soon!!!!
|
|
|
|
[#6]
You sir, have a particular set of skills
Awesome thread! |
|
|
|
[#7]
Great job!
|
|
|
|
[#8]
Quoted:
That is sweet! If I tried to make something like that, it would end up out in the woods in a smoldering pile and I'd be at the camper store spending money. 
BTDT...mine became a victim of mold.. My BUILD THREAD http://www.ar15.com/forums/t_10_17/648758__ARCHIVED_THREAD____B_O_T___bug_out_trailer__Build_Thread_____PICS__.html&page=1 after I took a chainsaw too it. 
mold behind one of my exterior diamond plate panels 
Rear section of wood removed. 
Removed subflooring and insulation, that green is mold 
Front wall tore apart, i just Kreg Jig to help build it. 
The one only maiden voyage was its shake down run 
|
|
|
|
[#9]
Quoted:
Man, i cant get this build out of my head. What size is the trailer you built? A lot of people buy a trailer kit from Harbor Freight or Northern Tool. The Harbor Freight kits are sized for a 4 foot by 8 foot platform, which makes it a little easier to fit your plywood (since plywood comes in 4 foot wide sheets), but standard mattresses are about 54 inches wide, so they won't fit in a Teardrop built on a Harbor Freight trailer kit. The Northern Tool trailer kits are a little more expensive, but they seem to be built a little better and are available in a 5 foot by 8 foot size. The 5 foot width means you'll be cutting the plywood to a 5 foot length and turning it sideways on the trailer (less efficient use of your plywood sheets), but a standard full-size mattress will fit in a Teardrop built on the Northern Tool 5 foot by 8 foot trailer. |
|
|
|
[#10]
Quoted:
A lot of people buy a trailer kit from Harbor Freight or Northern Tool. The Harbor Freight kits are sized for a 4 foot by 8 foot platform, which makes it a little easier to fit your plywood (since plywood comes in 4 foot wide sheets), but standard mattresses are about 54 inches wide, so they won't fit in a Teardrop built on a Harbor Freight trailer kit. The Northern Tool trailer kits are a little more expensive, but they seem to be built a little better and are available in a 5 foot by 8 foot size. The 5 foot width means you'll be cutting the plywood to a 5 foot length and turning it sideways on the trailer (less efficient use of your plywood sheets), but a standard full-size mattress will fit in a Teardrop built on the Northern Tool 5 foot by 8 foot trailer. Quoted:
Quoted:
Man, i cant get this build out of my head. What size is the trailer you built? A lot of people buy a trailer kit from Harbor Freight or Northern Tool. The Harbor Freight kits are sized for a 4 foot by 8 foot platform, which makes it a little easier to fit your plywood (since plywood comes in 4 foot wide sheets), but standard mattresses are about 54 inches wide, so they won't fit in a Teardrop built on a Harbor Freight trailer kit. The Northern Tool trailer kits are a little more expensive, but they seem to be built a little better and are available in a 5 foot by 8 foot size. The 5 foot width means you'll be cutting the plywood to a 5 foot length and turning it sideways on the trailer (less efficient use of your plywood sheets), but a standard full-size mattress will fit in a Teardrop built on the Northern Tool 5 foot by 8 foot trailer. Great info. Thank you sir. |
|
|
|
[#11]
That's cool!!!
|
|
|
|
[#12]
Quoted:
Great info. Thank you sir. Quoted:
Quoted:
Quoted:
Man, i cant get this build out of my head. What size is the trailer you built? A lot of people buy a trailer kit from Harbor Freight or Northern Tool. The Harbor Freight kits are sized for a 4 foot by 8 foot platform, which makes it a little easier to fit your plywood (since plywood comes in 4 foot wide sheets), but standard mattresses are about 54 inches wide, so they won't fit in a Teardrop built on a Harbor Freight trailer kit. The Northern Tool trailer kits are a little more expensive, but they seem to be built a little better and are available in a 5 foot by 8 foot size. The 5 foot width means you'll be cutting the plywood to a 5 foot length and turning it sideways on the trailer (less efficient use of your plywood sheets), but a standard full-size mattress will fit in a Teardrop built on the Northern Tool 5 foot by 8 foot trailer. Great info. Thank you sir. You're welcome. The Teardrops n Tiny Travel Trailers forum has a lot of information about building them. OP's trailer appears to be a Benroy type. Kharn posted pictures of a Weekender type. Then there's the classic Cub type, which is similar to the Weekender, but has elliptical curves on the edges of the sides (forming a teardrop shape), instead of the straight lines connected at various angles on the Weekender's sides. The Cub and Weekender allow building the trailer body a little longer than the platform of the trailer, since the body angles up and forward at the front edge of the trailer platform, and up and aft at the rear edge of the trailer platform. But the extra angles/curves make them a little more complicated to build. ETA: I forgot about the Kenskill type, which looks kind of like a cross between the Benroy and the Cub (front shaped sort of like the Cub, back shaped sort of like the Benroy). |
|
|
|
[#13]
Quoted:
The Harbor Freight kits are sized for a 4 foot by 8 foot platform, which makes it a little easier to fit your plywood (since plywood comes in 4 foot wide sheets), but standard mattresses are about 54 inches wide, so they won't fit in a Teardrop built on a Harbor Freight trailer kit. Quoted:
Quoted:
Man, i cant get this build out of my head. What size is the trailer you built? The Harbor Freight kits are sized for a 4 foot by 8 foot platform, which makes it a little easier to fit your plywood (since plywood comes in 4 foot wide sheets), but standard mattresses are about 54 inches wide, so they won't fit in a Teardrop built on a Harbor Freight trailer kit. JPN is correct. I started my layout using the matress dimensions. The trailer I built is 58" wide and 12' 8" long. Including the space for bicycles. |
|
|
|
[#14]
Quoted:
So inside is just the matress and the wall cabinets? Any additonal stowage? Quoted:
So inside is just the matress and the wall cabinets? Any additonal stowage? Quoted:
It would have been easier to buy one. Incredibly easy, but here's CampInn's price list: Camp Inn, and their 500 and 550 trailers are only 8' long, but their construction materials and methods are what you'd expect from a custom-built trailer that will last a long time. Go Little Guy is considerably cheaper, but from my friends' experience, they use basically MDF under a skin for the walls. If the skin gets any sort of cut or penetration, water will get inside and ruin the MDF, trashing your entire trailer. You can use a second mortgage to pay for an RV if it has both a bathroom and cooking facilities, since a teardrop doesn't, you have to finance it as an automotive (if they're a high end manufacturer and NADA listed) or personal loan, which have a shorter term and higher interest rate. Quoted:
Man, i cant get this build out of my head. What size is the trailer you built? Mine is 114" long (body, not including tongue box or tongue), 62" wide (60.5" interior, so a complete queen mattress can easily drop in, many 5' trailers actually have 2" shaved off the side of the mattress or they just squeeze it in, which makes changing the sheets a pain), and 48" tall (with 38" above the 6" foam mattress, lost ~4" due to the raised bed and the roof insulation), it is built on a Harbor Freight 4x8" trailer. Kharn |
|
|
|
[#15]
Great job
|
|
|
|
[#16]
Benroy type

Kenskill type 
Cub type 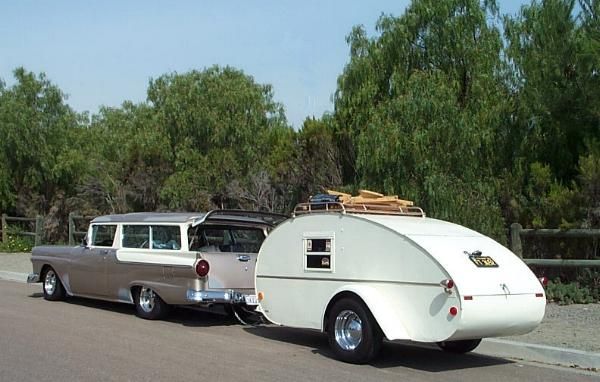
Weekender type 
About ten years ago, I was planning to built a Cub, and build it as light as possible. My daily driver was a VW Rabbit convertible, that I had swapped a 1.6 diesel and 5 speed into. I had used it to tow a 12 foot sailboat, so I knew I would have to build the teardrop as light as possible. Bought the Harbor Freight 4' by 8' trailer kit with the 12 inch four lug wheels (lightest 4' by 8' trailer kit I could find), was a member of a teardrop forum, and had downloaded templates that I could scale up to lay out the sides. Would have been less space inside than in a Benroy, but putting the lightest load on the tow vehicle was the main goal. Then, as the old saying goes... "shit happened", and that project had to be abandoned. Been thinking about trying again, after some other projects are completed. Now, my daily driver is a diesel Jetta, and I think that a lightly built Weekender would be a better fit for it. Or... if I talk myself into buying a Jeep, the Northern Tool 5' by 8' trailers apparently use the same lug pattern as YJ and newer Jeeps. People have built teardrops on those trailers and made various mods to allow using them offroad. |
|
|
|
[#17]
You guys have some skills for sure.
I'll probably just do a restoration/rebuild of my Sears David Bradley trailer and go "covered wagon" style. Something like this one. Pic stolen from web 
ETA: they even had a "pop-up" version. 
|
|
|
|
[#18]
For those considering building one, the biggest recommendations I have read from people that built one, and then built a second (
 ) after figuring out the problems with their first were: ) after figuring out the problems with their first were:
1) A door on each side, no one likes climbing over someone else in order to get out 2) Go at least 54 or, even better, 60" wide on the interior, for a full or queen-sized bed, 48" wide just isn't very big, add a hot summer evening and you'll want some space from your partner. 3) The RV doors are expensive, around $330 after shipping per door, but all you have to do is cut out the hole and stick it in. Homemade doors take a ton of work to do right and prevent leaks. Kharn |
|
|
|
[#19]
Quoted:
For those considering building one, the biggest recommendations I have read from people that built one, and then built a second ( ) after figuring out the problems with their first were:
1) A door on each side, no one likes climbing over someone else in order to get out 2) Go at least 54 or, even better, 60" wide on the interior, for a full or queen-sized bed, 48" wide just isn't very big, add a hot summer evening and you'll want some space from your partner. 3) The RV doors are expensive, around $330 after shipping per door, but all you have to do is cut out the hole and stick it in. Homemade doors take a ton of work to do right and prevent leaks. Kharn Having built one, I can say this is all true ^^^^^^^^^^^^^...Remember that when installing the doors, the hinge goes towards the front *many people dont install them correctly*. I had no intent in building my own doors, I had a hell a time with the rear hatch, pre-made doors with frames is the way to go. The reason most go 48" is the size of the wood and with going bigger, youll end up with a seam. |
|
|
|
[#20]
I have researched this quite a bit. You can buy 5'X10' sheets of plywood. You will have to put effort into finding it (looking at places other than home depot and lowes) but it is available.
One of my neighbors works for a lumber company and fortunately they get it by the box car load. I just need to get motivated and get with it. |
|
|
|
[#21]
Mad props, OP. You got talents I wish I had.
|
|
|
|
[#22]
Quoted:
BTDT...mine became a victim of mold.. My BUILD THREAD http://www.ar15.com/forums/t_10_17/648758__ARCHIVED_THREAD____B_O_T___bug_out_trailer__Build_Thread_____PICS__.html&page=1 after I took a chainsaw too it. <a href="http://s21.photobucket.com/user/die-tryin/media/Expedition%20Camper/cid_803-1.jpg.html" target="_blank">http://i21.photobucket.com/albums/b262/die-tryin/Expedition%20Camper/cid_803-1.jpg</a> mold behind one of my exterior diamond plate panels <a href="http://s21.photobucket.com/user/die-tryin/media/Expedition%20Camper/cid_238.jpg.html" target="_blank">http://i21.photobucket.com/albums/b262/die-tryin/Expedition%20Camper/cid_238.jpg</a> Rear section of wood removed. <a href="http://s21.photobucket.com/user/die-tryin/media/Expedition%20Camper/cid_191.jpg.html" target="_blank">http://i21.photobucket.com/albums/b262/die-tryin/Expedition%20Camper/cid_191.jpg</a> Removed subflooring and insulation, that green is mold <a href="http://s21.photobucket.com/user/die-tryin/media/Expedition%20Camper/cid_967.jpg.html" target="_blank">http://i21.photobucket.com/albums/b262/die-tryin/Expedition%20Camper/cid_967.jpg</a> Front wall tore apart, i just Kreg Jig to help build it. <a href="http://s21.photobucket.com/user/die-tryin/media/Expedition%20Camper/ruinedtrailer2.jpg.html" target="_blank">http://i21.photobucket.com/albums/b262/die-tryin/Expedition%20Camper/ruinedtrailer2.jpg</a> The one only maiden voyage was its shake down run <a href="http://s21.photobucket.com/user/die-tryin/media/Expedition%20Camper/cid_485.jpg.html" target="_blank">http://i21.photobucket.com/albums/b262/die-tryin/Expedition%20Camper/cid_485.jpg</a> Quoted:
Quoted:
That is sweet! If I tried to make something like that, it would end up out in the woods in a smoldering pile and I'd be at the camper store spending money.
BTDT...mine became a victim of mold.. My BUILD THREAD http://www.ar15.com/forums/t_10_17/648758__ARCHIVED_THREAD____B_O_T___bug_out_trailer__Build_Thread_____PICS__.html&page=1 after I took a chainsaw too it. <a href="http://s21.photobucket.com/user/die-tryin/media/Expedition%20Camper/cid_803-1.jpg.html" target="_blank">http://i21.photobucket.com/albums/b262/die-tryin/Expedition%20Camper/cid_803-1.jpg</a> mold behind one of my exterior diamond plate panels <a href="http://s21.photobucket.com/user/die-tryin/media/Expedition%20Camper/cid_238.jpg.html" target="_blank">http://i21.photobucket.com/albums/b262/die-tryin/Expedition%20Camper/cid_238.jpg</a> Rear section of wood removed. <a href="http://s21.photobucket.com/user/die-tryin/media/Expedition%20Camper/cid_191.jpg.html" target="_blank">http://i21.photobucket.com/albums/b262/die-tryin/Expedition%20Camper/cid_191.jpg</a> Removed subflooring and insulation, that green is mold <a href="http://s21.photobucket.com/user/die-tryin/media/Expedition%20Camper/cid_967.jpg.html" target="_blank">http://i21.photobucket.com/albums/b262/die-tryin/Expedition%20Camper/cid_967.jpg</a> Front wall tore apart, i just Kreg Jig to help build it. <a href="http://s21.photobucket.com/user/die-tryin/media/Expedition%20Camper/ruinedtrailer2.jpg.html" target="_blank">http://i21.photobucket.com/albums/b262/die-tryin/Expedition%20Camper/ruinedtrailer2.jpg</a> The one only maiden voyage was its shake down run <a href="http://s21.photobucket.com/user/die-tryin/media/Expedition%20Camper/cid_485.jpg.html" target="_blank">http://i21.photobucket.com/albums/b262/die-tryin/Expedition%20Camper/cid_485.jpg</a> Kharn |
|
|
|
[#24]
Very cool!!
|
|
|
|
[#25]
Quoted:
Yeah, well, it's easier for me to spank it than it is to get my wife to help but some things really are worth the effort. Quoted:
Quoted:
It would have been easier to buy one. Yeah, well, it's easier for me to spank it than it is to get my wife to help but some things really are worth the effort. 
Well said, and awesome work! |
|
|
|
[#26]
My God, that is amazing! I have so much admiration for people who can actually do things with their hands, make something out of nothing. You're why mankind survives and advances.
|
|
|
|
[#27]
Building stuff is cool. Nice work, guys!!
|
|
|
|
[#28]
Op delivers..
|
|
|
|
[#29]
Quoted:
you the man! No shit, great job! |
|
|
|
[#30]
Awesome !
|
|
|
|
[#31]
Thanks all y'all. My wife and I just got back from a night in taos with the camper. It sure is handy.
|
|
|
|
[#33]
Quoted:
Thanks all y'all. My wife and I just got back from a night in taos with the camper. It sure is handy. Very cool. I wasnt trying to hi-jack your thread, but I just wanted to show the "otherside" of a project like this. They arent just slapped together and even the best laid plans can fail. IMO,,those that build one and it is successful, its a win in my book. While mine was structurally sound and it went well as a build, it ultimately failed due to the mold problem. I agree about the kitchen area and Hatch being the most expensive and most work. We saved that for last because the whole time we were doing the rest of the build, we were working on ideas for the rear..We went thru 3 re-designs to get one that we liked. EVen the struts alone was a chore, What length, What pound rating, which way to mount them, etc etc etc. Too stiff and you could rip them outa the boards or take too much effort to close,,to light and they wont hold the door open. lol |
|
|
 Win a FREE Membership!
Sign up for the ARFCOM weekly newsletter and be entered to win a free ARFCOM membership. One new winner* is announced every week!
You will receive an email every Friday morning featuring the latest chatter from the hottest topics, breaking news surrounding legislation, as well as exclusive deals only available to ARFCOM email subscribers.

AR15.COM is the world's largest firearm community and is a gathering place for firearm enthusiasts of all types.
From hunters and military members, to competition shooters and general firearm enthusiasts, we welcome anyone who values and respects the way of the firearm.

Subscribe to our monthly Newsletter to receive firearm news, product discounts from your favorite Industry Partners, and more.
Copyright © 1996-2024 AR15.COM LLC. All Rights Reserved.
Any use of this content without express written consent is prohibited.
AR15.Com reserves the right to overwrite or replace any affiliate, commercial, or monetizable links, posted by users, with our own.


