|
[#1]

Consider this a tag. The Ford Hi-Boy thread has been a disappointment so far. Don't let me down, OP. |
|
|
|
[#2]
Tag too
that's a really nice monte for $2600 I am lazy though would probably have just done a crate motor of some sort in it |
|
|
|
[#3]
Awesome
|
|
|
|
[#4]
Will that intake clear? That's a truck engine.
|
|
|
|
[#5]
Why not keep the 200r4? The can handle lots of horsepower if properly built
Also there would be no need to modify the drive shaft length. A great advantage to the 200r4 is that it doesn't automatically shift out of first gear like a 700r4! I had a 1988 Monte Carlo that my parents bought new in 1988 until about a year ago. I regret selling it! |
|
|
|
[#6]
Not sure yet if the intake is going to clear or not. If it doesn't then a new intake or a cowl hood will be popped on.
As the 200R4 is bone stock right now and would need to be freshened up I am going to run the 4L80E. Factory 4L80E's are supposed good for 400+ lb ft of torque so I think it is a good starting point. We will see. Despite advice upstream that the LS9 cam would be a poor choice I am going with it. Lots of folks are running them in turbo applications and they are definitely get the job done. Is it ideal? Probably not, but for the money it is hard to beat. I will need a few LS2 specific parts to run it but it most definitely is at least worth a try as even with the few parts I need it is stilla cheaper alternative than most aftermarket cams. Not much to report today. Got the engine and transmission separated, got the engine on the stand, and started to tear it down. I am only going so far as taking off the heads and oil pan. Mostly to check if anything looks really nasty in there and to weld a turbo oil return into the pan. More to come. Just a couple of pics to keep peoples interest up. On the stand. Aluminum cylinder heads are sexy. 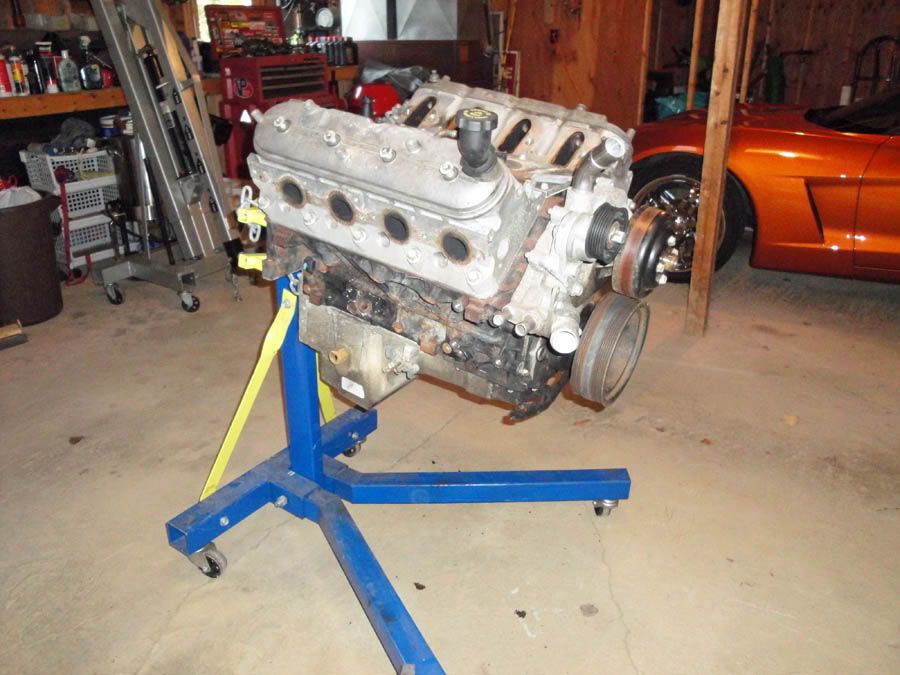
Passenger side valve cover pulled, it looks great in there. 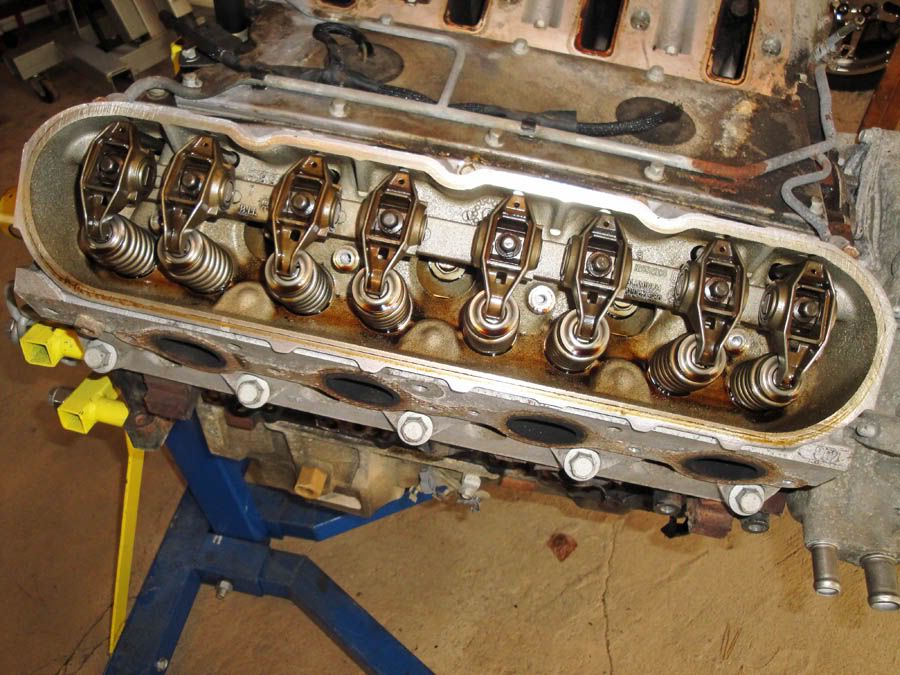
|
|
|
|
[#7]
Awesome ! 80's cars rule !
|
|
|
|
[#8]
Nice Monte! And for the price you did great. Tag for updates.
|
|
|
|
[#9]
Progress is being made.
The 5.3 is stripped and looks good! No ridge in the cylinders, very little carbon build up, pretty much clean and ready to make some big time boosted HP! I am a car guy from way back but have never once worked with aluminum cylinder heads, I was amazed at how light they were compared to the traditional cast iron heads I am used to. The feathery weight of these beauties has to be experienced! 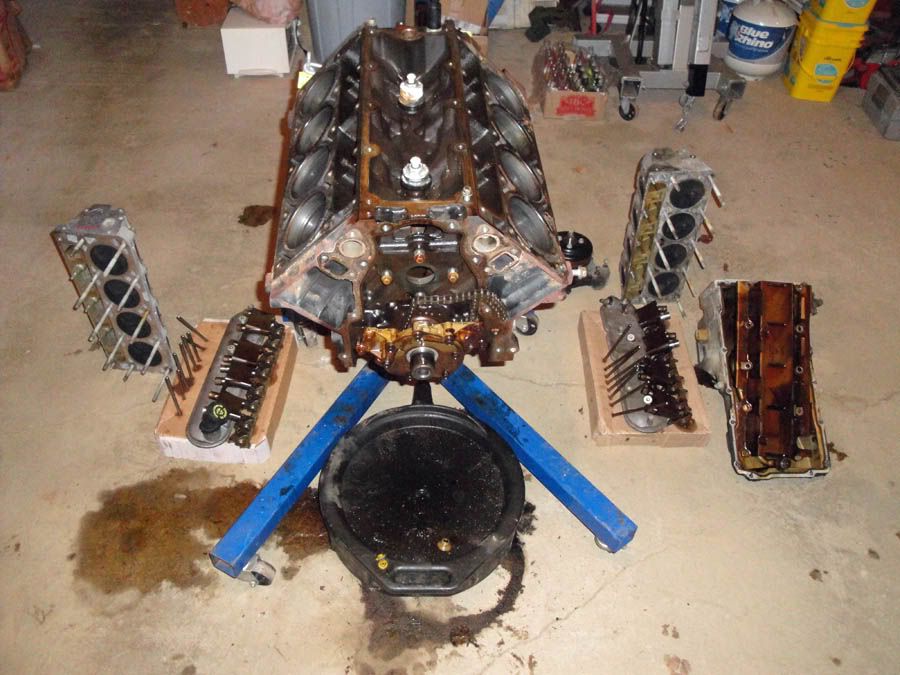
Parts have started showing up. New head gaskets, new head bolts (in the boxes), and an LS9 cam, for those not familiar it is the same cam used in the ZR-1 Corvette. The cam is ground for a blower motor but people are making good power with them on turbo engines and they have good street manners. 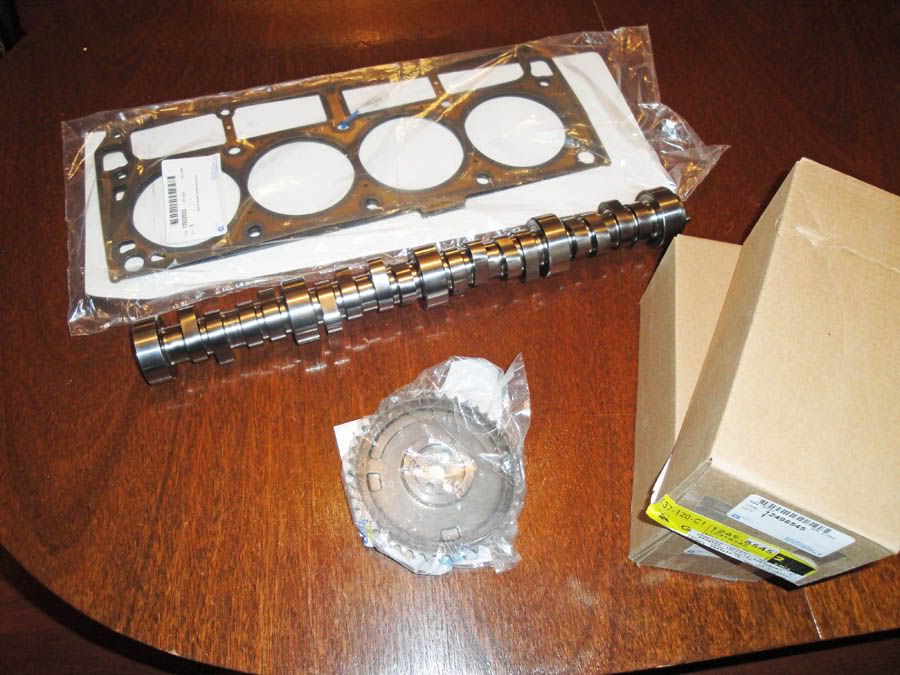
The old truck cam and the new LS9 cam side by side. The pic doesnt really capture it but the new cam has an obviously much bigger amount of lift than the old cam! 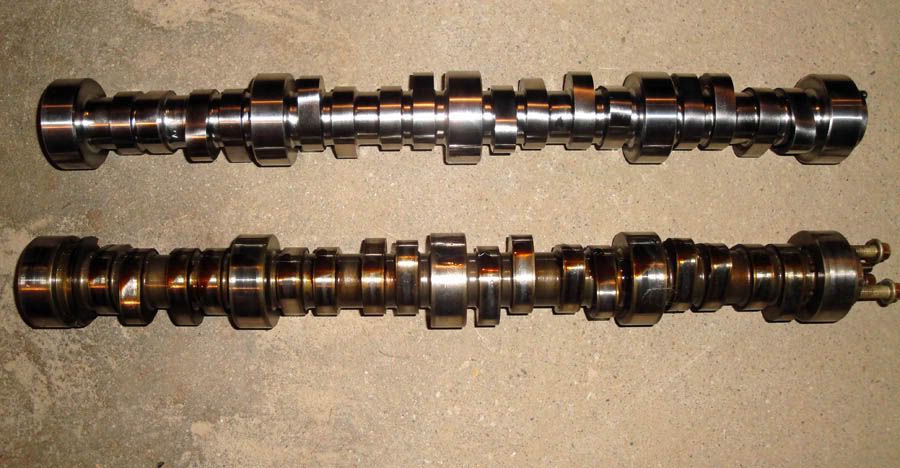
The Megasquirt engine computer before I started assembly. I ended up with an MS2 as opposed to an MS3. I won't bother going into the differences. But this computer allows me to have full control over fuel and ignition, too cool! I have used this same system before on a turboed 95 F150 I built and it is an awesome piece of hardware. 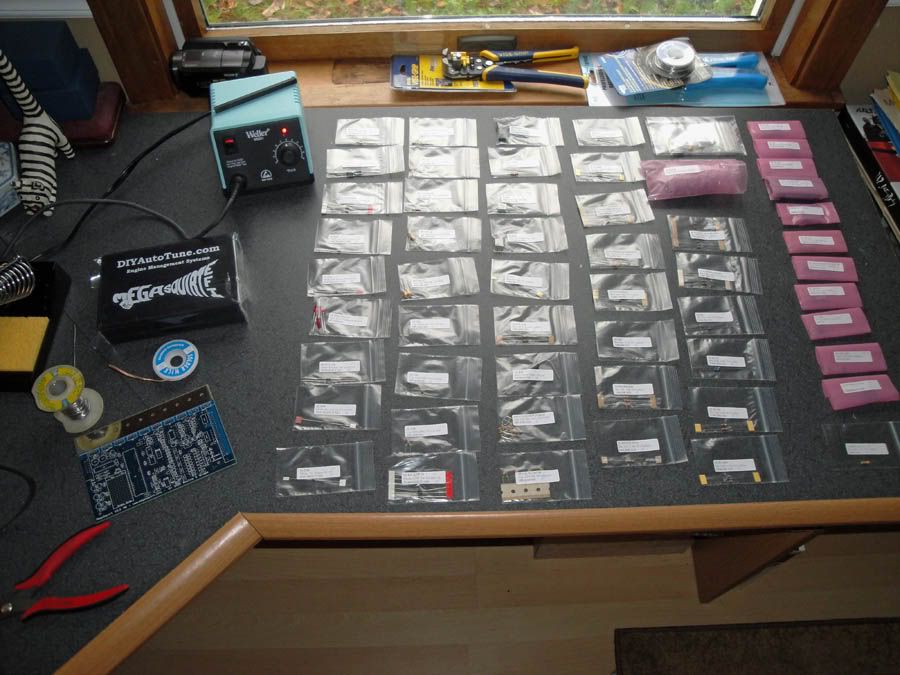
Here she is all assembled and being tested on the laptop. The green circuit board plugged into the Megasquirt computer is a tool used to simulate engine sensor inputs so you can verify you have built this thing correctly. The laptop has a piece of software loaded onto it called TunerStudio that shows real time engine functions and allows the user to build a custom tune. I.E. you can tailor your fuel and ignition maps to your specific application. If you are a car and computer nerd then this is almost nirvana. You can probably guess that I fall into the car/computer nerd category. 
More parts and pieces are coming. The car is going to start getting torn apart soon. Sadly I am up against the wall as far as nice weather goes so I am running short here. But stay tuned, more to come. |
|
|
|
[#10]
Quoted:
Progress is being made. The 5.3 is stripped and looks good! No ridge in the cylinders, very little carbon build up, pretty much clean and ready to make some big time boosted HP! I am a car guy from way back but have never once worked with aluminum cylinder heads, I was amazed at how light they were compared to the traditional cast iron heads I am used to. The feathery weight of these beauties has to be experienced! http://i22.photobucket.com/albums/b301/paulj1973/53apart.jpg Parts have started showing up. New head gaskets, new head bolts (in the boxes), and an LS9 cam, for those not familiar it is the same cam used in the ZR-1 Corvette. The cam is ground for a blower motor but people are making good power with them on turbo engines and they have good street manners. http://i22.photobucket.com/albums/b301/paulj1973/53parts.jpg The old truck cam and the new LS9 cam side by side. The pic doesnt really capture it but the new cam has an obviously much bigger amount of lift than the old cam! http://i22.photobucket.com/albums/b301/paulj1973/Cams.jpg The Megasquirt engine computer before I started assembly. I ended up with an MS2 as opposed to an MS3. I won't bother going into the differences. But this computer allows me to have full control over fuel and ignition, too cool! I have used this same system before on a turboed 95 F150 I built and it is an awesome piece of hardware. http://i22.photobucket.com/albums/b301/paulj1973/MSKit-2.jpg Here she is all assembled and being tested on the laptop. The green circuit board plugged into the Megasquirt computer is a tool used to simulate engine sensor inputs so you can verify you have built this thing correctly. The laptop has a piece of software loaded onto it called TunerStudio that shows real time engine functions and allows the user to build a custom tune. I.E. you can tailor your fuel and ignition maps to your specific application. If you are a car and computer nerd then this is almost nirvana. You can probably guess that I fall into the car/computer nerd category. http://i22.photobucket.com/albums/b301/paulj1973/MSassembled.jpg More parts and pieces are coming. The car is going to start getting torn apart soon. Sadly I am up against the wall as far as nice weather goes so I am running short here. But stay tuned, more to come. If you're not looking for all the bells and whistles an MS2 will work just fine. Looks like a fun project. Lotsa soldering, testing and more soldering and testing. |
|
|
|
[#11]
Pretty sure you can control the 80 with megasquirt;)
I would suggest head studs and possibly some rod bolts. Buddy of mine has a camaro with a 5.3 and an on3 turbo kit with one of the eBay 76mm turbos. He's on e85. Made 640rwhp on like 18psi. Started pushing water tho. That's when he did the head studs and it stopped it. |
|
|
|
[#12]

|
|
|
|
[#13]
Quoted:
If you're not looking for all the bells and whistles an MS2 will work just fine. Looks like a fun project. Lotsa soldering, testing and more soldering and testing. The MS3 would have been nice for the individual coil and injector control but the extra cost didn't seem worth it to me. The SD card datalogging would have been awfully nice though I have to admit! The MS2 is still an amazingly powerful piece of equipment for the cost, I love playing with this stuff. Quoted:
Pretty sure you can control the 80 with megasquirt;) I would suggest head studs and possibly some rod bolts. Buddy of mine has a camaro with a 5.3 and an on3 turbo kit with one of the eBay 76mm turbos. He's on e85. Made 640rwhp on like 18psi. Started pushing water tho. That's when he did the head studs and it stopped it. You actually need another piece of hardware called the MegaShift to control the 80 and it is just a hair under $300. For another 300 bucks I can be into a known name brand transmission controller so I think that is the route I am going to go when I am ready. There just isn't the forum support for the MegaShift that there is for the MegaSquirt and I don't feel confident enough to tackle it. I am going to drop the engine in and get it running on the 200R4. If I can control myself then hopefully I won't burn up that trans before I do the swap to the 4L80E. We'll see though! I am staying away from the head studs for now. Trying to stay on kind of a budget haha! My ultimate goal is 450-500 RWHP which the factory bolts, both rod and head, should live at. But again, time will tell! 
|
|
|
|
[#14]
Quoted:
Quoted:
If you're not looking for all the bells and whistles an MS2 will work just fine. Looks like a fun project. Lotsa soldering, testing and more soldering and testing. The MS3 would have been nice for the individual coil and injector control but the extra cost didn't seem worth it to me. The SD card datalogging would have been awfully nice though I have to admit! The MS2 is still an amazingly powerful piece of equipment for the cost, I love playing with this stuff. Quoted:
Pretty sure you can control the 80 with megasquirt;) I would suggest head studs and possibly some rod bolts. Buddy of mine has a camaro with a 5.3 and an on3 turbo kit with one of the eBay 76mm turbos. He's on e85. Made 640rwhp on like 18psi. Started pushing water tho. That's when he did the head studs and it stopped it. You actually need another piece of hardware called the MegaShift to control the 80 and it is just a hair under $300. For another 300 bucks I can be into a known name brand transmission controller so I think that is the route I am going to go when I am ready. There just isn't the forum support for the MegaShift that there is for the MegaSquirt and I don't feel confident enough to tackle it. I am going to drop the engine in and get it running on the 200R4. If I can control myself then hopefully I won't burn up that trans before I do the swap to the 4L80E. We'll see though! I am staying away from the head studs for now. Trying to stay on kind of a budget haha! My ultimate goal is 450-500 RWHP which the factory bolts, both rod and head, should live at. But again, time will tell!
|
|
|
|
[#15]
In case anyone is still is still following along:
More progress! Here is the Megasquirt 2 EMS and the relay board that goes with it. The relay board is a convenient spot to bring all the engine inputs and outpust to. It is possible to wire everything to the Megasquirt directly but the relay board is more convenient, easier, and safer, in my opinion at least. The two pieces of hardware need to be wired together and that is what I am starting to do in this picture. 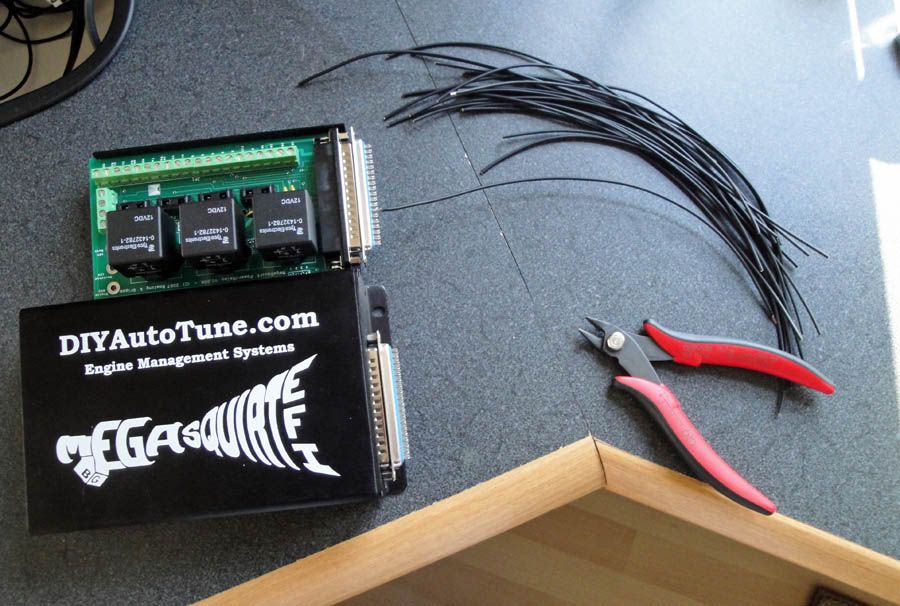
2 Hours later everything is finished and looking nice and neat. 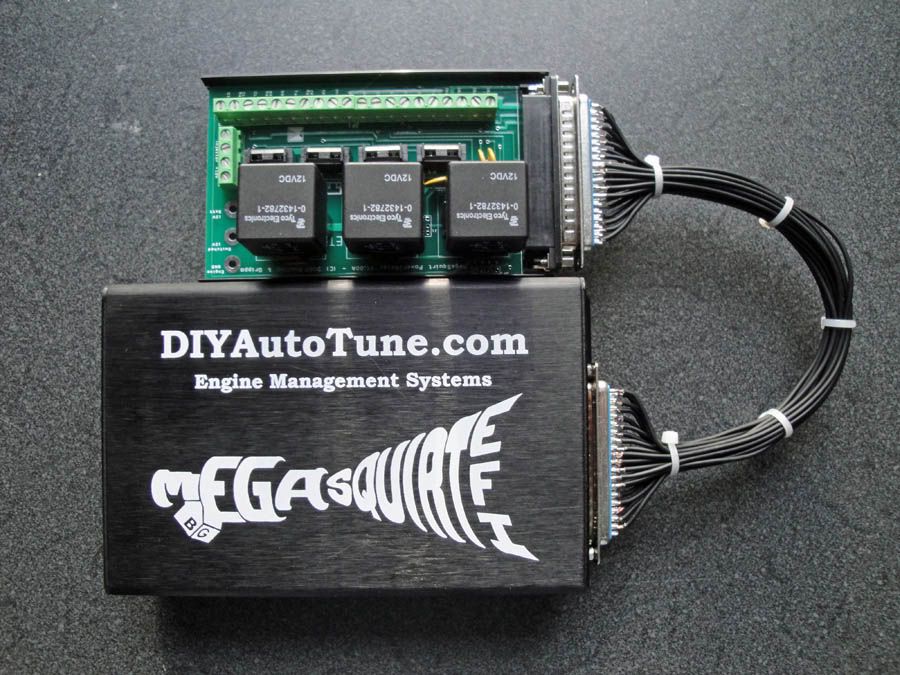
An finally the shielded metal housings are in place to keep any electrical interference at bay! This entire assembly will be mounted under the dash but I may still put wire loom over the wire bundle to keep it neat. 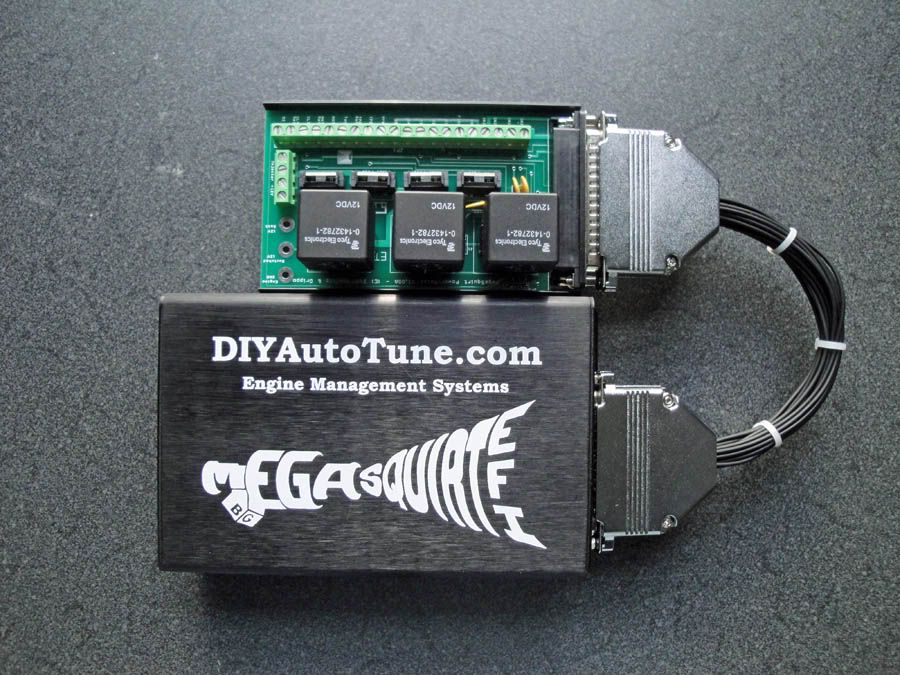
On the mechanical front I dropped the monster LS9 hydraulic roller cam into the engine this afternoon. Lots of assembly lube on the shaft, haha. 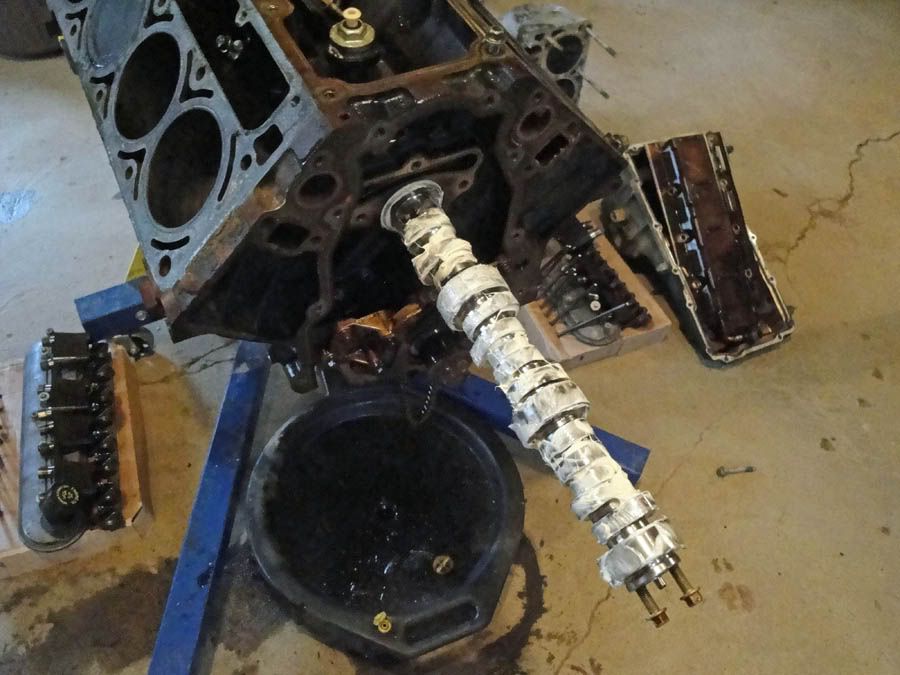
Buttoned back up, the block has been cleaned up and is ready for the heads to be dropped back on. I bought LS9 head gaskets which are designed around a blower motor so I hope they hold up to some turbo boost! 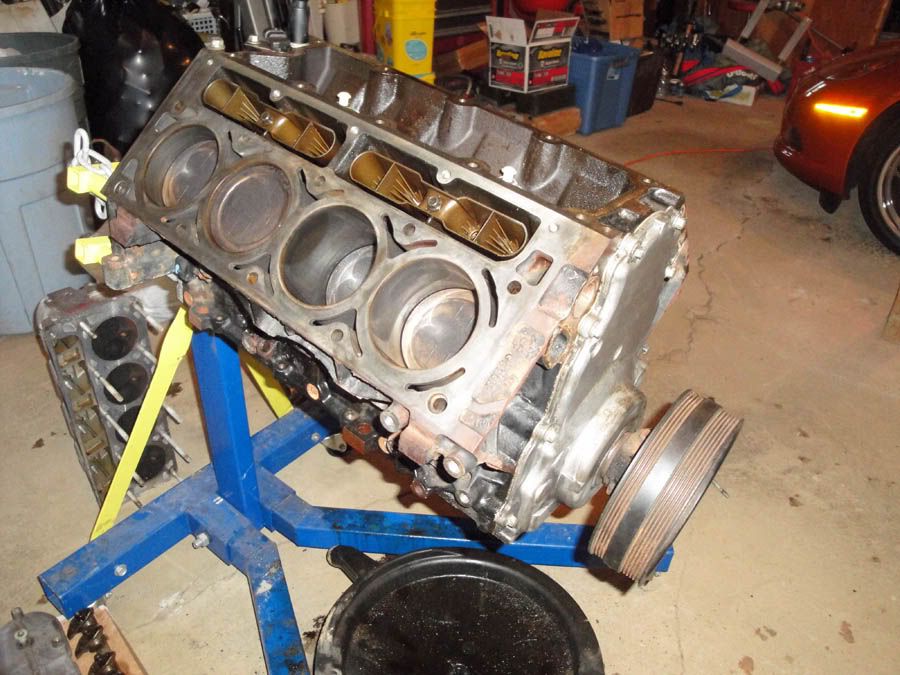
Some really killer parts are showing up this week! I am doing an awesome aircraft cannon plug as a passthrough on the firewall for all my engine wiring to the Megasquirt, new PAC valve springs, and finally fuel system parts to convert the car from carb to fuel injection will be here as well. This is getting exciting now! As usual stay tuned. |
|
|
|
[#16]
|
|
|
|
[#17]
Looks like you're having a good time!
|
|
|
|
[#18]
Quoted:
I always loved those cars, especially the fastback, they're getting as rare as hen's teeth. I sold Chevy back then. I couldn't believe how much more that window added to the sticker. They were dog slow and I was not a fan of them much. Now, I love the look of the Monte Carlo SS and the Hurst Olds of that era. |
|
|
|
[#19]
Looks like fun!
I used to have one of these. I remember being a little kid and really liking them! I had no idea I would own one some day. Oh, If I recall the trans is called a 200-4R, not 200-R4, but it doesn't matter. Mine would run 15.7 to 16.4 in the quarter mile depending on the weather. it was stock except for the exhaust system. Street tires. 2.4 sec 60 ft times and around 87 mph in the quarter. So it needed a 125 hp shot of nitrous and got it! The day it ran it's slowest all motor (the 16.4 in 98 degree weather!) it also ran a 14.4 at 99 mph with the nitrous!! I used the same plugs and timing, just poured in some octane booster/detonation reducer. I really wanted a manual and 5.0 mustangs of the day were running as fast with NO nitrous so...thats when I became a Ford guy. Enjoy the SS! I still think it's a pretty good looking car. |
|
|
|
[#20]
Oh Hell Yeah! I love resto threads.
Continue having fun dude, and consider yourself tagged. |
|
|
|
[#21]
Tagged
|
|
|
|
[#22]
Sweet
|
|
|
|
[#23]
Brian at http://www.gbodyparts.com/has been good to me about parts for my Turbo T, he has alot more than whats on his website for parts. You can call or email if you are looking for some specific body or interior parts.
|
|
|
|
[#24]
I've always liked that generation of Monte. Should make a nice project.
Probably at least 700 lbs lighter than a 2012 Camaro so it could fly. |
|
|
|
[#25]
Cool, this is turning into a real retro sleeper. Project is coming along quickly
|
|
|
|
[#26]
tag for the coolness
|
|
|
|
[#27]
My mother had that same year model and color when we lived in Lewiston.
|
|
|
|
[#28]
This is getting good. Tag.
|
|
|
|
[#29]
Would you do me a serious favor? My father has been wanting a 200R4 trans for his old car for a long time but since everyone and their mothers threw the motherfuckers away as garbage, I can't seem to find one.
If I pay shipping, will you sell me yours? |
|
|
|
[#30]
Quoted:
I wish I had one of these and the money to fix it up. '86 Grand Prix 2+2 Aero Coupe. They only built around 1100. http://i26.photobucket.com/albums/c124/GAcop/22aerocoupe_zps6bd1fb90.jpg There was a guy around here that had one of those a few years back. I told him to hang onto it, might be worth something some day. Not sure what happened to it since then. |
|
|
|
[#31]
Damn right this is a tag!
|
|
|
|
[#32]
Quoted:
I've always liked that generation of Monte. Should make a nice project. Probably at least 700 lbs lighter than a 2012 Camaro so it could fly. IIRC mine (Monte SS) was about 3400 lbs. I think a 2012 v-6 Camaro is about 3700. |
|
|
|
[#33]
Tagged for updates. Sweet project.
|
|
|
|
[#34]
Nice work. Tagged.
|
|
|
|
[#35]
I have a 74 Monte Carlo 454 turbo 400. Been sitting in the garage for years. Haven't got the money to restore it, haven't got to where I want to junk it either.
Love the old Monte's, looks like a fun project. |
|
|
|
[#36]
I'm far from a Chevy guy, but I have always loved those Montes. A very sharp looking car.
Looks like it should be a blast when you are done too. |
|
|
|
[#37]
|
|
|
|
[#38]
DAMN, i had the same car but with a hard top instead of the T's. the one car i regret getting rid of. |
|
|
|
[#39]
Alright, in all honesty this is a pretty lame update. But I am so excited I can hardly contain myself!
Boxes were on the porch today when I got home. That is always a good sign! The first box was this. My Innovate MTX-L Wideband O2 sensor. For those that don't know what this is, it is a sensor that keeps track, very precisely, of what your air to fuel ratio is. It sends that info to your engine computer, in this case my Megasquirt 2, and helps to keep your engine happy and alive. This particular instrument comes with a gauge that will be mounted in the car to show what the AFR is in real time, very cool! 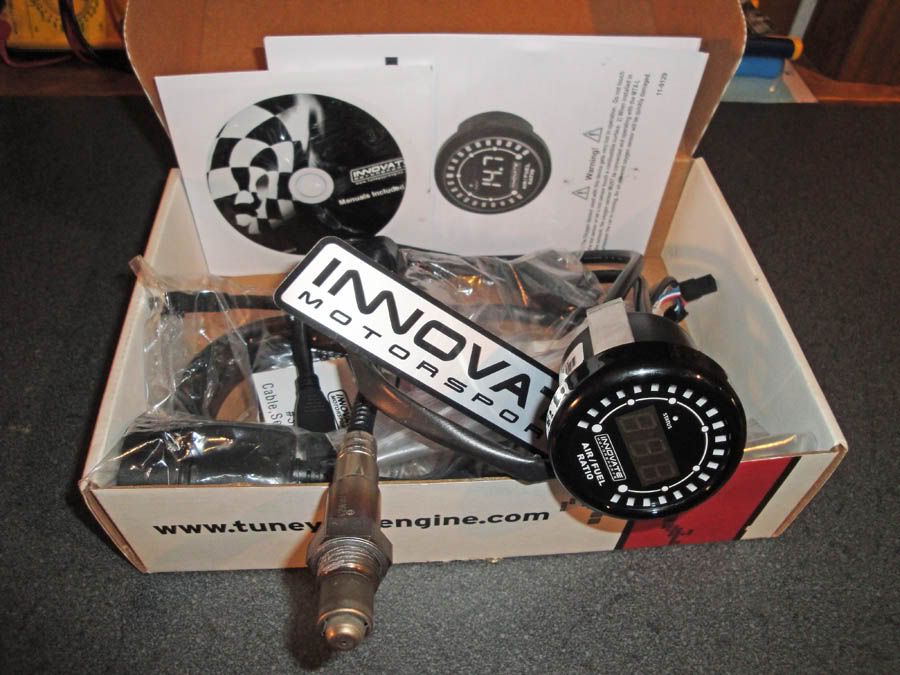
But much better yet my Amphenol cannon plug showed up. I am guessing there are some other avionics guys here that are reading this. They will be VERY familiar with the pictures below. This style of plug is really something else! This is all that is used in the aviation world for electrical connections and it is awesome. Trying to sort one out on your own can be a bit of a challenge, there are literally tens of thousands of styles! Pictured are all the different parts that make up an aviation cannon plug, a very cool piece of hardware. What is pictured here will be the firewall passthrough for the engine wiring harness back to the Megasquirt. When this is all done and wired it will be a very simple means of connecting/disconnecting the engine from the computer. 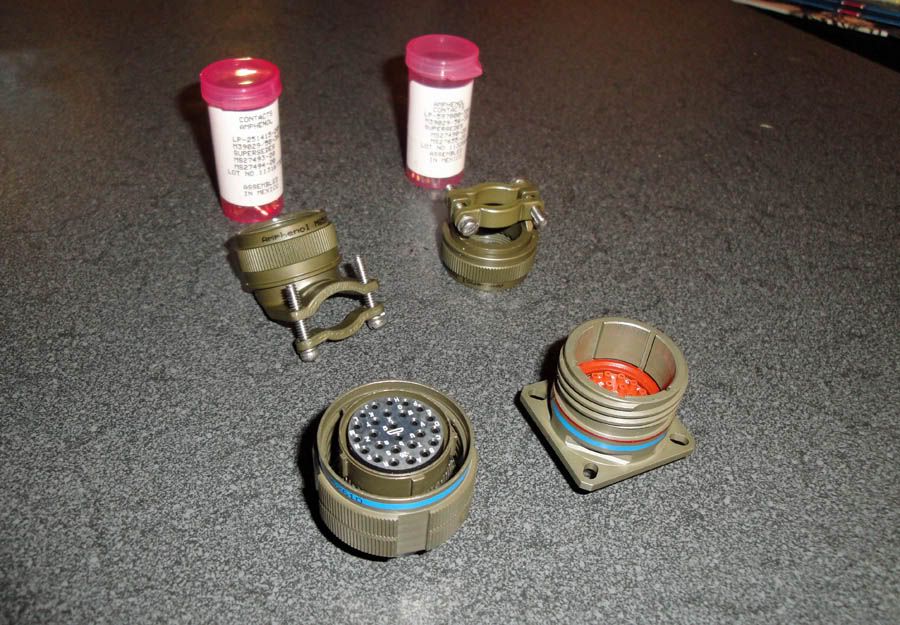
This is how it will look assembled, minus all of the sensor wires right now. The firewall will be sandwiched between the vertical flange and the blue stripes. To the left of the blue stripes the engine wiring harness will come out to make its attachment to all the engine sensors. This is awesome! 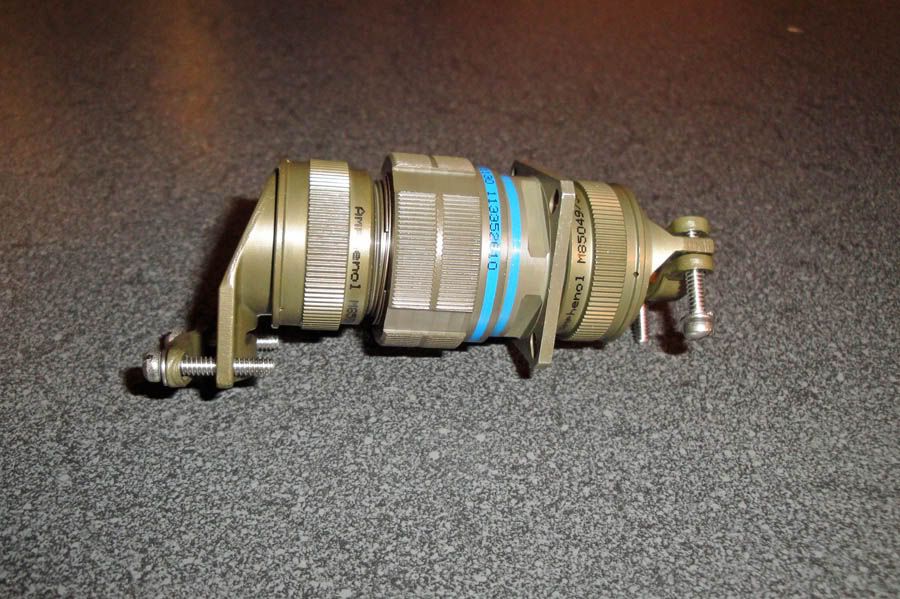
Stay tuned. I know I sound like a broken record but there will be more updates shortly! |
|
|
|
[#40]
How much for that connector if you don't mind my asking? I looked into some Deutsch connectors a while back and between the connector, pins and crimper I was out of my league.
|
|
|
|
[#41]
why wouldnt you use a stock harness and ecu with hptuners? ive used megasquirt and currently use hptuners on my car and find it far superior.
|
|
|
|
[#42]
I think an AFR Gauge would be bomb.
|
|
|
|
[#43]
How'd I miss this? Tag! |
|
|
|
[#44]
Quoted: But much better yet my Amphenol cannon plug showed up. I am guessing there are some other avionics guys here that are reading this. They will be VERY familiar with the pictures below. This style of plug is really something else! This is all that is used in the aviation world for electrical connections and it is awesome. Trying to sort one out on your own can be a bit of a challenge, there are literally tens of thousands of styles! Pictured are all the different parts that make up an aviation cannon plug, a very cool piece of hardware. What is pictured here will be the firewall passthrough for the engine wiring harness back to the Megasquirt. When this is all done and wired it will be a very simple means of connecting/disconnecting the engine from the computer. http://i22.photobucket.com/albums/b301/paulj1973/cannonplug.jpg This is how it will look assembled, minus all of the sensor wires right now. The firewall will be sandwiched between the vertical flange and the blue stripes. To the left of the blue stripes the engine wiring harness will come out to make its attachment to all the engine sensors. This is awesome! http://i22.photobucket.com/albums/b301/paulj1973/assembledcannonplug.jpg Stay tuned. I know I sound like a broken record but there will be more updates shortly! We use same but smaller connectors for our MoTeC data/engine control systems at work. They are badass and very stout but are a pain in the ass to wire for me. |
|
|
|
[#45]
Damn nice! My favorite body style. I had a Cutlass I put a 350 Rocket in to, and have always liked the Turbo-Ts, Grand Nationals and Monte SS.
Nice build. |
|
|
|
[#46]
very cool project
|
|
|
|
[#47]
tag-o-rama
|
|
|
|
[#48]
Quoted:
How much for that connector if you don't mind my asking? I looked into some Deutsch connectors a while back and between the connector, pins and crimper I was out of my league. Well I am kind of embarrassed to admit what that connector cost. Up above I claimed I was trying to do a budget build. Haha. For the connector pictured I have $125.00 invested. That seems pretty pricey when I could have just drilled a hole and put a grommet in.  But hey, it's my project and I'm building it the way I want! But hey, it's my project and I'm building it the way I want!
While the crimpers and the turrets that go with them are expensive brand new they can be had for between $75 to $100 on E-Bay, and they are a tool that will just never wear out. Or if you work in the avionics field you can just borrow a set from work! Quoted:
why wouldnt you use a stock harness and ecu with hptuners? ive used megasquirt and currently use hptuners on my car and find it far superior. I know virtually nothing about HP Tuners and tons about the MegaSquirt. I love building wiring harnesses, I love the MS interface, and I LOVE building a tune from scratch and watching my handiwork turn into a hulking beast. My mind was made up before I even started. Quoted:
We use same but smaller connectors for our MoTeC data/engine control systems at work. They are badass and very stout but are a pain in the ass to wire for me. They are indeed a badass connector! The one pictured here is a 26 pin that I will only be using 22 pins on. That leaves me four more in the future to add other inputs to! The wiring can be a PITA but the more you do them the easier they become. More parts are here and sometime in the next couple of weeks the engine swap will take place. |
|
|
|
[#49]
Great updates!!! I want to do a build soon too!
|
|
|
|
[#50]
Tag. Looking good man.
|
|
|
 Win a FREE Membership!
Sign up for the ARFCOM weekly newsletter and be entered to win a free ARFCOM membership. One new winner* is announced every week!
You will receive an email every Friday morning featuring the latest chatter from the hottest topics, breaking news surrounding legislation, as well as exclusive deals only available to ARFCOM email subscribers.

AR15.COM is the world's largest firearm community and is a gathering place for firearm enthusiasts of all types.
From hunters and military members, to competition shooters and general firearm enthusiasts, we welcome anyone who values and respects the way of the firearm.

Subscribe to our monthly Newsletter to receive firearm news, product discounts from your favorite Industry Partners, and more.
Copyright © 1996-2024 AR15.COM LLC. All Rights Reserved.
Any use of this content without express written consent is prohibited.
AR15.Com reserves the right to overwrite or replace any affiliate, commercial, or monetizable links, posted by users, with our own.


