|
[#1]
Wanna build me a car
Wish I could afford to regardless of your price! Thanks for the updates I can't wait for the dyno sheet! TAG etA 3 yay |
|
|
|
[#2]
Thanks for the update.
|
|
|
|
[#3]
Quoted:
Alright, in all honesty this is a pretty lame update. But I am so excited I can hardly contain myself! Boxes were on the porch today when I got home. That is always a good sign! The first box was this. My Innovate MTX-L Wideband O2 sensor. For those that don't know what this is, it is a sensor that keeps track, very precisely, of what your air to fuel ratio is. It sends that info to your engine computer, in this case my Megasquirt 2, and helps to keep your engine happy and alive. This particular instrument comes with a gauge that will be mounted in the car to show what the AFR is in real time, very cool! http://i22.photobucket.com/albums/b301/paulj1973/MTX-L.jpg But much better yet my Amphenol cannon plug showed up. I am guessing there are some other avionics guys here that are reading this. They will be VERY familiar with the pictures below. This style of plug is really something else! This is all that is used in the aviation world for electrical connections and it is awesome. Trying to sort one out on your own can be a bit of a challenge, there are literally tens of thousands of styles! Pictured are all the different parts that make up an aviation cannon plug, a very cool piece of hardware. What is pictured here will be the firewall passthrough for the engine wiring harness back to the Megasquirt. When this is all done and wired it will be a very simple means of connecting/disconnecting the engine from the computer. http://i22.photobucket.com/albums/b301/paulj1973/cannonplug.jpg This is how it will look assembled, minus all of the sensor wires right now. The firewall will be sandwiched between the vertical flange and the blue stripes. To the left of the blue stripes the engine wiring harness will come out to make its attachment to all the engine sensors. This is awesome! http://i22.photobucket.com/albums/b301/paulj1973/assembledcannonplug.jpg Stay tuned. I know I sound like a broken record but there will be more updates shortly! I used a cannon plug in the fire wall on my 68 Cougar when I re-wired it. Avionics guy here. |
|
|
|
[#4]
Quoted:
Quoted:
How much for that connector if you don't mind my asking? I looked into some Deutsch connectors a while back and between the connector, pins and crimper I was out of my league. Well I am kind of embarrassed to admit what that connector cost. Up above I claimed I was trying to do a budget build. Haha.  For the connector pictured I have $125.00 invested. That seems pretty pricey when I could have just drilled a hole and put a grommet in. For the connector pictured I have $125.00 invested. That seems pretty pricey when I could have just drilled a hole and put a grommet in.  But hey, it's my project and I'm building it the way I want! But hey, it's my project and I'm building it the way I want!
While the crimpers and the turrets that go with them are expensive brand new they can be had for between $75 to $100 on E-Bay, and they are a tool that will just never wear out. Or if you work in the avionics field you can just borrow a set from work! Quoted:
why wouldnt you use a stock harness and ecu with hptuners? ive used megasquirt and currently use hptuners on my car and find it far superior. I know virtually nothing about HP Tuners and tons about the MegaSquirt. I love building wiring harnesses, I love the MS interface, and I LOVE building a tune from scratch and watching my handiwork turn into a hulking beast. My mind was made up before I even started. Quoted:
We use same but smaller connectors for our MoTeC data/engine control systems at work. They are badass and very stout but are a pain in the ass to wire for me. They are indeed a badass connector! The one pictured here is a 26 pin that I will only be using 22 pins on. That leaves me four more in the future to add other inputs to! The wiring can be a PITA but the more you do them the easier they become. More parts are here and sometime in the next couple of weeks the engine swap will take place. Can you send me a link to where you bought the plug setup? Also, did you see my previous post asking about buying your 200R4 for my father? |
|
|
|
[#5]
Thanks for the info about the connector. That's pretty much what I experienced price wise while shopping around a while back. It's prefect for you application, but I just wanted something to simplify pulling the motor. I don't mind pulling two plugs rather than one if I save close to $80.
|
|
|
|
[#6]
Quoted:
Can you send me a link to where you bought the plug setup? Also, did you see my previous post asking about buying your 200R4 for my father? The cannon plug I sourced from www.digikey.com. I will tell you that there is a bewildering array of cannon plugs out there, when you go to Digi-Key and do a search for circular connectors (generic name for this style of plug) it brings back 100,000 plus different parts! It is kind of discouraging if you don't know exactly what you need. I don't know of anywhere you can go to just buy a complete ready to build plug, you need to know wire gauge, number of pins, type of pins, types of backshells, type of plug, size of plug, etc. It is kind of confusing to be honest. I'm sorry, I missed your question before about buying the trans. When I decide to pull it I will be glad to sell it to you. But I think freight is gonna be a killer. I will let you know when I am ready and we will see if we can work something out! Since it is election night and I am antsy I spent a little time out in the garage. Not a lot to report but I did swap valve springs over. As the new cam has a significant amount more lift than a stock cam I knew I had to change valve springs. PAC Racing makes an awesome spring for about $150 and they work with all the factory hardware, so that kind of helps to keep this a budget build. Here is a pic of one of the new springs on the left and factory springs on the right. Notice the new spring is taller and also has thinner coils. This will give me higher seat pressure and the ability to run all that lift in the new cam without the spring binding. 
Changing over the springs. About halfway through one head here. Thank God some auto parts stores rent out tools! This spring compressor made things really easy. 
I apologize that the car hasn't really made it into the pictures yet. That should change this weekend. My plan is for the old motor to come out and the new motor to at least be mocked up in the engine bay. So finally some car work will happen and there will be some pics to follow. I have a mountain of parts here, USPS, FedEx, and UPS have been stopping here every day. Hold tight and keep your fingers crossed tonight for our country. I hope my next update is an upbeat one where we have a new president elect! |
|
|
|
[#7]
tag
|
|
|
|
[#8]
I subscribed a while back, but haven't posted anything.
This is a cool thread. |
|
|
|
[#9]
Thanks for the update.
Perfect timing, I just switched from depressing election coverage to the Velocity channel for some gearhead distraction. |
|
|
|
[#10]
Tag. I'm so in on this
|
|
|
|
[#11]
Tag!
|
|
|
|
[#12]
Quoted:
Quoted:
Can you send me a link to where you bought the plug setup? Also, did you see my previous post asking about buying your 200R4 for my father? The cannon plug I sourced from www.digikey.com. I will tell you that there is a bewildering array of cannon plugs out there, when you go to Digi-Key and do a search for circular connectors (generic name for this style of plug) it brings back 100,000 plus different parts! It is kind of discouraging if you don't know exactly what you need. I don't know of anywhere you can go to just buy a complete ready to build plug, you need to know wire gauge, number of pins, type of pins, types of backshells, type of plug, size of plug, etc. It is kind of confusing to be honest. I'm sorry, I missed your question before about buying the trans. When I decide to pull it I will be glad to sell it to you. But I think freight is gonna be a killer. I will let you know when I am ready and we will see if we can work something out! Since it is election night and I am antsy I spent a little time out in the garage. Not a lot to report but I did swap valve springs over. As the new cam has a significant amount more lift than a stock cam I knew I had to change valve springs. PAC Racing makes an awesome spring for about $150 and they work with all the factory hardware, so that kind of helps to keep this a budget build. Here is a pic of one of the new springs on the left and factory springs on the right. Notice the new spring is taller and also has thinner coils. This will give me higher seat pressure and the ability to run all that lift in the new cam without the spring binding. http://i22.photobucket.com/albums/b301/paulj1973/valvesprings.jpg Changing over the springs. About halfway through one head here. Thank God some auto parts stores rent out tools! This spring compressor made things really easy. http://i22.photobucket.com/albums/b301/paulj1973/springcompressor.jpg I apologize that the car hasn't really made it into the pictures yet. That should change this weekend. My plan is for the old motor to come out and the new motor to at least be mocked up in the engine bay. So finally some car work will happen and there will be some pics to follow. I have a mountain of parts here, USPS, FedEx, and UPS have been stopping here every day. Hold tight and keep your fingers crossed tonight for our country. I hope my next update is an upbeat one where we have a new president elect! Hope your ride turns out better than the election... Posted Via AR15.Com Mobile |
|
|
|
[#13]
Well the wind got knocked out of my sails along with many others after my last update. We obviously do not have a new president elect. But I'm not letting it get me down! Work is progressing.
Here are some of the cool parts that have shown up. A beast of a fuel pump, the mighty Bosch 044! That thing will provide more than enough fuel to put me over the 500 RWHP mark. Lots of assorted fittings, a fuel filter, and a whole bunch of -6 braided stainless line. 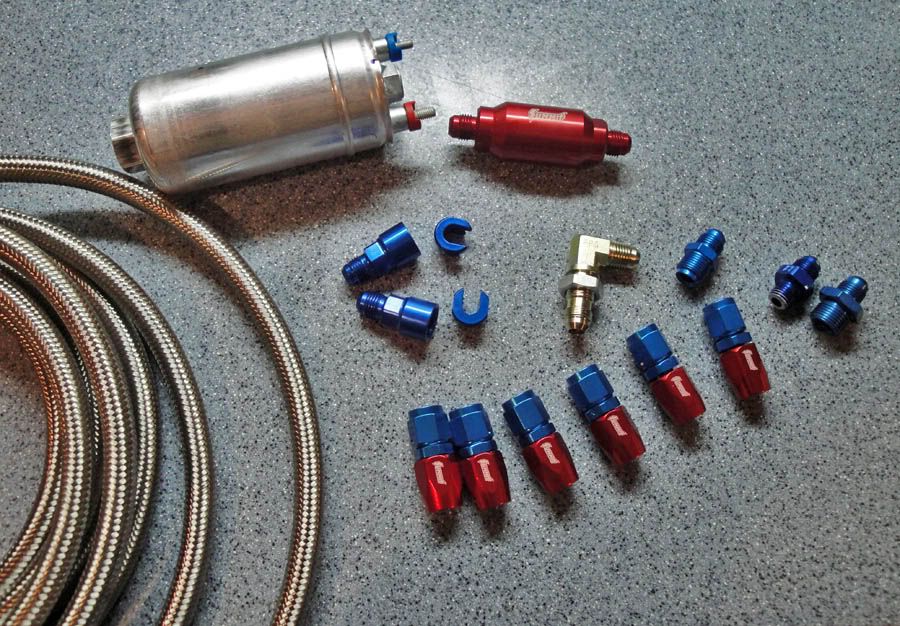
A mock up and cheesy diagram of how all this fuel stuff will work. 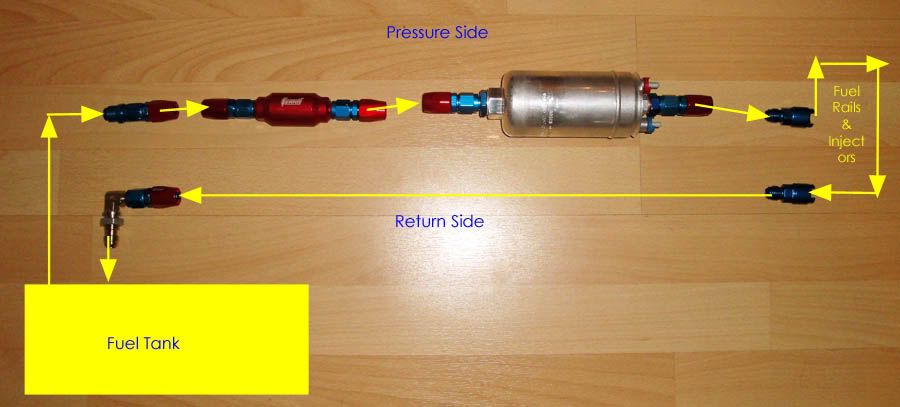
A new set of head bolts laid out. These are one time use item. You torque them to a certain value (22 ft. lbs), then go back and tighten them again in 90 degree increments. The bolts stretch and clamp the head to the block. Once stretched they are done if you take them off again. I hope I won't be taking the heads off for a long time! 
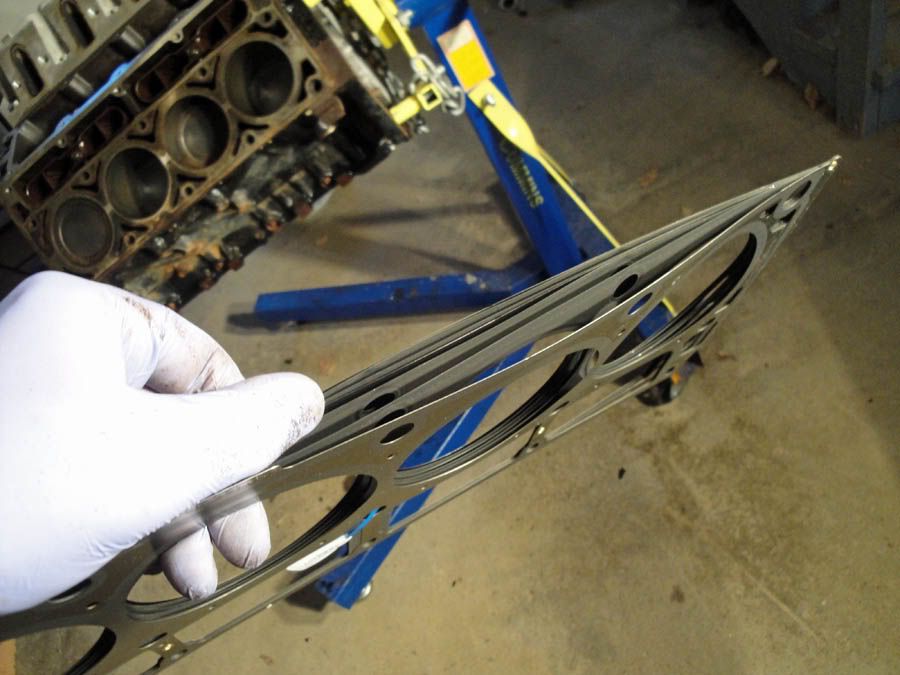
One of the LS9 head gaskets. Multi layer sandwich action. These are another reason I don't want to be pulling the heads again any time soon, at $50 bucks each these are expensive head gaskets, ouch.
Making the first pass on the drivers side head to torque it down! 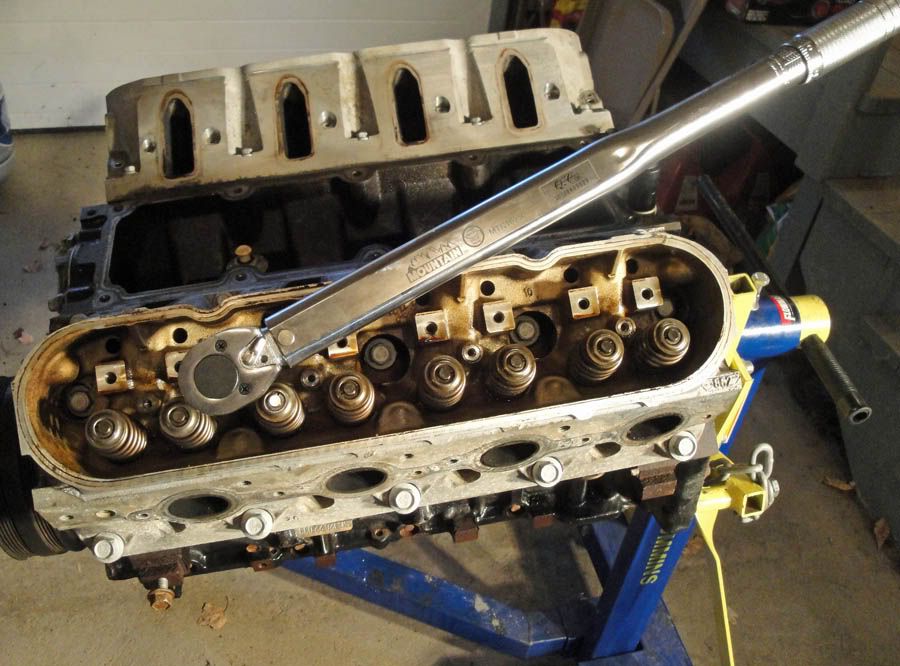
I started on the wiring harness, the best part of the whole project for me! Here are the injector pigtails for the drivers side. The whole harness should look quite nice and hopefully fairly professional when I am done. 
I am on the fence about trying to find a low profile LS6 intake. I set the truck intake back on the engine tonight and it is HUGE! It really looks kind of ugly and the chances of the hood closing on it seem unlikely. We'll see though. As usual, more to come! |
|
|
|
[#14]
My dream car since before I was able to drive, so tag.
|
|
|
|
[#15]
Quoted:
Alright, in all honesty this is a pretty lame update. But I am so excited I can hardly contain myself! Boxes were on the porch today when I got home. That is always a good sign! The first box was this. My Innovate MTX-L Wideband O2 sensor. For those that don't know what this is, it is a sensor that keeps track, very precisely, of what your air to fuel ratio is. It sends that info to your engine computer, in this case my Megasquirt 2, and helps to keep your engine happy and alive. This particular instrument comes with a gauge that will be mounted in the car to show what the AFR is in real time, very cool! http://i22.photobucket.com/albums/b301/paulj1973/MTX-L.jpg But much better yet my Amphenol cannon plug showed up. I am guessing there are some other avionics guys here that are reading this. They will be VERY familiar with the pictures below. This style of plug is really something else! This is all that is used in the aviation world for electrical connections and it is awesome. Trying to sort one out on your own can be a bit of a challenge, there are literally tens of thousands of styles! Pictured are all the different parts that make up an aviation cannon plug, a very cool piece of hardware. What is pictured here will be the firewall passthrough for the engine wiring harness back to the Megasquirt. When this is all done and wired it will be a very simple means of connecting/disconnecting the engine from the computer. http://i22.photobucket.com/albums/b301/paulj1973/cannonplug.jpg This is how it will look assembled, minus all of the sensor wires right now. The firewall will be sandwiched between the vertical flange and the blue stripes. To the left of the blue stripes the engine wiring harness will come out to make its attachment to all the engine sensors. This is awesome! http://i22.photobucket.com/albums/b301/paulj1973/assembledcannonplug.jpg Stay tuned. I know I sound like a broken record but there will be more updates shortly! Looks like someone is gonna need some cannon plug pliers! What is more fun is realizing that the new guy did not line up the connector quite right and managed to bend a few pins when they were reinstalling a box... |
|
|
|
[#16]
Quoted:
Looks like someone is gonna need some cannon plug pliers! What is more fun is realizing that the new guy did not line up the connector quite right and managed to bend a few pins when they were reinstalling a box... Even worse is when someone forgets to disconnent 3 or 4 cannon plugs prior to rolling an engine back.
|
|
|
|
[#17]
Quoted:
Quoted:
Looks like someone is gonna need some cannon plug pliers! What is more fun is realizing that the new guy did not line up the connector quite right and managed to bend a few pins when they were reinstalling a box... Even worse is when someone forgets to disconnent 3 or 4 cannon plugs prior to rolling an engine back.
Or how about when someone builds up a cannon plug and then discovers the backshell still sitting on the bench without any wires passed through it?
Anyone that has been around this stuff for a while will have done that, and no I didn't do that on this project! (yet) |
|
|
|
[#18]
Quoted:
Quoted:
Quoted:
Looks like someone is gonna need some cannon plug pliers! What is more fun is realizing that the new guy did not line up the connector quite right and managed to bend a few pins when they were reinstalling a box... Even worse is when someone forgets to disconnent 3 or 4 cannon plugs prior to rolling an engine back.
Or how about when someone builds up a cannon plug and then discovers the backshell still sitting on the bench without any wires passed through it?
Anyone that has been around this stuff for a while will have done that, and no I didn't do that on this project! (yet) The real question is, when you get a recessed pin, are you going to replace the plug or use some "cannon plug sealant"? |
|
|
|
[#19]
I saw this thread, but figured it would die out with no updates so I ignored it..
I am definitely tagging now. |
|
|
|
[#20]
Well my long weekend to work on the Monte didn't come off as planned. No big deal though, I did get at least some stuff done.
All the ignition outputs have been added to the MS, they are the four wires exiting to the upper right of the photo, I also did up a power distribution block shown on the left of the relay board. I think I am going to attach all of this to an aluminum sheet and hide it up under the dash. 
All the injector pigtails are done now. I think they look awesome personally. 
Here is the start of a pigtail extension harness. Pigtail on the left, awesome crimp connectors covered in heatshrink in the center, and pigtail extension on the right. 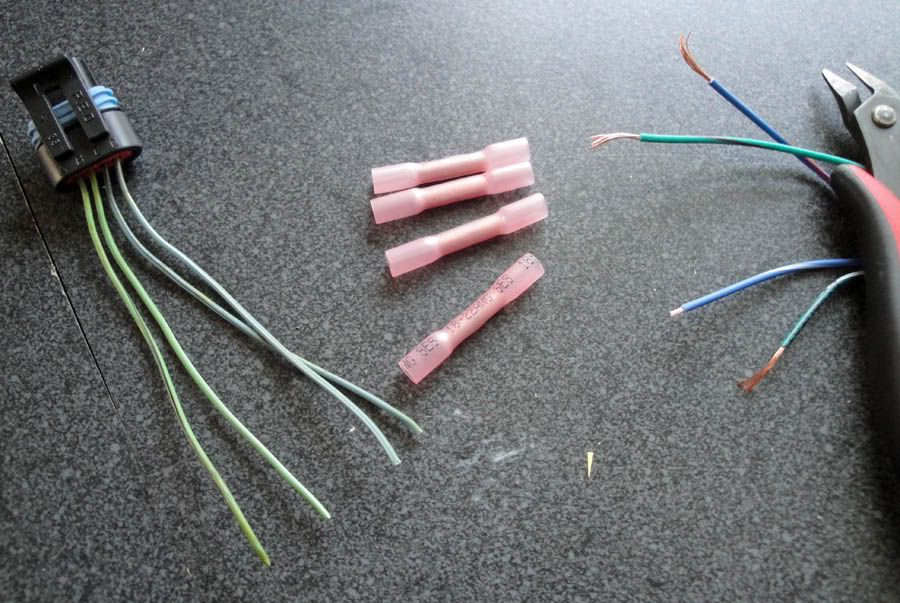
All assembled and neatened up with wax string. If you aren't an avionics guy you probably have never heard of wax string for wiring purposes. Use it a few times and you will have such disdain for zip ties you won't believe it. It is a great product. 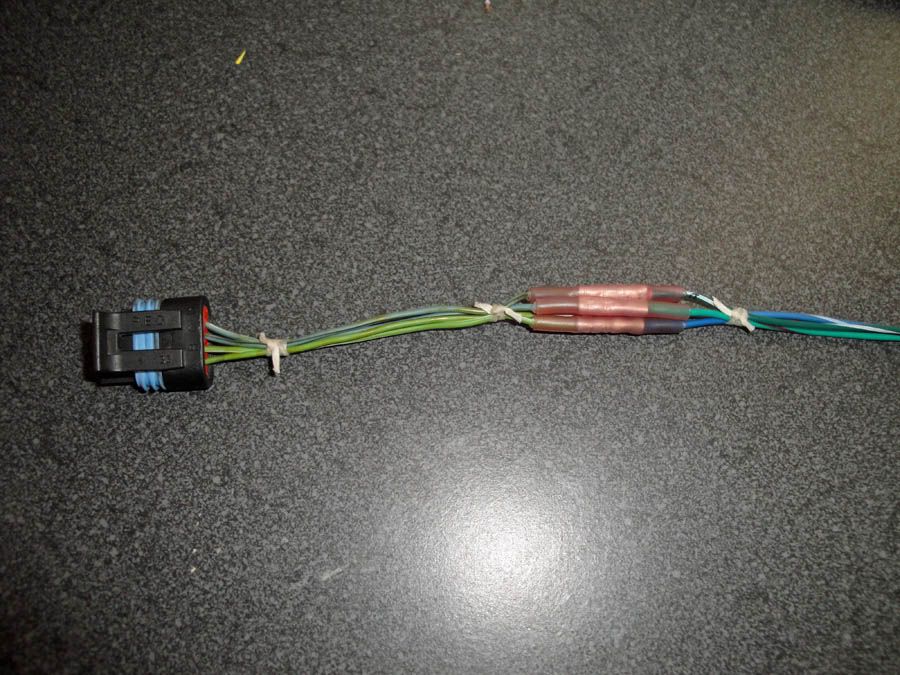
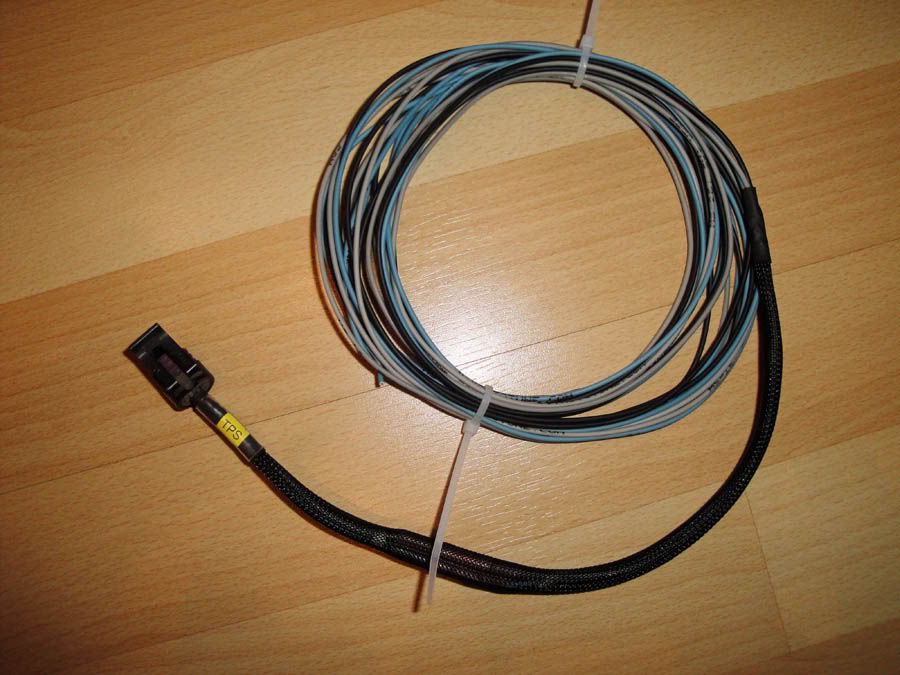
I built up the extensions for both the Idle Air Control and Throttle Position Sensor. I think these came out particularly nice but I am kind of biased since I built them up. Sadly my clear heatshrink was not big enough to fit over the IAC pigtail so it won't get a yellow label saying what it is. Oh well! 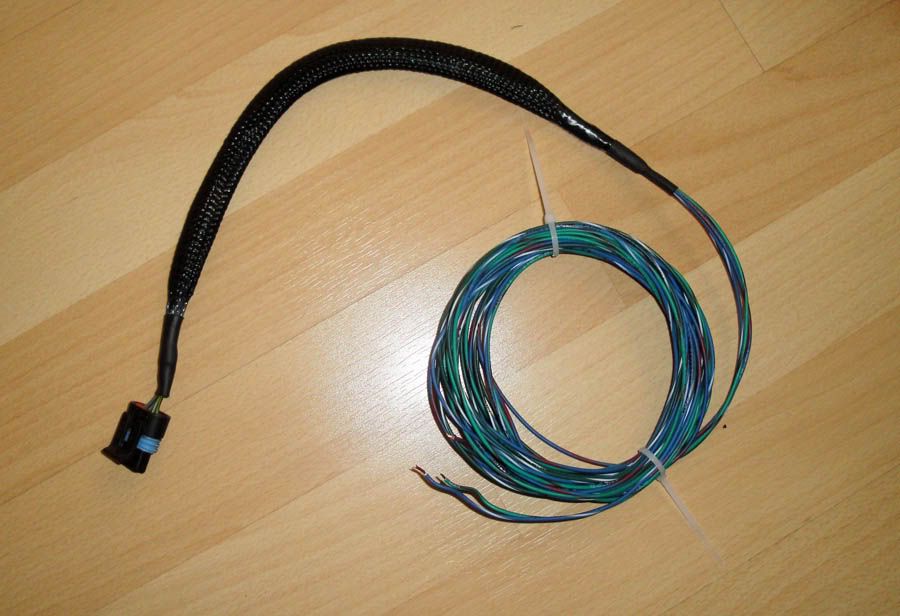
The motor is pretty well put back together. No oil pan yet as the turbo oil drainback I ordered was the wrong size, so I am waiting for another one to show up. I'm getting there, keep checking back. 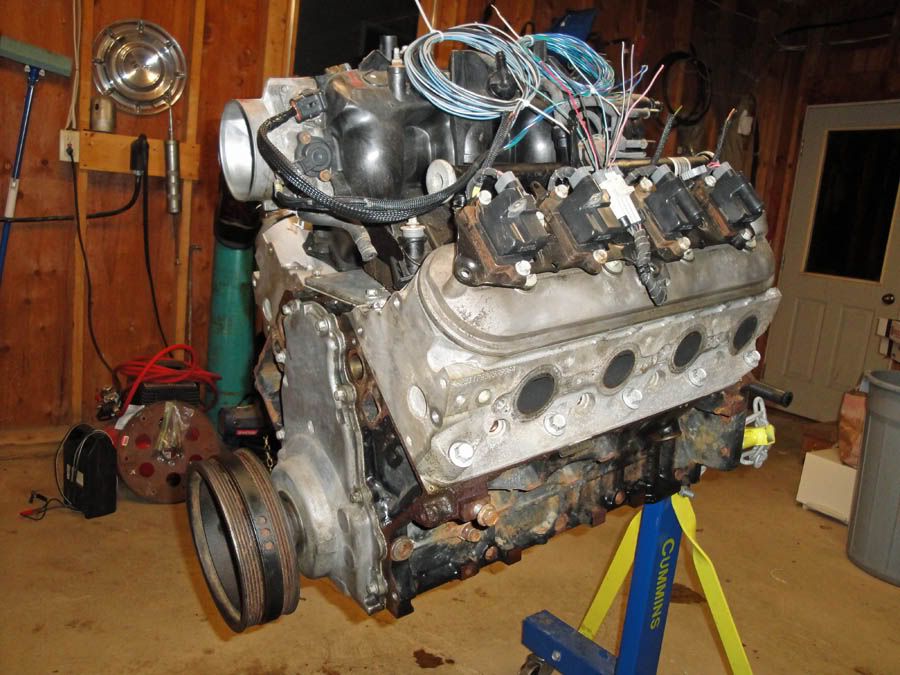
|
|
|
|
[#21]
Quoted:
I wish I had one of these and the money to fix it up. '86 Grand Prix 2+2 Aero Coupe. They only built around 1100. http://i26.photobucket.com/albums/c124/GAcop/22aerocoupe_zps6bd1fb90.jpg Built only to be available for NASCAR use. Manufacturers must build at least 1K... |
|
|
|
[#22]
My favorite thread in a while. Since im so sick of the election stuff on ARFCOM lately. Please tell me you are gonna paint that engine before you throw it in
|
|
|
|
[#23]
Learned to drive in a 86 SS.
|
|
|
|
[#24]
You had me searching Craigslist for a G-body last night. I prefer the GN or Regal look, but the Monte Carlo's tend to be more common and in nicer condition.
Posted Via AR15.Com Mobile |
|
|
|
[#25]
Quoted:
You had me searching Craigslist for a G-body last night. I prefer the GN or Regal look, but the Monte Carlo's tend to be more common and in nicer condition. Posted Via AR15.Com Mobile Interesting you should say that. My whole inspiration for this was my long departed 1986 Regal. I got rid of it in 1997 and I have missed it ever since. I really wanted a GN or Regal but neither could be found for a reasonable price. The Montes kept popping up and I finally gave in. And to be honest I think they look awesome. I have often wondered what happened to my tired old Regal after I got rid of her. The frame was cracked but it could have been fixed. I had just grown tired of that car. Now I wish I still had it. It has probably long since been crushed. |
|
|
|
[#26]
Quoted:
Quoted:
You had me searching Craigslist for a G-body last night. I prefer the GN or Regal look, but the Monte Carlo's tend to be more common and in nicer condition. Posted Via AR15.Com Mobile Interesting you should say that. My whole inspiration for this was my long departed 1986 Regal. I got rid of it in 1997 and I have missed it ever since. I really wanted a GN or Regal but neither could be found for a reasonable price. The Montes kept popping up and I finally gave in. And to be honest I think they look awesome. I have often wondered what happened to my tired old Regal after I got rid of her. The frame was cracked but it could have been fixed. I had just grown tired of that car. Now I wish I still had it. It has probably long since been crushed. It does look awesome! I guess the Super Sports were more highly regarded than your average Regal, leading to them being better cared for. The bad thing is that a clean Monte Carlo is only a few thousand less than a so-so GN around here. Posted Via AR15.Com Mobile |
|
|
|
[#27]
A couple of things:
Congrats on the wise choice of avionics fittings: I use them on my projects, too...but I gotta ask: You do know that those connector housings on your ECU and interface aren't going to protect from EMI, right? Not without properly installed shielding over the cable run?––and even then, it doesn't do any good unless the CCAs are enclosed in a grounded metal enclosure... ...and why no backshells on the pass-through cabling through your firewall––or did you just not show them in your pre-assembly pictures? I've done the 164-pin plug installations, and forgot to put the backshell on first, so yeah...I know where you're coming from on that...LOL! For those interested, you can get the base tool and die heads for these connectors off of eBay, but you really need to know what you're looking for, and what you're doing. The base tool can be had for <$100, and the heads run around $45 (last I checked)...but there are around 70 or so of them (for my applications, anyway!)...so you really need to know exactly what you're looking for. You'll also want the disposable pin removal/installation tools...it makes repairing these connectors really easy. They're fairly bulletproof, and provide really good electrical contact. OP: Let me know if you need a couple. I could send some your way, but I have a feeling that you already have some. Is there a reason why you didn't want to go with the two-piece crimp splices? We call 'em "red splices" in the Navy...they come with the metal splice, and then a really, really good environmental sealant/shrink wrap sleeve. I think they'd be a bit thinner in your wire bundle on your cabling...also might consider staggering the splices on your next one. I'm really jazzed by this rebuild...I'd never heard of the Megasquirt, and know next to nothing about turbochargers/fuel-injection, being an old Holley guy...but turbocharged fuelie cars are really, really calling to me. I just had a 350 magged and it has a clean bill of health...I'm thinking about building my first twin-turbo fuelie engine. This thread is really pushing that idea along! |
|
|
|
[#28]
Quoted:
A couple of things: Congrats on the wise choice of avionics fittings: I use them on my projects, too...but I gotta ask: You do know that those connector housings on your ECU and interface aren't going to protect from EMI, right? Not without properly installed shielding over the cable run?––and even then, it doesn't do any good unless the CCAs are enclosed in a grounded metal enclosure... ...and why no backshells on the pass-through cabling through your firewall––or did you just not show them in your pre-assembly pictures? I've done the 164-pin plug installations, and forgot to put the backshell on first, so yeah...I know where you're coming from on that...LOL! For those interested, you can get the base tool and die heads for these connectors off of eBay, but you really need to know what you're looking for, and what you're doing. The base tool can be had for <$100, and the heads run around $45 (last I checked)...but there are around 70 or so of them (for my applications, anyway!)...so you really need to know exactly what you're looking for. You'll also want the disposable pin removal/installation tools...it makes repairing these connectors really easy. They're fairly bulletproof, and provide really good electrical contact. OP: Let me know if you need a couple. I could send some your way, but I have a feeling that you already have some. Is there a reason why you didn't want to go with the two-piece crimp splices? We call 'em "red splices" in the Navy...they come with the metal splice, and then a really, really good environmental sealant/shrink wrap sleeve. I think they'd be a bit thinner in your wire bundle on your cabling...also might consider staggering the splices on your next one. I'm really jazzed by this rebuild...I'd never heard of the Megasquirt, and know next to nothing about turbochargers/fuel-injection, being an old Holley guy...but turbocharged fuelie cars are really, really calling to me. I just had a 350 magged and it has a clean bill of health...I'm thinking about building my first twin-turbo fuelie engine. This thread is really pushing that idea along! Wow, lots of questions to answer here haha! I am actually not that worried about EMI. The only real noise I am worried about is on the ignition input to the MegaSquirt and that signal is carried on a shielded twisted pair so there won't be a problem there. And since this engine is distributorless there should be virtually no noise anywhere unless I have really fouled up the wiring somehow. I do have backshells for the cannon plug. Check back earlier in the thread and you will see the connector dry fit together. there is one straight backshell for use in the cabin of the car and one 90 degree backshell for use in the engine bay. I do have the pin/de-pin tool for this cannon plug. It actually came with one for the both the male socket and the female socket, so I actually have two. Thanks for the offer though! I have access to them at work as well thankfully. In the Air Force we had the exact splices you are talking about but we just called them environmental splices. Without a doubt the nicest wire splices I have ever worked with, they are awesome. I had planned on using from the get go. Sadly when I priced them out online they were $1.50 each! With the amount of them I needed I opted for the ones pictured here. They are still pretty expensive but only about .36 cents each. It made the 100 of them I ordered a little easier to take! The military splices are however significantly thinner as you pointed out already and for that alone they may be worth the extra money. But hey, these ones I bought do work really well so I can't complain. If you are seriously considering a turbo build I would advise a single as opposed to twins. If you needs twins for a space problem then go for it. But modern turbos have gotten so good that a single will perform astoundingly well as long as it is sized properly for your project and the plumbing will be infinitely easier! Good luck, if you have never had a turbo car, or never had the pleasure of hearing a turbo spool up and slam you back in the seat then you are in for a very pleasant surprise! |
|
|
|
[#29]
Nice project, keep the updates coming!
|
|
|
|
[#30]
Quoted:
If you are seriously considering a turbo build I would advise a single as opposed to twins. If you needs twins for a space problem then go for it. But modern turbos have gotten so good that a single will perform astoundingly well as long as it is sized properly for your project and the plumbing will be infinitely easier! That is some good advice...and if I screw it up, I'm only out ONE turbo. Do you reccomend any literature on the subject? |
|
|
|
[#31]
Back up to the top! More work has been done.
Lots more wiring work has been done. Here is the drivers side harness looking like a big damn mess! 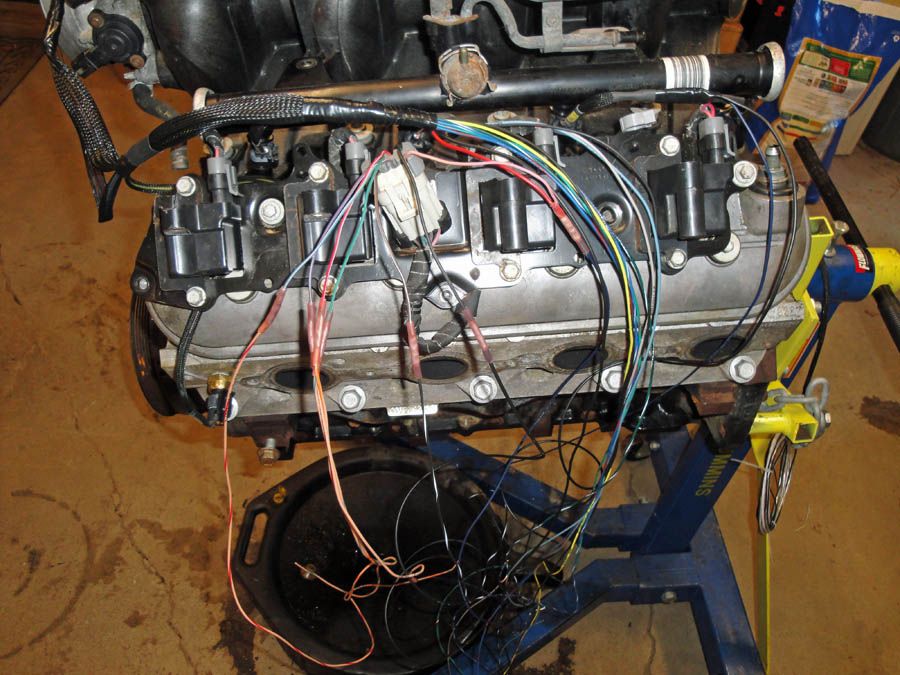
And a couple days later here is the engine harness just shy of completion. No cannon plug on yet as I want the 5.3 in the engine bay so I can keep things neat and have the harness just the right length. So once I test fit the motor I will have a better idea of where to trim the leads and install the cannon plug. What a lot of wiring. Personally I think it looks quite good, but since I built it I may be a bit biased. 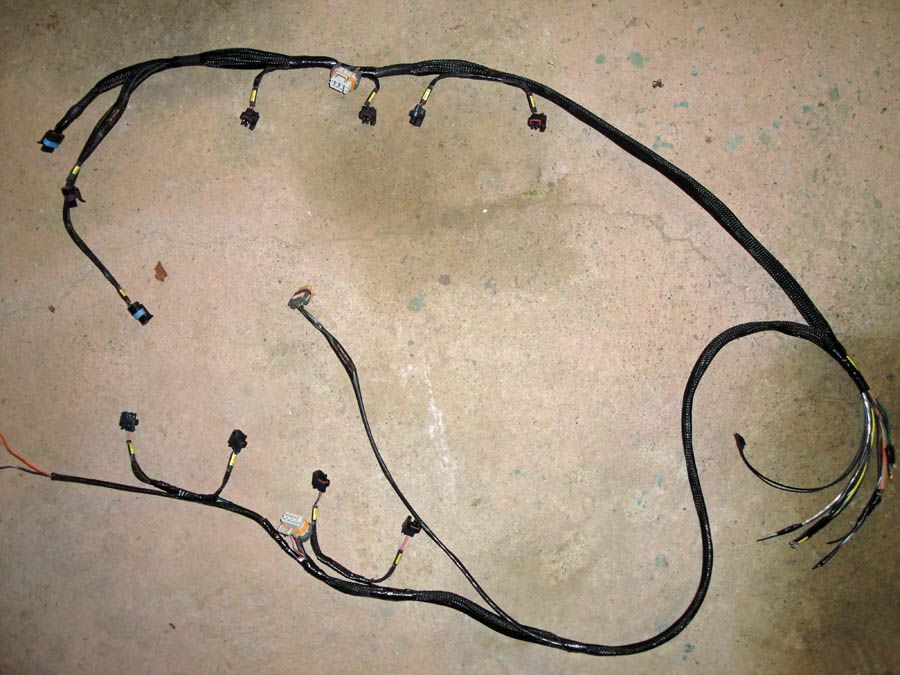
Much bigger news though, actual CAR work has started finally haha! I lit off the 305 for the last time this morning in order to pull the old girl into the garage. Then I started pulling her apart! 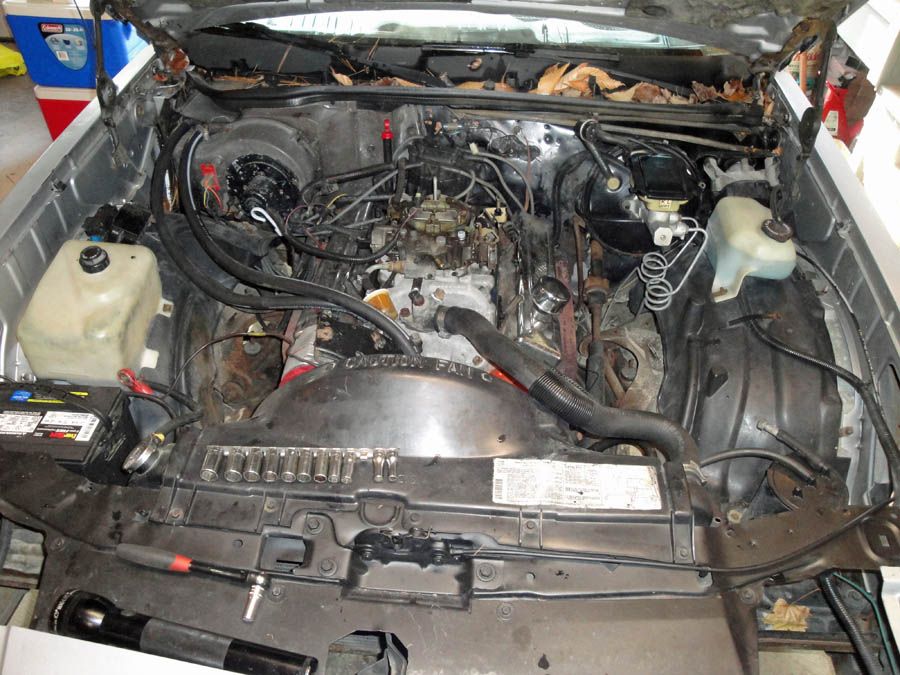
Later on this afternoon I had the engine hanging from the crane. Notice that windshield, think my T-Roofs leak?
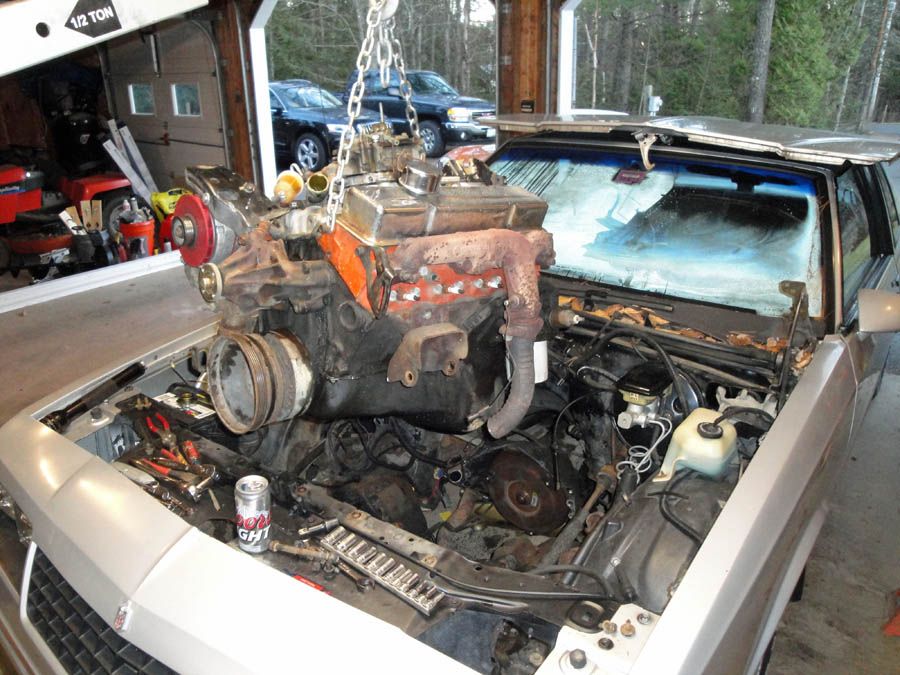
And how is that for a simply cavernous engine bay? Turbo plumbing will be almost too easy with this much room to work with. 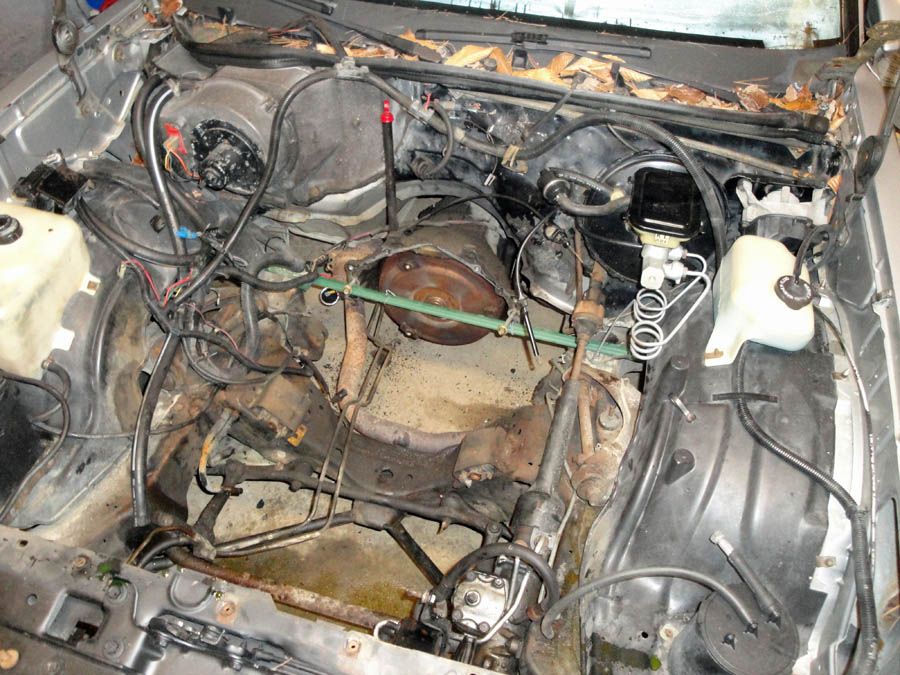
The well used 305 sitting in front of the SS that it has powered for so long. It obviously has been through some changes over the years. It certainly seems to have 26 years worth of grease, oil, and belt shavings all over it. The heads have apparently been off for some reason fairly recently. It is a pretty strong little mill, but nothing compared to what is replacing it. 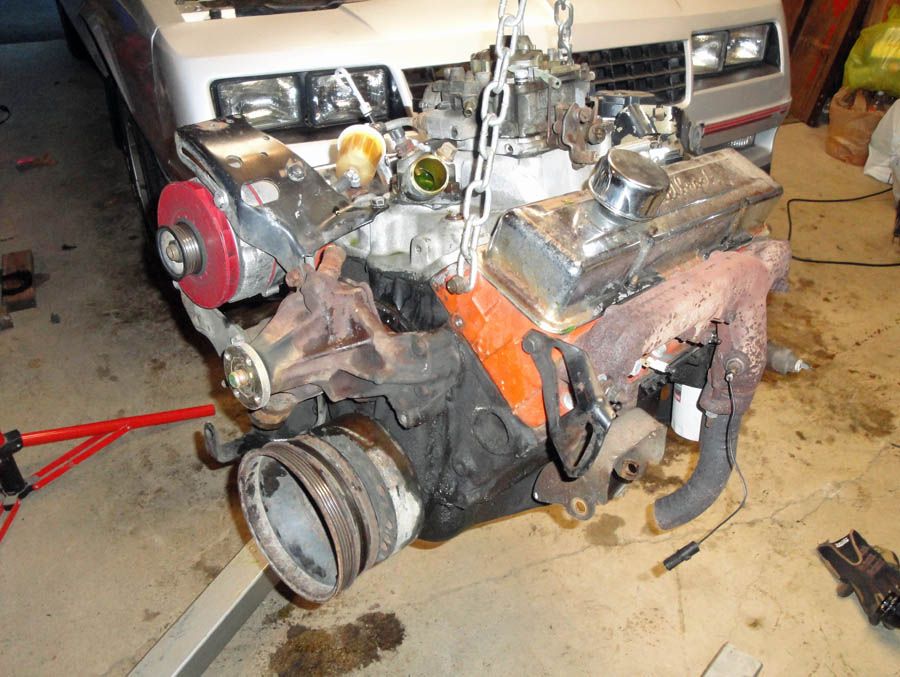
And finally how is this for some real Joe Dirt shit??? A hoodless, engineless, Monte SS sitting out in my driveway! Look at how softly sprung these cars were, the front end came up a good 8 inches as I pulled the motor. 
As usual, stay tuned. Should be test fitting the 5.3 soon, then things will really get rolling! |
|
|
|
[#32]
A silly question but does your state smog test? Will you have to put converters back on it or is it old enough it doesn't have to pass emission test?
|
|
|
|
[#33]
Well, I hadn't checked in since page 1, and you have done alot.
However, after three pages of wiring, computers, and Amphenol connectors, I was begining to wonder if there was going to be a car in the project at all. Standing by. |
|
|
|
[#34]
Damm you OP!
This thread has me tempted to go pick up that Chevy Express van with the 6.0 engine for cheap, and drop it in my firebird.. |
|
|
|
[#35]
Since you had the motor apart you really should of switched to gen4 5.3 rods and pistons! Been reading about a lot of guys bending the
gen3 rods. The gen4's are ls2 style and stronger. It would be a good idea to open the ring gaps up too.
|
|
|
|
[#36]
Thanks for the new updates.
|
|
|
|
[#37]
Progress tonight but only a bit. It is 19 degrees outside and my salamander heater was out of fuel so I ran out of enthusiasm haha!
Big step forward though. The motor has been test fitted into the car! The truck intake actually appears that it will clear the hood as well, I am fired up. I will still need to get the motor back in and do up the motor mounts. I need to cut the Dirty Dingo motor mounts down a bit but they are going to work and they are sweet. It looks like right at home doesn't it? Sadly the drivers side exhaust manifold hits the steering column so that will need to be sorted out. 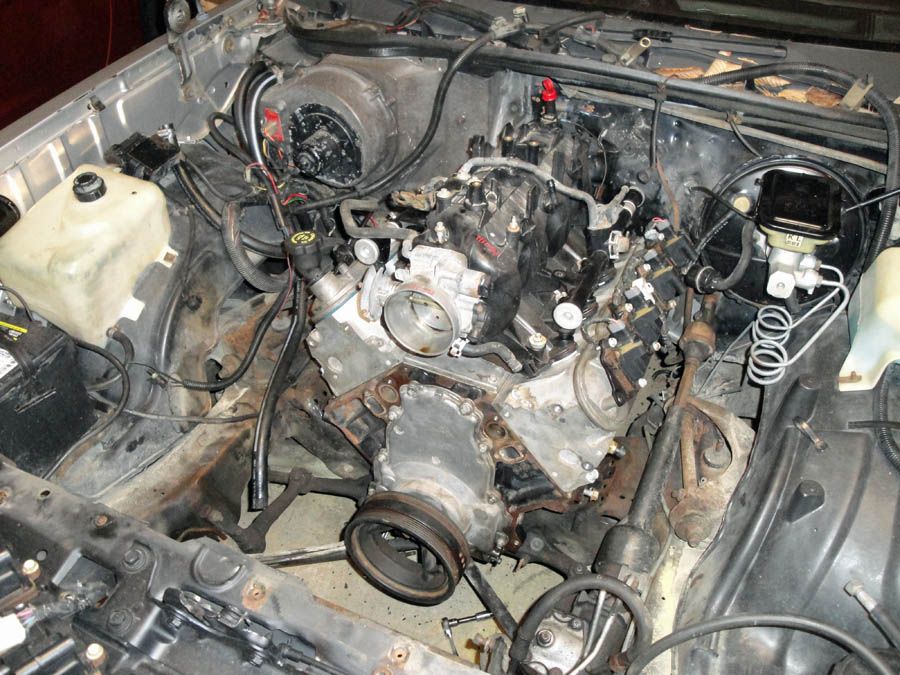
The other bad news is that the truck oil pan is WWAAAAAYYYYYYY too deep to be used on this car. While it clears the crossmember nicely it hangs so low I would be terrified to drive this thing anywhere there was a speedbump! 
Front view. 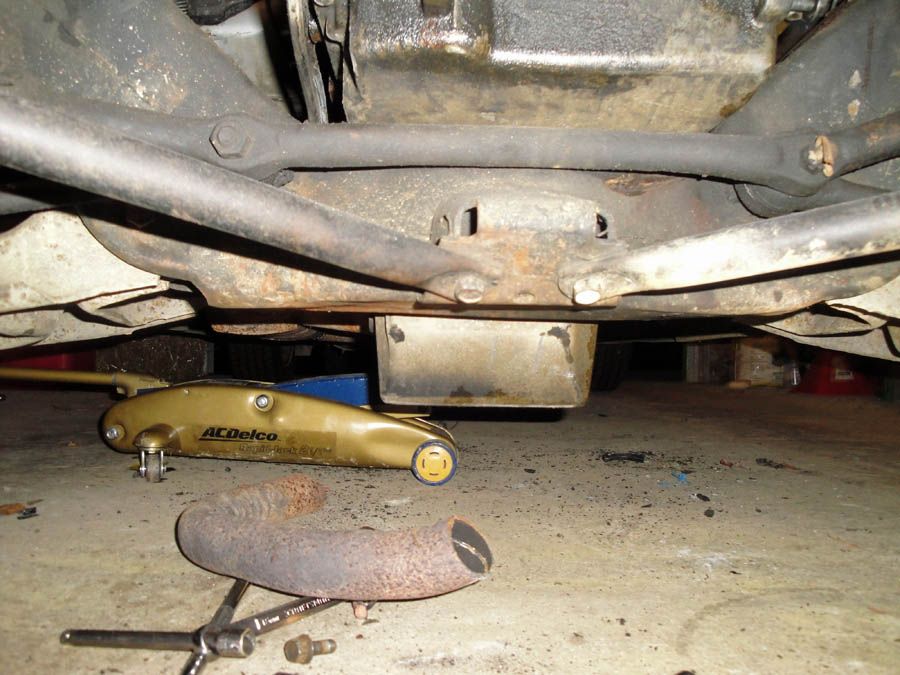
So the search is on for a shallower oil pan. GM makes one that may work for me. Who knows. Right now I am just glad to be inside and warm. The motor is back out and the Monte is put away. I would love to spend all weekend wrenching on the old girl but it is a drill weekend so that idea is shot. As usual stay tuned. More to come! |
|
|
|
[#38]
Tagscribe
|
|
|
|
[#39]
Quoted: just get an fbody pan.Progress tonight but only a bit. It is 19 degrees outside and my salamander heater was out of fuel so I ran out of enthusiasm haha! Big step forward though. The motor has been test fitted into the car! The truck intake actually appears that it will clear the hood as well, I am fired up. I will still need to get the motor back in and do up the motor mounts. I need to cut the Dirty Dingo motor mounts down a bit but they are going to work and they are sweet. It looks like right at home doesn't it? Sadly the drivers side exhaust manifold hits the steering column so that will need to be sorted out. http://i22.photobucket.com/albums/b301/paulj1973/53in.jpg The other bad news is that the truck oil pan is WWAAAAAYYYYYYY too deep to be used on this car. While it clears the crossmember nicely it hangs so low I would be terrified to drive this thing anywhere there was a speedbump! http://i22.photobucket.com/albums/b301/paulj1973/oilpan.jpg Front view. http://i22.photobucket.com/albums/b301/paulj1973/oilpan2.jpg So the search is on for a shallower oil pan. GM makes one that may work for me. Who knows. Right now I am just glad to be inside and warm. The motor is back out and the Monte is put away. I would love to spend all weekend wrenching on the old girl but it is a drill weekend so that idea is shot. As usual stay tuned. More to come! |
|
|
|
[#40]
Dry sump?
|
|
|
|
[#41]
This thread is awesome. I'm young and cherry but have just started dabbling in automotive stuff. Mainly my own truck 91 ck1500. Not much you can do with the tbi motor. I have a dream of getting a ls2 and t56 6 speed from a gto and putting it in my truck. One day.
How do you experts learn all this stuff without going to a school? I mainly have learned by taking stuff apart. Wiring that computer seems like a hell of a job. I'll come be your apprentice if you need some help.
|
|
|
|
[#42]
Good news and bad news to report in this update! Lets start with the bad.
Once I squared the motor and got it sitting where it should with the motor mount perches in place the motor sat a bit to high for the stock hood so the truck intake manifold had to go! I got a smokin' deal on an LS1 intake manifold so that will be taking the place of the factory truck monstrosity. The really bad news though was that I have early model 5.3 heads that have a notch cast into them that will only work with a certain style head gasket, and most definitely NOT work with the LS9 style gasket. I felt sick when I learned this as I had already assembled the heads and torqued down the one time use torque to yield head bolts and the heads were coming off again for sure. After much thought I decided I really wanted to use the LS9 head gaskets so I bought another set of heads that don't have the notch cast into them. I also bought a set of re-usable head bolts so if I have to pull the heads again I won't be shit canning another set of head bolts. This was supposed to be a budget build! Oh well. The motor should be back together with the new heads and intake and going back in for good this week which is good because it has been in and out of the car at least ten times and I am sick of seeing it hanging on the hoist. Now onto the good news. I have managed to get a lot more work done and man am I getting close hearing this thing bark! The truck oil pan does not hang too low once the motor is set up on the mounts! It is still below the crossmember but only by about an inch and half. So I am going to risk it and run this pan, if it gets smashed to shit and the car comes home on a wrecker then so be it. But if something comes up high enough to hit this pan then things have probably gone wrong anyway! So let's get on to some pics. I finally was able to do the assembly on the cannon plug, this was a big day for me. Here is a picture in the middle of the assembly for the engine harness. You can see all the wires that have had the female pins crimped onto them and are inserted in the back of the circular connector. In the left of the pic is a pin that is waiting to be crimped onto a wire. 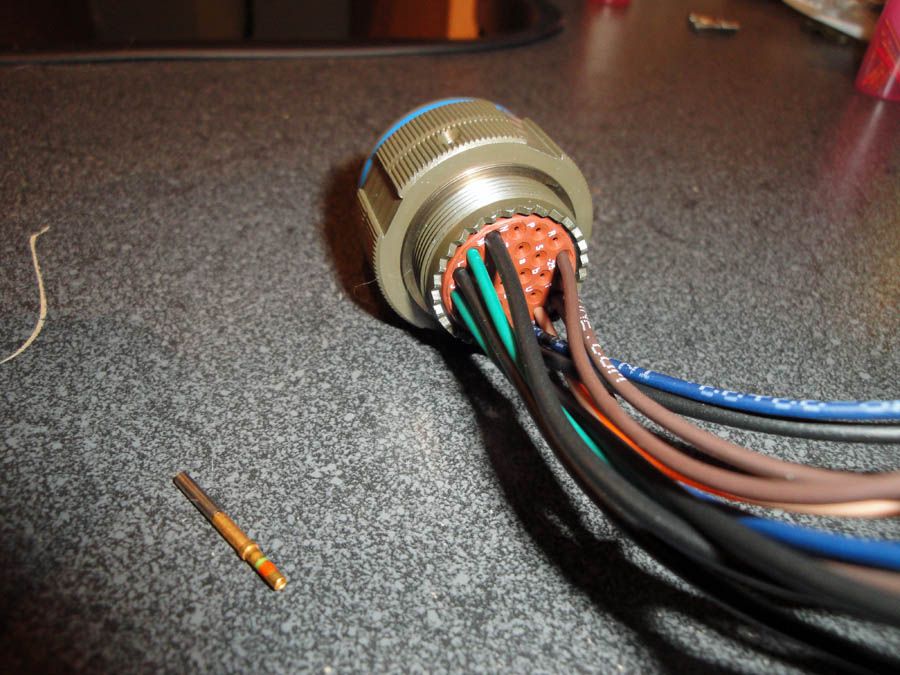
Here are the two plugs all assembled. Female on the left and male on the right. 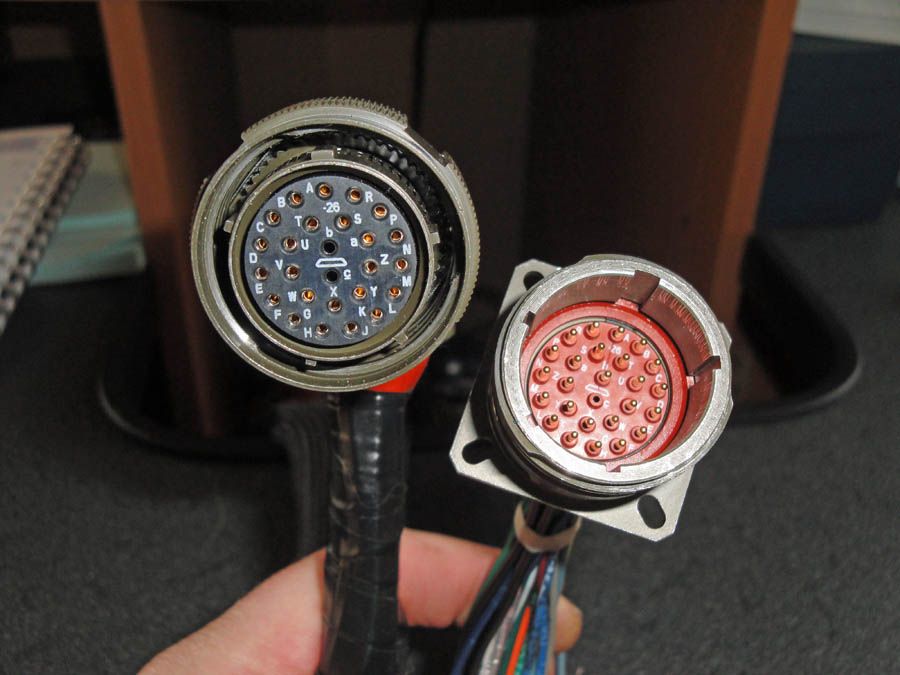
And here is the finished harness finally! At the top the circular connector is mating the two halves together, the engine harness is on the left and the passenger compartment harness is on the right. 
And finally installed on the firewall! 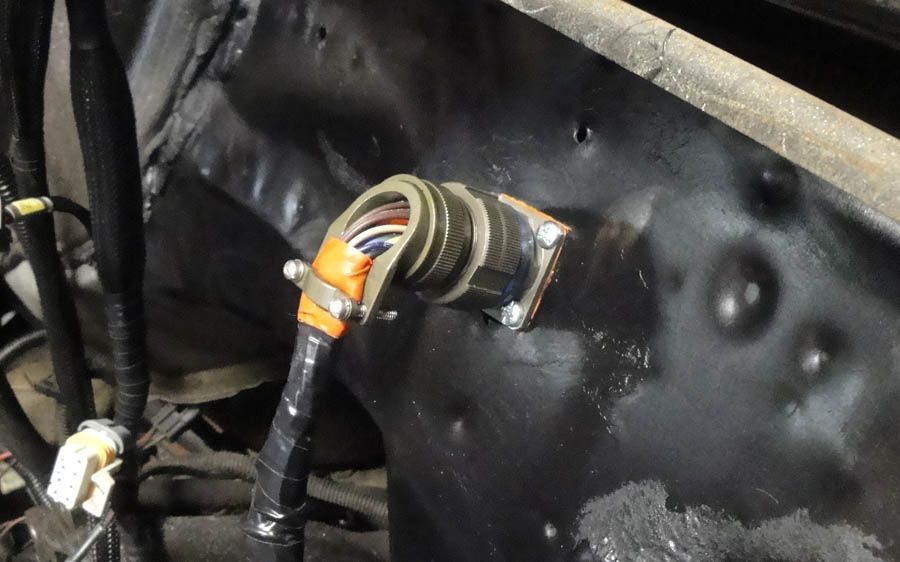
Here is the MegaSquirt mounted up on the sheet metal panel I made for it. 
Safely tucked under the drivers seat. You can see the wiring harness coming down to meet it on the left. The seat has full travel front to back with no interference of the computer or harness. I obviously still need to bring the power and ground feeds to terminal strip. 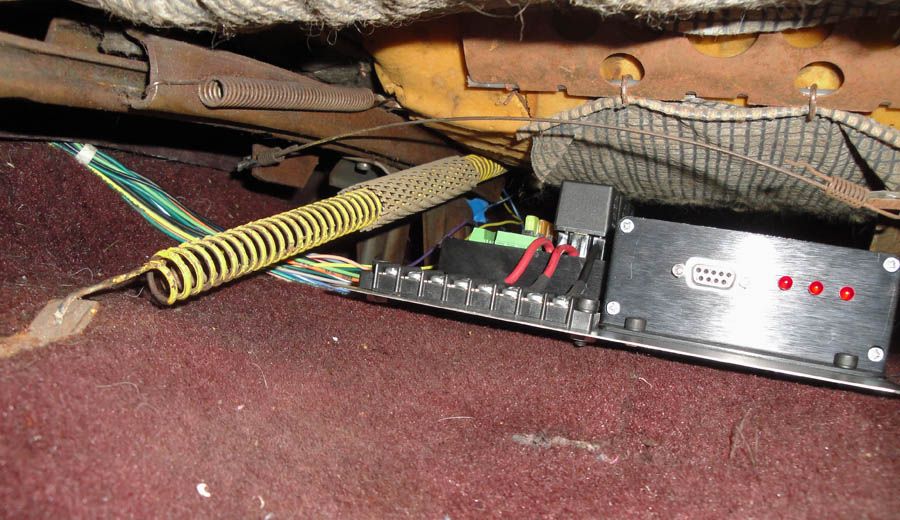
An action shot! Yours truly welding in the drivers side motor mount perch. 
The finished product. Both perches are welded in and look great. These are a pretty neat motor mount. 
And finally a shot showing what some elbow grease and a rattle can of satin black can do. It looks pretty decent in there to me. Cannon plug connector can be seen at the top of the firewall. 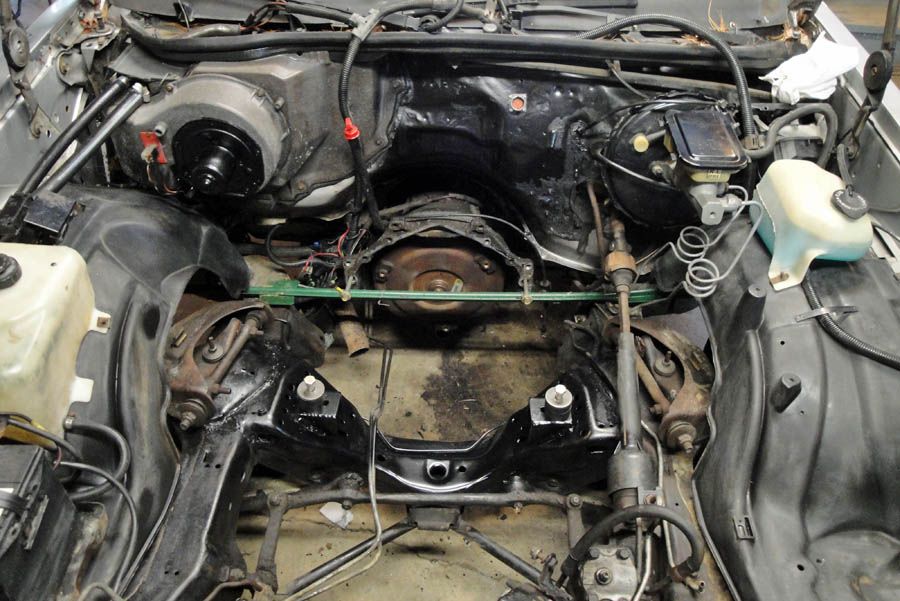
More to come this week. I gotta keep up with the work while we don't have any snow on the ground. |
|
|
|
[#43]
OP, talent, you have it. Can't wait to see the finished project. Makes me miss my '86 Monte SS.
Yes those T-Tops can leak. The weather stripping on mine had dry rotted long before I got it, and I had a fair amount of rust in the valleys around the tops. |
|
|
|
[#44]
jus get different heads. 5.3s arent exactly pricey heads.
|
|
|
|
[#45]
Quoted:
jus get different heads. 5.3s arent exactly pricey heads. Already done! |
|
|
|
[#46]
Love this thread. Keep the awesomeness coming.
|
|
|
|
[#47]
OP I'd think you wouldn't have any trouble fabbing up some sort of skid plate for that oil pan.
|
|
|
|
[#48]
Quoted: Quoted: jus get different heads. 5.3s arent exactly pricey heads. Already done! PJ, do yourrself a favor.. when u get the heads off... take the pan off as well and pop out the pistons and regap the rings for boost. itll cut down the chance of you taking out ring lands. also: fbody pan |
|
|
|
[#49]
Quoted:
Quoted:
Quoted:
jus get different heads. 5.3s arent exactly pricey heads. Already done! PJ, do yourrself a favor.. when u get the heads off... take the pan off as well and pop out the pistons and regap the rings for boost. itll cut down the chance of you taking out ring lands. also: fbody pan I just can't bring myself to pop the pistons out and open the ring gap. There is no way I am going to turn the wick up enough to worry about the rings butting. I am planning on 10 lbs. of boost max, if that. Down the road when I put together a whole new motor I will re-visit the issue. But for now I am not worried in the least. As far as the pan goes I think the truck pan is fine. With the way the motor sits I just can't see it hitting anything. If either of these issues comes to a head I will gladly post it up here though, everyone loves carnage pics! |
|
|
|
[#50]
This thread rocks.
|
|
|
 Win a FREE Membership!
Sign up for the ARFCOM weekly newsletter and be entered to win a free ARFCOM membership. One new winner* is announced every week!
You will receive an email every Friday morning featuring the latest chatter from the hottest topics, breaking news surrounding legislation, as well as exclusive deals only available to ARFCOM email subscribers.

AR15.COM is the world's largest firearm community and is a gathering place for firearm enthusiasts of all types.
From hunters and military members, to competition shooters and general firearm enthusiasts, we welcome anyone who values and respects the way of the firearm.

Subscribe to our monthly Newsletter to receive firearm news, product discounts from your favorite Industry Partners, and more.
Copyright © 1996-2024 AR15.COM LLC. All Rights Reserved.
Any use of this content without express written consent is prohibited.
AR15.Com reserves the right to overwrite or replace any affiliate, commercial, or monetizable links, posted by users, with our own.


