|
[#1]
Installed new flat screen TV, mount, power, 3 HDMI cables.
Took 350 lb 40" CRT to Good Will Ran LAN cables to new TV, DirectTV, BluRay, Android TV box, Touchscreen, AP, and desktop computer. Ran three runs of Cat5 upstairs for whole house audio (start). Installed new LAN switch downstairs. Lotta time in the crawlspace this weekend. |
|
|
|
[#2]
For the first time in many years I am on vacation.
|
|
|
|
[#3]
Quoted:
Sprayed and back rolled about 1/3 of my house. Used more paint than I thought I would so FML...20 gal down and a good bit more to go... http://i2.photobucket.com/albums/y7/cms81586/10421587_10100210279620258_2408766580145359567_n_zps7e87a014.jpg ALL DONE! Finally... 


|
|
|
|
[#4]
Quoted:
Quoted:
Sprayed and back rolled about 1/3 of my house. Used more paint than I thought I would so FML...20 gal down and a good bit more to go... http://i2.photobucket.com/albums/y7/cms81586/10421587_10100210279620258_2408766580145359567_n_zps7e87a014.jpg ALL DONE! Finally... http://i2.photobucket.com/albums/y7/cms81586/Home_zpsc2f8c258.jpg http://i2.photobucket.com/albums/y7/cms81586/Home2_zps226a27e7.jpg http://i2.photobucket.com/albums/y7/cms81586/Home3_zps0ecbfbe5.jpg http://i2.photobucket.com/albums/y7/cms81586/Home4_zpsf1de2ad0.jpg I'm not a fan of SW style but that looks very nice indeed. |
|
|
|
[#5]
Bought one of the rolling 26" Harbor Freight tool chest sets yesterday. My little boy helped me bolt on the required parts. We get to start filling it up today and I'll spend some time cleaning up the basement garage. I've got a mess now. My bench top is covered with smaller tool boxes. That HF one should really help out with clutter.
CHRIS |
|
|
|
[#6]
Got a new couch, got rid of the old one.
|
|
|
|
[#7]
Built this out of a pallet for my wife:

|
|
|
|
[#8]
Quoted:
Quoted:
Sprayed and back rolled about 1/3 of my house. Used more paint than I thought I would so FML...20 gal down and a good bit more to go... http://i2.photobucket.com/albums/y7/cms81586/10421587_10100210279620258_2408766580145359567_n_zps7e87a014.jpg ALL DONE! Finally... http://i2.photobucket.com/albums/y7/cms81586/Home_zpsc2f8c258.jpg http://i2.photobucket.com/albums/y7/cms81586/Home2_zps226a27e7.jpg http://i2.photobucket.com/albums/y7/cms81586/Home3_zps0ecbfbe5.jpg http://i2.photobucket.com/albums/y7/cms81586/Home4_zpsf1de2ad0.jpg very nice. those last 2 pics had me wondering what if. a woodpecker got into the house. 
|
|
|
|
[#9]
Made a rolling cart for the generator.


Need to secure the generator to the cart and paint. |
|
|
|
[#10]
I'm renting a house now and have spent too much getting things together to take care of it, so I'm DIY'ing a few things. I honestly forgot how much I enjoy it since it's been years
A few days ago I built some workbenches: 
(friend's RC planes on top, mine are in a spare room )
Then a couple of days ago I built armor stand 1 of 3: 
It didn't have enough character 
Tonight I made another Home Depot trip and picked up some maple plywood and another Western Red cedar 4X4 to build a TV stand. It's all cut and stained, a little darker than I had expected but it's growing on me. I'll post pics tomorrow after I finish it (hopefully) |
|
|
|
[#11]
This weekend I fixed two leaking toilet flush valves.
In the process I somehow made the fill valves leak. 
|
|
|
|
[#12]
Did my first real woodworking project. Built this 2'x4' work bench out of all 2x4s. Sanded it and as soon as I get a day or two without rain, I'll stain it. It's going to be outside next to the shed.
|
|
|
|
[#13]
Assembled my TV stand today after getting the center shelf cut and stained, and hit the whole thing with polyurethane.

When I put the middle shelf in I took a step back and thought "Man... I might have found something I don't completely suck at!"
I went for super simple and quick since I needed the stand fast (AV receiver came in today, speakers tomorrow). I didn't have a design, just an idea in my head... it worked out! |
|
|
|
[#14]
|
|
|
|
[#15]
Made some stuff for wife today


|
|
|
|
[#16]
I needed More Guns for a pyro shoot coming up .
so tossed this rack of 3" guns together. . 
|
|
|
|
[#17]
I haven't thought to post, but we've done a bunch in the last 7 days.
In the crazy storm last Thursday: a 2-story branch from our pecan fell and bent our gutter (but miraculously did no damage, a major feat since the tree is so close to our house), a tree next door was uprooted and took out our fence, the wind blew about a dozen shingles off the garage roof, and a bunch of "small" limbs fell into our yard. Last weekend we chopped up all the limbs and tree. The tree that fell is poisonous and can't be used for firewood or smoking. Today we ran a chipper/shredder for about 2 hours and reduced the shed-sized-x-5foot pile of small limbs, leaves, and twigs into a much smaller pile of mulch. The fence is on the agenda for this weekend, but now they're forecasting a bunch more rain Saturday. The roof/shingles are waiting...we've been wanting to put in a ridge vent, so we're going to do that and replace the few missing shingles at the same time. |
|
|
|
[#18]
Installed a new water softener and made an earthquake brace for it.

|
|
|
|
[#19]
Quoted:
Installed a new water softener and made an earthquake brace for it. http://i136.photobucket.com/albums/q194/Tinysd/Mobile%20Uploads/8B087D7D-3128-412F-81E1-262F83368FBD.jpg Specs on the softener? I'm planning to do one sometime in the next 5 - 10 years
|
|
|
|
[#20]
Painted my bonus room. Lots of cutting in, the trim in the trey was a real bitch. Still need to replace the flooring and do an in wall surround sound system, but it is really coming along nicely. The next project will be installing the rest of the whole home audio, then painting the rest of the house. Then flooring. Then bathroom updates. Then kitchen. It never ends

|
|
|
|
[#21]
Just moved in to my new place about a month and a half ago. Just got around to finishing my walk in closet. The closet is huge, think 93.5" x 172". The ceiling on the west side is about 107" and the East side is down around 70" following the slope of the roof.
Along the west wall, I installed shelving with a clothes hanger bar. The area between the west wall and doors, I continued the shelving. So basically it is double set of horse shoes with about thirty feet of hanger space. I installed heavy duty hangers at every wall stud I crossed. I then fastened a support along the wall beneath the shelves. I hit studs where I could, but probably used a 150 heavy duty drywall anchors also. I then anchored the top shelf to the support through the top of the shelf. All screw holes were counter-sunk and back filled so there are very few visible fasteners except on the brackets. I then installed crown molding along the top side of the shelf to hide the imperfections in the wall. I then caulked all the joints. Then I repainted the walls to clean up the caulking seams. The poles were mainly supported by the shelving brackets. I also installed metal end retainers on the two long 92" runs. I set them so they kept the bar from popping up out of the bracket clips. For the poles that intersected these primary bars, I put a screw through them to keep the secondaries from popping out. I then put some decorative curtain rod ends on the projecting rods for cosmetics. Along the east wall, I installed a bunch of prefab Closetmaid drawers and organizers and anchored them to the studs. Told my wife good luck filling it up. She said, "Challenge accepted." |
|
|
|
[#22]
Replaced my wife's godmother's electric panel.
Bad main breaker. Old branch circuit breakers. Troubleshoot. Home Depot trip. Old out. New in. Trimmed out. Marked everything. Cleaned up. Her son helped and it took 6 hours. Got a good meal out of it.
Stay safe |
|
|
|
[#23]
Spent hours finding the sector of a circle that matches the very rotted pediment above the front door.
I took a lot of pics, then tore it out. I assumed it must be a sector of a circle 52 inches wide and 21 inches tall. Something a carpenter would easily lay out and put together. When I lay my lines directly over the picture and adjust the pic size it matches perfectly. The sun sector at bottom middle, the sector for the very top, and even the sector that defines the field the 'rays' are built in. I will not make the mistake of building it up using very thin sections of wood (almost like wood siding). Thin sections move a lot and blow off paint quickly. Some 2 inch thick cypress and a router will leave a lot more wood behind and still look good up-close. The urethane ones never look sharp when you get close. OK over a window, not so good over a front door. |
|
|
|
[#24]
Quoted:
Replaced my wife's godmother's electric panel. Bad main breaker. Old branch circuit breakers. Troubleshoot. Home Depot trip. Old out. New in. Trimmed out. Marked everything. Cleaned up. Her son helped and it took 6 hours. Got a good meal out of it.
Stay safe Worked for a master electrician all through high school doing fuse panel replacements. More than 30 years ago my cut was $500 for however long it took. Eight to ten hours if cutting through brick was needed for the new entrance cable. Jumpers from old meter base to top of new meter base (new base free from POCO). I could have power out for all of 10 to 15 minutes for critical circuits like freezers and the utility receptacle I needed to finish up. Every install passed the master and the inspector the first time. |
|
|
|
[#25]
Quoted:
Specs on the softener? I'm planning to do one sometime in the next 5 - 10 years
Quoted:
Quoted:
Installed a new water softener and made an earthquake brace for it. http://i136.photobucket.com/albums/q194/Tinysd/Mobile%20Uploads/8B087D7D-3128-412F-81E1-262F83368FBD.jpg Specs on the softener? I'm planning to do one sometime in the next 5 - 10 years
Click |
|
|
|
[#26]
Long day today, but I rewired and replaced the socket on one hanging light fixture and completely replaced another light fixture, then went to war with the squirrels that have been wreaking havoc in the house. They had chewed through some 1/2" drywall just above the floor in the kitchen pantry, so I reinforced the bottom 12" of pantry wall with 1/2" plywood--if they get through that I'll either replace that plywood with pressure treated plywood so they can achieve better living through chemistry, or rig something up like an electric fence to light their fire.
Then I took some 1/4" wire mesh (aka hardware cloth) and blocked an entrance they had chewed into the attic. Doesn't sound like much but including the trip to Home Depot, it took all day. Made my wife happy, so it was well worth it. |
|
|
|
[#27]
(I forgot to post yesterday...)
We cut down 4 8-foot evergreen bushes, dug and set 5 fence posts, and took care of the normal yardwork. Today's after-work agenda is to stain/seal all of the 2x4s and pickets for the fence. |
|
|
|
[#28]
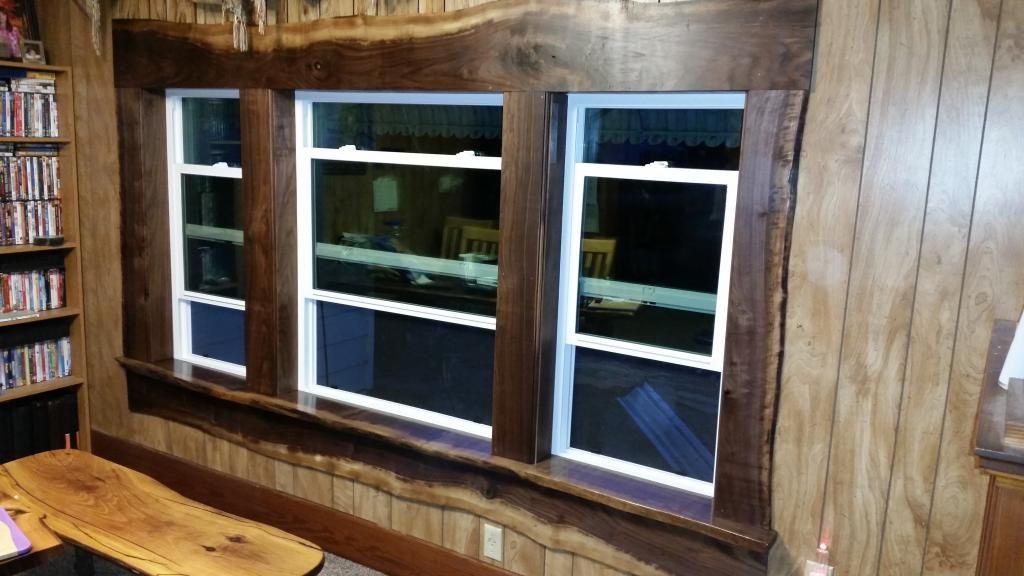
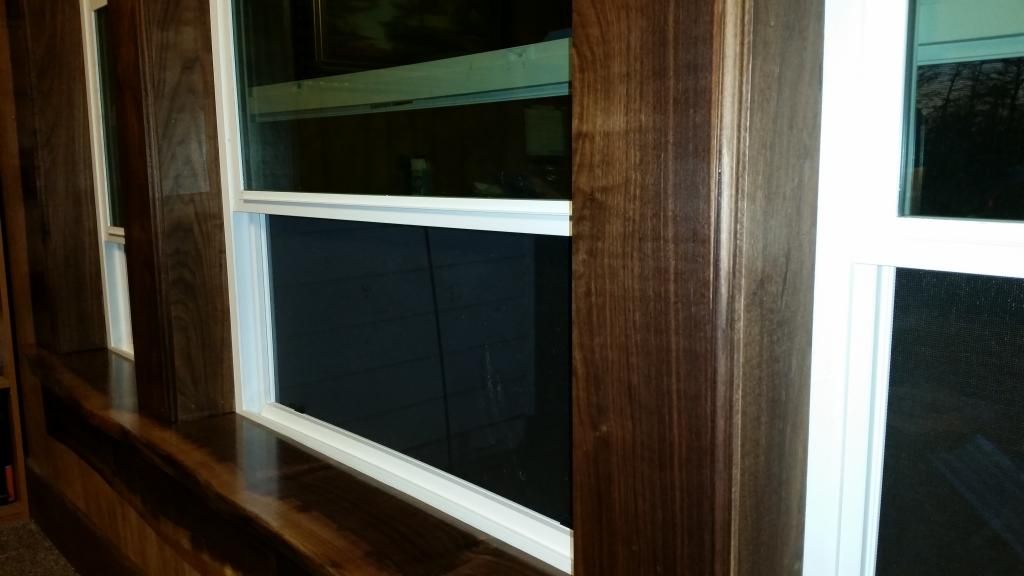
Trimming out around new windows I put in the dining room. Im making the trim from solid walnut that I milled last summer.
|
|
|
|
[#29]
Quoted:
Trimming out around new windows I put in the dining room. Im making the trim from solid walnut that I milled last summer. Pictures are mandatory here sir. |
|
|
|
[#30]
Quoted:
Pictures are mandatory here sir. Quoted:
Quoted:
Trimming out around new windows I put in the dining room. Im making the trim from solid walnut that I milled last summer. Pictures are mandatory here sir. I will post some tomorrow. I have 4 more pieces to make and I should have it done tomorrow evening. |
|
|
|
[#31]
Here is the walnut trim. Took me 4 days to get it all right, and Im not sure its 100% still. Live edge on 4 sides, plus the sill. I know I need to go ahead and get rid of the wood paneling, but that is another project.
 " /> " />
 " /> " />
Today I also refinished the old hedge bench you can see in that first picture. |
|
|
|
[#32]
Sewed my dog Remington a coat. Oh yes, real me sew too!
The only problem was, that the last time I touched a sewing machine was approximately 30 years ago. Took me a while to figure out how to set up the machine, but in the end it was surprisingly easy and by going slow I managed to avoid any bad trouble. List of materials: - Gutted an old goretex jacket for outer shell fabric - bought some teddy cloth (fake fur) for the lining - Black yarn - White yarn - 3M Glue on reflective tape - Salvaged webbing + locks - Double fold bias tape for the trim. The build is rather straight forward. I first measured the pooch, and cut a mockup jacket out of an old bed sheet. Then fitted that on the dog for several times and tried to locate perfect spots for velcro and webbing. After several attempts, I was somewhat satisfied and cut both of the actual fabrics to final size based on the mockup jacket. Next I pinned and then hand stiched the fabrics together with the right sides up and started sewing the Double fold tape to the edge going very slowly and making sure that both the lining and the shell fabric got properly locked inside the fold. Then all that was left was double checking the location of the reflective tape, velcro and webbing and sewing them on (Ok I had to check for instructional videos from Youtube). Remington wearing his new jacket: 
Jacket outside: 
Jacket inside: 
|
|
|
|
[#33]
Trying to run a copper phone pair to the basement for a 'barn ringer' hook up in the wood shop.
It is loud enough to hear over a running tool with ear muffs on. I could also get a strobe unit, but they have the same issue. I need at least one pair. The main beam in the house is in the way. Six solid inches of old hardened wood blocking off access under the joists for one room. The one with the internet phone access. Time for the old wire fishing tricks and a long extension on a 3/4 inch 'ships auger' type drill bit. Threaded between some water pipes closer to a small hole in the wall but 16 inches from the beam face. At least the drill bit will not be near the pipes. Just the extension shaft. My 5 foot flex bit cannot bite into the wood. If you try and press it bends the long flex shaft. |
|
|
|
[#34]
I don't normally post in this thread because most of what I do is just "normal" to me and doesn't stand out as anything special. But looking back on the last couple months of stuff I've done around the house I've really poured out a LOT of good projects... too many to mention...
1 project was to add "elevated" walkways in my attic. I have blown insulation and any time I need to do some work up there (mostly electrical, communications, or A/V stuff) I have to carefully place my foot down on the ceiling truss squishing the insulation down in that spot. Then the area I'm working in is ALL squished down. I found that I can "fluff" the insulation back up when I'm done but it's time consuming and it's tedious to work while balancing on 1 or 2 trusses. I decided I had enough and I was going to take care of it. I bridged from truss to truss with 2X4 & 2X6's (for longer spans bc that's what I had for long boards) and then screwed some decking to them to create walkways & work areas in the most commonly accessed areas (next to walls). These will come in VERY handy when routing speaker wires for surrounding sound etc and I wish I had done this years ago when I bought the place, it would have saved me SO much time from re-fluffing the blown insulation... Also built/repaired/painted a few furniture items for my wife. So much cheaper to take somebody's free, abused things and turn them into new again with just a little work. I took a glider rocker and glider foot-stool that I got for free because it was falling apart and I took it apart, glued and screwed all the joints again, then painted it white to cover up the rough finish and match where we wanted to put it. Took a $30 junk dresser and fixed it up with a little wood filler and paint... |
|
|
|
[#35]
Quoted:
I don't normally post in this thread because most of what I do is just "normal" to me and doesn't stand out as anything special. But looking back on the last couple months of stuff I've done around the house I've really poured out a LOT of good projects... too many to mention... 1 project was to add "elevated" walkways in my attic. I have blown insulation and any time I need to do some work up there (mostly electrical, communications, or A/V stuff) I have to carefully place my foot down on the ceiling truss squishing the insulation down in that spot. Then the area I'm working in is ALL squished down. I found that I can "fluff" the insulation back up when I'm done but it's time consuming and it's tedious to work while balancing on 1 or 2 trusses. I decided I had enough and I was going to take care of it. I bridged from truss to truss with 2X4 & 2X6's (for longer spans bc that's what I had for long boards) and then screwed some decking to them to create walkways & work areas in the most commonly accessed areas (next to walls). These will come in VERY handy when routing speaker wires for surrounding sound etc and I wish I had done this years ago when I bought the place, it would have saved me SO much time from re-fluffing the blown insulation... Also built/repaired/painted a few furniture items for my wife. So much cheaper to take somebody's free, abused things and turn them into new again with just a little work. I took a glider rocker and glider foot-stool that I got for free because it was falling apart and I took it apart, glued and screwed all the joints agaibn, then painted it white to cover up the rough finish and match where we wanted to put it. Took a $30 junk dresser and fixed it up with a little wood filler and paint... I really like your idea for the walkways. I need to add more insulation, so I'll probably add these when I do! |
|
|
|
[#36]
Built another armor stand and finished a big workbench/shelving setup in my garage. Next up is a big pegboard for tools, a vacuum system and some nice lighting for the latter.
|
|
|
|
[#37]
Quoted:
I really like your idea for the walkways. I need to add more insulation, so I'll probably add these when I do! Quoted:
Quoted:
I don't normally post in this thread because most of what I do is just "normal" to me and doesn't stand out as anything special. But looking back on the last couple months of stuff I've done around the house I've really poured out a LOT of good projects... too many to mention... 1 project was to add "elevated" walkways in my attic. I have blown insulation and any time I need to do some work up there (mostly electrical, communications, or A/V stuff) I have to carefully place my foot down on the ceiling truss squishing the insulation down in that spot. Then the area I'm working in is ALL squished down. I found that I can "fluff" the insulation back up when I'm done but it's time consuming and it's tedious to work while balancing on 1 or 2 trusses. I decided I had enough and I was going to take care of it. I bridged from truss to truss with 2X4 & 2X6's (for longer spans bc that's what I had for long boards) and then screwed some decking to them to create walkways & work areas in the most commonly accessed areas (next to walls). These will come in VERY handy when routing speaker wires for surrounding sound etc and I wish I had done this years ago when I bought the place, it would have saved me SO much time from re-fluffing the blown insulation... Also built/repaired/painted a few furniture items for my wife. So much cheaper to take somebody's free, abused things and turn them into new again with just a little work. I took a glider rocker and glider foot-stool that I got for free because it was falling apart and I took it apart, glued and screwed all the joints agaibn, then painted it white to cover up the rough finish and match where we wanted to put it. Took a $30 junk dresser and fixed it up with a little wood filler and paint... I really like your idea for the walkways. I need to add more insulation, so I'll probably add these when I do! For blown in get a small adjustable rake. For bats (or rolls) just pick up a row as required. |
|
|
|
[#38]
Put 2 new circuits in my mom's garage. One circuit has 3 new T5 fluorescent fixtures and two 15A duplex outlets. The other circuit is a dedicated feed for a 20A duplex outlet to use for shop tools in the future.
Also got started on reflooring Mom's attic. It was done years ago in a way that has always driven me nuts. Evidently it was started under the assumption that the area (about 12' by 20' was completely square and the joists were precisely spaced. Even worse there were a bunch of corners cut off the 3/4" plywood used for the flooring so the electrical cables could be routed. The flooring was solid but tacky looking. odd-size plywood pieces patched together and electrical cables all over the floor. I am putting 2x2 furring strips on top of the joists cut to provide gaps that cables can pass through. Those gaps will be bridges with nail stops. After that is done I will be sistering 2x4 supports on the joists where the ends of the plywood sheets will hit and then layout the area with chalklines to make sure the flooring runs square. Nobody but me will give a crap or see it but I'll know it's done right and maybe the next guy who lives in the house or someone who needs to go in the attic to do some repair will see it and appreciate the fact that they will be able to safely work or store stuff up there. Will also be putting in some catwalks so getting to the outlying areas of the attic will not require the skills and attitude of a suicidal monkey. BTW, I've evidently got the coolest wife ever. A lot of guys get tired of items constantly being put on their "honey do" list. Yesterday my wife told me that she will not ever tell me anything that needs to be done on the house (unless it's an emergency) because when she does tell me I get to work on it, which cuts into the time we spend together. I'd much rather spend time with her than do DIY projects but she and my Mom both deserve to live in homes that are safe, comfortable, and where everything is in good repair. :) I think my wife may be starting a "honey don't" list. LOL |
|
|
|
[#39]
Quoted:
I really like your idea for the walkways. I need to add more insulation, so I'll probably add these when I do! Quoted:
Quoted:
I don't normally post in this thread because most of what I do is just "normal" to me and doesn't stand out as anything special. But looking back on the last couple months of stuff I've done around the house I've really poured out a LOT of good projects... too many to mention... 1 project was to add "elevated" walkways in my attic. I have blown insulation and any time I need to do some work up there (mostly electrical, communications, or A/V stuff) I have to carefully place my foot down on the ceiling truss squishing the insulation down in that spot. Then the area I'm working in is ALL squished down. I found that I can "fluff" the insulation back up when I'm done but it's time consuming and it's tedious to work while balancing on 1 or 2 trusses. I decided I had enough and I was going to take care of it. I bridged from truss to truss with 2X4 & 2X6's (for longer spans bc that's what I had for long boards) and then screwed some decking to them to create walkways & work areas in the most commonly accessed areas (next to walls). These will come in VERY handy when routing speaker wires for surrounding sound etc and I wish I had done this years ago when I bought the place, it would have saved me SO much time from re-fluffing the blown insulation... Also built/repaired/painted a few furniture items for my wife. So much cheaper to take somebody's free, abused things and turn them into new again with just a little work. I took a glider rocker and glider foot-stool that I got for free because it was falling apart and I took it apart, glued and screwed all the joints agaibn, then painted it white to cover up the rough finish and match where we wanted to put it. Took a $30 junk dresser and fixed it up with a little wood filler and paint... I really like your idea for the walkways. I need to add more insulation, so I'll probably add these when I do! I will soon be doing something similar. I'm in the process of reflooring the attic so I will have a bunch of 2 ft. by 8 ft. plywood scrap. My plan is to use them to build some narrow catwalks to/from the outlying areas of the attic. I will be ripping the 3/4" plywood scrap in half so I will have 1 ft. wide strips. I'll be putting some 1x2 strips on both sides to provide tactile feel for the edges. Also thinking about creating some work platforms--maybe 2 ft. x 4 ft. out of 3/4" plywood with some 2x2 rails near the ends. The rails will be on the bottom and will act as guides along the joists when moving the platforms around. The idea is to make several so each unfloored area of the attic will have at least one movable work platform. |
|
|
|
[#40]
Quoted:
For blown in get a small adjustable rake. This is what I've done for the past 5 years in my attic... it's still a royal PITA... I have a large attic, it's not unusual for me to walk 40+ feet to my work area, make a big mess there, then have to rake all the insulation while back-tracking my steps. Often times the raking takes more time than the work I was doing. That is what pushed me to do this. It took me about 8 total hours to add most of the walkways. The few that I have left to do yet aren't a big deal and I'll complete them when I can... |
|
|
|
[#41]
Quoted:
For blown in get a small adjustable rake. For bats (or rolls) just pick up a row as required. Quoted:
Quoted:
Quoted:
I don't normally post in this thread because most of what I do is just "normal" to me and doesn't stand out as anything special. But looking back on the last couple months of stuff I've done around the house I've really poured out a LOT of good projects... too many to mention... 1 project was to add "elevated" walkways in my attic. I have blown insulation and any time I need to do some work up there (mostly electrical, communications, or A/V stuff) I have to carefully place my foot down on the ceiling truss squishing the insulation down in that spot. Then the area I'm working in is ALL squished down. I found that I can "fluff" the insulation back up when I'm done but it's time consuming and it's tedious to work while balancing on 1 or 2 trusses. I decided I had enough and I was going to take care of it. I bridged from truss to truss with 2X4 & 2X6's (for longer spans bc that's what I had for long boards) and then screwed some decking to them to create walkways & work areas in the most commonly accessed areas (next to walls). These will come in VERY handy when routing speaker wires for surrounding sound etc and I wish I had done this years ago when I bought the place, it would have saved me SO much time from re-fluffing the blown insulation... Also built/repaired/painted a few furniture items for my wife. So much cheaper to take somebody's free, abused things and turn them into new again with just a little work. I took a glider rocker and glider foot-stool that I got for free because it was falling apart and I took it apart, glued and screwed all the joints agaibn, then painted it white to cover up the rough finish and match where we wanted to put it. Took a $30 junk dresser and fixed it up with a little wood filler and paint... I really like your idea for the walkways. I need to add more insulation, so I'll probably add these when I do! For blown in get a small adjustable rake. For bats (or rolls) just pick up a row as required. I have blown in, but it has settled to the level of the rafters. I'm not sure its worth fooling with fluffing it vs adding more, especially since I'm not convinced there was ever enough in there to begin with! |
|
|
|
[#42]
I finally got around to running more of the speaker wire for my home audio system. I've been putting it off because I wasn't exactly sure of the best routes to take, but it's been nearly a year, so I bit the bullet and got another room done. I'll finish up the last one tomorrow. I think I've spent more on speaker wire than speakers now
I did have one mishap today. I drilled a 3/4" hole in the middle of a hallway ceiling today. I flipped my measurements and went 16' where I should have gone 13' (I needed to go over 13' and across 16', went 16' x 13' instead of 13' x 16' I'll patch that tomorrow!
Only run left now is the shortest and hopefully easiest one. Working in the attic is much more enjoyable at 20* than 120*! |
|
|
|
[#43]
Bought a new toilet.
American Standard Champion 4 |
|
|
|
[#44]
Quoted:
Working in the attic is much more enjoyable at 20* than 120*! So true... I rather have a coat on in the attic than be sweating my butt off. Coat keeps insulation off me, sweat makes it stick... I save ALL my non-urgent attic projects for cooler weather. If I MUST go up in the summer I go up first thing in the morning (just as the sun is peaking over the horizon) which is when your attic is theoretically the coolest. I've been up there on some July/August mornings when it wasn't terrible at all. But go much later than 8 or 9 am and it gets miserable. |
|
|
|
[#45]
Quoted:
Bought a new toilet. American Standard Champion 4 What are your thoughts on this toilet? Good...bad? I have the American Standard Cadet 3s in my house and we've NEVER clogged them in over 6 years that they have been in the house. I have read that the Champion 4 toilets flush even better. |
|
|
|
[#46]
Haven't yet installed. Bought my house 2 years ago, and it has a horrible glacier bay toilet which doesn't flush anything. Will post an AAR.
|
|
|
|
[#47]
FINALLY got the last speakers installed. There is music everywhere in my home now, and it is awesome. I had one last screwup today, the stud finder missed some bracing, so I now have a 3" x 6" hole to patch. The silver lining is that it made me rethink the placement for those, and I wound up with a better location with easier access.
|
|
|
|
[#48]
I sealed the grout in the bathroom, installed baseboard, shower hardware and checked fitment of a toilet for installation.
|
|
|
|
[#49]
hung 2 doors, cut-in door knobs for them and installed two new shitter seats
|
|
|
|
[#50]
We tore down the amazingly-well-built kayak storage shed the previous owners built (insert sarcasm here
 ). The support system was 6x 1-inch fenceposts buried about 1 foot in the ground. No concrete. ). The support system was 6x 1-inch fenceposts buried about 1 foot in the ground. No concrete.  |
|
|
 Win a FREE Membership!
Sign up for the ARFCOM weekly newsletter and be entered to win a free ARFCOM membership. One new winner* is announced every week!
You will receive an email every Friday morning featuring the latest chatter from the hottest topics, breaking news surrounding legislation, as well as exclusive deals only available to ARFCOM email subscribers.

AR15.COM is the world's largest firearm community and is a gathering place for firearm enthusiasts of all types.
From hunters and military members, to competition shooters and general firearm enthusiasts, we welcome anyone who values and respects the way of the firearm.

Subscribe to our monthly Newsletter to receive firearm news, product discounts from your favorite Industry Partners, and more.
Copyright © 1996-2024 AR15.COM LLC. All Rights Reserved.
Any use of this content without express written consent is prohibited.
AR15.Com reserves the right to overwrite or replace any affiliate, commercial, or monetizable links, posted by users, with our own.


