|
[#1]
Liked your design so much I stole it Shortened up overall demensions a little to better suit my layout and space. Also did double layer 3/4" ply top to reduce bounce. Pretty darn solid bench and love the cut outs for roll out toolbox storage. Thanks! Quoted:
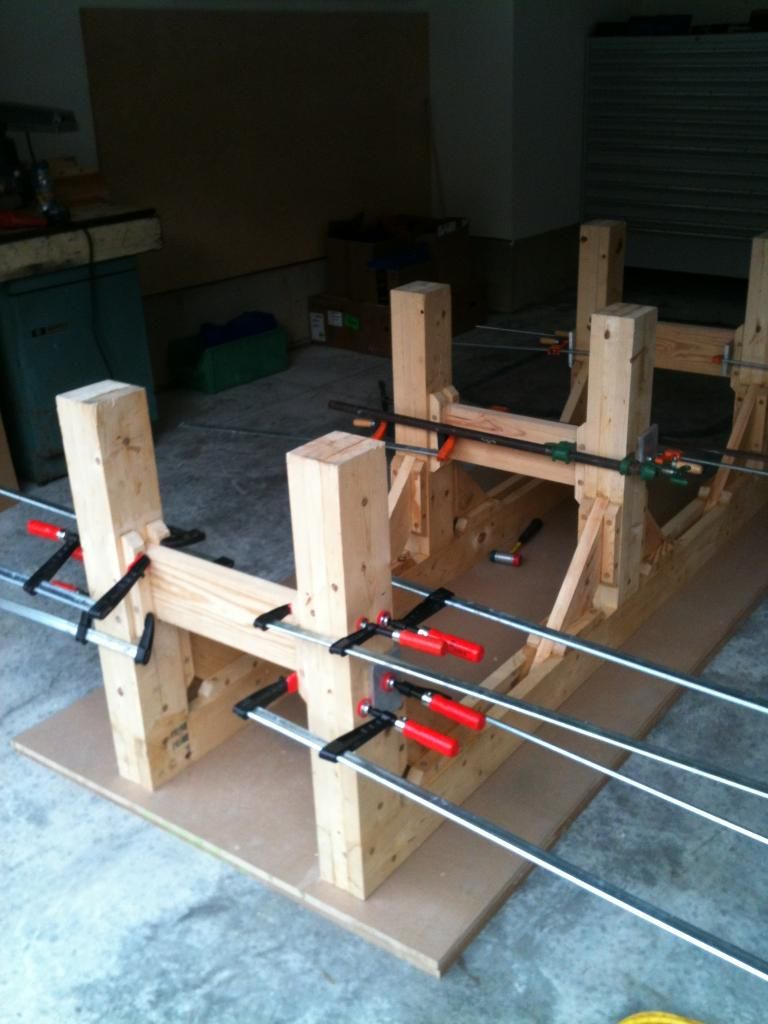
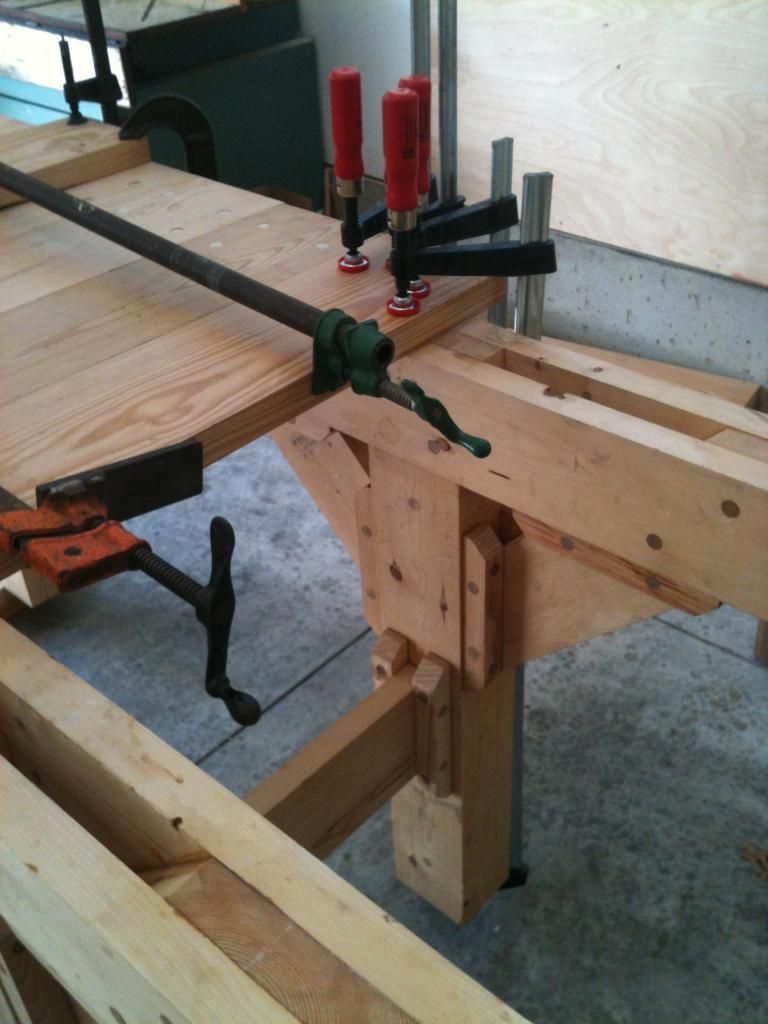
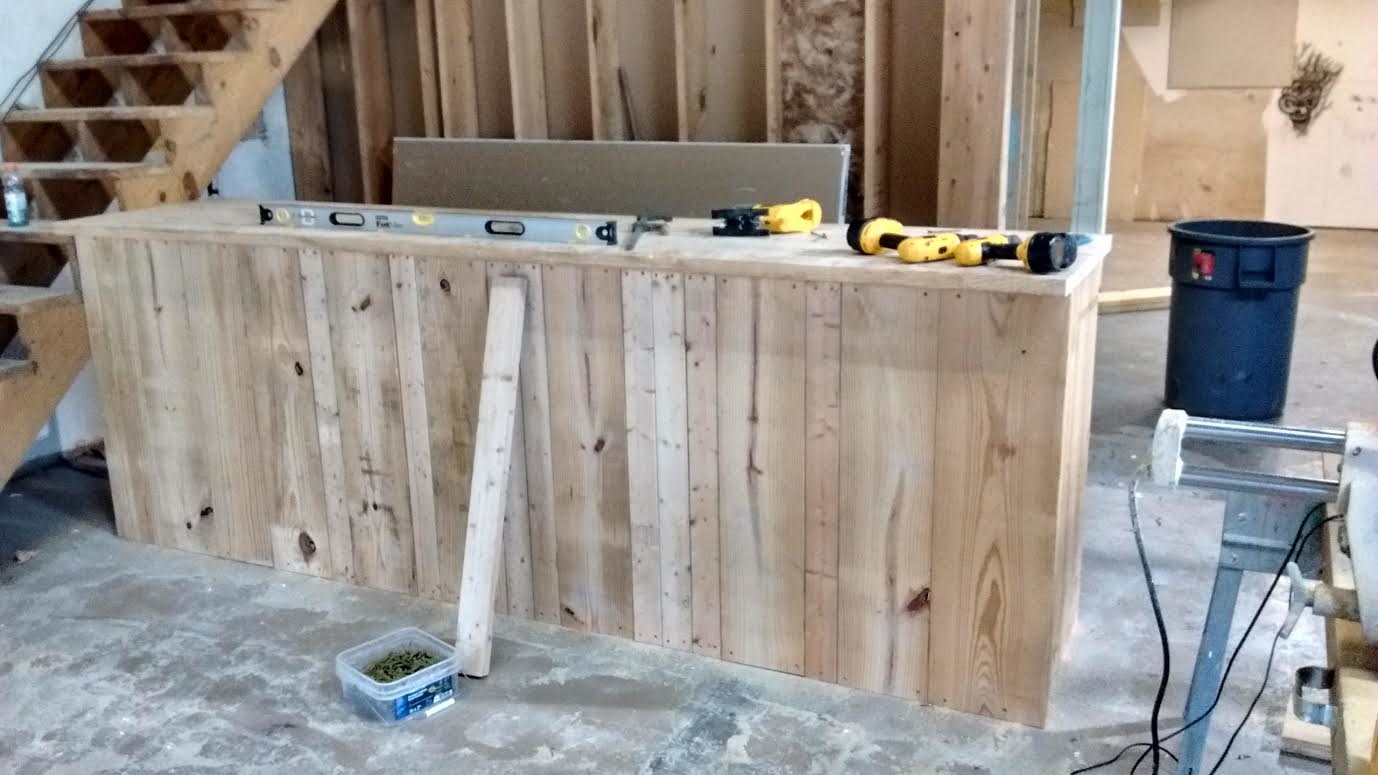
I made it up as I went - I am not a woodworker. 12' long, 32" deep, 43" high (I wanted it high enough to fit the table saw under it - the little people complain that they need something to stand on). Metal mesh shelves (from Menards) were extras I had leftover from a different project. The top is a 4'x8' sheet of 3/4" tongue & groove plywood cut into three 32" x 48" pieces (which really gives you 32" x 47.5" so I ended up 1.5" short on the end). Instead of traditional lags I used HeadLok flathead lags. https://lh5.googleusercontent.com/-oXmAqE04iw0/VFx00dVRGQI/AAAAAAAABGY/rbbtsfWnhoo/w1299-h974-no/Bench%2B04.jpg |
|
|
|
[#2]
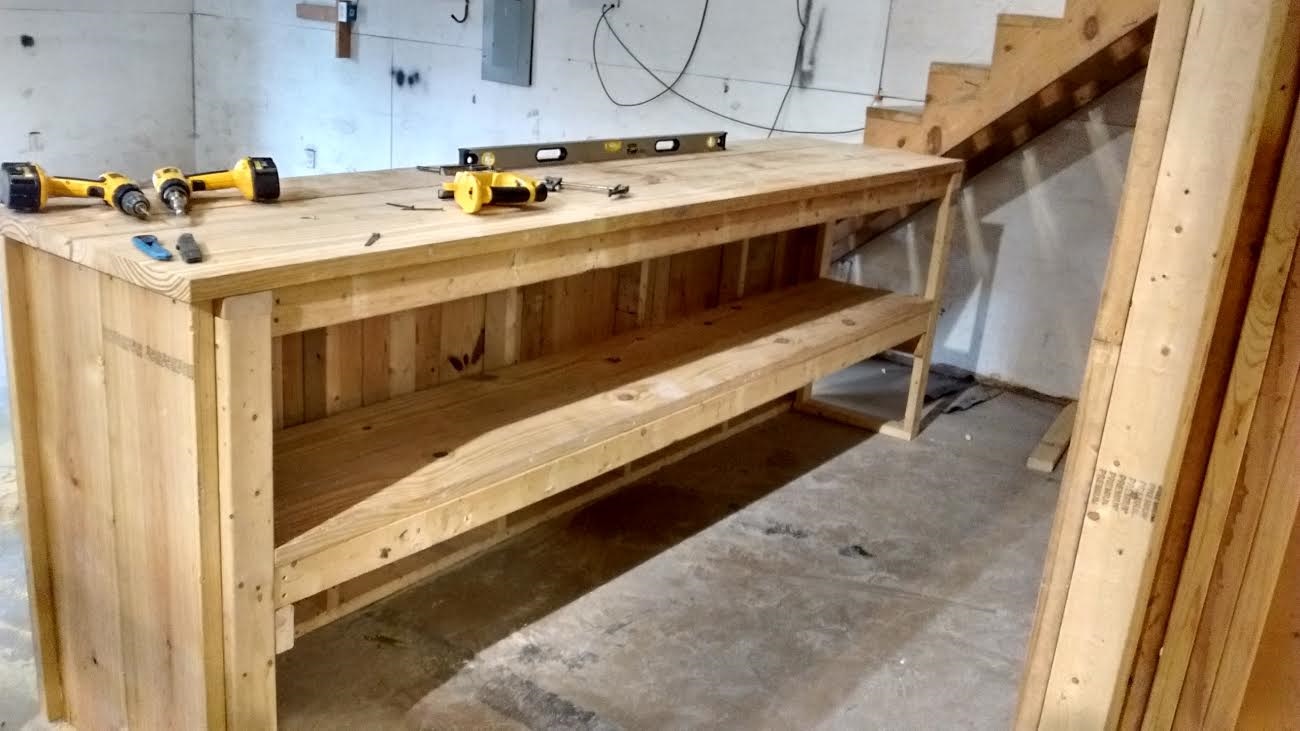
Here's one I'm currently working on in its temporary location (it'll be replacing the smaller "bench"). Still needs some work (finish the lower shelf, make a backboard of some sort). Height is 39.5". Top is 60"w x 27.5ish" (Five 2x6s). Legs are pressure treated 4x4. Frame is 2x4. Used deck screws throughout except I used carriage bolts for the top end of the legs. I was concerned during this project that I might be improving on my carpentry skills, but my fears were unwarranted. I'm still a shitty carpenter.


My next bench will most likely use sistered 2x4 legs and a double layer of 3/4" ply for the top. Might make it 60w x 24d in order to easily get two top layers out of a single sheet of ply. I'll probably use the same upper frame arrangement, but I'll probably do the lower shelf area differently. Maybe I'll wait for some cooler weather, as well, so I'm not hot & sweaty & in a hurry to get shit done. The garage is currently a work in progress. Since finding Garage Journal, I'm discovering all kinds of shit I can't live without. |
|
|
|
[#3]
Pics are pretty self explanatory. Not a nail anywhere- all screws.
They are 37 inches to the top and 24 inches deep. They are bolted to the wall but they will slide right out if I need them to or in case I move I can take them with me. 


|
|
|
|
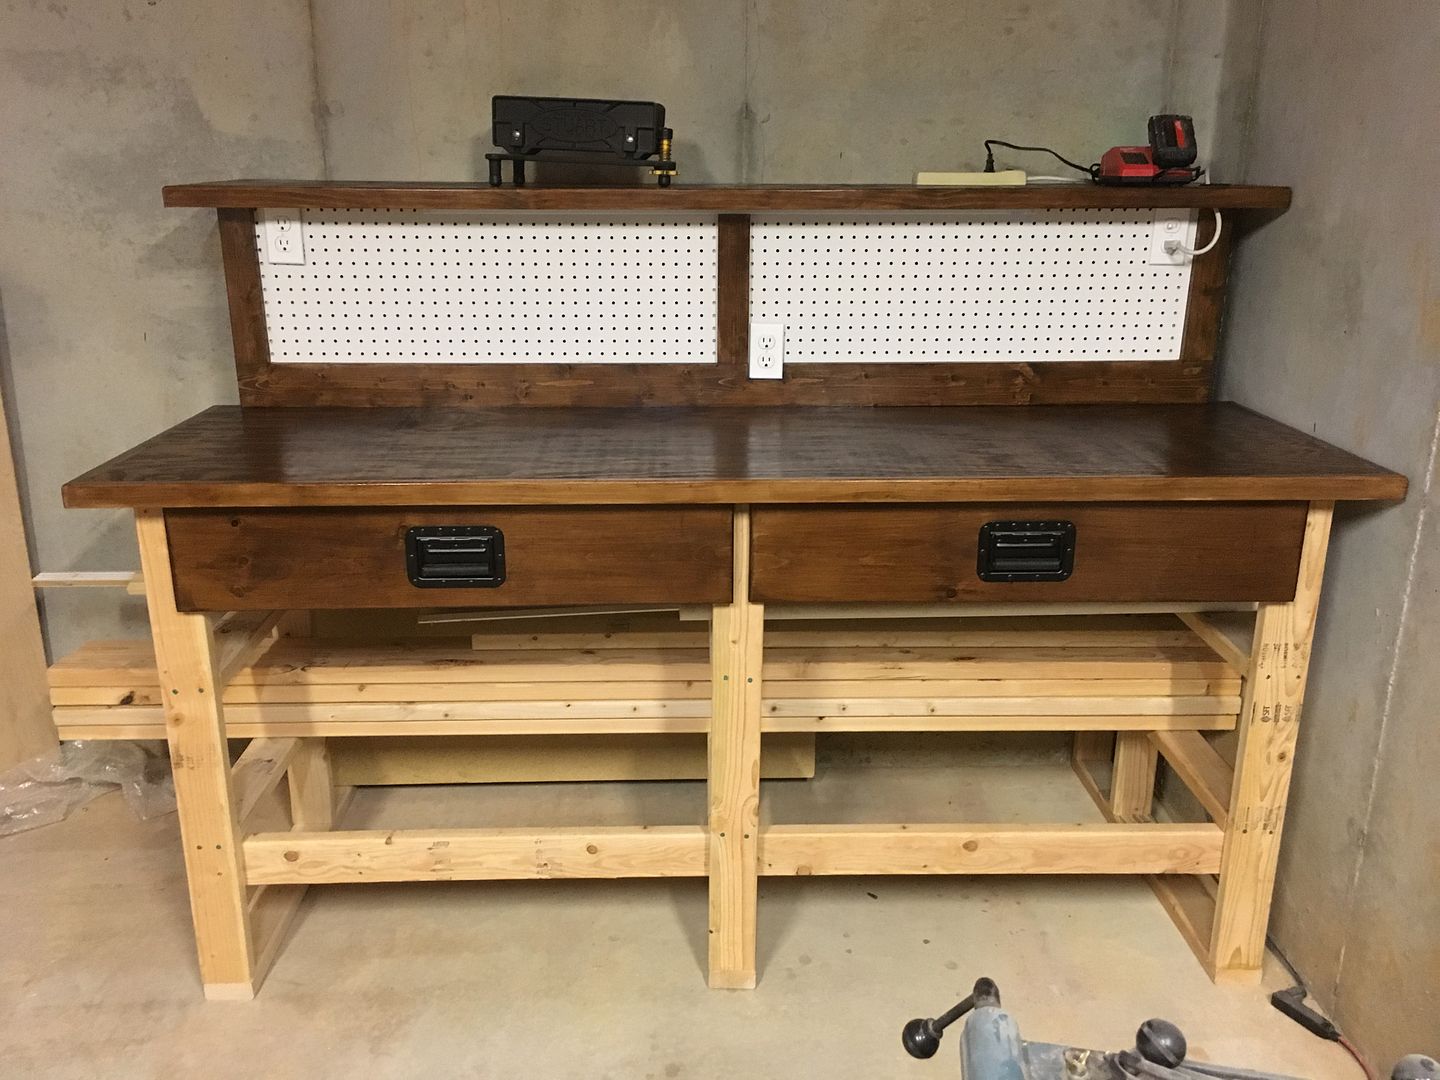
[#4]
Here is a workbench I made for working on my guns. Top is a a section of old bowling alley that I re-enforced with 3/4 plywood underneath. Base is made of 2x4 and 4x4 SYP that was joined with dado's, glue and screws and then painted for a cleaner look. I also dado'ed in a power strip in the front. The top is 6' wide by 30" deep and 3" thick IIRC

|
|
|
|
[#5]
Anyone have experience building a bench attached to a wall that folds Down?
|
|
|
|
[#6]
Quoted:
Anyone have experience building a bench attached to a wall that folds Down? I have plans for one in one of my Wood Magazine issues. Not sure how stable it would be though. |
|
|
|
[#7]
Quoted:
Anyone have experience building a bench attached to a wall that folds Down? Here's a good one, kind of light duty but saves space for sure. You could always build it heavier if needed: Link |
|
|
|
[#8]
Quoted:
This book is a very good resource, with several designs shown. http://www.shopwoodworking.com/the-workbench-design-book I built the roubo design. It is solid, and does not rack in any direction. Ash top, red oak legs and strecthers, draw bored mortise and tenoned. Legs tenoned and dovetailed to top. When photos were taken last winter hadn't installed the leg vise yet. Also put a shelf down at the stretchers. http://i113.photobucket.com/albums/n219/jonquinn66/imagejpg2_zps9c59cd5a.jpg http://i113.photobucket.com/albums/n219/jonquinn66/imagejpg1_zps17950503.jpg Quoted:
Quoted:
This is awesome. I need a proper woodworking bench. Im currently using a heavily modded (ie cheap) HF bench thats not TOO bad. Not in the same ballpark as that. But I want to build my own and am still collecting tools to do so. This book is a very good resource, with several designs shown. http://www.shopwoodworking.com/the-workbench-design-book I built the roubo design. It is solid, and does not rack in any direction. Ash top, red oak legs and strecthers, draw bored mortise and tenoned. Legs tenoned and dovetailed to top. When photos were taken last winter hadn't installed the leg vise yet. Also put a shelf down at the stretchers. http://i113.photobucket.com/albums/n219/jonquinn66/imagejpg2_zps9c59cd5a.jpg http://i113.photobucket.com/albums/n219/jonquinn66/imagejpg1_zps17950503.jpg wonderful bench! ...I've got "Workbenches" by schwarz, and I've got "the workbench" by Lon Schleining, ...I enjoyed Schleining's book much more, and has a bunch of great photos of workbenches... |
|
|
|
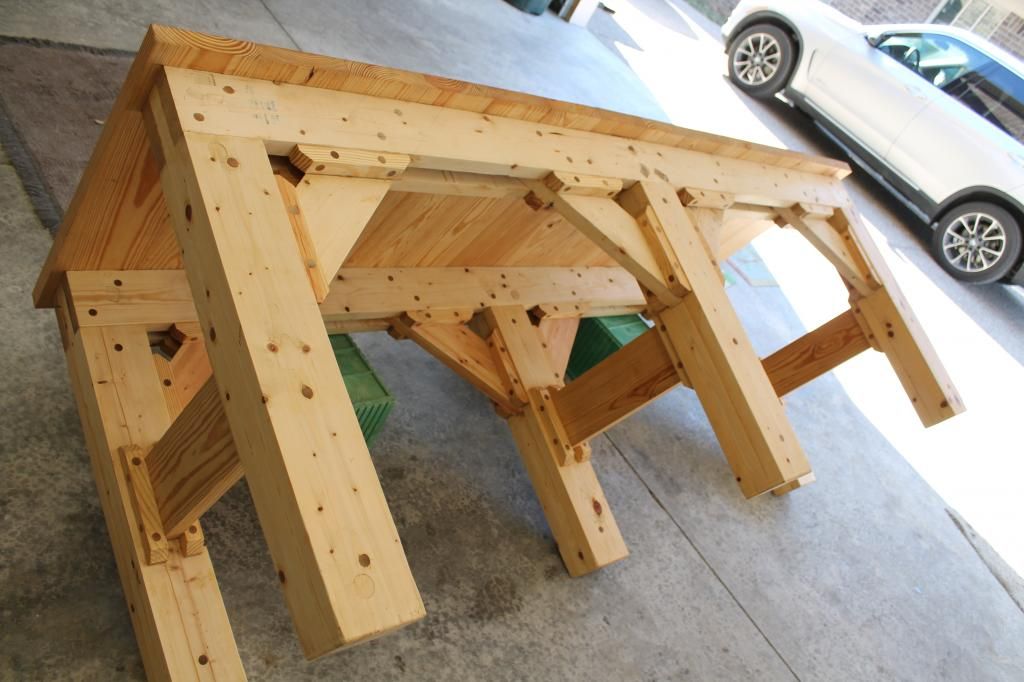
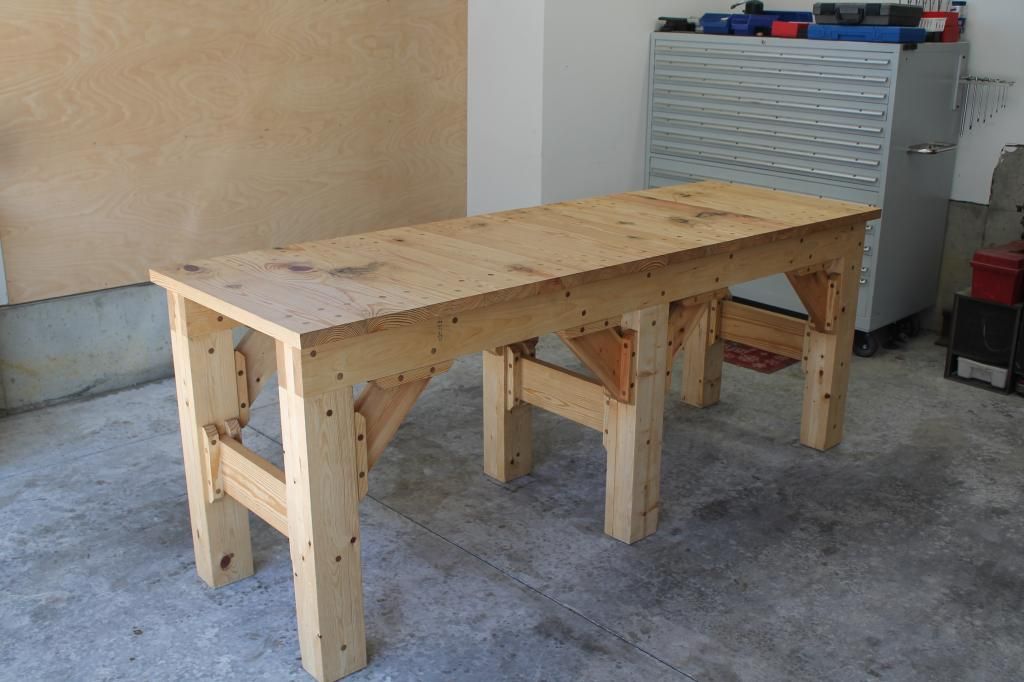
[#9]
...made some upgrade to the workbench, ..added a "sliding deadman" (i.e. board jack), which I've wanted to do for a long while now...
I designed this with inspiration from the "shaker bench" design by benchcrafted, ... the lower rail (cantilevered off the bench frame rail) and standoffs with the "house"-shaped profile... a modification to the design, I wanted it to be easily removeable, but have fit w/ little to no "slop"... generally some "slop" is needed in the upper rail (which houses a groove for the tenon to ride in), but since my tenon is removable (slides in/out of a groove in the top of the deadman panel), I simply rest the assembly on the lower rail, tip it into place, and slide the tenon in from the right side. a captive pin and a removable pin holds the tenon secure during use... Deadman Assembly: Panel = soft maple Runner = red oak Upper Rail = red oak Lower Rail = red oak Removable Tenon (Pine) Removable Pin (walnut and oak dowels) Captive Pin (walnut dowel) 
Closeup showing removable tenon and removable pin 
Lower Rail: 
View on Bench: 

|
|
|
|
[#10]
I salvaged an old vanity from a bathroom remodel, and glued/bolted together a bunch of 2x4"s which I had planed flat for $20 at a large cabinet shop. Put a round-over bit in my rotozip for the edges, and finished it with bar-top varnish.
Painted the vanity "Old Ford Blue" or Dillon blue. 
|
|
|
|
[#11]
work in progress...


|
|
|
|
[#12]
Posted this on another thread a while back.
Took awhile to complete No metal fasteners, wood glue and a couple hundred dowels. Was going to add another sheet on top so I used the "bad" side of the boards on top. Thinking now I will just leave it as is. My big guy liked helping along the way. 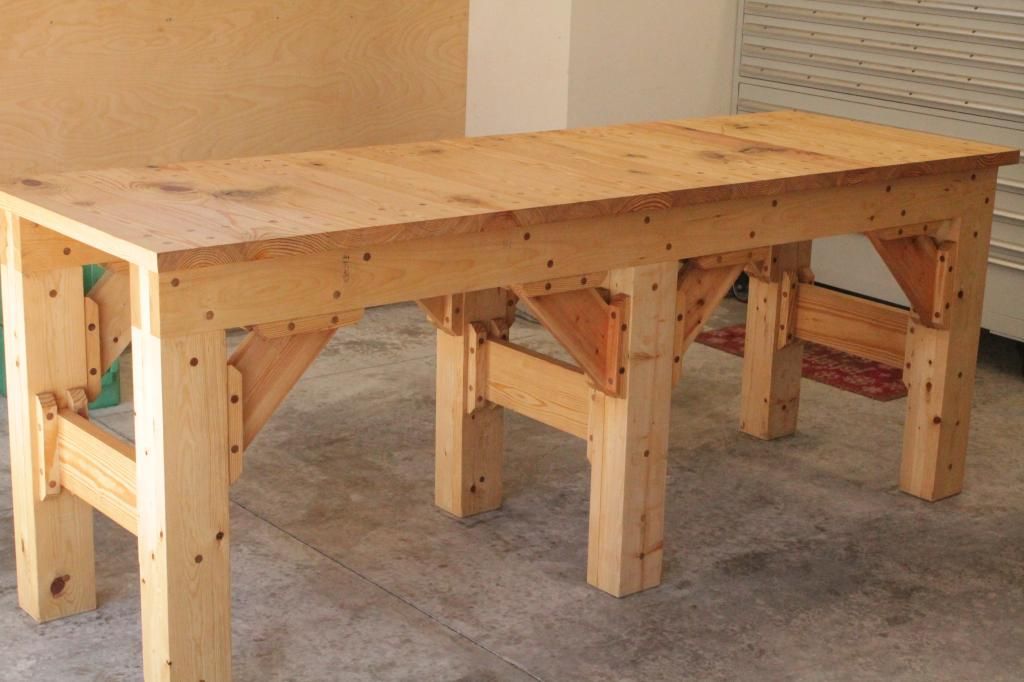

|
|
|
|
[#13]
Quoted:
This is what ive been working on this week. http://i1080.photobucket.com/albums/j327/JrcEngineering1/photo_11_zps69247c47.jpg http://i1080.photobucket.com/albums/j327/JrcEngineering1/photo_21_zps1a00ae4d.jpg http://i1080.photobucket.com/albums/j327/JrcEngineering1/photo_31_zps3d08bf86.jpg http://i1080.photobucket.com/albums/j327/JrcEngineering1/photo_11_zps79a21886.jpg http://i1080.photobucket.com/albums/j327/JrcEngineering1/photo_51_zpsde575fdb.jpg http://i1080.photobucket.com/albums/j327/JrcEngineering1/photo_31_zps7d164ff6.jpg Really like seeing the wood grain lining up on the doors and stile pieces. Nice eye for detail. |
|
|
|
[#14]
Wow... I'm impressed by the woodworkers in this thread. Here's my first attempt at a bench, we bought the house last Spring, and this was the project I was most looking forward to! Lots of drywall screws and carriage bolts, but its incredibly stable and heavier than s***. I'm thinking all I really need now is a couch off to the right!


|
|
|
|
[#15]
Quoted:
Wow... I'm impressed by the woodworkers in this thread. Here's my first attempt at a bench, we bought the house last Spring, and this was the project I was most looking forward to! Lots of drywall screws and carriage bolts, but its incredibly stable and heavier than s***. I'm thinking all I really need now is a couch off to the right! http://i65.tinypic.com/4r9gzq.jpg http://i66.tinypic.com/9abcaq.jpg http://i63.tinypic.com/v5fj95.jpg Looks great. I'm copying this... |
|
|
|
[#16]
tag
|
|
|
|
[#18]
I just built this counter for one of my best friends. He's moving into this building shortly for his company and asked me to put that monster together.
123" long x 42.75" tall Shelf is removable for cleaning purposes, and the countertop is 3 pieces of 2x10. I looked at it after I was done and said it would make for an awesome work bench. |
|
|
|
[#19]
My larger flat areas end up buried instead of workspaces.
Has anybody tried a 3' x 5' size? I'm thinking that would be to small to accumulate things that need to "go somewhere", while being plenty large to work on mid to smaller size projects. Let me know if I'm wrong there, and also, what is the best height for one? I'm 6'2, Didn't realize it'd make a big difference, but 34" is too much bending over, while 36" is good for reloading, but a little high to get arms some horizontal power. Is there an "official formula" for height, since it's hard to change, and you don't know it's wrong until you've used it a while...
|
|
|
|
[#20]
This thread is relevant to my interests.
|
|
|
|
[#21]
Quoted:
My larger flat areas end up buried instead of workspaces. Has anybody tried a 3' x 5' size? I'm thinking that would be to small to accumulate things that need to "go somewhere", while being plenty large to work on mid to smaller size projects. Let me know if I'm wrong there, and also, what is the best height for one? I'm 6'2, Didn't realize it'd make a big difference, but 34" is too much bending over, while 36" is good for reloading, but a little high to get arms some horizontal power. Is there an "official formula" for height, since it's hard to change, and you don't know it's wrong until you've used it a while... |
|
|
|
[#22]
Put this together from pieces of my 8' long bench that I had to sacrifice. The plastic legs are a cool idea but they were a little twisted and it was a bit of a pain to assemble but is sturdy as hell though now. LED light is from amazon, magnifying light on spring arm is from harbor freight.
Finished my pipe clamp/pallet wood moxon vise the other day. Really happy how it turned out, especially that I used some pretty crappy pieces of wood. Think im going to make a router table that goes in the vise, the pipes are 2' long each so i should have plenty. |
|
|
|
[#23]
Quoted:
Put this together from pieces of my 8' long bench that I had to sacrifice. The plastic legs are a cool idea but they were a little twisted and it was a bit of a pain to assemble but is sturdy as hell though now. LED light is from amazon, magnifying light on spring arm is from harbor freight. https://www.AR15.Com/media/mediaFiles/320892/IMG-3821-176051.JPG Finished my pipe clamp/pallet wood moxon vise the other day. Really happy how it turned out, especially that I used some pretty crappy pieces of wood. https://www.AR15.Com/media/mediaFiles/320892/IMG-3820-176052.JPG Think im going to make a router table that goes in the vise, the pipes are 2' long each so i should have plenty. |
|
|
|
[#24]

|
|
|
|
[#25]
Quoted:
If you do that, please make a thread on how you did it. I could really use such a thing. |
|
|
|
[#26]
Quoted:
Here is a workbench I made for working on my guns. Top is a a section of old bowling alley that I re-enforced with 3/4 plywood underneath. Base is made of 2x4 and 4x4 SYP that was joined with dado's, glue and screws and then painted for a cleaner look. I also dado'ed in a power strip in the front. The top is 6' wide by 30" deep and 3" thick IIRC http://img.photobucket.com/albums/v474/cgv69/DSC_2471.jpg |
|
|
|
[#27]
Quoted:
Wow... I'm impressed by the woodworkers in this thread. Here's my first attempt at a bench, we bought the house last Spring, and this was the project I was most looking forward to! Lots of drywall screws and carriage bolts, but its incredibly stable and heavier than s***. I'm thinking all I really need now is a couch off to the right! http://i65.tinypic.com/4r9gzq.jpg http://i66.tinypic.com/9abcaq.jpg http://i63.tinypic.com/v5fj95.jpg |
|
|
|
[#28]
Definitely some great work in here.
Really inspiring. Inspiration usually costs me money
|
|
|
|
[#29]
Doubletappery......
Definitely some great work in here. Really inspiring. Inspiration usually costs me money
|
|
|
|
[#30]
Threw together this temporary light duty workbench and reloading bench for $50. Made from a 4' piece of damaged counter top, some scrap 3/4" ply glued and screwed to the underside (1.5" thick), 2x 20" 1000lb metal shelf brackets, and 1x 12" shelf support bracket in the center.
Its set about 45" off the ground (I'm 6'1") purely for reloading press reasons. Might not ever reload on it at this house since we're probably moving within a year. Incase I am able to reload on it I figured set it at the correct height. I really needed another horizontal surface above toddler level to finish some other projects. I was pretty skeptical about those shelf brackets, but they work surprisingly well and saved me from having to measure and cut for a 2x4 cantilever support to the studs. Pretty cheap too considering the time it saved me. |
|
|
|
[#31]
Finally got all of my tools and equipment bought and got around to trying my hand at the FueledByRamen clone that I found here. Been working all day on it and still need to put the bottom mdf shelf in. But for my first run at building ANYTHING, I am very pleased with it.
Its square, solid, and level...so there's that I guess. ETA: Thanks again FueledByRamen....this was exactly the bench I needed. |
|
|
|
[#32]
Got the bottom shelf in tonight and bought all of the HF peg board hooks I could find. Now just need lighting and a power strip. I'm psyched to have a useable workspace.
|
|
|
|
[#33]
How about a little friendly bump?
|
|
|
|
[#34]
Finished my gun bench up today and got it in the house. Didn't draw up any plans. Just had the measurements that I had to stay under to get it in the house and went to town.
6' long, 28" deep, 38" tall, shelves are 1x8", lower shelf is 20" deep, slatwall backer, under cabinet lighting from amazon, and Ikea work light. 
|
|
|
|
[#35]
Quoted: Finished my gun bench up today and got it in the house. Didn't draw up any plans. Just had the measurements that I had to stay under to get it in the house and went to town. 6' long, 28" deep, 38" tall, shelves are 1x8", lower shelf is 20" deep, slatwall backer, under cabinet lighting from amazon, and Ikea work light. https://s1.postimg.org/2xnlb548nz/IMG_3017.jpg |
|
|
|
[#36]
Quoted:
Nice work. Are you going to put a bench vise on it? Quoted:
Quoted: Finished my gun bench up today and got it in the house. Didn't draw up any plans. Just had the measurements that I had to stay under to get it in the house and went to town. 6' long, 28" deep, 38" tall, shelves are 1x8", lower shelf is 20" deep, slatwall backer, under cabinet lighting from amazon, and Ikea work light. https://s1.postimg.org/2xnlb548nz/IMG_3017.jpg Any ideas or suggestions? |
|
|
|
[#37]
Quoted: Thanks! I’m planning on it, but not sure if I want to permanently mount it or make a removable base I can put it on. Also not sure on placement. Any ideas or suggestions? With the dimensions of your bench top, I would grab a 8x8 piece of steel and mount a 3-4" vise atop that. Depending on how you framed below the bench top will determine where you have the ability to anchor the plate to the bench. I would do something along the lines of 'dog bones' to hold the plate down to the top and keep it mobile. 
Bolting down a vise to the steel plate will mean the plate needs to be elevated the thickness of the the fasteners holding it. The way your bench is oriented, if it were mine, I'd orient the vise so that the crank was on the right edge, and the jaws moved left/right. |
|
|
|
[#38]
Quoted:
You're quite welcome. With the dimensions of your bench top, I would grab a 8x8 piece of steel and mount a 3-4" vise atop that. Depending on how you framed below the bench top will determine where you have the ability to anchor the plate to the bench. I would do something along the lines of 'dog bones' to hold the plate down to the top and keep it mobile. https://www.woodworkerexpress.com/images/P/G86G0HXLC8SE-07.jpg Bolting down a vise to the steel plate will mean the plate needs to be elevated the thickness of the the fasteners holding it. The way your bench is oriented, if it were mine, I'd orient the vise so that the crank was on the right edge, and the jaws moved left/right. |
|
|
|
[#39]
This isn't going to be a quick restoration, but I scored this vise yesterday and another smaller one last month when I was out of town.
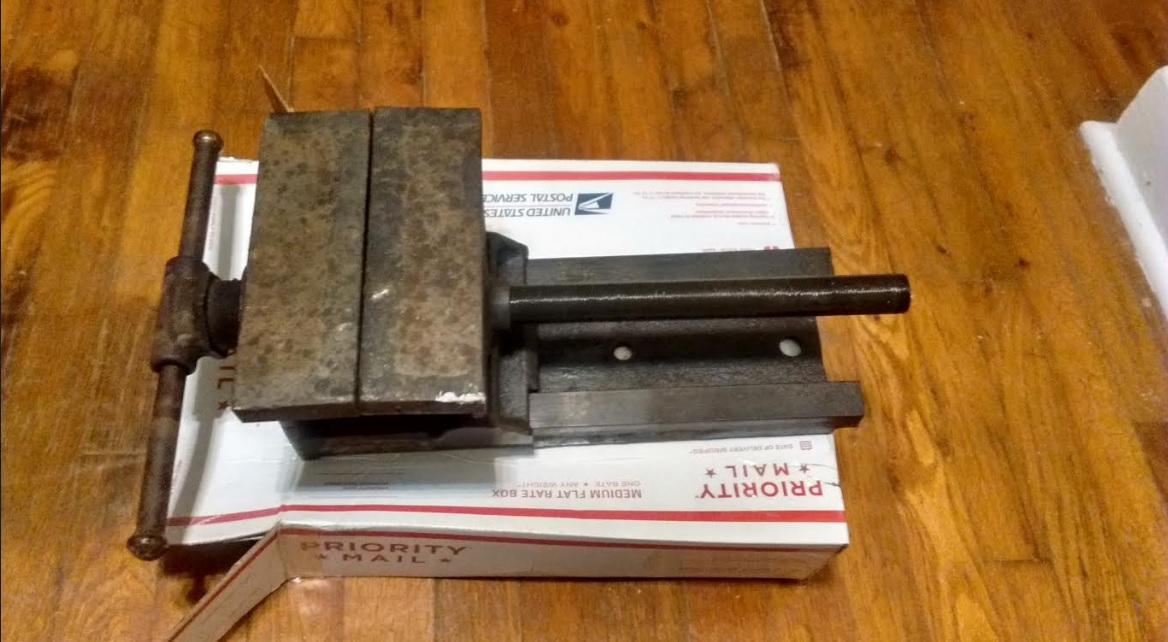
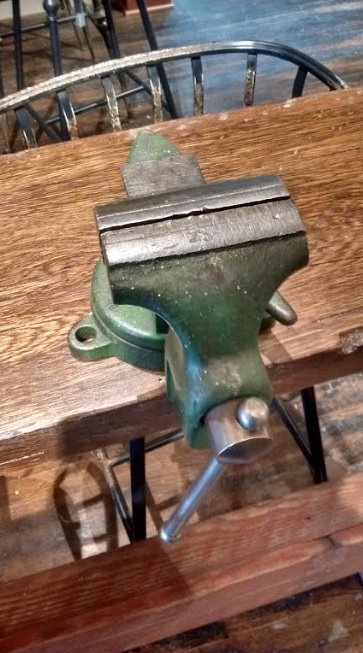
When the time comes that I have the opportunity to build a giant bench (~36-42" x 120-144") I will put these on it. I seem to be turning into a bench vise collector. Between the 2 pictured vises, I'm into them for $63. |
|
|
|
[#40]

|
|
|
|
[#41]
Quoted: My original thought was something pretty similar. A plate that the vice mounts to that could be secured to the bench top with T-handles. I ended up going to Harbor Freight tonight and picking up a hitch receiver and receiver vice mount. I'm going to mount the receiver on the underside of the bench. I'm thinking this will work well for how little I'm going to use it. This will mainly be used for holding an AR/upper for cleaning or minor work. Should be able to work on this tomorrow. I'll update with how it works out. There is a good amount of play when you insert the mount into the receiver, even with the hitch pin. To eliminate this I drilled and tapped a 9/16” bolt into the receiver. Simply tighten it down against the mount and it will eliminate the wiggle. |
|
|
|
[#42]
Quoted: I did this on my other workbench. I swap out the vise with the grinder when needed. There is a good amount of play when you insert the mount into the receiver, even with the hitch pin. To eliminate this I drilled and tapped a 9/16” bolt into the receiver. Simply tighten it down against the mount and it will eliminate the wiggle. |
|
|
|
[#43]
I want to do an 18"x3' bench with a Moxxon vise on the long side. Anybody know of plans?
|
|
|
|
[#44]
Perfect timing. I am moving to my new house with a huge workshop and I will need to build several benches. I will be following this thread for ideas and when I build mine I will contribute with my build.
|
|
|
|
[#45]
Quoted: My original thought was something pretty similar. A plate that the vice mounts to that could be secured to the bench top with T-handles. I ended up going to Harbor Freight tonight and picking up a hitch receiver and receiver vice mount. I'm going to mount the receiver on the underside of the bench. I'm thinking this will work well for how little I'm going to use it. This will mainly be used for holding an AR/upper for cleaning or minor work. Should be able to work on this tomorrow. I'll update with how it works out. 
|
|
|
|
[#46]
Quoted:
I want to do an 18"x3' bench with a Moxxon vise on the long side. Anybody know of plans? |
|
|
|
[#47]
Perhaps this will get you some direction?
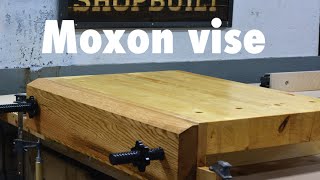 Woodworking project - Moxon vise |
|
|
|
[#48]
|
|
|
|
[#49]
that's probably the approach most people are taking lately. A moxon vise you clamp temporarily to your benchtop.
I built mine with parts from Benchcrafted. but I think he wanted something like the LN bench but maybe without the expensive twin screw chain vise? 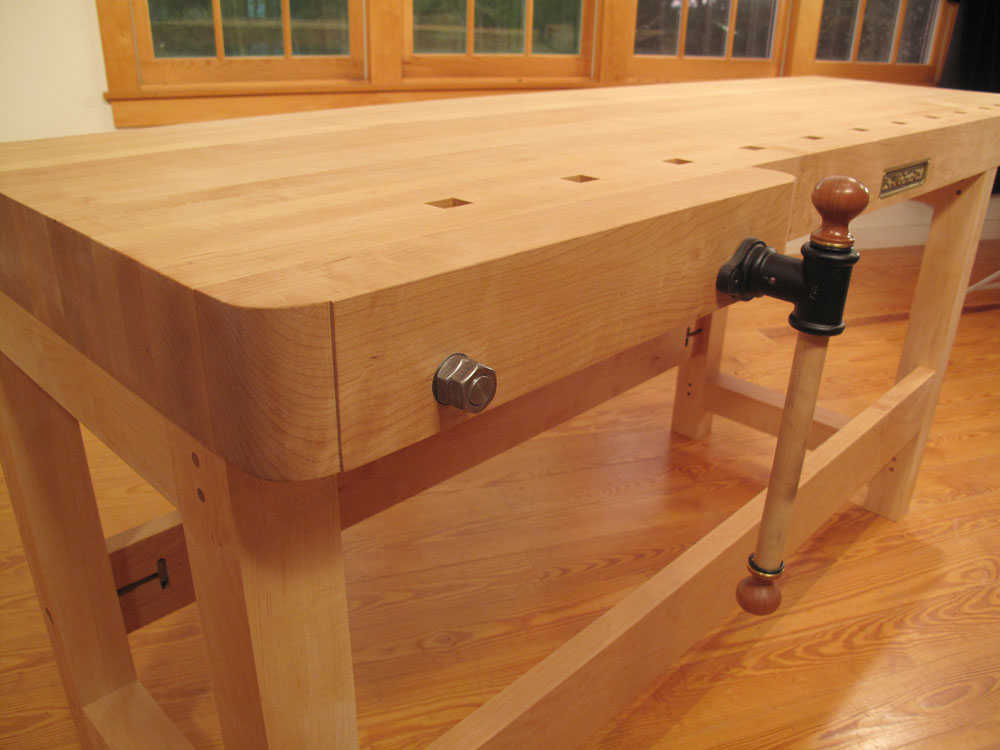
if so the vise could be substituted with individual screws. But I wouldn't copy that LN bench exactly - I'd make the base (legs and stretchers) a lot more sturdy. especially if it were going to be used planing and jointing rough sawn boards. lots of racking forces that would be hard on those spindly looking stretchers. |
|
|
|
[#50]
Quoted:
I want to do an 18"x3' bench with a Moxxon vise on the long side. Anybody know of plans? This may be the bench design you are looking for, or very close to it. Its called a holzapffel workbench. I looked in my Chris Schwarz workbench books today but must have missed it. But even better here is a link to a big web article, maybe from one of the books about building one of these benches. Make the base (legs and stretchers) as heavy as you can. That mass and rigidity is a big help. I used oak thats about 5x6 for the legs from a tree I cut down a number of years ago and had the bigger timbers sitting in the garage drying, but I made a roubo style bench. Holzapffel style workbench article with twin screw moxon style face vise. I don't know what your budget is, but here is a set of wooden twin screws and othe hardware. I bought a single one for the shoulder vise on my bench. They are nicely made and heavy. https://www.lakeerietoolworks.com/collections/all/products/wood-vise-twin-screw-premium-kit These guys, Benchcrafted, make nice stuff too. I put one of the tail/wagon wheel vises on the end of my bench, and later built a bench on bench style moxon vise with their kit. A little less expensive https://www.benchcrafted.com/moxon |
|
|
 Win a FREE Membership!
Sign up for the ARFCOM weekly newsletter and be entered to win a free ARFCOM membership. One new winner* is announced every week!
You will receive an email every Friday morning featuring the latest chatter from the hottest topics, breaking news surrounding legislation, as well as exclusive deals only available to ARFCOM email subscribers.

AR15.COM is the world's largest firearm community and is a gathering place for firearm enthusiasts of all types.
From hunters and military members, to competition shooters and general firearm enthusiasts, we welcome anyone who values and respects the way of the firearm.

Subscribe to our monthly Newsletter to receive firearm news, product discounts from your favorite Industry Partners, and more.
Copyright © 1996-2024 AR15.COM LLC. All Rights Reserved.
Any use of this content without express written consent is prohibited.
AR15.Com reserves the right to overwrite or replace any affiliate, commercial, or monetizable links, posted by users, with our own.