|
Posted: 8/13/2013 7:55:50 PM EDT
I am currently working on my first workbench since moving into my house. After seeing the amount of threads in the DIY Forum on various workbench's, I asked DIY Mod ZW17 if I could create a thread on workbench's that he work tack. He has given me the go ahead and I would appreciate everyone's help, either in posting pictures of your workbench's or making the links to the various types of workbench's.
I would like to have the thread divided into 4 different categories, similar to the Picture Thread in the Tactical Gear forum ( Warbelt, Chest Rig, Plate Carrier ) The 4 categories would be Metal Working bench, Carpentry / General purpose, Gunsmithing / Reloading, and possibly one for Vises. What I really need is help in creating the thread its self. As I said, I would like it in the same format as the Tactical Gear Pictures thread, unless everyone wants one Pic Thread for all types of workbench's. Thanks in advance for the help. |
|
|
|
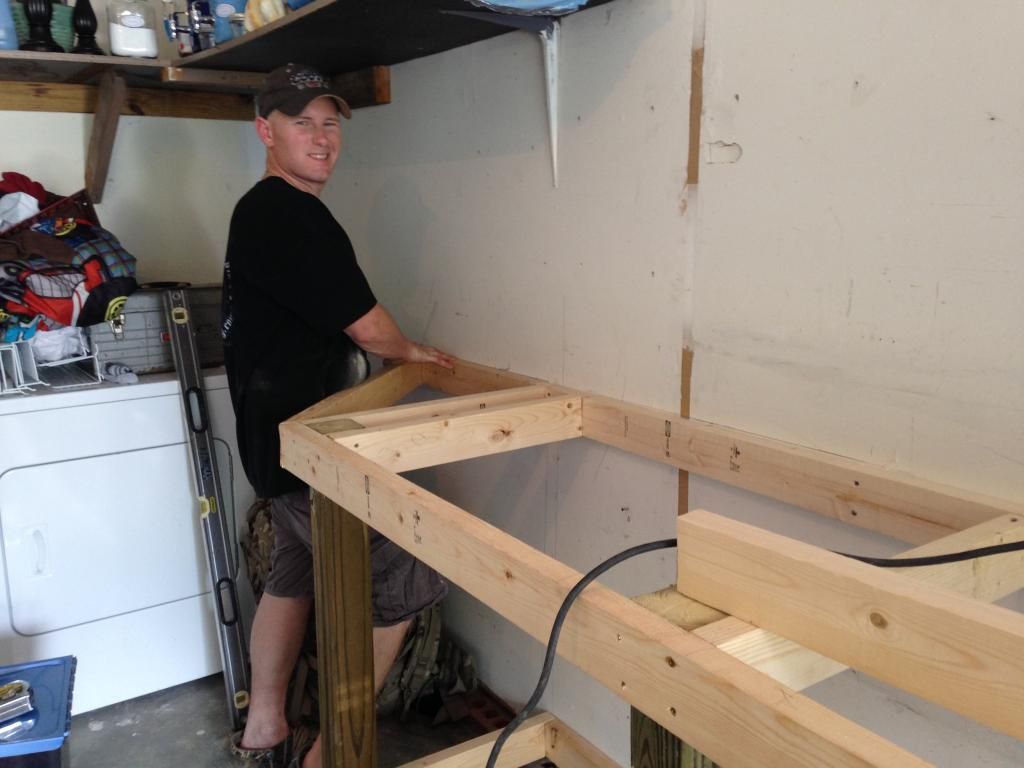
[#1]
|
|
|
|
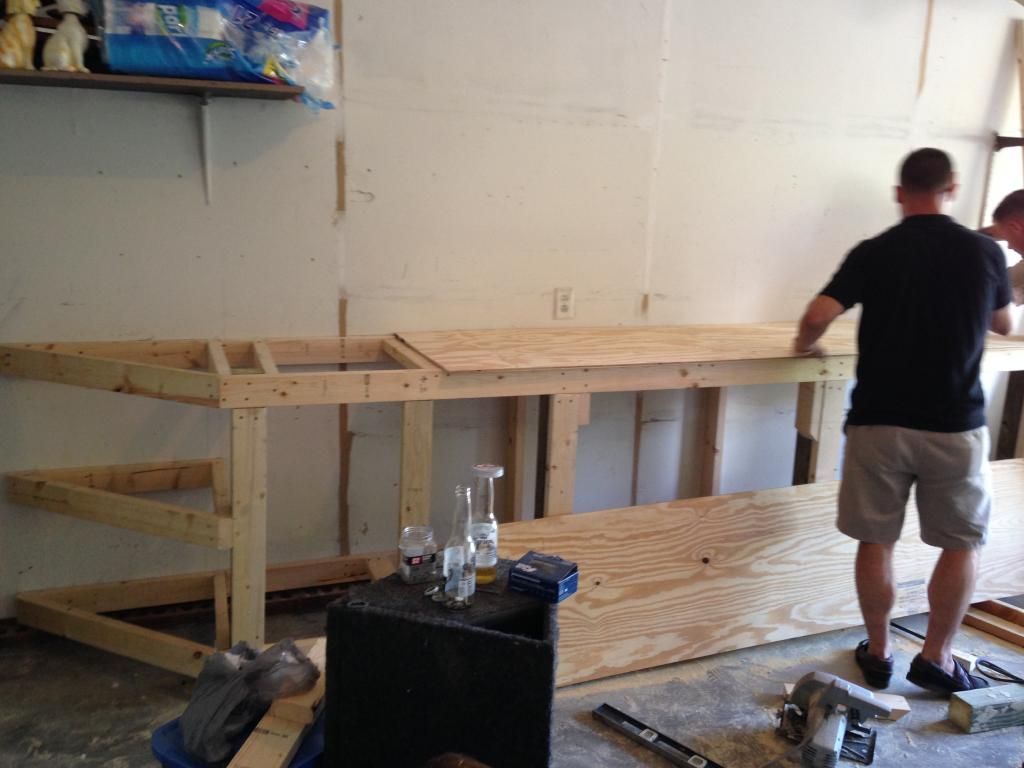
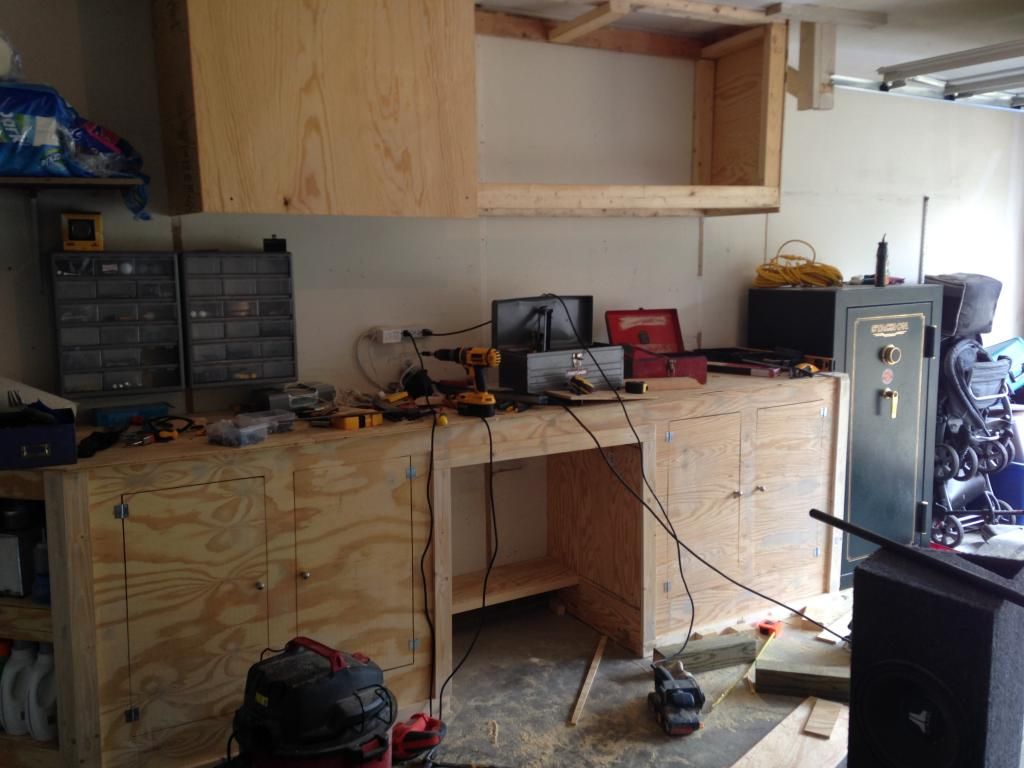
[#2]
Thoughts on workbenches.
-It's a workbench, not a piece of furniture. As such it will get dinged, scratched, and stained over the years. Resign yourself to this fact. -Height, the general rule is that it should come up to the knuckle on your thumb when you are standing. I like mine to come up to my wrist joint to keep me from bending over so far when I'm working. -Top should be solid and sturdy to resist "bounce" when you hit it. 1 1/2" is what I aim for. Solid core doors work, I like two layers of 3/4" hardwood plywood topped with a replaceable layer of 1/4" hardboard (replaceable as it's a workbench and it will get dinged, scratched, and stained over the years). Go big or go home and use 1 1/2" maple slabs. Prelaminated (ie, glued together) maple slabs can be found at Woodcraft and Grizzly. -Placement of your workbench now and in the future will assist you in the design. If it will be up agains a wall, then the construction can be as simple as a kitchen cabinet; an open box topped as noted above. Screw it to the wall studs just like a kitchen cabinet to aid in stability. Or free standing with a foot print close to the width of your top. Up against the wall (note the top here is two layers of 3/4" ply topped with 1/4" hardboard 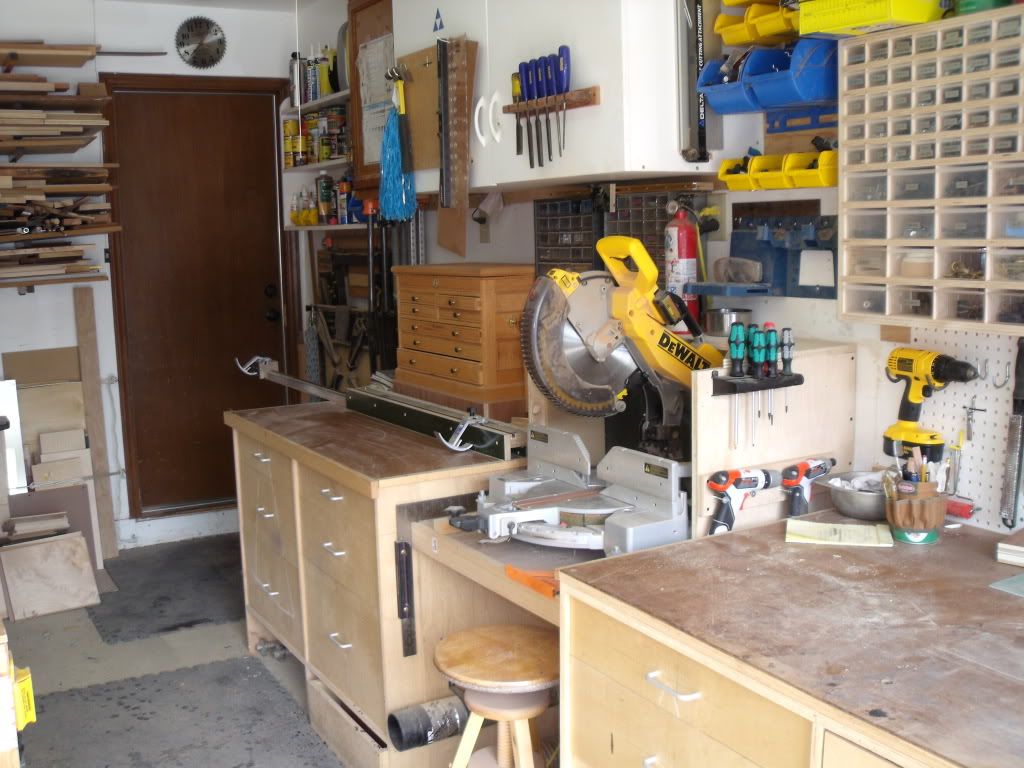
Free standing with a 1 1/2" maple slab for a top 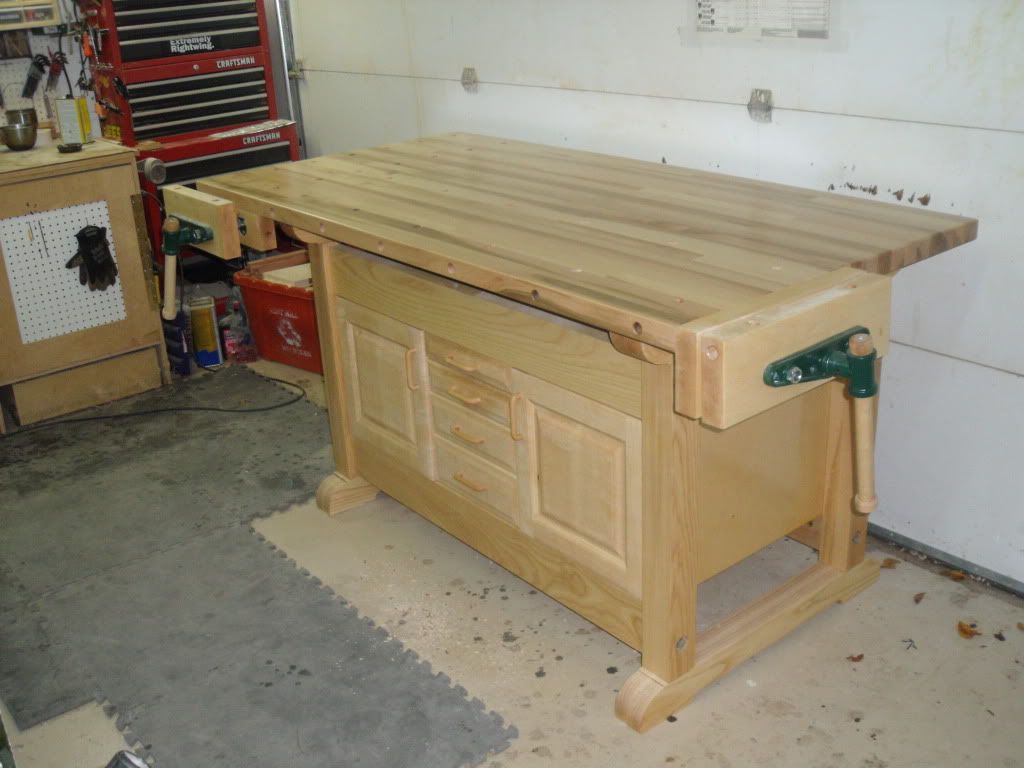
-Attaching things to your workbench top (reloading presses, vises, etc). You can permanently mount your piece to the workbench by simply drilling through the top and bolting it down. If at some point in the future you want to make a change, you're stuck with holes in your workbench that you will have to work around. The best method I've found is to use threaded inserts. 
get them here In use 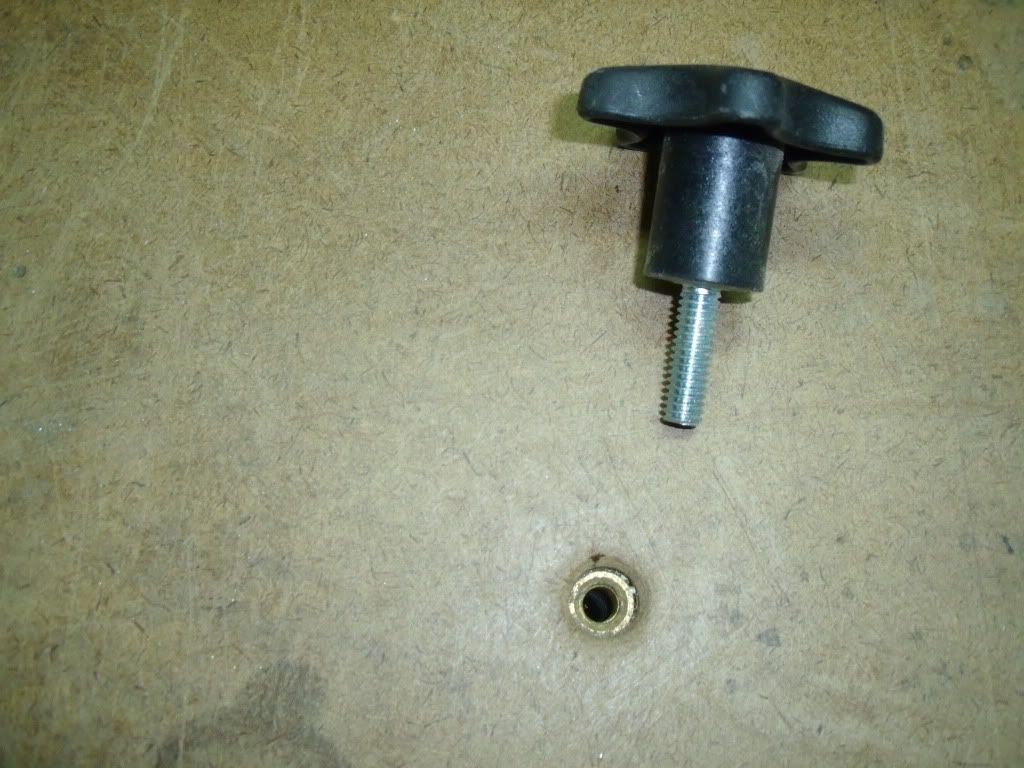
Take everything you might mount to your bench and cut oversized scraps of plywood to mount them to. Then drill a like hold in all the "mounting plates" and attach to your threaded inserts like this. 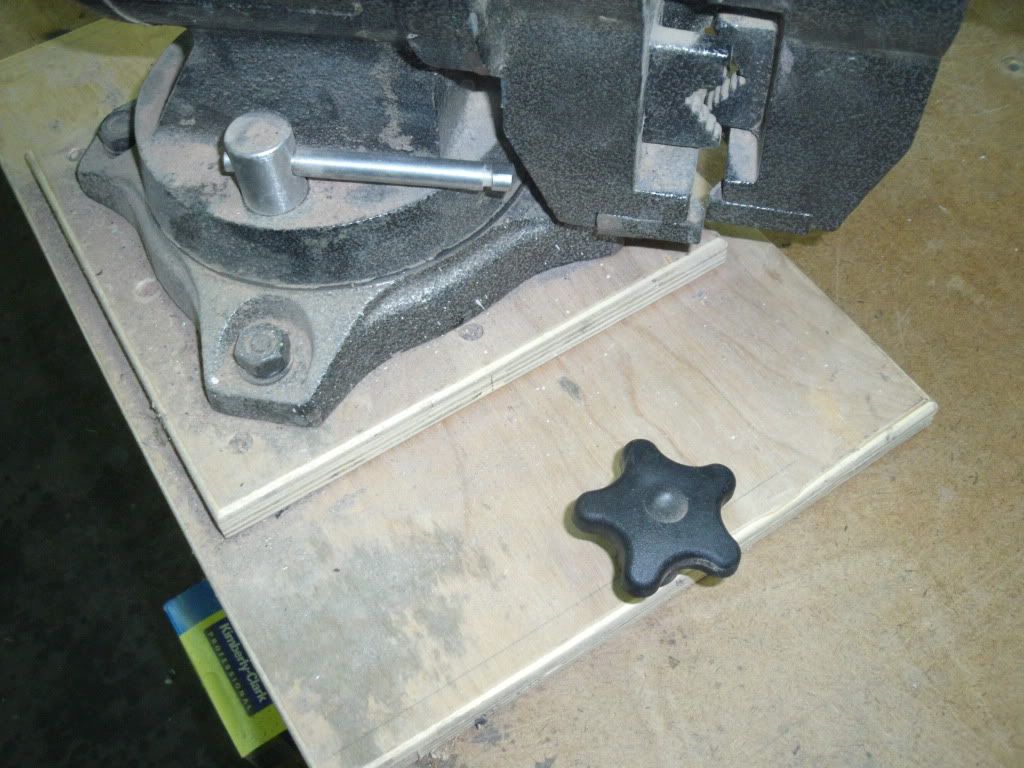
When nothing is mounted to the bench, you can get threaded inserts to fill the hole in the threaded insert to dust and debris does not fall through. 
|
|
|
|
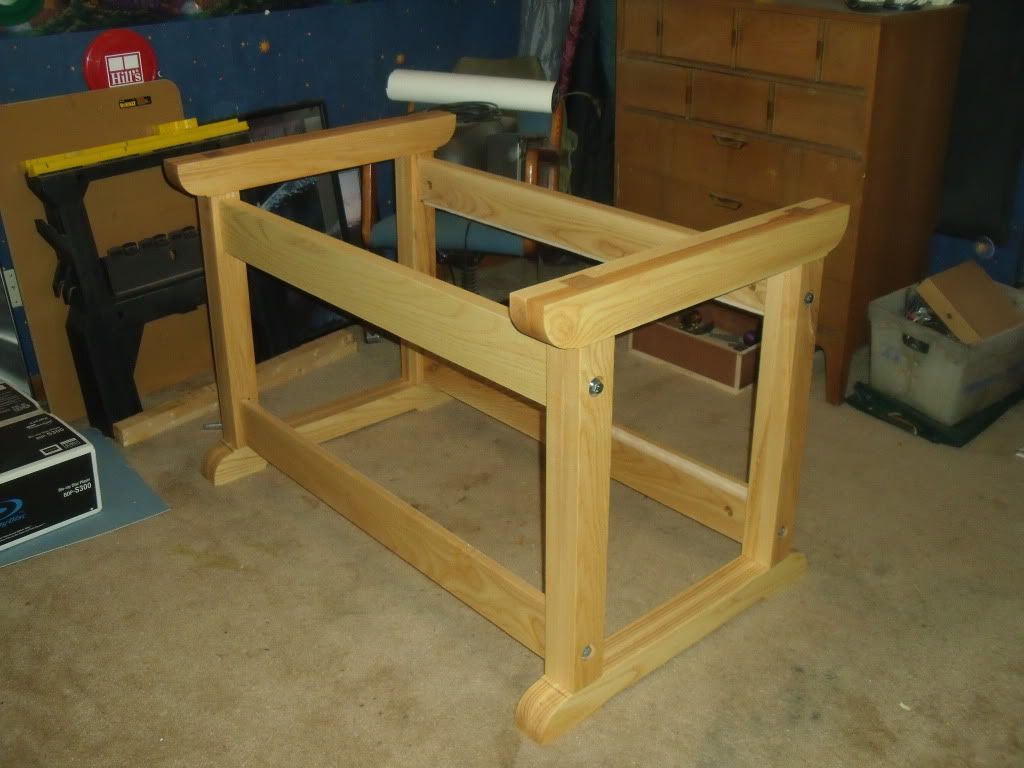
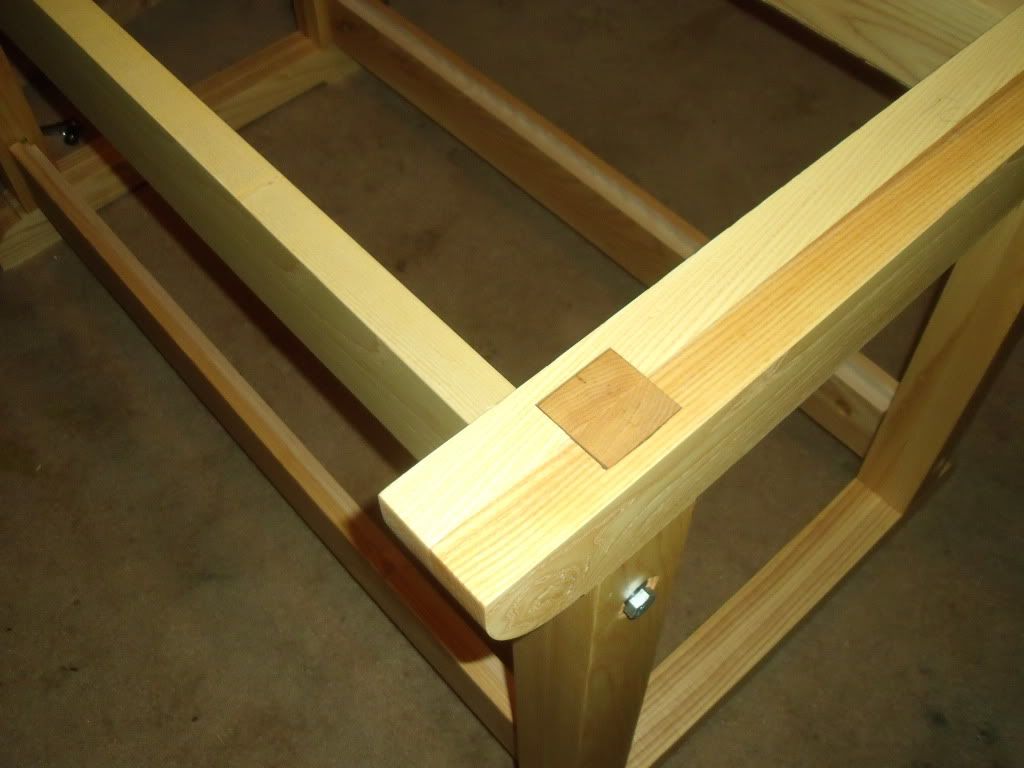
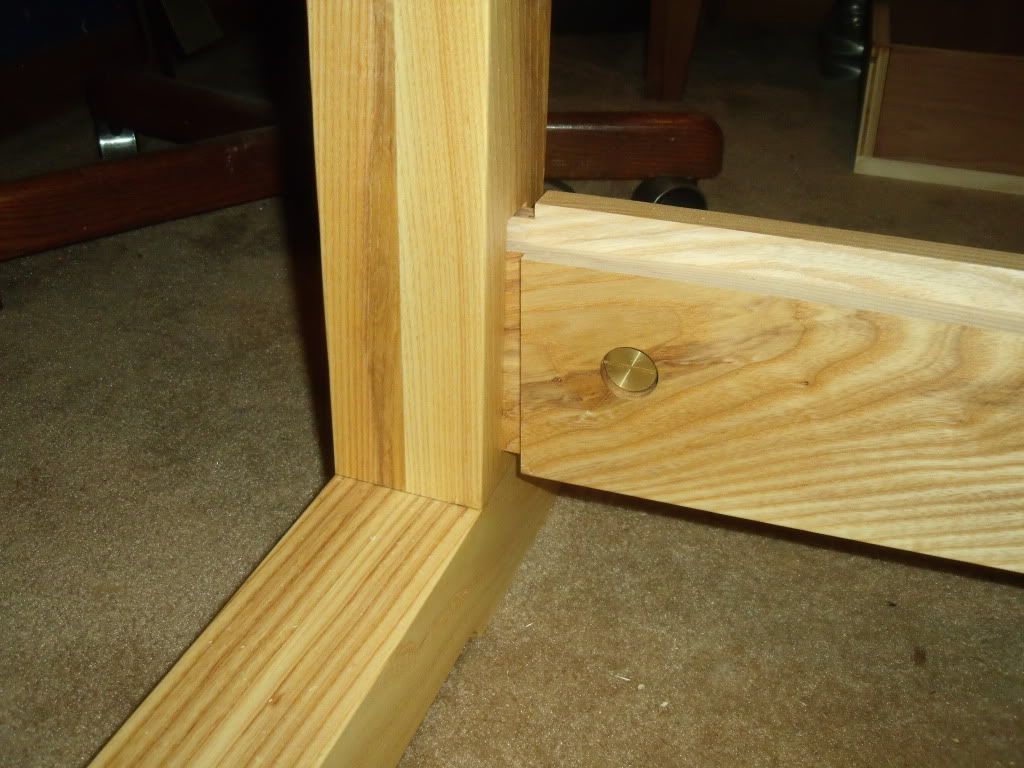
[#3]
Basic free standing bench construction example
|
|
|
|
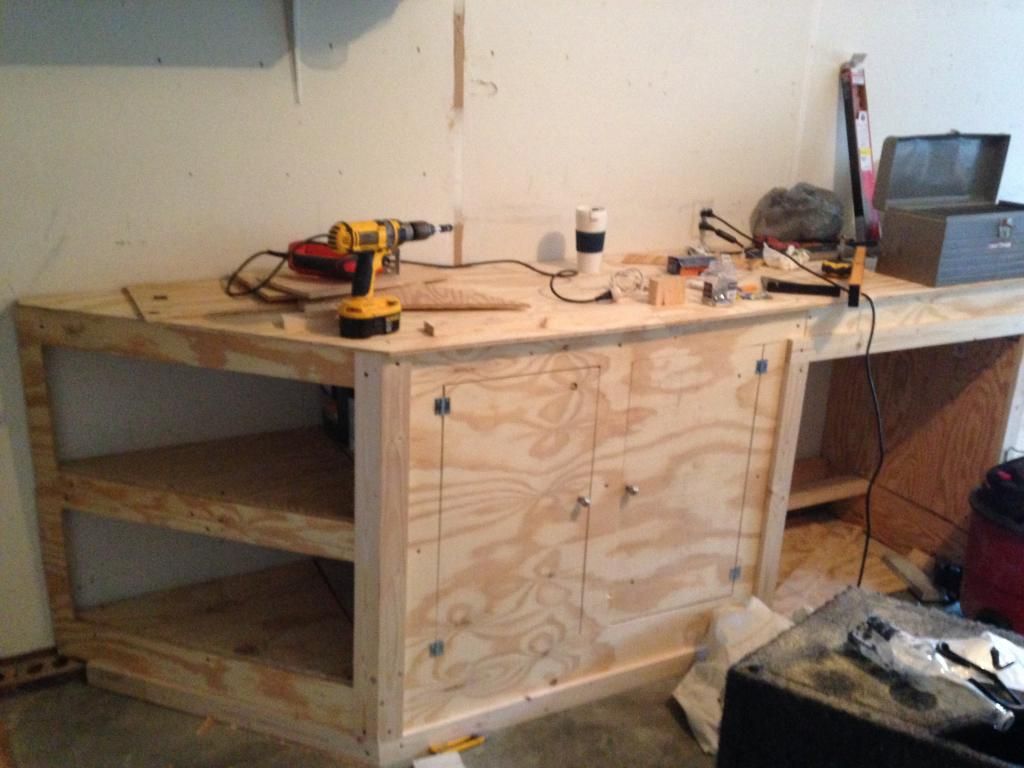
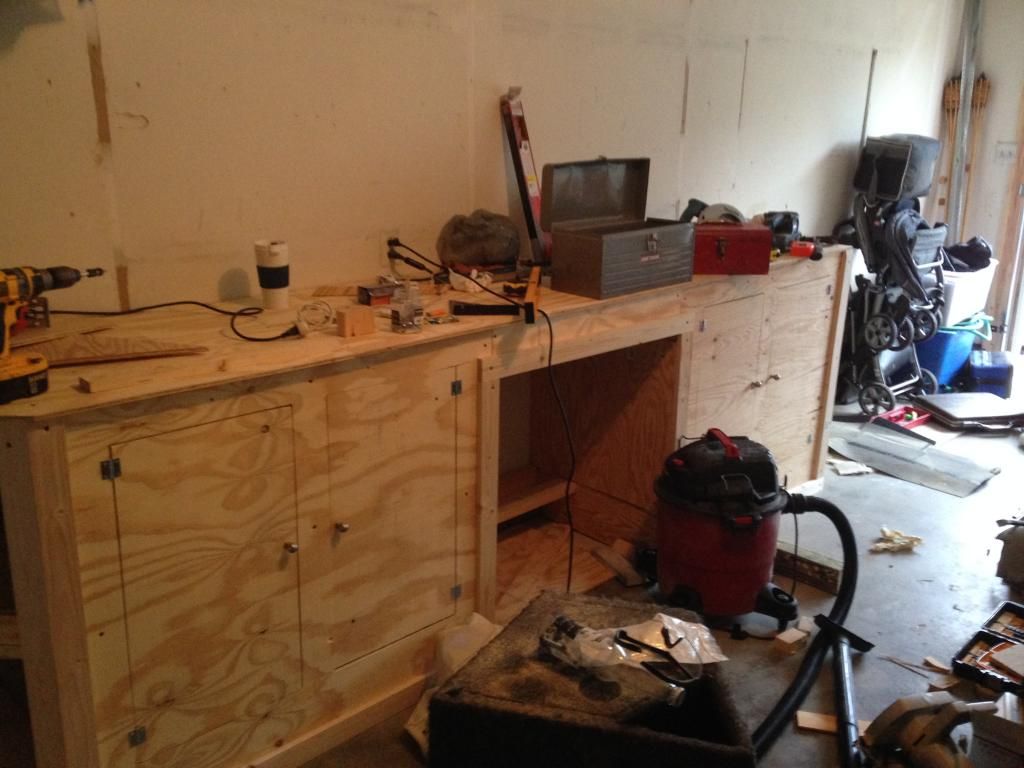
[#4]
Here is my work bench for welding and metal work. I have limited space so I went with a 4' x 2' table that has a receiver tube welded onto it for throwing on a vise, tubing bender, etc. It has a 1" thick steel top so I can bang on it with no worries and the legs are .250 wall 2" x 2" tubing. I need to get some locking casters but a wedge under them works fine for now
Getting the steel top using OSHA standards 
Front view 
Side view. Bars put in for grounding welders and hanging clamps as well as a power strip to reduce the power cord mess. 
Receiver tube with welded on nut to get all of the play out of it. 
Tubing bender attached 
|
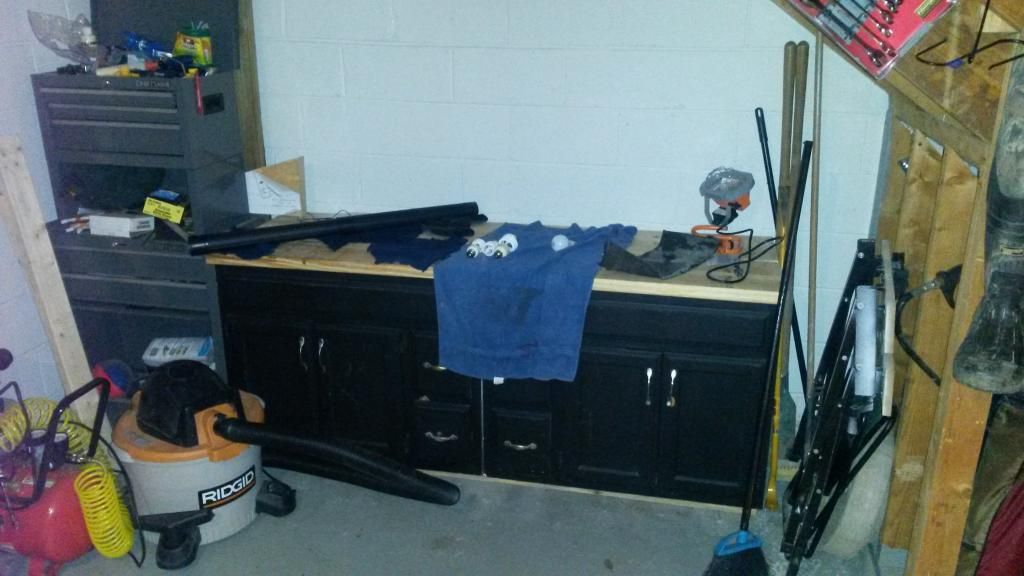
|
|
|
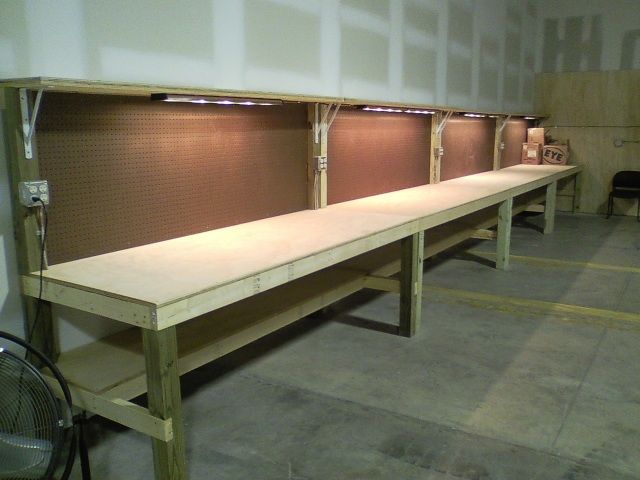
[#5]
32' of work bench with top and lower shelves. Made as four individual benches then fastened together at the ends for versatile future uses.
|
|
|
|
[#6]
Quoted:
32' x 2' of work bench with top and lower shelves. Made as four individual benches then fastened together at the ends for versatile future uses. http://i1077.photobucket.com/albums/w469/jagerbomber1/image_zps8648eda5.jpg More details for the less informed please. Half lap joinery, etc. nice set up. |
|
|
|
[#7]
Quoted:
More details for the less informed please. Half lap joinery, etc. nice set up. Quoted:
Quoted:
32' of work bench with top and lower shelves. Made as four individual benches then fastened together at the ends for versatile future uses. http://i1077.photobucket.com/albums/w469/jagerbomber1/image_zps8648eda5.jpg More details for the less informed please. Half lap joinery, etc. nice set up. The actual measurements of each individual work bench is- top shelve 12" x 8', work surface 32" x 8' and used the cutoff from this for the 16" x 8' lower shelf. Total materials for a single bench- 1 1/2 sheets 3/4" ac (6 sheets did all four with no waste) 3 4x4x8' posts 4 2x4x16' (you will be able to pick out better grade lumber from 16 than 8' stock) 1 sheet pegboard 2x4 framing 2'oc for the lower and work shelf decked with 3/4" ac (would double this on the work surface if used for any heavy work beating, vise, etc.) 4x4 corner posts notched for framework. Ran the back post all the way to the top. Notched in a 2x4 at the post tops then ran a 2x2 ledger down the inside of the back posts and across back of work bench to mount the pegboard to. Top shelf is 2 layers 3/4 ac glued and screwed. The top 2x4 gives it backbone and the heavy duty shelf brackets do good holding up the front. Every thing is screwed together. The trick I've found to really make these type benches solid is to size all my lumber on the table saw then make the post notches a cunt hair less than the board where they have to be bumped in... that and hand picking good straight heart lumber. Very simple, easy to build benches. |
|
|
|
[#8]
Keeping a workbench cleaned off seems to be a full time job for me!
Anyway, our youngest son and his wife bought a house that was devoid of "handyman" accessories one of which was NO workbench! He works full time and although he could build a bench, he had NO time to allot to building one. His mom and I waited till Harbor Freight had their hardwood work bench ( http://www.harborfreight.com/garage-shop/workbench/60-inch-workbench-93454.html ) on sale and bought him one. He was ESTATIC when we delivered it to him. He had that workbench assembled in no time! He called us that night and thanked us for it as now he has a place to not only work on projects but a place to store tools in it too. |
|
|
|
[#9]
I am low on tool $$$, so I built two very basic workbenches (space constrained).
I built two 24x48 "platforms" out of plywood and 2x4s. Then I took 30 inch 2x4s and screwed those on each corner as a leg. One platform is a shelf, other is the table top. Strong, sturdy, and most importantly, cheap. |
|
|
|
[#10]
My small welding bench. Receiver hitch in front for tooling and back if needed to solidly mount to wall.


|
|
|
|
[#11]
Here is a link to my permanent workbench thread in the reloading section:
http://www.ar15.com/forums/t_6_42/350820_Work_Bench_How_To.html |
|
|
|
[#12]
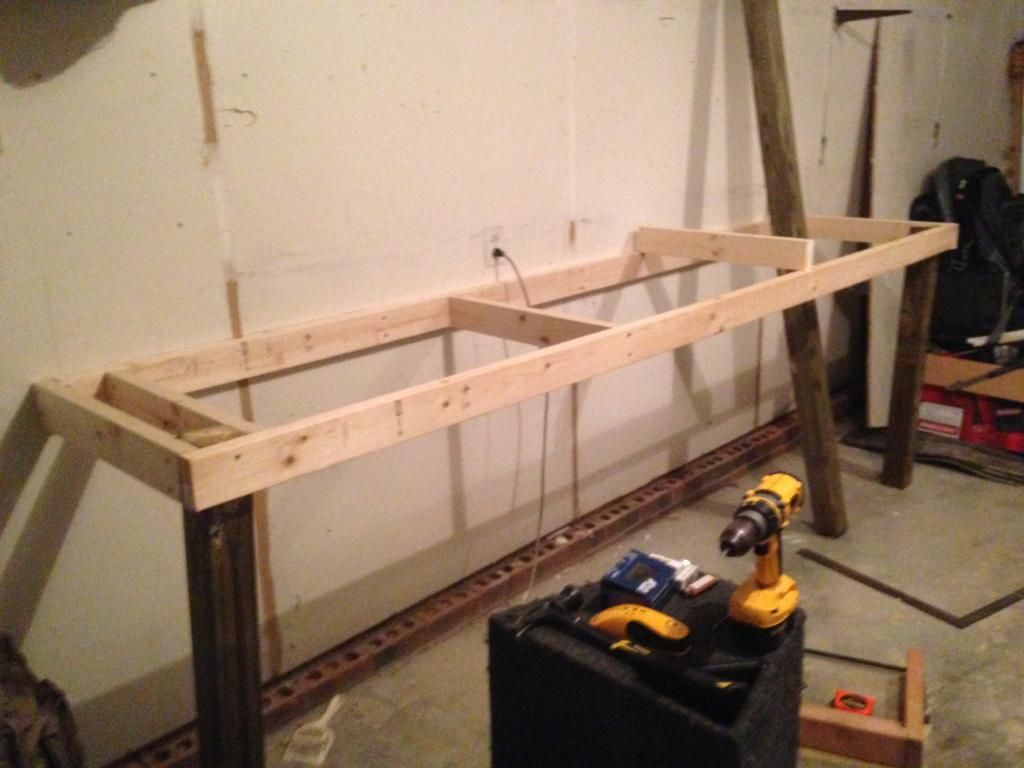
Here is my work bench. 17 feet of heaven. Here is a picture right before I mounted my reloading press.
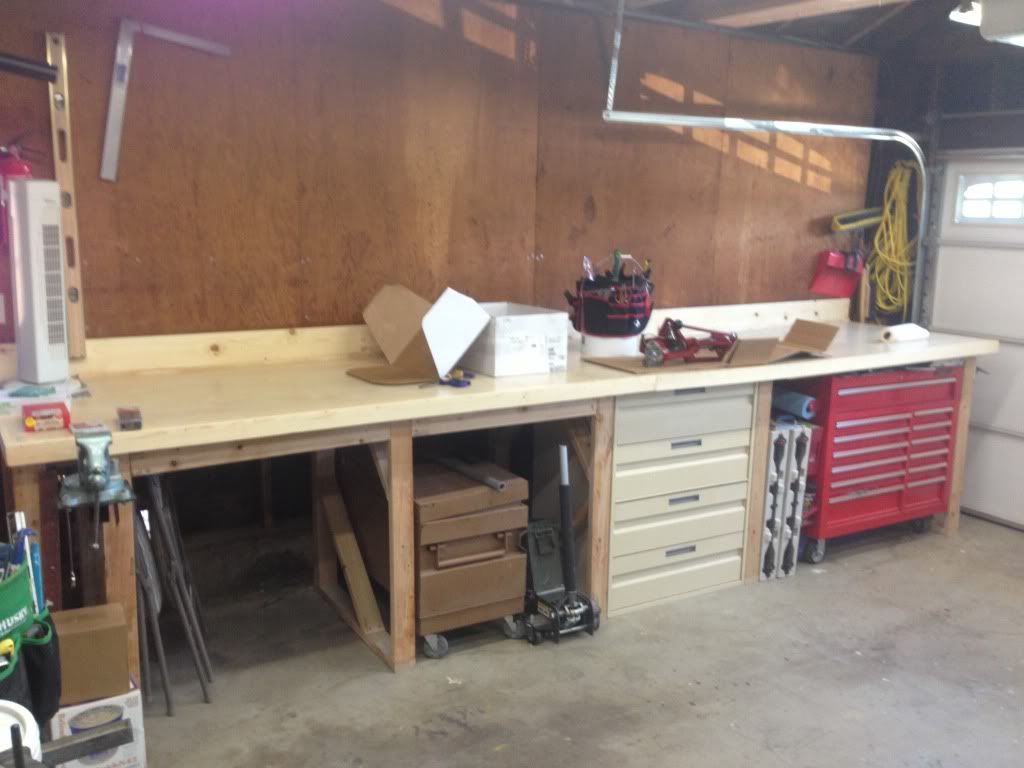
Just got done yesterday installing air lines under the bench. Plus you can see the angle iron my press is bolted through for extra support. Bench top is toe layers of 3/4 ply. 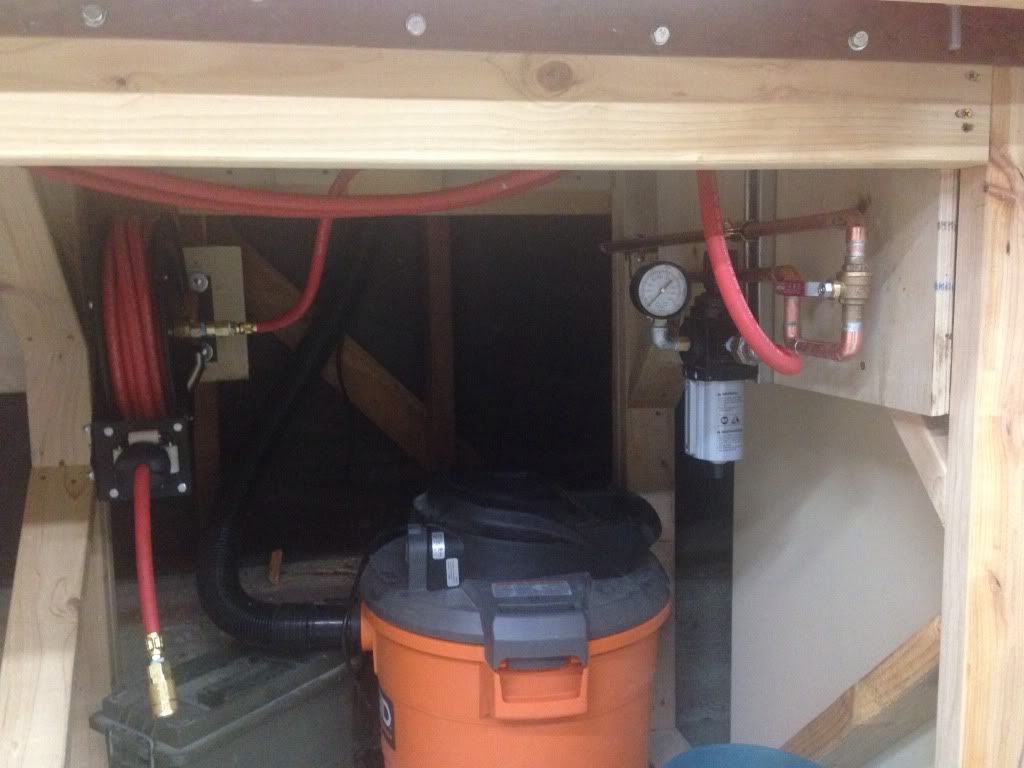
Here is what I use to mount my vise, that way I can use the same location to mount other items like a grinder. 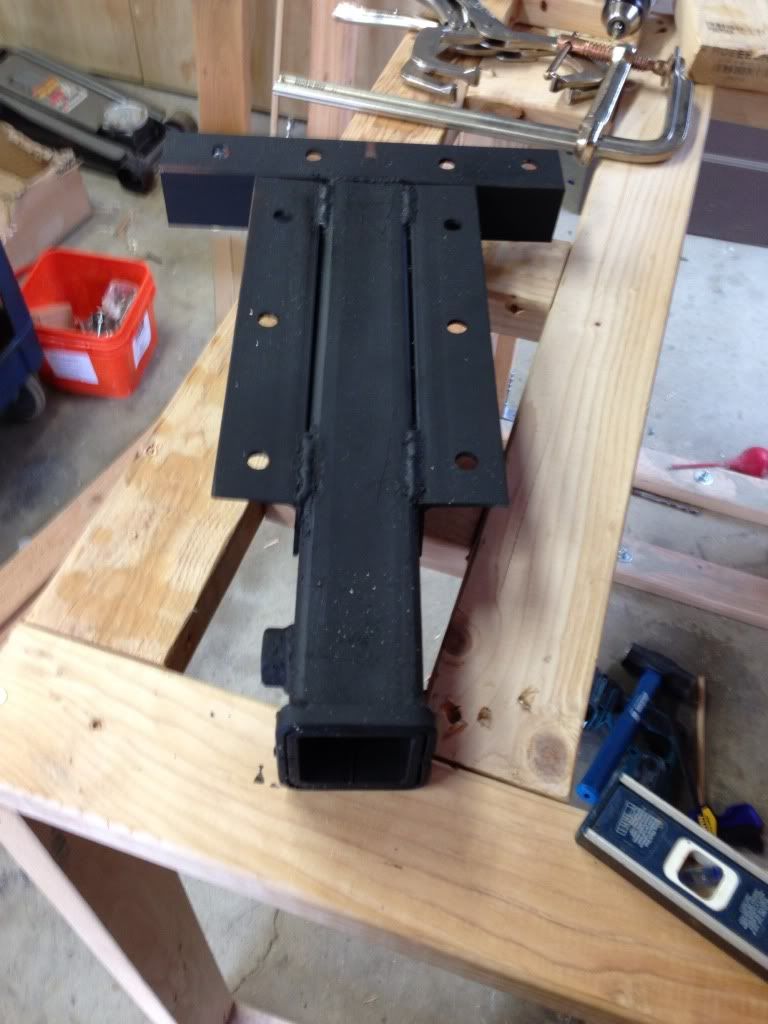
|
|
|
|
[#13]
|
|
|
|
[#14]
I needed to build a bench for my workshop, and a couple weeks ago, I asked the boss if I could have this aluminum box tube and c-channel skid that we weren't using for anything. He gave me the go-ahead, so in the truck it went. I notched the 4x4's to fit the channel snugly, then fastened them 3 sides with some Timberlok screws. They're not cheap, but they're incredibly strong, and you don't need many to finish the job. I braced up the legs with some 2x6 on 3 sides, again with the Timberlok screws, then glued and screwed a piece of 3/4" oak ply down on top. I left it the full 4'x8', as I plan on building some shelving on top at the rear, and doing some lighting too. I'm into it for about $100 so far.


|
|
|
|
[#15]
Quoted:
32' of work bench with top and lower shelves. Made as four individual benches then fastened together at the ends for versatile future uses. http://i1077.photobucket.com/albums/w469/jagerbomber1/image_zps8648eda5.jpg Nice worker Jagerbomber. The one I built is very similar except the shelf under the top comes to the edge and I covered the top with a thin metal like tin but not that soft |
|
|
|
[#16]
Anybody ever get the plans for this bench? |
|
|
|
[#17]
Quoted:
Anybody ever get the plans for this bench? Quoted:
Anybody ever get the plans for this bench? I built it, what do you want to know? |
|
|
|
[#18]
What was the shelve unit he used?
|
|
|
|
[#19]
Some very impressive benches in this thread. I especially like the mobile welding tables using Reese receivers.
But I have a serious question for you guys building the nice wood benches. And I'm not flaming, I'm genuinely curious. Why? It's a work bench, it's that big heavy wood table that you screw stuff down to, accidentally drill into, get covered in paint overspray, burn with welder sparks, and generally beat the crap out of. Why use furniture grade joints and nice wood on such a beast when 2x4's, 2x6's, and drywall screws will produce the same end result. Now don't get me wrong, I do a fair bit of wood working and appreciate an intricate joinery method but in this application it's just  . .
|
|
|
|
[#20]
Quoted:
Some very impressive benches in this thread. I especially like the mobile welding tables using Reese receivers. But I have a serious question for you guys building the nice wood benches. And I'm not flaming, I'm genuinely curious. Why? It's a work bench, it's that big heavy wood table that you screw stuff down to, accidentally drill into, get covered in paint overspray, burn with welder sparks, and generally beat the crap out of. Why use furniture grade joints and nice wood on such a beast when 2x4's, 2x6's, and drywall screws will produce the same end result. Now don't get me wrong, I do a fair bit of wood working and appreciate an intricate joinery method but in this application it's just .
A woodworker's workbench is a tool. You don't abuse your tools. I have secondary work surfaces in my shop that are designed for abuse. Most notably are the benches with the replaceable 1/4" hardboard surfaces. |
|
|
|
[#21]
Quoted:
A woodworker's workbench is a tool. You don't abuse your tools. I have secondary work surfaces in my shop that are designed for abuse. Most notably are the benches with the replaceable 1/4" hardboard surfaces. Quoted:
Quoted:
Some very impressive benches in this thread. I especially like the mobile welding tables using Reese receivers. But I have a serious question for you guys building the nice wood benches. And I'm not flaming, I'm genuinely curious. Why? It's a work bench, it's that big heavy wood table that you screw stuff down to, accidentally drill into, get covered in paint overspray, burn with welder sparks, and generally beat the crap out of. Why use furniture grade joints and nice wood on such a beast when 2x4's, 2x6's, and drywall screws will produce the same end result. Now don't get me wrong, I do a fair bit of wood working and appreciate an intricate joinery method but in this application it's just .
A woodworker's workbench is a tool. You don't abuse your tools. I have secondary work surfaces in my shop that are designed for abuse. Most notably are the benches with the replaceable 1/4" hardboard surfaces. I can see that method of thinking. And that is precisely why I "floor" the tops of my benches with 2x6s. Cheap, sturdy, back the screws out and replace as needed. I was just pointing out that some of those benches look good enough to use as tables in a home, for me that's a waste of time and resources. 
|
|
|
|
[#22]
|
|
|
|
[#23]
Screw a 2x4 into the studs of your wall. Build a frame with 2x4s off of that first one (standard box apx 12-16" apart). Make the box 2' deep and screw the legs into the frame (if you plan on mounting a vise, put the legs on the GROUND as that will distribute the weight to a concrete floor. If you want max space underneath, figure out your angles and screw the legs into the wall studs with lag bolts).
For the top, MDF. Cheap, durable and best yet, you get 4 tops out of 1 sheet. Cut the 4x8 sheet of MDF in half length wise (should be 2'). Place BOTH haves on the frame and screw it in. Make sure you measure very well here before you drill for the screws and everything is PERFECTLY square and asymmetric. After you use the bench and the top is ugly or worn, flip the MDF over. New top. When the 2nd is ugly or worn, unscrew it and toss it. You have a fresh one right under it (that second piece you put under the first). Total cost for a STRONG 8'x2' bench that will outlast a lifetime? Maybe $40 between a sheet of MDF, 5 2x4s and some screws. |
|
|
|
[#24]
Great picture here and some great advice. I just have one question. I have a concrete room in my basement. What's the best way to attach the back of the frame to the concrete wall ?Thanks
|
|
|
|
[#25]
Depends... Ram-set powdered actuated fasteners can work. Tapcon screws also work well but require a drilled hole. Red heads for a really heavy duty application, though threaded rod epoxied in a hole is just as strong.
This is for poured concrete. I would not anchor anything to cinder block. |
|
|
|
[#26]
I made mine out of some pallet rack that was being scrapped. Put it together and attached a sheet of .25 steel. The top is at 43" which is the perfect height for me standing.
Forgive the wires, I am in the middle of rewiring the shop. 
I attached caster by welding them to some 4" angle and bolting them to the load beam. 

I keep a 2x3 on a folding table for welding small parts. 
|
|
|
|
[#27]
Hey guys, her is mine I finished up last weekend.
Up until then it was plywood rack , and tge back side of it still is. Turned out ok , my wife said no more cleaning guns On the living room floor 


|
|
|
|
[#28]
Quoted:
Hey guys, her is mine I finished up last weekend. Up until then it was plywood rack , and tge back side of it still is. Turned out ok , my wife said no more cleaning guns On the living room floor <a href="http://s1271.photobucket.com/user/TRIMDAD/media/5CA9C08B-3F90-4B32-9604-E497F2182813.jpg.html" target="_blank">http://i1271.photobucket.com/albums/jj633/TRIMDAD/5CA9C08B-3F90-4B32-9604-E497F2182813.jpg</a> <a href="http://s1271.photobucket.com/user/TRIMDAD/media/8C7738B4-04A8-40E3-A010-B273D497F38E.jpg.html" target="_blank">http://i1271.photobucket.com/albums/jj633/TRIMDAD/8C7738B4-04A8-40E3-A010-B273D497F38E.jpg</a> <a href="http://s1271.photobucket.com/user/TRIMDAD/media/86F0C0A4-7C76-4DCF-ADB7-AC0C002D6A78.jpg.html" target="_blank">http://i1271.photobucket.com/albums/jj633/TRIMDAD/86F0C0A4-7C76-4DCF-ADB7-AC0C002D6A78.jpg</a> <a href="http://s1271.photobucket.com/user/TRIMDAD/media/76E55EAC-C1D1-436C-B95F-7FAAB4700109.jpg.html" target="_blank">http://i1271.photobucket.com/albums/jj633/TRIMDAD/76E55EAC-C1D1-436C-B95F-7FAAB4700109.jpg</a> Hey that's really nice. Noticed you have it on casters. Any concern about lack of caster support in the middle? |
|
|
|
[#29]
Quoted:
Hey that's really nice. Noticed you have it on casters. Any concern about lack of caster support in the middle? Quoted:
Quoted:
Hey guys, her is mine I finished up last weekend. Up until then it was plywood rack , and tge back side of it still is. Turned out ok , my wife said no more cleaning guns On the living room floor <a href="http://s1271.photobucket.com/user/TRIMDAD/media/5CA9C08B-3F90-4B32-9604-E497F2182813.jpg.html" target="_blank">http://i1271.photobucket.com/albums/jj633/TRIMDAD/5CA9C08B-3F90-4B32-9604-E497F2182813.jpg</a> <a href="http://s1271.photobucket.com/user/TRIMDAD/media/8C7738B4-04A8-40E3-A010-B273D497F38E.jpg.html" target="_blank">http://i1271.photobucket.com/albums/jj633/TRIMDAD/8C7738B4-04A8-40E3-A010-B273D497F38E.jpg</a> <a href="http://s1271.photobucket.com/user/TRIMDAD/media/86F0C0A4-7C76-4DCF-ADB7-AC0C002D6A78.jpg.html" target="_blank">http://i1271.photobucket.com/albums/jj633/TRIMDAD/86F0C0A4-7C76-4DCF-ADB7-AC0C002D6A78.jpg</a> <a href="http://s1271.photobucket.com/user/TRIMDAD/media/76E55EAC-C1D1-436C-B95F-7FAAB4700109.jpg.html" target="_blank">http://i1271.photobucket.com/albums/jj633/TRIMDAD/76E55EAC-C1D1-436C-B95F-7FAAB4700109.jpg</a> Hey that's really nice. Noticed you have it on casters. Any concern about lack of caster support in the middle? Thanks ! It's a little bit of overkill but it will work . It definatly looks like it would be a problem doesn't it. When I built it as a plywood rack years ago I made it pretty stout . The middle section is two sheets of 3/4 thick with a stupid amount if brace work Underneath. . This is why it looks so tall - 5" castors sitting under. 5" thick braces . It doesn't sag at all , Down side is it heavy , really heavy!!! It take two people to move it in and out .. But the wife is happy
|
|
|
|
[#30]
Here's my current build:
1) Raw materials

2) Milling (all with hand tools and a hell of a lot of elbow grease!) 
3) Frame 
4) Frame (Landing Gear Down)! 
5) Detail of Landing Gear (Retracted under frame) 
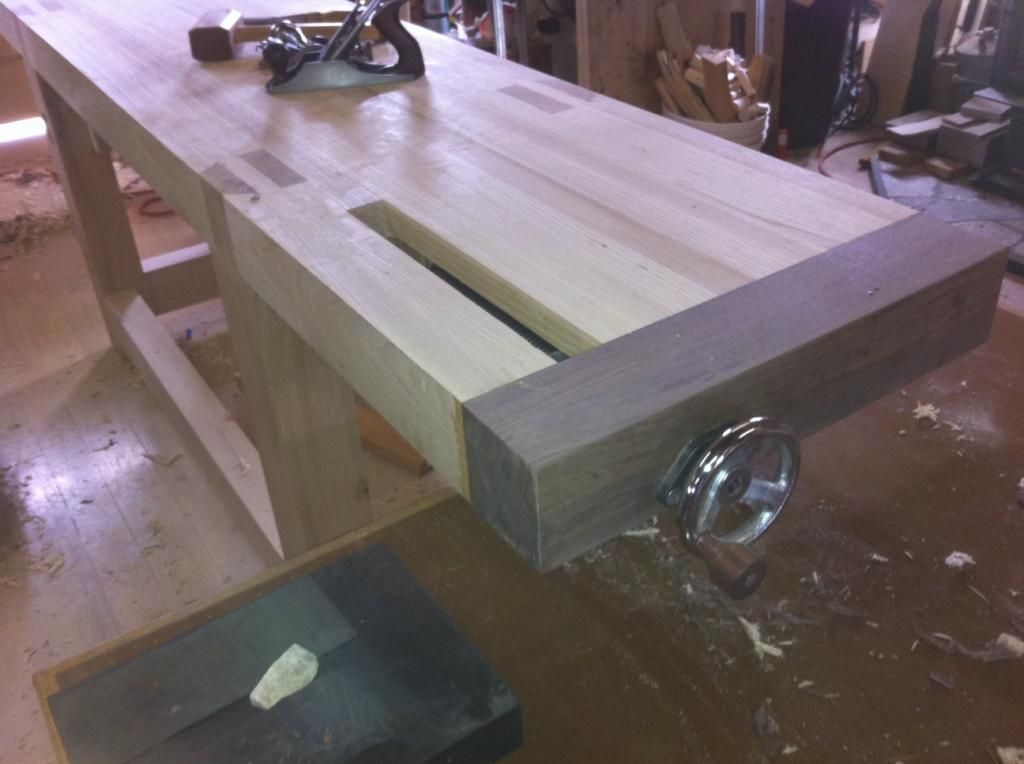
6) Detail of Mounting interface to Benchtop (wooden bushing w/ through hole for lag screw, and rear slotted hole for lag screw allows for seasonal "movement of slab benchtop) 
7) Benchtop mounted, dog holes bored, ...Vices installed... What I have left to do (create and install a "chop" for front vice, and create a "tool tray" for big gaping area in the back!) 
|
|
|
|
[#31]
This is what ive been working on this week.
|
|
|
|
[#32]
Lots of great work in here. I'm taking notes for my upcoming work station build!
|
|
|
|
[#33]
Nice! Youse guys got skillz.

|
|
|
|
[#34]
Little quickie workbench I built last week. I realized I needed some more space when I kept using the top of one my garbage cans to put stuff on.
I needed to keep one of the garbage cans so I incorporated it into the bench. Also put casters on the legs do I could move it around. I kept the bottom shelf low so I would have room to put a tool chest under the bench. 


|
|
|
|
[#35]
My father picked this up for me for $75 it came from a schools shop class. Have added a second top on it since this picture to mount the vise on so the original top will stay nice.

|
|
|
|
[#36]
I made it up as I went - I am not a woodworker.
12' long, 32" deep, 43" high (I wanted it high enough to fit the table saw under it - the little people complain that they need something to stand on). Metal mesh shelves (from Menards) were extras I had leftover from a different project. The top is a 4'x8' sheet of 3/4" tongue & groove plywood cut into three 32" x 48" pieces (which really gives you 32" x 47.5" so I ended up 1.5" short on the end). Instead of traditional lags I used HeadLok flathead lags. 


|
|
|
|
[#37]
Finished mine, thought I had more progress pictures but they must not have uploaded to my pb account


Can't find the pictures of making the top, I ripped 2x4's to 3" and glued/screwed them together and clamped over night, then just sanded the tops. Came out better than I expected 
All done 

|
|
|
|
[#38]
It doesn't have to be anything fancy. I happened upon a guy taking these cabinets to the dump. I got them from him and hauled them home. The top is 2X10 and plenty strong. I connected them together with a 2X4 frame on the bottom. I'll eventually put casters on them. Excuse the mess, I'm drying these rags out after they got a little oily.
|
|
|
|
[#39]
Quoted:
Here's my current build: 1) Raw materials
http://i61.tinypic.com/muk9jk.png 2) Milling (all with hand tools and a hell of a lot of elbow grease!) http://i58.tinypic.com/2vhzmhl.png 3) Frame http://i59.tinypic.com/2ppbygp.png 4) Frame (Landing Gear Down)! http://i57.tinypic.com/1qg0op.png 5) Detail of Landing Gear (Retracted under frame) http://i62.tinypic.com/30j1lpv.png 6) Detail of Mounting interface to Benchtop (wooden bushing w/ through hole for lag screw, and rear slotted hole for lag screw allows for seasonal "movement of slab benchtop) http://i62.tinypic.com/21od7pz.png 7) Benchtop mounted, dog holes bored, ...Vices installed... What I have left to do (create and install a "chop" for front vice, and create a "tool tray" for big gaping area in the back!) http://i59.tinypic.com/s66k95.png
This is awesome. I need a proper woodworking bench. Im currently using a heavily modded (ie cheap) HF bench thats not TOO bad. Not in the same ballpark as that. But I want to build my own and am still collecting tools to do so. |
|
|
|
[#40]
Quoted:
This is awesome. I need a proper woodworking bench. Im currently using a heavily modded (ie cheap) HF bench thats not TOO bad. Not in the same ballpark as that. But I want to build my own and am still collecting tools to do so. Quoted:
This is awesome. I need a proper woodworking bench. Im currently using a heavily modded (ie cheap) HF bench thats not TOO bad. Not in the same ballpark as that. But I want to build my own and am still collecting tools to do so. This book is a very good resource, with several designs shown. http://www.shopwoodworking.com/the-workbench-design-book I built the roubo design. It is solid, and does not rack in any direction. Ash top, red oak legs and strecthers, draw bored mortise and tenoned. Legs tenoned and dovetailed to top. When photos were taken last winter hadn't installed the leg vise yet. Also put a shelf down at the stretchers. 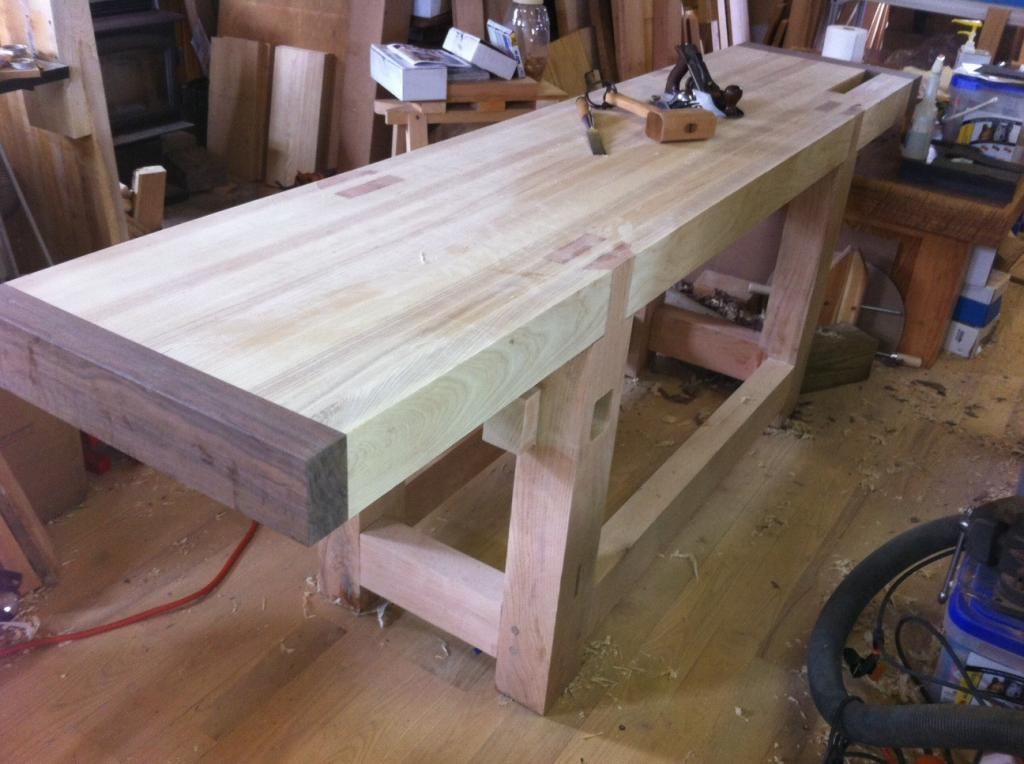
|
|
|
|
[#41]
Quoted: This book is a very good resource, with several designs shown. http://www.shopwoodworking.com/the-workbench-design-book I built the roubo design. It is solid, and does not rack in any direction. Ash top, red oak legs and strecthers, draw bored mortise and tenoned. Legs tenoned and dovetailed to top. When photos were taken last winter hadn't installed the leg vise yet. Also put a shelf down at the stretchers. http://i113.photobucket.com/albums/n219/jonquinn66/imagejpg2_zps9c59cd5a.jpg http://i113.photobucket.com/albums/n219/jonquinn66/imagejpg1_zps17950503.jpg Quoted: Quoted: This is awesome. I need a proper woodworking bench. Im currently using a heavily modded (ie cheap) HF bench thats not TOO bad. Not in the same ballpark as that. But I want to build my own and am still collecting tools to do so. This book is a very good resource, with several designs shown. http://www.shopwoodworking.com/the-workbench-design-book I built the roubo design. It is solid, and does not rack in any direction. Ash top, red oak legs and strecthers, draw bored mortise and tenoned. Legs tenoned and dovetailed to top. When photos were taken last winter hadn't installed the leg vise yet. Also put a shelf down at the stretchers. http://i113.photobucket.com/albums/n219/jonquinn66/imagejpg2_zps9c59cd5a.jpg http://i113.photobucket.com/albums/n219/jonquinn66/imagejpg1_zps17950503.jpg |
|
|
|
[#42]
Quoted:
That is not a bench, that's a work of art, really nice work. Quoted:
Quoted:
Quoted:
This is awesome. I need a proper woodworking bench. Im currently using a heavily modded (ie cheap) HF bench thats not TOO bad. Not in the same ballpark as that. But I want to build my own and am still collecting tools to do so. This book is a very good resource, with several designs shown. http://www.shopwoodworking.com/the-workbench-design-book I built the roubo design. It is solid, and does not rack in any direction. Ash top, red oak legs and strecthers, draw bored mortise and tenoned. Legs tenoned and dovetailed to top. When photos were taken last winter hadn't installed the leg vise yet. Also put a shelf down at the stretchers. http://i113.photobucket.com/albums/n219/jonquinn66/imagejpg2_zps9c59cd5a.jpg http://i113.photobucket.com/albums/n219/jonquinn66/imagejpg1_zps17950503.jpg Agreed! Very nice JQ. Thanks for the link. I believe I have seen that book before and I currently have "The Workbench Book" by Scott Landis. But it is not so much a design book as a picture/info book. Lots of history and good ideas. Yours is great. |
|
|
|
[#43]
I have the Landis one too and agree that is is more of a photo album. There are some nice ones in his book (i will try to make a smaller sized shaker bench this next summer). I Still have lots of 8/4 ash left from the big bench, for the top. But the Schwarz book is the one to use for building. He did an earlier version that may now be out of print with a few other styles (and drawings).
|
|
|
|
[#44]
Here's how I set up my shop, on my lowly enlisted man's salary. As many free/recycled/repurposed materials as possible. My main workbench is a 32" solid core door set on top of two 36" kitchen cabinets that my friend was ditching from a remodel. Door was free from work. Covered the knob/lock hole with the fire exit sign that used to be on the door. It's ugly, but it is solid and heavy, and I don't care if I beat it up. Nested underneath the bench is a trash day special kitchen table that I added casters to, I use it to roll out in the driveway when I want to paint projects, sand, etc. Easily moved around and I couldn't care less if I destroy it. Bench to the right is a knockdown design, frame is 1x4, supporting ends fold inwards like cabinet doors, and the top folds down over them. Light duty, but works for what it was designed for.

Just finished this one, top is a solid core 36" door, on 4x4's with 2x6 frame on 3" casters. Will soon be putting a sheet of hardboard over the top and trimming with oak to cover the knob/lock holes and hinge mortises. Set it at 34" high, serves as a good assembly bench. 
|
|
|
|
[#45]
Here's my bench I made the other night. Went with a 3/4'' top but should've gone thicker. I'm already thinking of all the shit I will be putting on it and I want to build another one.
 |
|
|
|
[#46]
Here is my steel working bench. The top is 1/2" thick 6061T6 aluminum. The frame is medium wall 2" and the casters have stood up to anything I have pounded on. I even bent my vice and the wheels are fine.
 Here is my first reloading bench:  Here is my second reloading bench made from Home Depot kitchen cabinets:  Still looking for a current bench photo............. |
|
|
|
[#47]
Quoted:
Hey guys, her is mine I finished up last weekend. Up until then it was plywood rack , and tge back side of it still is. Turned out ok , my wife said no more cleaning guns On the living room floor <a href="http://s1271.photobucket.com/user/TRIMDAD/media/5CA9C08B-3F90-4B32-9604-E497F2182813.jpg.html" target="_blank">http://i1271.photobucket.com/albums/jj633/TRIMDAD/5CA9C08B-3F90-4B32-9604-E497F2182813.jpg</a> <a href="http://s1271.photobucket.com/user/TRIMDAD/media/8C7738B4-04A8-40E3-A010-B273D497F38E.jpg.html" target="_blank">http://i1271.photobucket.com/albums/jj633/TRIMDAD/8C7738B4-04A8-40E3-A010-B273D497F38E.jpg</a> <a href="http://s1271.photobucket.com/user/TRIMDAD/media/86F0C0A4-7C76-4DCF-ADB7-AC0C002D6A78.jpg.html" target="_blank">http://i1271.photobucket.com/albums/jj633/TRIMDAD/86F0C0A4-7C76-4DCF-ADB7-AC0C002D6A78.jpg</a> <a href="http://s1271.photobucket.com/user/TRIMDAD/media/76E55EAC-C1D1-436C-B95F-7FAAB4700109.jpg.html" target="_blank">http://i1271.photobucket.com/albums/jj633/TRIMDAD/76E55EAC-C1D1-436C-B95F-7FAAB4700109.jpg</a> What wood did you use on this ? I need to make doors for my cabnets and this would work for me so I'm not making shaker style ones |
|
|
|
[#48]
|
|
|
|
[#49]
Jealously has a name: Mine
Nice!!!!!!! Bench. Quoted:
This book is a very good resource, with several designs shown. http://www.shopwoodworking.com/the-workbench-design-book I built the roubo design. It is solid, and does not rack in any direction. Ash top, red oak legs and strecthers, draw bored mortise and tenoned. Legs tenoned and dovetailed to top. When photos were taken last winter hadn't installed the leg vise yet. Also put a shelf down at the stretchers. http://i113.photobucket.com/albums/n219/jonquinn66/imagejpg2_zps9c59cd5a.jpg http://i113.photobucket.com/albums/n219/jonquinn66/imagejpg1_zps17950503.jpg Quoted:
Quoted:
This is awesome. I need a proper woodworking bench. Im currently using a heavily modded (ie cheap) HF bench thats not TOO bad. Not in the same ballpark as that. But I want to build my own and am still collecting tools to do so. This book is a very good resource, with several designs shown. http://www.shopwoodworking.com/the-workbench-design-book I built the roubo design. It is solid, and does not rack in any direction. Ash top, red oak legs and strecthers, draw bored mortise and tenoned. Legs tenoned and dovetailed to top. When photos were taken last winter hadn't installed the leg vise yet. Also put a shelf down at the stretchers. http://i113.photobucket.com/albums/n219/jonquinn66/imagejpg2_zps9c59cd5a.jpg http://i113.photobucket.com/albums/n219/jonquinn66/imagejpg1_zps17950503.jpg |
|
|
|
[#50]
Tag
|
|
|
 Win a FREE Membership!
Sign up for the ARFCOM weekly newsletter and be entered to win a free ARFCOM membership. One new winner* is announced every week!
You will receive an email every Friday morning featuring the latest chatter from the hottest topics, breaking news surrounding legislation, as well as exclusive deals only available to ARFCOM email subscribers.

AR15.COM is the world's largest firearm community and is a gathering place for firearm enthusiasts of all types.
From hunters and military members, to competition shooters and general firearm enthusiasts, we welcome anyone who values and respects the way of the firearm.

Subscribe to our monthly Newsletter to receive firearm news, product discounts from your favorite Industry Partners, and more.
Copyright © 1996-2024 AR15.COM LLC. All Rights Reserved.
Any use of this content without express written consent is prohibited.
AR15.Com reserves the right to overwrite or replace any affiliate, commercial, or monetizable links, posted by users, with our own.


