|
Posted: 3/22/2017 6:39:01 PM EDT
I'm almost done with the basement media room rebuild v3. (well, figuratively done...it's never really done.
 ) )
I might do a build thread and massive pic dump is anyone is interested. 
|
|
|
|
[#1]
I am. That looks nice!
|
|
|
|
[#2]
oh yeah, let's see 'em
|
|
|
|
[#3]
Yep, bring it on..! :)
BTW, I have a 144" diag AT screen in my theater room. Built it myself. What size is yours?? Looks great! |
|
|
|
[#4]
Quoted:
I am. That looks nice! |
|
|
|
[#5]
Quoted:
Yep, bring it on..! :) BTW, I have a 144" diag AT screen in my theater room. Built it myself. What size is yours?? Looks great! If I do another screen, it will be a dedicated 2.35:1 screen as opposed to 16:9. |
|
|
|
[#6]
In the beginning....
We bought this house 15 years ago and I knew immediately I was going to make the basement into a home theater/media room. I told my wife I would do whatever she wanted in the other rooms in the house (sans my home office), but I had 100% say on the basement. Foolishly, she agreed. 
This was the basement as it was when we initially viewed the house and made an offer. 

Version 1.0 began almost immediately. It was all pretty low budget back them. InFocus X1 800x600 projector, Screen Goo painted screen, Yamaha RX-V1400 AVR and Polk speakers (7.1) I think I even started out with a Jensen powered subwoofer.
Layout and planning of components. 


No more lawn chairs! 
Near completion of version 1.0 


Screenshot of Madden from Gamecube on Infocus X1/Screen Goo painted screen (I think the original screen size was around 90") 
Version 2.0 began when the Xbox 360 came out. The InFocus X1 was a good little projector to get my feet wet and it worked well for SD DVD and the Gamecube, but when we started to getting into 720P/1080i content, the X1 started to show it's flaws. About the same time I started to get some samples of screen material from different companies and would tape them onto the wall for a side to side comparison with the Screen Goo. It was a pretty dramatic difference so I started hunting for a projector and screen combo for my next upgrade. I ended up with a Optoma HD72 and a 106" Silver Ticket Grey fixed screen. The differences were fairly dramatic. The image was extremely bright from the HD72 and seemed to pop off the screen. While it's always difficult to tell the differences from a photograph of a projected image, you can see a clear distinction between the shots below of Elder Scrolls:Oblivion and the Xbox Live screen and the shot of Madden above which was from the InFocus/Screen Goo combo. (I can't find any pics of actual movies on the X1 or the HD72.) Version 2.0 HD72 and Silver Ticket 106" fixed grey screen 

The HD72 would only last a couple of years until the Format Wars (HD-DVD vs Blu-ray) really heated up. There was nothing wrong with the HD72, but it was a native 720P projector and I needed my 1080P fix. So like any good junkie chasing his next high, I went searching for a new drug. (The HD72 would still pull outdoor duties. I have a 300" outdoor screen and we watch select college football games on it in the fall.) For Version 2.5, I upgraded the projector to the Epson Pro Cinema 1080UB. It was native 1080P projector sporting a 50,000:1 contrast ratio that I think actually may have lived up to it's claimed number. The Epson and the Silver Ticket Grey screen complimented each other almost perfectly. Extremely bright and vivid image with fantastic blacks. Black levels were the Achilles heel of most projectors back then. Ultimately, this combo would last almost 7 years before being retired. Aside from 3 replacement bulbs from heavy use, the Epson was a hassle-free machine up until the time I sold it a month or so ago. Epson Pro Cinema 1080UB Projector and ceiling mount 
View from behind projector 
A couple screen shots from the Epson Pro Cinema 1080UB/Silver Ticket fixed screen 


Thoughout these upgrades, most of the room stayed the same. I upgraded the sub to a Velodyne CHT-12 400 watt 12" sub fairly early, added a popcorn machine, acquired the Mr and Mrs Pac Man Pinball machine from my parents when they retired and moved out west and changed some play back and gaming devices in the rack. But for the most part, the room largely remained unchanged. That was soon to change.
|
|
|
|
[#7]
For version 3.0, I was ready to start from scratch. The only thing I was going to leave in place were the physical walls and general layout of the room. Everything else was fair game.
I had a couple of things that I wanted to add: -4K HDR or as close as I could get given a budget on the PJ -Dolby Atmos/DTS:X -Dedicated gaming area -Place for turntable(s) -Add Smart Home aspects for lighting and A/V control I also had some issues that I needed to address in v3.0: -Remove bar area and corner TV shelf -Remove basement window -Remove mantle above gas fireplace -Numerous LFE/bass issues (weak bass lacking punch, desire to go down to the 20Hz range, nulls throughout seating area, etc.) -Muddy dialogue from center channel -Poor discrete performance from surrounds -General messy sound stage caused by numerous reflections, echoes, and flutters in the room -Out of physical media storage space -Material upgrades such as carpet, doors and trim I started by getting in most of the new equipment. Like a kid on Christmas! 
I like big subs and I cannot lie. 
New Epson 5040UB sitting next to the old Epson 1080UB. Quite a difference in physical size. 
I needed to get the new layout of the speakers set in stone before I started with the renovation; namely the Atmos ceiling speakers and surround speakers. I am glad I did this because as suspected, my surrounds needed to drop down in level considerably. They provided a decent diverse effect with 7.1 sitting that high up on the wall . But they provided zero separation between the bed layer surrounds and the height layer Atmos speakers in 7.1.4. Everything in the surround and Atmos speakers just ran together providing no detail or perception of sounds originating from the surround channels or the Atmos channels. As soon as I dropped them down to ear level, the magic happened. The ear could tell when something was left, right, behind or above. (You can see how high the surrounds originally were in the before pictures.) During this time, I discovered my old speaker wire runs needed re-done. It wasn't just oxidation. The jacket was literally breaking down into a gummy substance. I didn't ohm it out to see if the resistance increased, I just changed it all as most of the runs were being relocated anyhow and it was just as easy to pull all the new wire runs together. 
New boxes cut in with 12-gauge OFC CL2 cable. I soldered the ends to seal it. 
After dialing in the location for the Atmos speakers, I cut them in and used a plywood backing board the same width as the ceiling tile to support the additional weight of the speaker. 
Pulled speaker wire for the two rear surrounds channels to the center column. I also pulled a subwoofer cable for futureproof reasons. I may run a 3rd subwoofer for near-field placement behind the seating. 
Laying out the gaming area with existing seating. Moved some outlets and cut in a recessed box for the wall-mount TV. Pulled wires for 5.1 surround and ran an HDMI cable back to main rack so the TV could also be used as a second zone (Super Bowls, events, etc.) Removed old TV shelf. Basement window would soon be removed. 
With all wiring done, it was time to clear the room for the next phase; some drywall work, paint, carpet and trim work. |
|
|
|
[#8]
I moved all of the furniture out of the room. Destroyed the old stage and unforutnately I had to destroy the bar. It was designed to come apart in three pieces to move (top, middle, and base.) But the middle frame was quite literally 1" too big to clear the stairway up. It was a shame because I had spent a bit of time building it and I had a guy that wanted to buy it.
The gun room/ammo fort wasn't very happy about the invasion. 
Room completely cleared, all trim removed and fresh paint. Ready for carpet. 


Carpet going down. We're in the home stretch! 

And this is where things would bog down for almost a full 6 weeks. The carpet had vertical lines in it at random places. It's like the loom had a needle that was sporadically not working. They rolled it back up and re-ordered new carpet. A couple weeks later, they come out to install the new carpet and it had the same issue. In fact, it was more prevalent. The two different orders were placed more than 2 months apart (we placed the original order the end of November) but it appeared that they were cut from the same roll at the loom. Either that or that loom/mill has some serious issues going on and no one was QAing the product. At this point, I was getting upset. The project is stalled, I have a basement full of furniture sitting on the first floor and the upstairs is getting ready to be torn apart,as well. (We had multiple renos going on...phase 1 was the basement and phase 2 were the bathroom/bedrooms upstairs. Phase 1 was supposed to be complete before Phase 2 even started.) So now I have no place for the upstairs furniture to go when they carpet upstairs. Lowes went to bat and made it right even though it wasn't really their fault. They upgraded the carpet from Mohawk to Shaw so there was no way it could come from the same mill. And they upgraded the carpet to a much better quality carpet than what we had originally purchased. It was a pain in the ass, but in the end we ended up with a much better product. During the carpet down time, the trim went in and the new seating showed up. 


While I was waiting for the carpet, I also replaced the ceiling tiles as the old ones were starting to show their age (discoloring, sagging, etc.) 
Finally, the carpet arrived without defects! The new panel doors were also installed. 


External wire chase for the rear surround channels and rear subwoofer cable was painted to match and installed 


|
|
|
|
[#9]
With the boring crap out of the way, the fun stuff could begin. Anticipation started to take hold!
Screen being assembled 
LED lighting that was originally going to be installed behind the screen for back lighting. I didn't like the way it was turning out so I ditched it. 
Screen in place ready to be mounted. 
Getting the seating arranged in it's final position for proper screen placement 

Screen mounted 

Acousitc treatments being laid out for placement. (Prior to tearing the room up, I marked all of the reflection points between all speakers and the listening position.) 


Acoustic Panels by ATS Acoustics covered in Guilford of Maine fabric 


Bracket for attaching to walls 

Template on the wall. Took a little bit of time to devise a system for getting them level, but the provided template was a huge help. 
First one on the wall 

Developing a Henry Ford-style assembly line for attaching all the brackets to the panels 

Brackets mounted on the walls 


Panels themselves going on the walls. They just slid right in. Incredibly snug fit to the wall with ZERO vibration. 


Immediately, the room got extremely quiet. The panels ate up every bit of 'extra' noise. I tried clapping to measure the echo and it was like clapping into a pillow. All I could hear was the clap itself and not subsequent micro reflections of the clap reverberating around the room. I knew right away that this was going to solve so many of my issues from the previous builds. I just didn't realize how much. I will go into more detail later on in this thread; but dollar for dollar this turned out to be the single best upgrade I have ever made to the room. Moral of the story--sound treatments matter. Big time. |
|
|
|
[#10]
Time to move to A/V components themselves.
RSL C34E ceiling mounted speakers for the height layer 

Mounted in the ceiling and adjusted to all face the primary listening position 


Moving to the gaming area.... Installed shelving for physical media and anchored to wall 
Surround speakers for gaming area installed 


TV mount installed. Speaker mounts by VideoSecu wired and ready. 

Speaker, network and HDMI wiring going to mini-rack for gaming area 
TV mounted 
Front LRC speakers mounted. Used blue tack to help hold the Klipsch bookshelf speaker in the mounts. I didn't want to drill the cabinets. Center channel is sitting on a Pinpoint mount. 
Repurposed the old theater seating, Yamaha RX-V1400 AVR and Velodyne sub for the gaming area 
Moved pinball machine back into place. During the move, something was disturbed and it would not power on. Ain't nobody got time for that right now! More on that later. 
Popcorn machine moved to it's new location 
Time to move back to the main screen area.... Getting the front sound stage back in position 

HSU Subs 

GoldenEar Technology SuperCenter XL 
Moving to the surrounds... The peculiar shape of the GoldenEar Aons 

I positioned the boxes so they mate up with the terminals for clean wire management 
Let there be light! Re-installing PJ Mount 

Projector mounted 


Setting up projector: focus, zoom, centering, etc 


After a short channel test for phase, time to take a break and listen to some Roger Waters 
|
|
|
|
[#11]
Where did you get this? I've seen similar but they were all too small for my needs. This one may be big enough for the bundle of wires behind my equipment rack.
|
|
|
|
[#12]
Quoted:
Where did you get this? I've seen similar but they were all too small for my needs. This one may be big enough for the bundle of wires behind my equipment rack. http://www.ar15.com/media/mediaFiles/319675/20170315-160417-180894.jpg That hood reverses also. Instead of protruding out, you can flip it and have to recess into the box. I got the white, singles at Lowes. |
|
|
|
[#13]
Good lord, this is flippin Awesome!
Would love to have the space for a setup like this. Well done, looks amazing. Something to be proud of for sure. You did it right |
|
|
|
[#14]
Thanks! When we looked at the house, the basement space is what pretty much sold it. I knew exactly what I was going to do with it.
|
|
|
|
[#15]
Fully operational and about 95% complete. There are still some minor changes but for the most part the room is ready for use.
Front sound stage looing back 
From the pinball machine looking forward 
Gaming area 


Going to need additional cubes for the rest of the vinyl and box sets 
The main screen 

|
|
|
|
[#16]
Equipment List
Main Screen Equipment List Display and Screen Epson PowerLite Home Cinema 5040UB Projector Elite Screen 110" Sable Frame 2 in CineWhite 1.1 Gain Rack Marantz SR7011 Network AVR AC Infinity AIRCOM T9 Cooling System Emotiva XPA Five Gen3 5-CH Amplifier Oppo UDP-203 4K UHD SACD Player Roku Ultra 4K HDR Samsung BD-C5900 3D Blu Ray Player Logitech Harmony Hub for Harmony Elite Remote Spectrum Cable Cisco HD Cable Box Onkyo DX-C311 CD Player Onkyo TA-RW414 Cassette Player Cyber Power OR2200 Sine Wave UPS Cables Interconnects : Blue Jeans Cable LC-1, Signal Cable Silver Resolution Reference ICs RCA Subwoofer Cables : MediaBridge Ultra Series Speaker Cables : MediaBridge 12AWG CL2 Oxygen Free (solder sealed) HDMI : Blue Jeans Cable Belden Series-FE Premium Certified, MediaBridge 18Gbps Premium Certified High Speed, Monoprice Premium Certified High Speed Analog Phono VPI Scoutmaster TT w/ JMW-9 Tonearm Soundsmith Zephyr MIMC Star 0.4mV Cartridge LehmannAudio Black Cube SE II Phono Stage set at 66dB gain and loaded at 1000 Ohms Signal Cable Silver Resolution Reference Phono ICs Music Hall MMF 2.3 TT (Acrylic platter upgrade) Music Hall/Audio Technica Spirit 3.5mV MM Cartridge Emotiva XPS-1 Phono Stage in MM mode Sound (7.2.4) Bed Layer Front L/R Channels : (2) GoldenEar Technology Triton Five Towers Center Channel : (1) GoldenEar Technology SuperCenter XL Surround L/R Channels : (2) GoldenEar Technology Aon 3 Bookshelfs Surround Back L/R Channels : (2) GoldenEar Technology Aon 2 Bookshelfs Height Layer Atmos Ceiling Channels : (4) RSL Speaker Systems C34E Edgeless Subwoofers (2) HSU Research VTF-15H MK2 15" Subs Sound Treatments Acoustic Panels ATS Acoustics Acoustic Panels covered in Guilford of Maine fabric Gaming Area Equipment List Display Samsung KU7000 55" LED Mini Rack Onkyo RX-V1400 AVR XBox and PlayStation Consoles Sound (5.1) Front L/R Channels : (2) Klipsch RB-61 II Reference Series Bookshelfs Center Channels : (1) Klipsch RC-52 Reference Series Center Surround L/R Channels : (2) Polk Audio OWM3 On-Wall Speakers Smart Control Logitech Harmony Elite Remote and Hub Echo Dot GE Z-Wave Dimmers Samsung SmartThings Rack Component Rack didn't change much, just some of the equipment inside it. (The old Onkyo gear has to be pushing 25 years old now.) 

Analog corner VPI Scoutmaster and Music Hall MMF 2.3 
Scoutmaster and Soundsmith Zephyr MIMC Star Cart 


Lehmann Audio Black Cube SE II Phono preamp 
|
|
|
|
[#17]
Working with the Disney WOW disc to re-calibrate the projector after switching from CineGray to CineWhite screen.
Couple of screen shots from a Bluray disk (not UHD unfortunately.) First pic was the baseline settings from the old screen. It's got a bit of blue/cyan tint to the image. 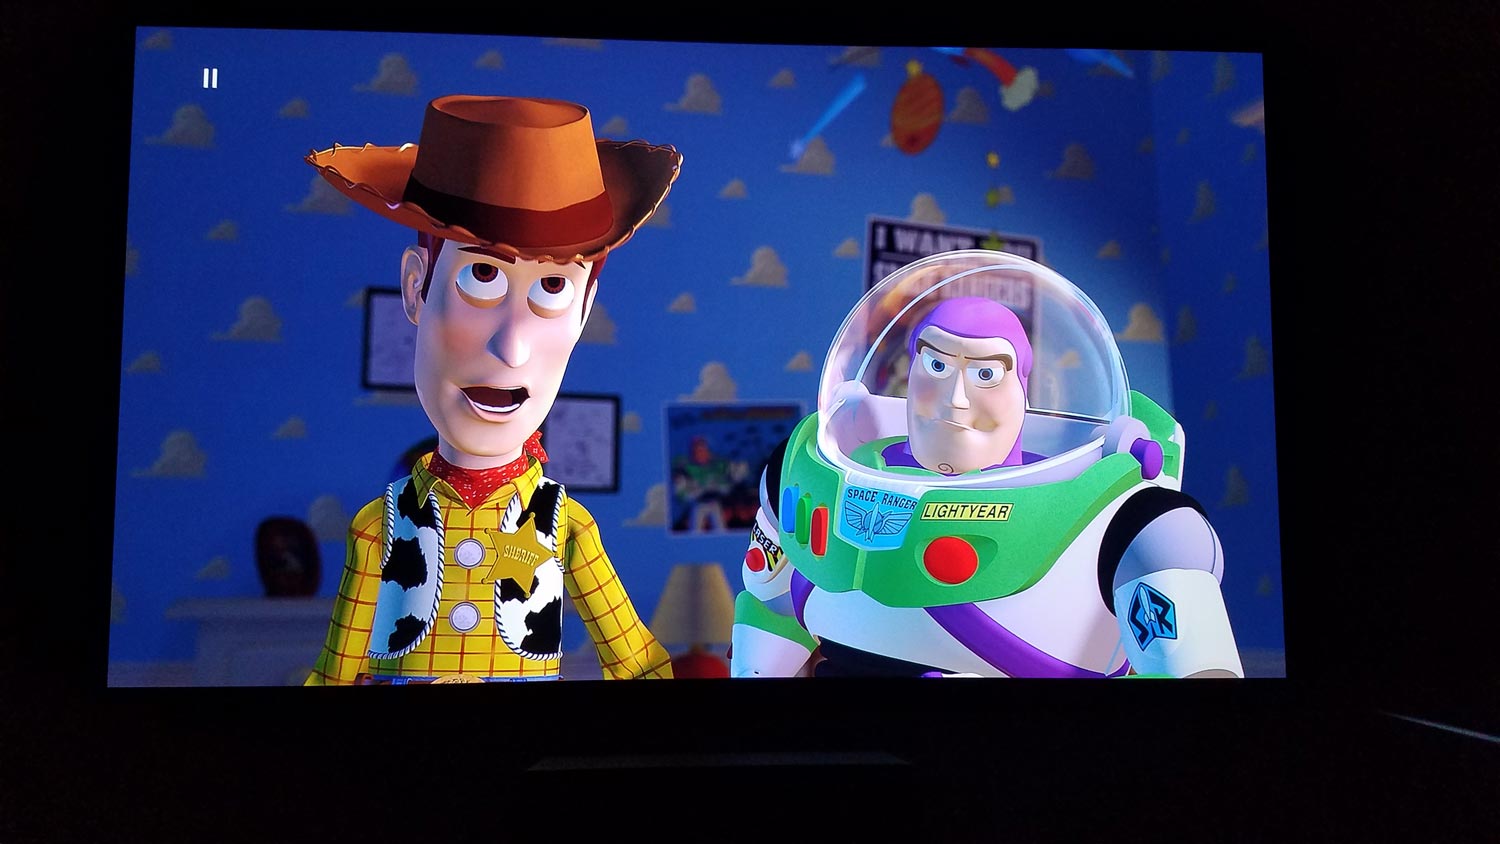
Next two pics are exactly the same frame. First picture is without Image Enhancement enabled on the projector (4K upscaled). Second picture is with Image Enhancement set to 3 out of 5. You can see quite a bit of detail gets pulled out of the image. Look at Woody's neckerchief, buttons, badge and even his eyes. The button outline sharpens and becomes two distinct circles, you can actually see the embossing on his Sheriff's badge and you can even see iris details in his eyes. (Hopefully the JPG doesn't compress too much and negate the detail difference.) 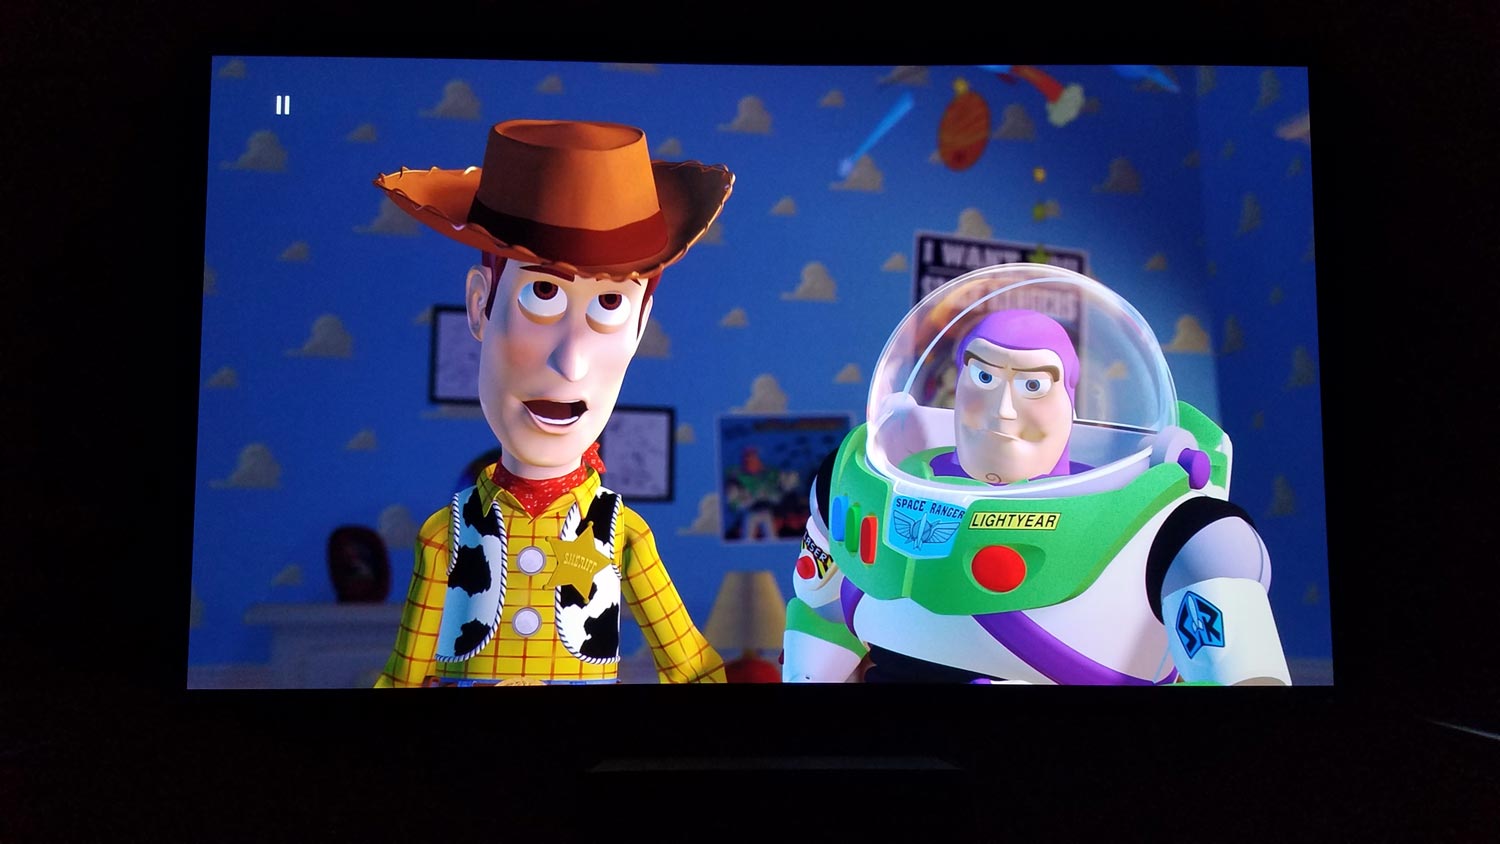
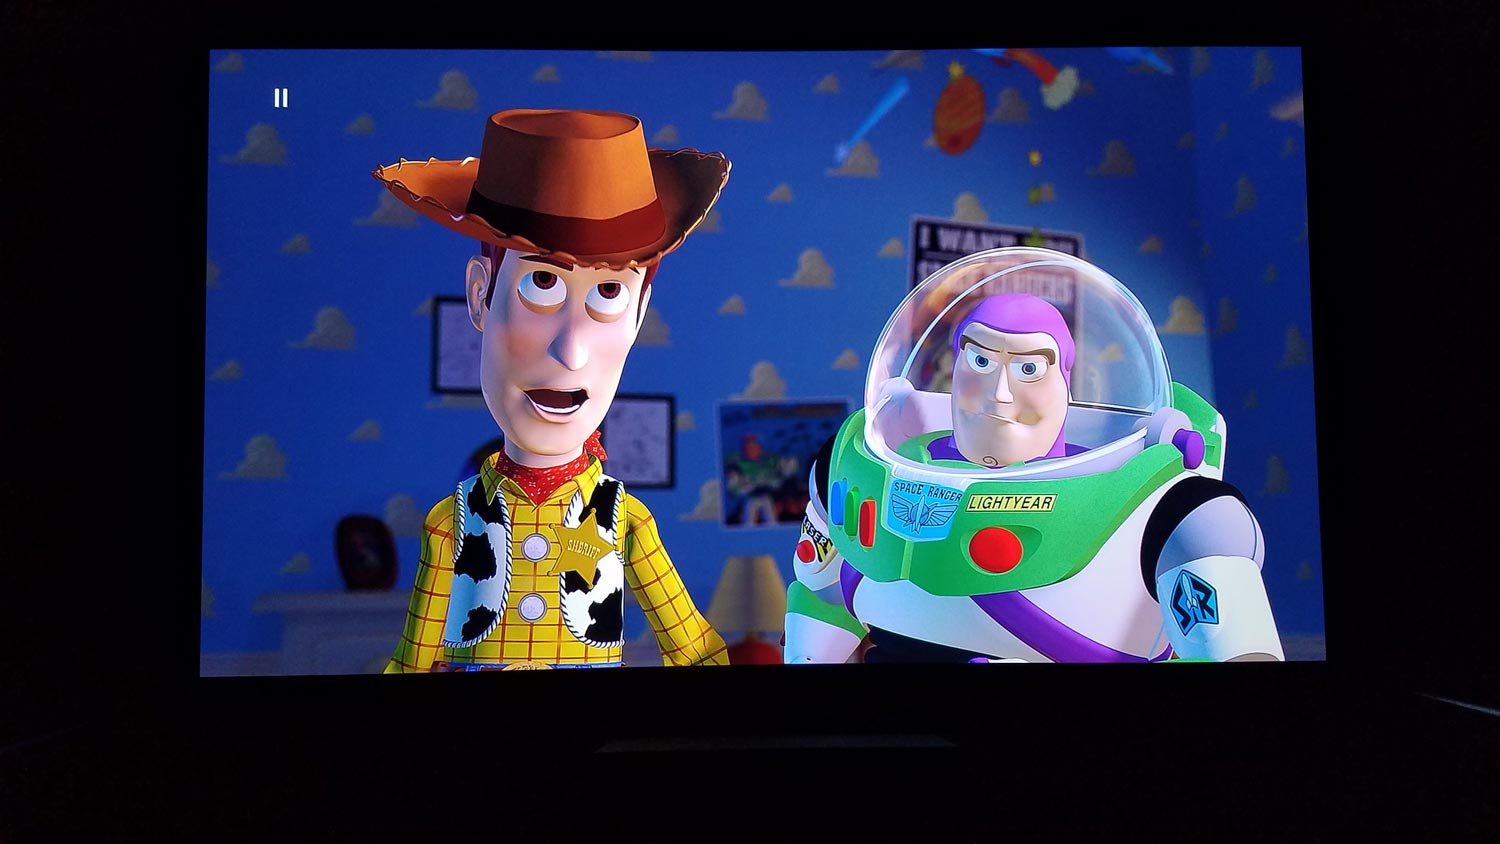
Last image is with a quick calibration of the colors. The blue tint is reduced and the colors (flesh, etc) look more natural. 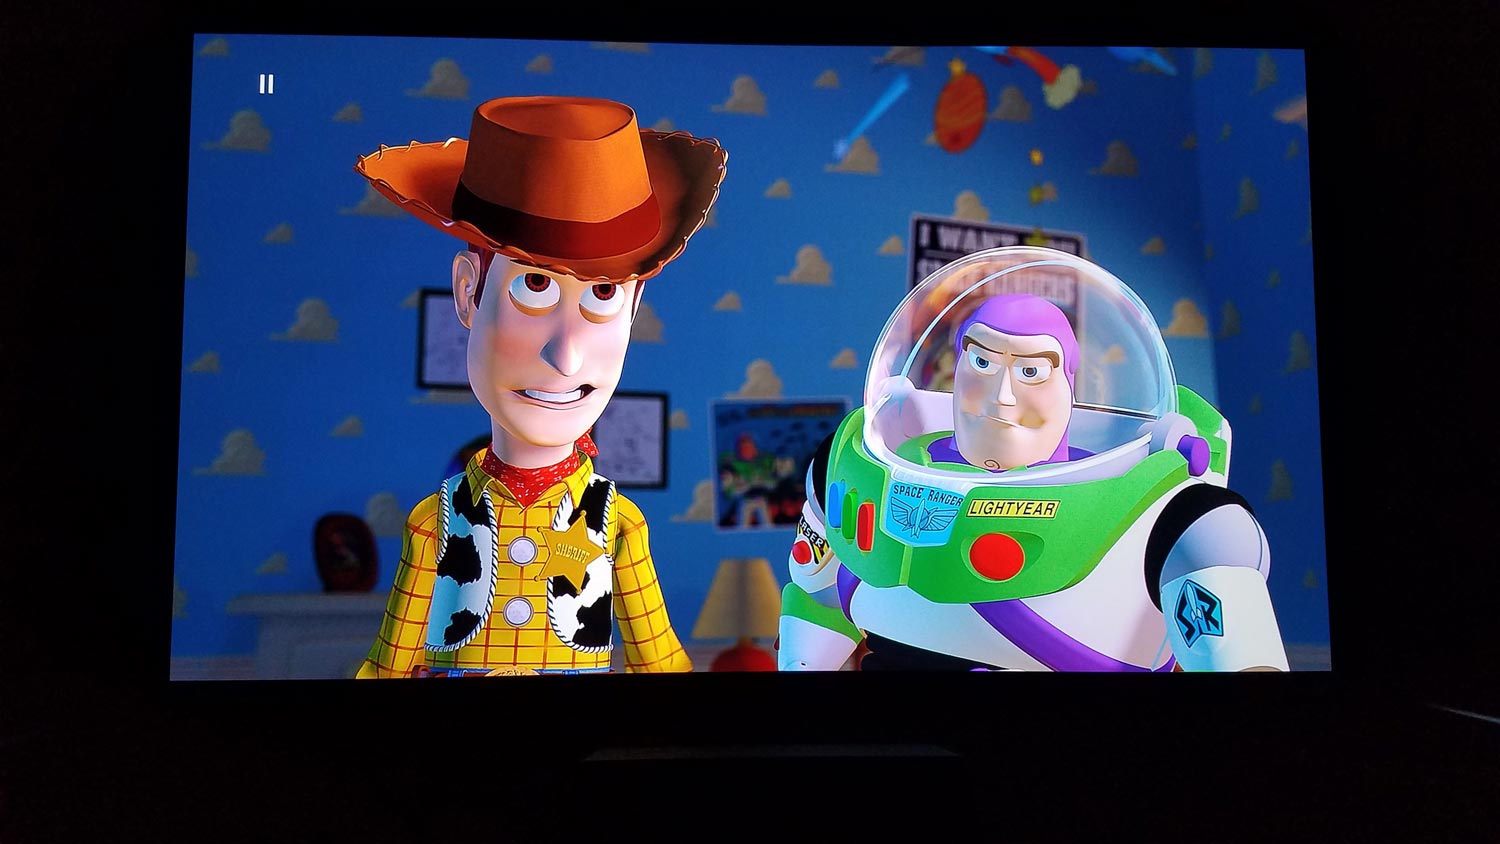
|
|
|
|
[#18]
After moving the Pac Man pinball machine around, it didn't want to turn back on.
It didn't take long to find out why. Here are pics of the main MPU board. It's thoroughly trashed. I'm guessing the move was just enough to finally do it in. 

I put the new MPU board in the machine, set the dip switches and plugged in the harnesses and she came right back to life. I even put a whoopin' on the kids just to properly break it back in.

I believe all of the playing field rubber, bumpers, flippers, etc is original. It's really starting to deteriorate and come off in small pieces littering the playing field. I ordered all new rubber and some replacement bulbs for it and will replace the worn items soon. |
|
|
|
[#19]
Amazing post. You have impeccable taste in components.! Wow, those Subs are real shakers. Everything just so perfect! So envious of your build. CONGRATS!
|
|
|
|
[#20]
 You, sir, are amazing. You, sir, are amazing.
|
|
|
|
[#21]
I guess ill just go be poor in another thread.
Looks awesome!
|
|
|
|
[#22]
wow, that's a lot goin' on in that floorplan.
Nicely done, an electronic A/V dream playground |
|
|
|
[#23]
Thanks, guys!
Quoted:
Amazing post. You have impeccable taste in components.! Wow, those Subs are real shakers. Everything just so perfect! So envious of your build. CONGRATS! I ran two extra sub cables, one to the left of the seating in the corner by the stairs and one behind the seating, for possible future use. I wanted the one behind the seating for near-field effect--the bass you can feel. But I can honestly say that I don't think I'll need them. The two up front do a good job of providing that physical effect. They literally shake the entire house if I run them fully ported and adjust the Q. My wife hates them. I think they are glorious.
Quoted:
wow, that's a lot goin' on in that floorplan. Nicely done, an electronic A/V dream playground I'd love to have a dedicated theater room but I love music too much and my son commandeered by consoles years ago. And it was important to me to keep the pinball machine in the family (too many memories from it when my brother and I were little kids--my dad reckoned himself a pinball wizard ) So it made sense to make a media room for the entire family to use; movies, music, games, sports, TV, etc. When my mom and dad come back home to visit, my dad makes a bee line for the pinball machine. lol
|
|
|
|
[#24]
Man, that is some set up! Congratulations on getting it done! I'd love to finish my place like that. We have an unfinished walkout and this was the plan when we built, but it never came to pass. You might have just inspired me a bit!
My big problem is not knowing where to start. The technology has changed so much, it is hard to know how to plan for everything. What research sources did you rely on for your equipment purchases and how did you learn to place all of that stuff? |
|
|
|
[#25]
Quoted:
Man, that is some set up! Congratulations on getting it done! I'd love to finish my place like that. We have an unfinished walkout and this was the plan when we built, but it never came to pass. You might have just inspired me a bit! My big problem is not knowing where to start. The technology has changed so much, it is hard to know how to plan for everything. What research sources did you rely on for your equipment purchases and how did you learn to place all of that stuff? I have been into audio since I was a little kid. That love transferred over to video, as well, especially once the projectors became attainable for the average guy. AVSforum.com is pretty much the AR15.com tech forums of the AV world. There is a wealth of knowledge over there--and some bad advice just like our tech forums. There are some old guys over there that know more about audio than I'll ever hope to know.
AVS (and steve hoffman, audiocircle, etc) are all good sources of equipment suggestions. But at the end of the day, demo the products as much as you can. Go listen to the speakers and see the projectors in use. A lot of the internet direct companies will even do in-home demos. You order them up, they ship free and if you don't like them, you ship them back free. While it's a lot of work, this is probably the best case scenario for consumers because you get to demo the speakers in your space as opposed to some room at an audio shop that may be completely different in volume, size and shape. GoldenEar Technology is another example of AVS input. Im not sure those speakers would have been on my radar if it weren't for a couple of members that I really trust on two of the forums insisting that I at least give them a listen. I demo'd a lot of speakers and in the end I kept comparing everything to the GEs--speakers that they really had no business competing with in sound. Im fairly convinced they may be one of the better kept secrets in the audio world right now. Sandy Gross is doing amazing things again. One thing I'll say is don't try to make your space into something it isn't. Atmos is a perfectly good example of that. You have to have the right room for it to work correctly. Of all the complaints Ive seen/heard about Atmos, it almost always comes down to either the room itself (vaulted ceilings, for example) or improper placement. I have found from experience that the Atmos guide to placement at dolby.com is not provided for mere suggestion but almost as a strict blueprint for a proper sound install. Deviating from their angles, heights, etc by mere inches has a pretty dramatic effect on the final sound experience. (I spent many weeks with speaker wire strung across the floor, moving speakers around the room, speakers hanging from the ceiling and doing more 'subwoofer crawls' with an SPL meter and spectrum analyzer than I care to count. )
Same with projectors. They aren't TVs. While they are vastly brighter than my first InFocus (I think that thing was only like 800 lumens), at the end of the day they still want a 100% controlled lighting environment. If you can't control every bit of lighting in the space, projectors may not be the right application. |
|
|
|
[#26]
Quoted:
Man, that is some set up! Congratulations on getting it done! I'd love to finish my place like that. We have an unfinished walkout and this was the plan when we built, but it never came to pass. You might have just inspired me a bit! My big problem is not knowing where to start. The technology has changed so much, it is hard to know how to plan for everything. What research sources did you rely on for your equipment purchases and how did you learn to place all of that stuff? I took a slightly different route with my room. For the projector and the screen, I went to a couple of stores in Memphis and there was nothing in my budget so I started reading projector reviews at AVS. I settled on the Panasonic AE-900U. I recently found my receipt during a home office re-org and it shocked me that I spent $2,300 on it. I also used AVS to guide me through building a 103" screen as well. It took a weekend to build (most of that was waiting for border paint to dry) and cost $75. When I was done, my wife who has a much better eye for detail said that it looked better than the $12,000 Sony we had seen in the store. The Panny served me well over the years but it wore out. The auto-iris would squeal when moving. For a replacement I used the Panasonic specs as wells reviews at AVS and picked up an Epson Home Cinema 8345. Every specification was equal or better than my Pansonic but for only $750. It was also an upgrade from a 720p to 1080p. I have always been interested in the audio side and built my first set of speakers in 1987. For my home theater I just chose a well regarded design from a frequent poster at AVS & Parts Express - Dayton DIII. That link is only a brief description of the design. At the original website, more experienced listeners compared the speakers to retail models costing $2,500/pair. I have about $150 in each of my front 3 speakers. For surrounds, I'm using some old Polk bookshelf speakers but I have all of the parts to build something similar to these - Dayton 2-way. Same designer as my main speakers but I have a little known design that is an mid-tweeter-mid (aka MTM). Subwoofers are the best DIY project in audio and obviously I built mine as well. I started with a pair of the 15" version of the TC-3000 and put them in a 3 cubic foot boxes like these. The best part of DIY is that you can build it to fit your room rather than buying something that doesn't fit the decor or the size. My receiver is 13 or 14 years old and I haven't needed to upgrade yet (the upgrade bug is starting to bite). It's a Pioneer with auto calibration called MCACC. Other companies call it other things but the process is basically the same. You set up a mic in your listening position and press a button on the receiver. It beeps, hisses and clicks for a while and will set the speaker levels, delay and even EQ to get as close to perfect experience for that location in the room. I can't stress enough that auto calibration is the best thing the receiver companies have come up with. I remember measuring the distance from each speaker to my wife's head and then setting the delay based on speaker differences. (Yes, she puts up with a lot) Another reason I picked my receiver is that it supposedly used the output section of the Pioneer Premier series and so it would easily drive 4 ohm speakers. Not quite. Those DIIIs are power hungry and the receiver would go into protection mode during action scenes with gunshots. At least my receiver had pre-amp outputs and I added some Crown XLS-1000 amps to run my front 3 speakers with 375w @ 4 ohms. quick2k3 mentioned the sub crawl and REW (Room EQ Wizard). While receivers will auto calibrate, they don't put enough effort into calibrating the subs. The location in the room impacts a sub more than anything else so you first have to find the proper location. You do that by putting the sub in your listening position playing a test tone and crawling around on the floor with an SPL meter looking for the location with the loudest sound. Hence the term "sub crawl". quick2k3 also measured the sub's in-room response with a calibrated microphone and a software program called Room EQ Wizard. Based on the response graph he added parametric equalization and flattened the in-room response. I did a similar approach and my sub amp is a piece of pro audio equipment called a Feedback Destroyer. It samples the audio 46,000 times per second and applies an EQ curve to provide me an output that is + or - 3db from 120hz to 17hz. The output of the EQ feeds a pro audio amp which drives my two subs with 800w each. Whether you build, buy or do both you need to start with the speakers. Quality speakers last a lifetime. |
|
|
|
[#27]
Robert and Quick. Thank you for the "sound advice"!
My day went sideways on me and I'm just now getting back to this thread. I appreciate the information a great deal. I'm going to start reading and get up to speed on the topic. We are on the fence about moving and downsizing or keeping what we have. At least you have given me some place to start my research. Thanks! |
|
|
|
[#28]
Very nice. Went through a similar process prior to my divorce
. My budget is considerably less now and I had to give up the front projector and 9' screen but I am very happy with my current system.
|
|
|
|
[#29]
nice build.
|
|
|
 Win a FREE Membership!
Sign up for the ARFCOM weekly newsletter and be entered to win a free ARFCOM membership. One new winner* is announced every week!
You will receive an email every Friday morning featuring the latest chatter from the hottest topics, breaking news surrounding legislation, as well as exclusive deals only available to ARFCOM email subscribers.

AR15.COM is the world's largest firearm community and is a gathering place for firearm enthusiasts of all types.
From hunters and military members, to competition shooters and general firearm enthusiasts, we welcome anyone who values and respects the way of the firearm.

Subscribe to our monthly Newsletter to receive firearm news, product discounts from your favorite Industry Partners, and more.
Copyright © 1996-2024 AR15.COM LLC. All Rights Reserved.
Any use of this content without express written consent is prohibited.
AR15.Com reserves the right to overwrite or replace any affiliate, commercial, or monetizable links, posted by users, with our own.


