|
[#1]
Originally Posted By SWIRE:
. The garden is away from the majority of the walnut trees. There is one near by that has a smaller branch that reaches towards the direction of the garden. It will be removed when I have time. From what I've read, as long as you are outside of the dripline of the walnut the effects of the juglone us minimal. Back on page one, the satellite view of the property with the red outline. There is a circular garden in the middle of the property near the bottom. I've actually pushed that garden towards the center of the property a bit more. On the red line are two walnut trees. In the picture with the blue outline, on the blue line right below that garden you can make out the main trunks of two trees. Those are the walnut trees. The strawberries are closer and they are not showing any signs of juglone affecting them. The only issue I see is that all of it seems to be downhill from a lot of the walnuts. The juglone carried by water (hydrojuglone) can move, though not through ground as quickly as, say, running down a sidewalk or off of a roof. Interesting that the strawberries are unaffected. That may bode well. Good job on the planting holes. I find that if I do that, I have to redo it every year or (at minimum) every two--even the porch planters under the porch roof I have to dump and refill every year or two. Squirrels hide a walnut in there, and Poof....I get puny flowers the next spring. 
The truth is, the front yard along the fence is a great place for a veggie garden, but I realize you might not want it there. |
|
|
|
|
[#2]
Originally Posted By w12x40:
Very cool undertaking! Your sig line really means something. My wife frequently tells me how much she'd love to have an old house and work on it. I am going to show her your pictures the solve that problem. I think you're going in the correct order - fix the roof and the plumbing to prevent more water damage, then repair the other stuff. I do some restoration work as an engineer and I learn a bit about historic methods of construction. If you want a little more background, you might want to check out Donald Friedman's Historical Building Construction, George Nash's Renovating Old Houses and Eric Sloane's A Reverence for Wood. I've used all three of these to help determine methods of construction and materials for some of my projects. The Historic American Buildings Survey may have more pictures of the structure for you. I use this for bridges and "security-sensitive" structures when the local authorities refuse to allow me to take pictures, but it has a lot of stuff. I was talking with an exterminator about the damn mice in the house despite the presence of a sociopathic murdering cat. He says that mice will nest inside just for the shelter even without a food source, so that might be why you have snakes. Thanks for documenting this as you go. I know you're just expending energy with little in return, but I enjoy it. Tons of people say "I want to work on an old house". What they really mean is "I want to play general contractor and interior decorator, using someone else's money". They love the idea of it but no one loves the work or the cost. I love historic houses, after the first one got me addicted to them. But even my first historic house has been completely spruced up. I did about 1/3 of the house and got burnt out. Thanks for the reference material. I will look into them. |
|
|
|
|
[Last Edit: Kitties-with-Sigs]
[#3]
Originally Posted By SWIRE:
Thanks for the comments. If anyone wants to see anything in further detail I have more pictures and I can provide more detail. I'm trying to keep this a high level summary as much as possible. I'm documenting it for people here and for my own personal record. Tons of people say "I want to work on an old house". What they really mean is "I want to play general contractor and interior decorator, using someone else's money". They love the idea of it but no one loves the work or the cost. I love historic houses, after the first one got me addicted to them. But even my first historic house has been completely spruced up. I did about 1/3 of the house and got burnt out. Thanks for the reference material. I will look into them. I would add, also, for anybody enamored of the idea.... The mistake most people make is not allowing themselves time to play (bank deadlines for appraisals and such are harsh taskmasters) and most people also have to work a job or two. So it's slow going, and you don't get any time off and it just wears you down something awful. Most folks are also not prepared for the level of "start one project, but be prepared to hit another project, and have a plan for that going in, because they fall like dominoes and you can't do the first one til you finish the one you've unearthed" And sometimes it's not just one, but three or four (rotted mud sill that must be replaced, anyone?) and the whole damn thing just grinds to a halt. Nor do people believe me when I give them a timeline for "replacing that bit of drywall," because I give them an estimate for about five times the reasonable amount of time it should take. Their mouths fall open and I have to explain, "the studs are not on any kind of center and I will have to take out more than would be the norm to find a place to attach it. The wood is like concrete. You can't drive nails into it without a serious air tool, you can't put a screw in it without drilling a pilot hole first. AND, the studs were made to hold plaster/lath. They are not nice and square, and not the same size all the way from top to bottom. OH and when I open that wall, there is more than likely termite damage. If it's a window wall, there will be rot and that window will have to be reframed. OH and it's balloon framing. There's no header up there to nail to. That's right, I have to find a different way to frame it. OH, and the wall is not standard thickness. So regular insulation thicknesses? Yeah that's right. Those don't work. And you can't go buy two-by-four stock to frame. You have to buy 2 X 6, and rip it to size, because it's not built with dimensional lumber..." And on and on and on and on and on. They want the end part--the sexy fun of painting it and having it look all fresh. They don't want the guts. Because it is all guts. Hardly any glory. |
|
|
|
|
[#4]
Originally Posted By Kitties-with-Sigs:
Interesting that the strawberries are unaffected. That may bode well. Good job on the planting holes. The truth is, the front yard along the fence is a great place for a veggie garden, but I realize you might not want it there. Since we are talking about the holes I'll do a partial summary of the garden which needs to stay in the back. Too much foot traffic up front. The tomato holes are huge given the size of the plants that I planted. In the Seeds thread from earlier this year those seedlings are what I am no planting, about 3 weeks later than I wanted. However, I grow them in the plastic cups for that specific reason, no telling what the weather will do and the cups give them plenty of room to grow. These are the holes that I dug for the tomatoes. The spacing is tight but I had a ton of plants. 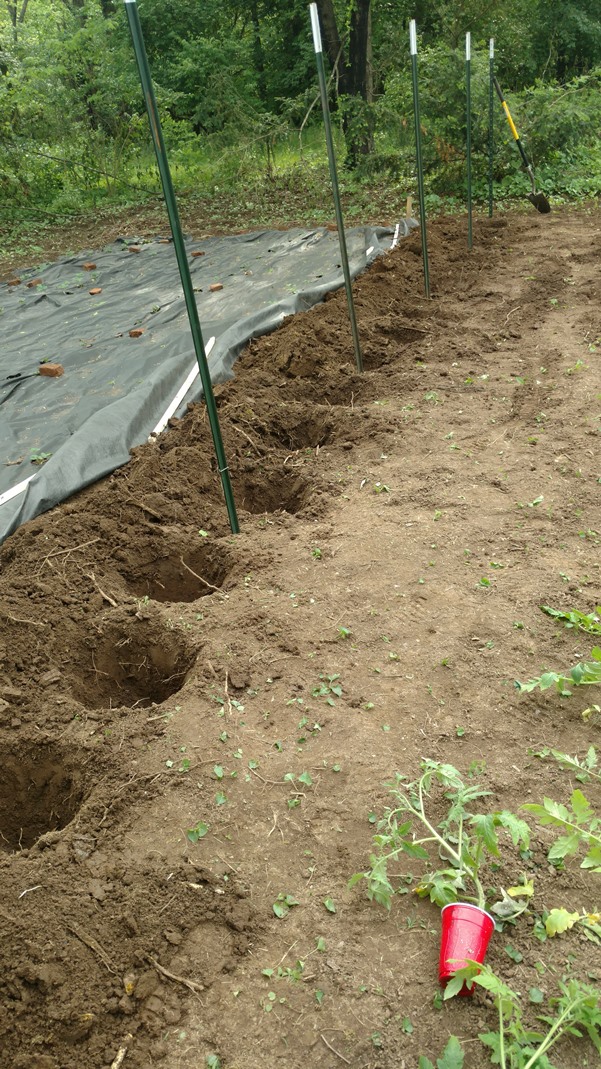
This was the initial dirt mix that I creating. It was 1/3 clay dirt from the garde, 1/3 peat moss, and 1/3 composted manure. Mixed together with fertilizer. The clay breaker was thrown in the bottom of the holes first. 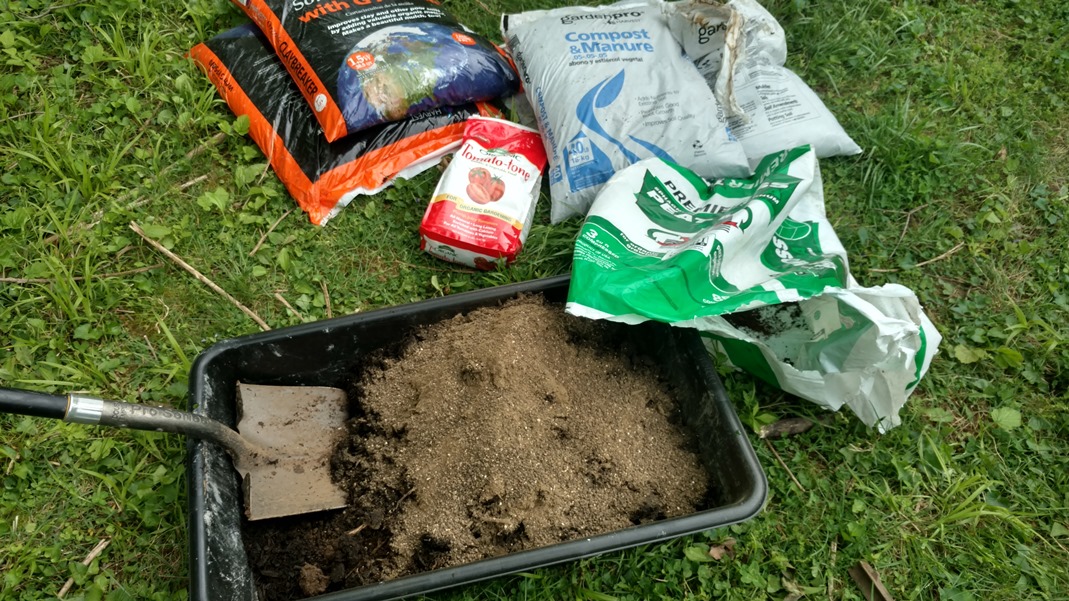
I ran out of that dirt mixture and came across the bulk compost place. I was also running out of time so I just filled the holes with the straight compost hoping that it has broken down enough to work as soil. That is 1 cubic yard in my truck that cost $15. Compare that to the 2 backs of composted manure in the previous picture which cost about $7. So 4 bags or a truck load for the same price. I really wish I had found the bulk place last fall. 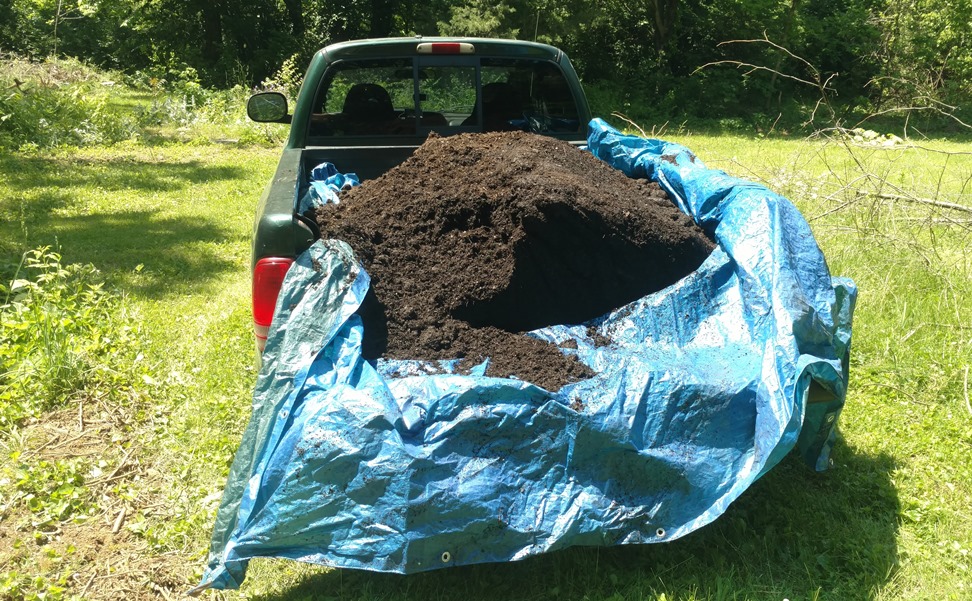
The plants are laid out and ready to get planted. 
The cups are 18 ounce cups, so they are large. Compare that to the size of the hole and you can see the effort I went through in order to help improve the soil quality. I don't know if it will work for this year but it will help down the road. 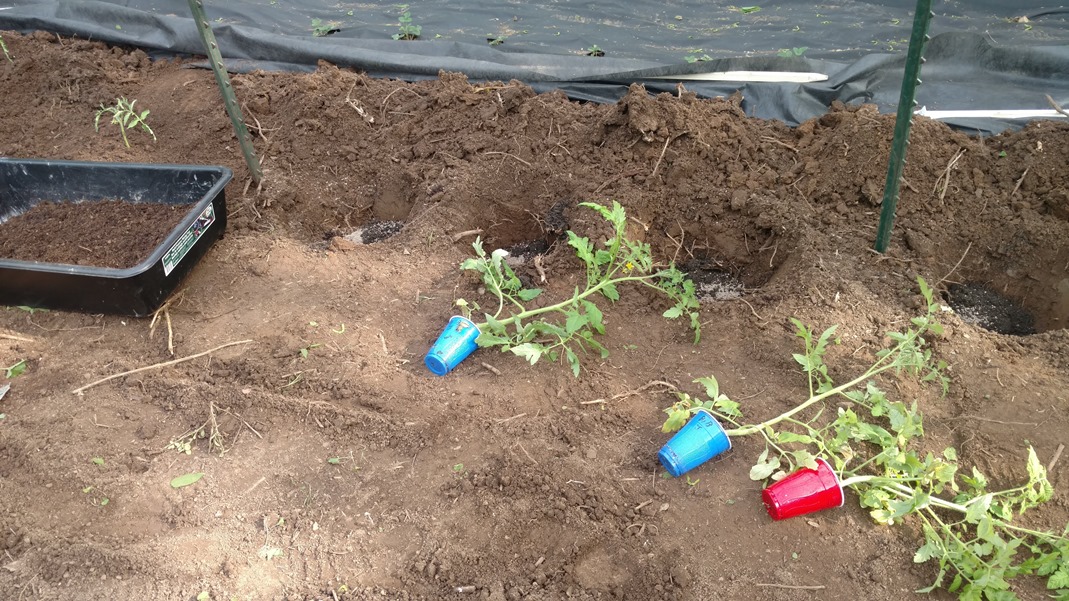
Tomatoes planted, drip line installed, and fabric put down. I still need to run the string line between the posts in the Florida weave style. 
As a side note, the poison ivy is/was doing great. The entire pond bottom looked like this. 
|
|
|
|
|
[#5]
Originally Posted By Kitties-with-Sigs:
Yes, you burn easily doing this work. I would add, also, for anybody enamored of the idea.... The mistake most people make is not allowing themselves time to play (bank deadlines for appraisals and such are harsh taskmasters) and most people also have to work a job or two. So it's slow going, and you don't get any time off and it just wears you down something awful. Most folks are also not prepared for the level of "start one project, but be prepared to hit another project, and have a plan for that going in, because they fall like dominoes and you can't do the first one til you finish the one you've unearthed" And sometimes it's not just one, but three or four (rotted mud sill that must be replaced, anyone?) and the whole damn thing just grinds to a halt. Nor do people believe me when I give them a timeline for "replacing that bit of drywall," because I give them an estimate for about five times the reasonable amount of time it should take. Their mouths fall open and I have to explain, "the studs are not on any kind of center and I will have to take out more than would be the norm to find a place to attach it. The wood is like concrete. You can't drive nails into it without a serious air tool, you can't put a screw in it without drilling a pilot hole first. AND, the studs were made to hold plaster/lath. They are not nice and square, and not the same size all the way from top to bottom. OH and when I open that wall, there is more than likely termite damage. If it's a window wall, there will be rot and that window will have to be reframed. OH and it's balloon framing. There's no header up there to nail to. That's right, I have to find a different way to frame it. OH, and the wall is not standard thickness. So regular insulation thicknesses? Yeah that's right. Those don't work. And you can't go buy two-by-four stock to frame. You have to buy 2 X 6, and rip it to size, because it's not built with dimensional lumber..." And on and on and on and on and on. They want the end part--the sexy fun of painting it and having it look all fresh. They don't want the guts. Because it is all guts. Hardly any glory. Originally Posted By Kitties-with-Sigs:
Originally Posted By SWIRE:
Thanks for the comments. If anyone wants to see anything in further detail I have more pictures and I can provide more detail. I'm trying to keep this a high level summary as much as possible. I'm documenting it for people here and for my own personal record. Tons of people say "I want to work on an old house". What they really mean is "I want to play general contractor and interior decorator, using someone else's money". They love the idea of it but no one loves the work or the cost. I love historic houses, after the first one got me addicted to them. But even my first historic house has been completely spruced up. I did about 1/3 of the house and got burnt out. Thanks for the reference material. I will look into them. I would add, also, for anybody enamored of the idea.... The mistake most people make is not allowing themselves time to play (bank deadlines for appraisals and such are harsh taskmasters) and most people also have to work a job or two. So it's slow going, and you don't get any time off and it just wears you down something awful. Most folks are also not prepared for the level of "start one project, but be prepared to hit another project, and have a plan for that going in, because they fall like dominoes and you can't do the first one til you finish the one you've unearthed" And sometimes it's not just one, but three or four (rotted mud sill that must be replaced, anyone?) and the whole damn thing just grinds to a halt. Nor do people believe me when I give them a timeline for "replacing that bit of drywall," because I give them an estimate for about five times the reasonable amount of time it should take. Their mouths fall open and I have to explain, "the studs are not on any kind of center and I will have to take out more than would be the norm to find a place to attach it. The wood is like concrete. You can't drive nails into it without a serious air tool, you can't put a screw in it without drilling a pilot hole first. AND, the studs were made to hold plaster/lath. They are not nice and square, and not the same size all the way from top to bottom. OH and when I open that wall, there is more than likely termite damage. If it's a window wall, there will be rot and that window will have to be reframed. OH and it's balloon framing. There's no header up there to nail to. That's right, I have to find a different way to frame it. OH, and the wall is not standard thickness. So regular insulation thicknesses? Yeah that's right. Those don't work. And you can't go buy two-by-four stock to frame. You have to buy 2 X 6, and rip it to size, because it's not built with dimensional lumber..." And on and on and on and on and on. They want the end part--the sexy fun of painting it and having it look all fresh. They don't want the guts. Because it is all guts. Hardly any glory. If you do come up this way, you should help me rip up the 200 year old hardwood floor on the 2nd floor of the Victorian side. I believe the wall has settled enough and pulled away from the house enough that the floor joists have fallen off whatever ledger board or whatever it was they were attached too. The ceiling is fine downstairs but the floor above has a big sag in it and bounces. Not to mention it looks like the floor drops about 3 inches from one side of the room to the other. What do you think I will find under a 200 year old floor? My biggest concern, from ripping out the 100 year old attic floor in my 1903 house, is that board are so brittle they will crack and break to the point that I can't reuse them. As you said that old wood doesn't let you pound nails or pull them out. So pulling out the nails driving through the tongues of the hardwood floor is nearly impossible. |
|
|
|
|
[Last Edit: Kitties-with-Sigs]
[#6]
1-I think you need to have somebody with infinite patience to pull out that hardwood.
2-I think you need to run a humidifier in that room for a while before you pull up said hardwood. It might save you replacing a few boards (you'll replace some anyway, but less is more here.) And even as I type that, I worry that it should go the opposite way, and that maybe the shrink that comes from drying out will allow you to get it apart more easily.
3-That's a weird structural problem, and I think you need to look at the outside of that wall and make sure it is not bowed outward from some shit going on with the roof or just from pulling apart from an improperly loaded structure. ETA: For instance.... If the studs are rotted at the mudsill, and the whole wall had dropped in the middle, that could be your problem too. The interior walls could be holding the ceiling stable, but the exterior wall has lost its rigidity because the studs are not intact, so the wall is moving outward and down, and the upper floor might show it. 4- I can't even speak to the bounce, but I would rather take out a ceiling (usually) than rip up that hardwood. What is the ceiling below it? True sheetrock? plaster? or what? 5-YOU NEED TO GO IN THAT ATTIC. Something could be going on with your roof structure that is causing it to fuck up that exterior wall. Sometimes it's a matter of cabling the house together, and then putting supports in the attic to stabilize the roof (a lot of old houses didn't have any ties across the rafter peaks. Those ties are seriously important. If you don't have them, you may need to install them. There are also a few other things you can do from ceiling joists to roof, depending on your framing, to take some of the "push out" off of the exterior walls. ETA: If you need to lift the wall at all...like if the sill is rotten or the studs have rotted bottoms and are collapsing or some such, you need to fix THAT before you stiffen up the roof. We made this mistake. We were in the process of lifting the back of the house (it needed nearly 8" ) and in the middle of that we were taking out an interior wall and using the balloon-framed top of that wall to create a strongback in the attic to act as the header to span the opening. We were in the middle of the "lift" of the back wall (you can lift only about a quarter inch per day at maximum...gotta give the house time to adjust or it'll break) and we (newbies) went ahead with building the strongback, cuz..yaknow..we needed to move forward, right? Anyway...that went beautifully, then we continued to lift and a few days later, the house said "I'm done." That's the thing about lifting only a little at a time. Teh house will tell you when it's had enough and that's as far as you can go, and at that point, you have to live with the slope of the floor. Well...we'd stiffened up the top of the house with that damn strongback, and that's why the house couldn't go any further. (Duh...newbies with an old house) Anyway...So now our house looks like itt's got some structural issues because it's got a bow in the roofline. 
it does not have issues. It's just that we cranked on the backwall and made a sway in the middle of the damn roofline before the house said STOP!!! You need to know what's happening in your attic to know how your house is doing. Get up there. Take somebody with you. Attics are creepy as hell., even without the extra personalities you have in residence. |
|
|
|
|
[#7]
The previous owner believes an earthquake is responsible for the foundation shifting and moving northwest. New Madrid fault was around 1812 when the house was being built. Not sure which one came first. Someone, before the former owner, reinforced the foundation with concrete and stone. It is about 3 feet thick now. The first floor is a library/study. The ceiling, other than water damage of the plaster due to a broken window, is in pretty good shape. The ceiling does not appear to bow. Above that would be a bedroom. The house has the typical plaster coated solid brick walls. So I'm not sure how the floor joists were attached. Above that is a 1/2 height floor attic. It is in good shape.
Point of interest. The wall on the left is 200 years old. The wall straight forward and on the right are about 12 years old. Here is a picture of the wall. The left side is the 2 story side with the problem. The wall does not appear to bow. You can also see the foot of concrete they added on the outside, the wall is about a foot thick, and in the basement the wall is about a foot thick. 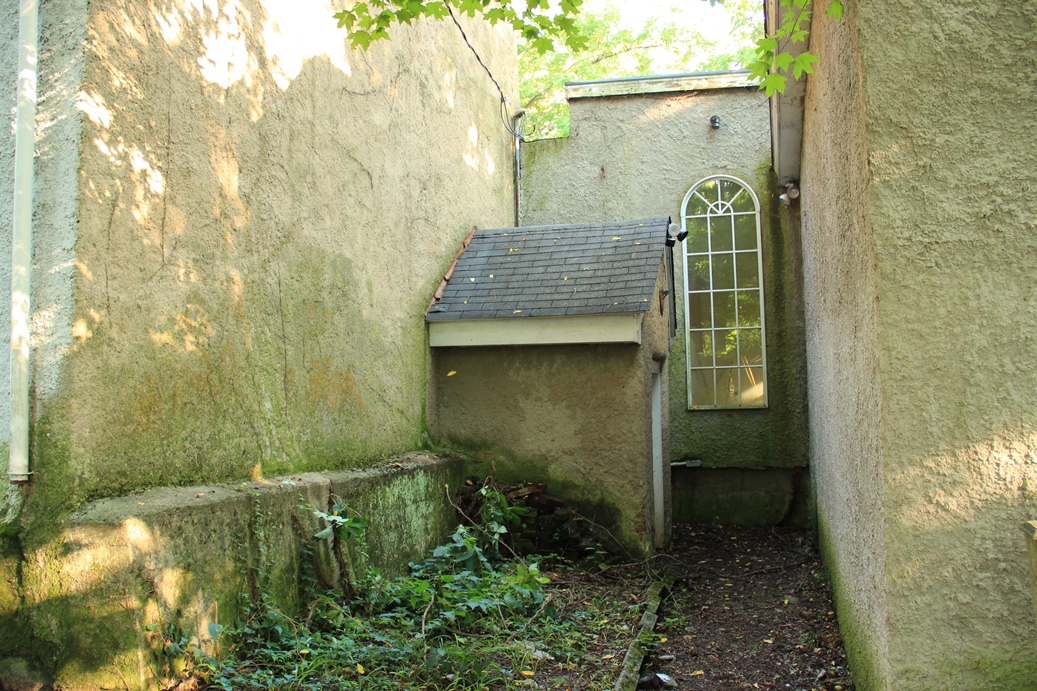
|
|
|
|
|
[#8]
Originally Posted By Kitties-with-Sigs:
ETA: For instance.... If the studs are rotted at the mudsill, and the whole wall had dropped in the middle, that could be your problem too. The interior walls could be holding the ceiling stable, but the exterior wall has lost its rigidity because the studs are not intact, so the wall is moving outward and down, and the upper floor might show it. |
|
|
|
|
[#9]
Originally Posted By SWIRE:
The previous owner believes an earthquake is responsible for the foundation shifting and moving northwest. New Madrid fault was around 1812 when the house was being built. Not sure which one came first. Someone, before the former owner, reinforced the foundation with concrete and stone. It is about 3 feet thick now. The first floor is a library/study. The ceiling, other than water damage of the plaster due to a broken window, is in pretty good shape. The ceiling does not appear to bow. Above that would be a bedroom. The house has the typical plaster coated solid brick walls. So I'm not sure how the floor joists were attached. Above that is a 1/2 height floor attic. It is in good shape. Point of interest. The wall on the left is 200 years old. The wall straight forward and on the right are about 12 years old. Here is a picture of the wall. The left side is the 2 story side with the problem. The wall does not appear to bow. You can also see the foot of concrete they added on the outside, the wall is about a foot thick, and in the basement the wall is about a foot thick. http://www.afterhourtechs.com/millspring/library_exterior_wall.jpg That's a really amazing photo with the old walls next to new walls. What is the exterior, exactly? |
|
|
|
|
[#10]
The chimney catching water and leaking it into the floor rotting the wood. This right here. Fireplaces are the devil. (Both of ours need to come down and be rebuilt, complete with a block foundation underground. Yeah like we have $20,000 to just throw at that. |
|
|
|
|
[#11]
Originally Posted By Kitties-with-Sigs:
ETA: If you need to lift the wall at all...like if the sill is rotten or the studs have rotted bottoms and are collapsing or some such, you need to fix THAT before you stiffen up the roof. You need to know what's happening in your attic to know how your house is doing. Get up there. The attic that I haven't been is a small section over the kitchen, which is partly under the flat roof. I've been in the attic over 2 story part and everything seems solid and stable. The attic over the kitchen is going to be a tight fit. It was built as a lean too porch and then enclosed from what I can tell. So one end is zero height and the other end might be 3 feet. My guess could be off but I don't see there being much more space than that in it. Who knows what type of spirits, animals, or bones I will find in it. It is one of those things "don't start the project unless you are ready to start two more". As long as I pretend everything is good and don't know, I don't have to worry about fixing it. 
|
|
|
|
|
[Last Edit: Kitties-with-Sigs]
[#12]
Originally Posted By SWIRE:
I don't think the 2 story part of the house has exterior studs. My 1903 house doesn't, just solid brick and plaster on top. I haven't torn into a wall there yet to check though. The attic that I haven't been is a small section over the kitchen, which is partly under the flat roof. I've been in the attic over 2 story part and everything seems solid and stable. The attic over the kitchen is going to be a tight fit. It was built as a lean too porch and then enclosed from what I can tell. So one end is zero height and the other end might be 3 feet. My guess could be off but I don't see there being much more space than that in it. Who knows what type of spirits, animals, or bones I will find in it. It is one of those things "don't start the project unless you are ready to start two more". As long as I pretend everything is good and don't know, I don't have to worry about fixing it. I do know that those structures are what people cable together with those stars (you know..like the ones people use to decorate now? ). Those are how restoration people pull bulging walls in and hold them stable. ETA: (for anybody reading who doesn't get it...you do NOT use those decorative stars to hold walls. You would use the real thing.) |
|
|
|
|
[#13]
Originally Posted By SWIRE:
...It is one of those things "don't start the project unless you are ready to start two more". Gotta tear it down, then bust up the concrete and remove the fill, then support the floor joists while we replace that mudsill, then jack the house up a bit, then build the foundation under that part, then set the house back down on it (there will be much prayer involved) and THEN put on the new front porch. One that...you know...is NOT supported by the freaking front wall and is NOT pulling the damn house down. Grrrrr. |
|
|
|
|
[Last Edit: SWIRE]
[#14]
Originally Posted By Kitties-with-Sigs:
I added some edits about the attic. Not sure any apply to you. No houses I've worked on have had plaster over brick. They've all been some sort of wooden framing. That's a really amazing photo with the old walls next to new walls. What is the exterior, exactly? The 1903 house has a wall similar to the wall on the far left. It is called a 1 brick wall with a flemish bond. 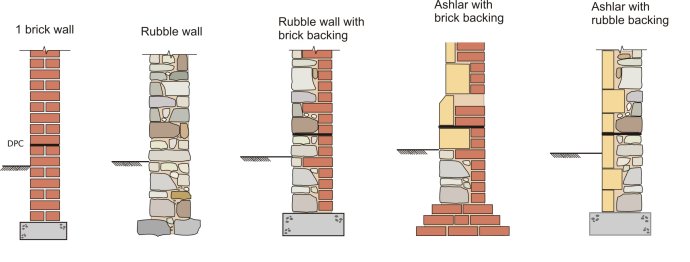
This image isn't of my 1903 brick but it could be as it looks just like it. 
The walls on the Craig house are thicker. I found this drawing of a 1 1/2 brick wall and I believe that is how the walls are built. They could have an air gap instead of bricks but I think the house is too old for that. The air gap was a newer design feature. 
The plaster was spread right onto the brick on the inside about an inch thick. I only have one picture that sort of shows this. It is plaster and brick. Up stairs I also can see this as the two rows of bricks end and there are no studs. 
I previously mentioned a hidden fireplace. Since I pulled my old pictures I also pulled out pictures related to that. The left side is how I found the house. The right side is with the mantel I got from a neighbor. I coated the entire room with drywall mud after patching all the cracks. Then I painted it. The room looks terrible in these pictures but now it looks great. 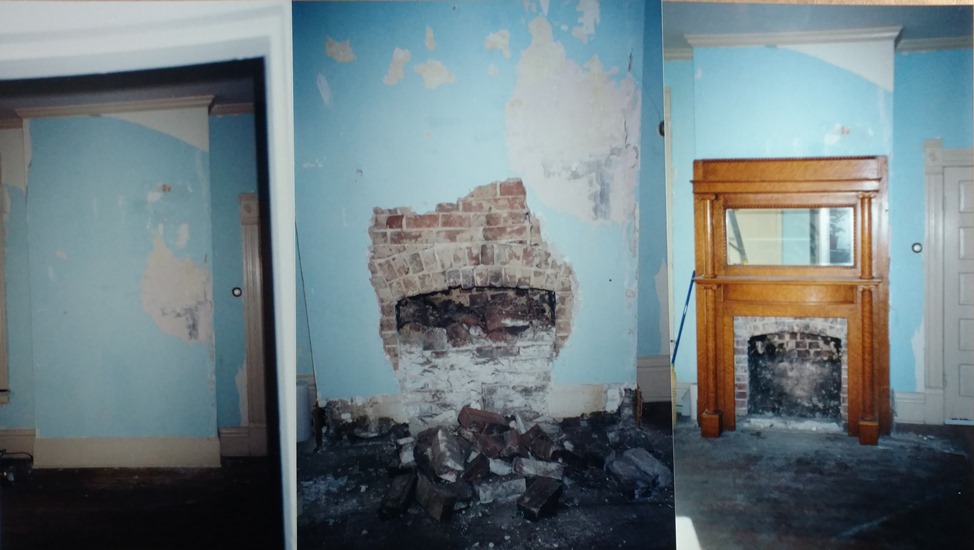
Here is what the room looked like after coating the walls and sanding the floor but before painting. This is the 1903 house not the Craig house. 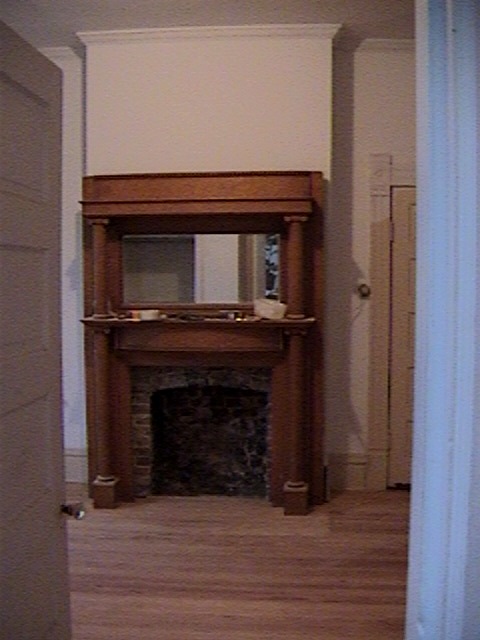
The fireplace and wall as of today. That is not a box of tannerite in front it, you are seeing things. 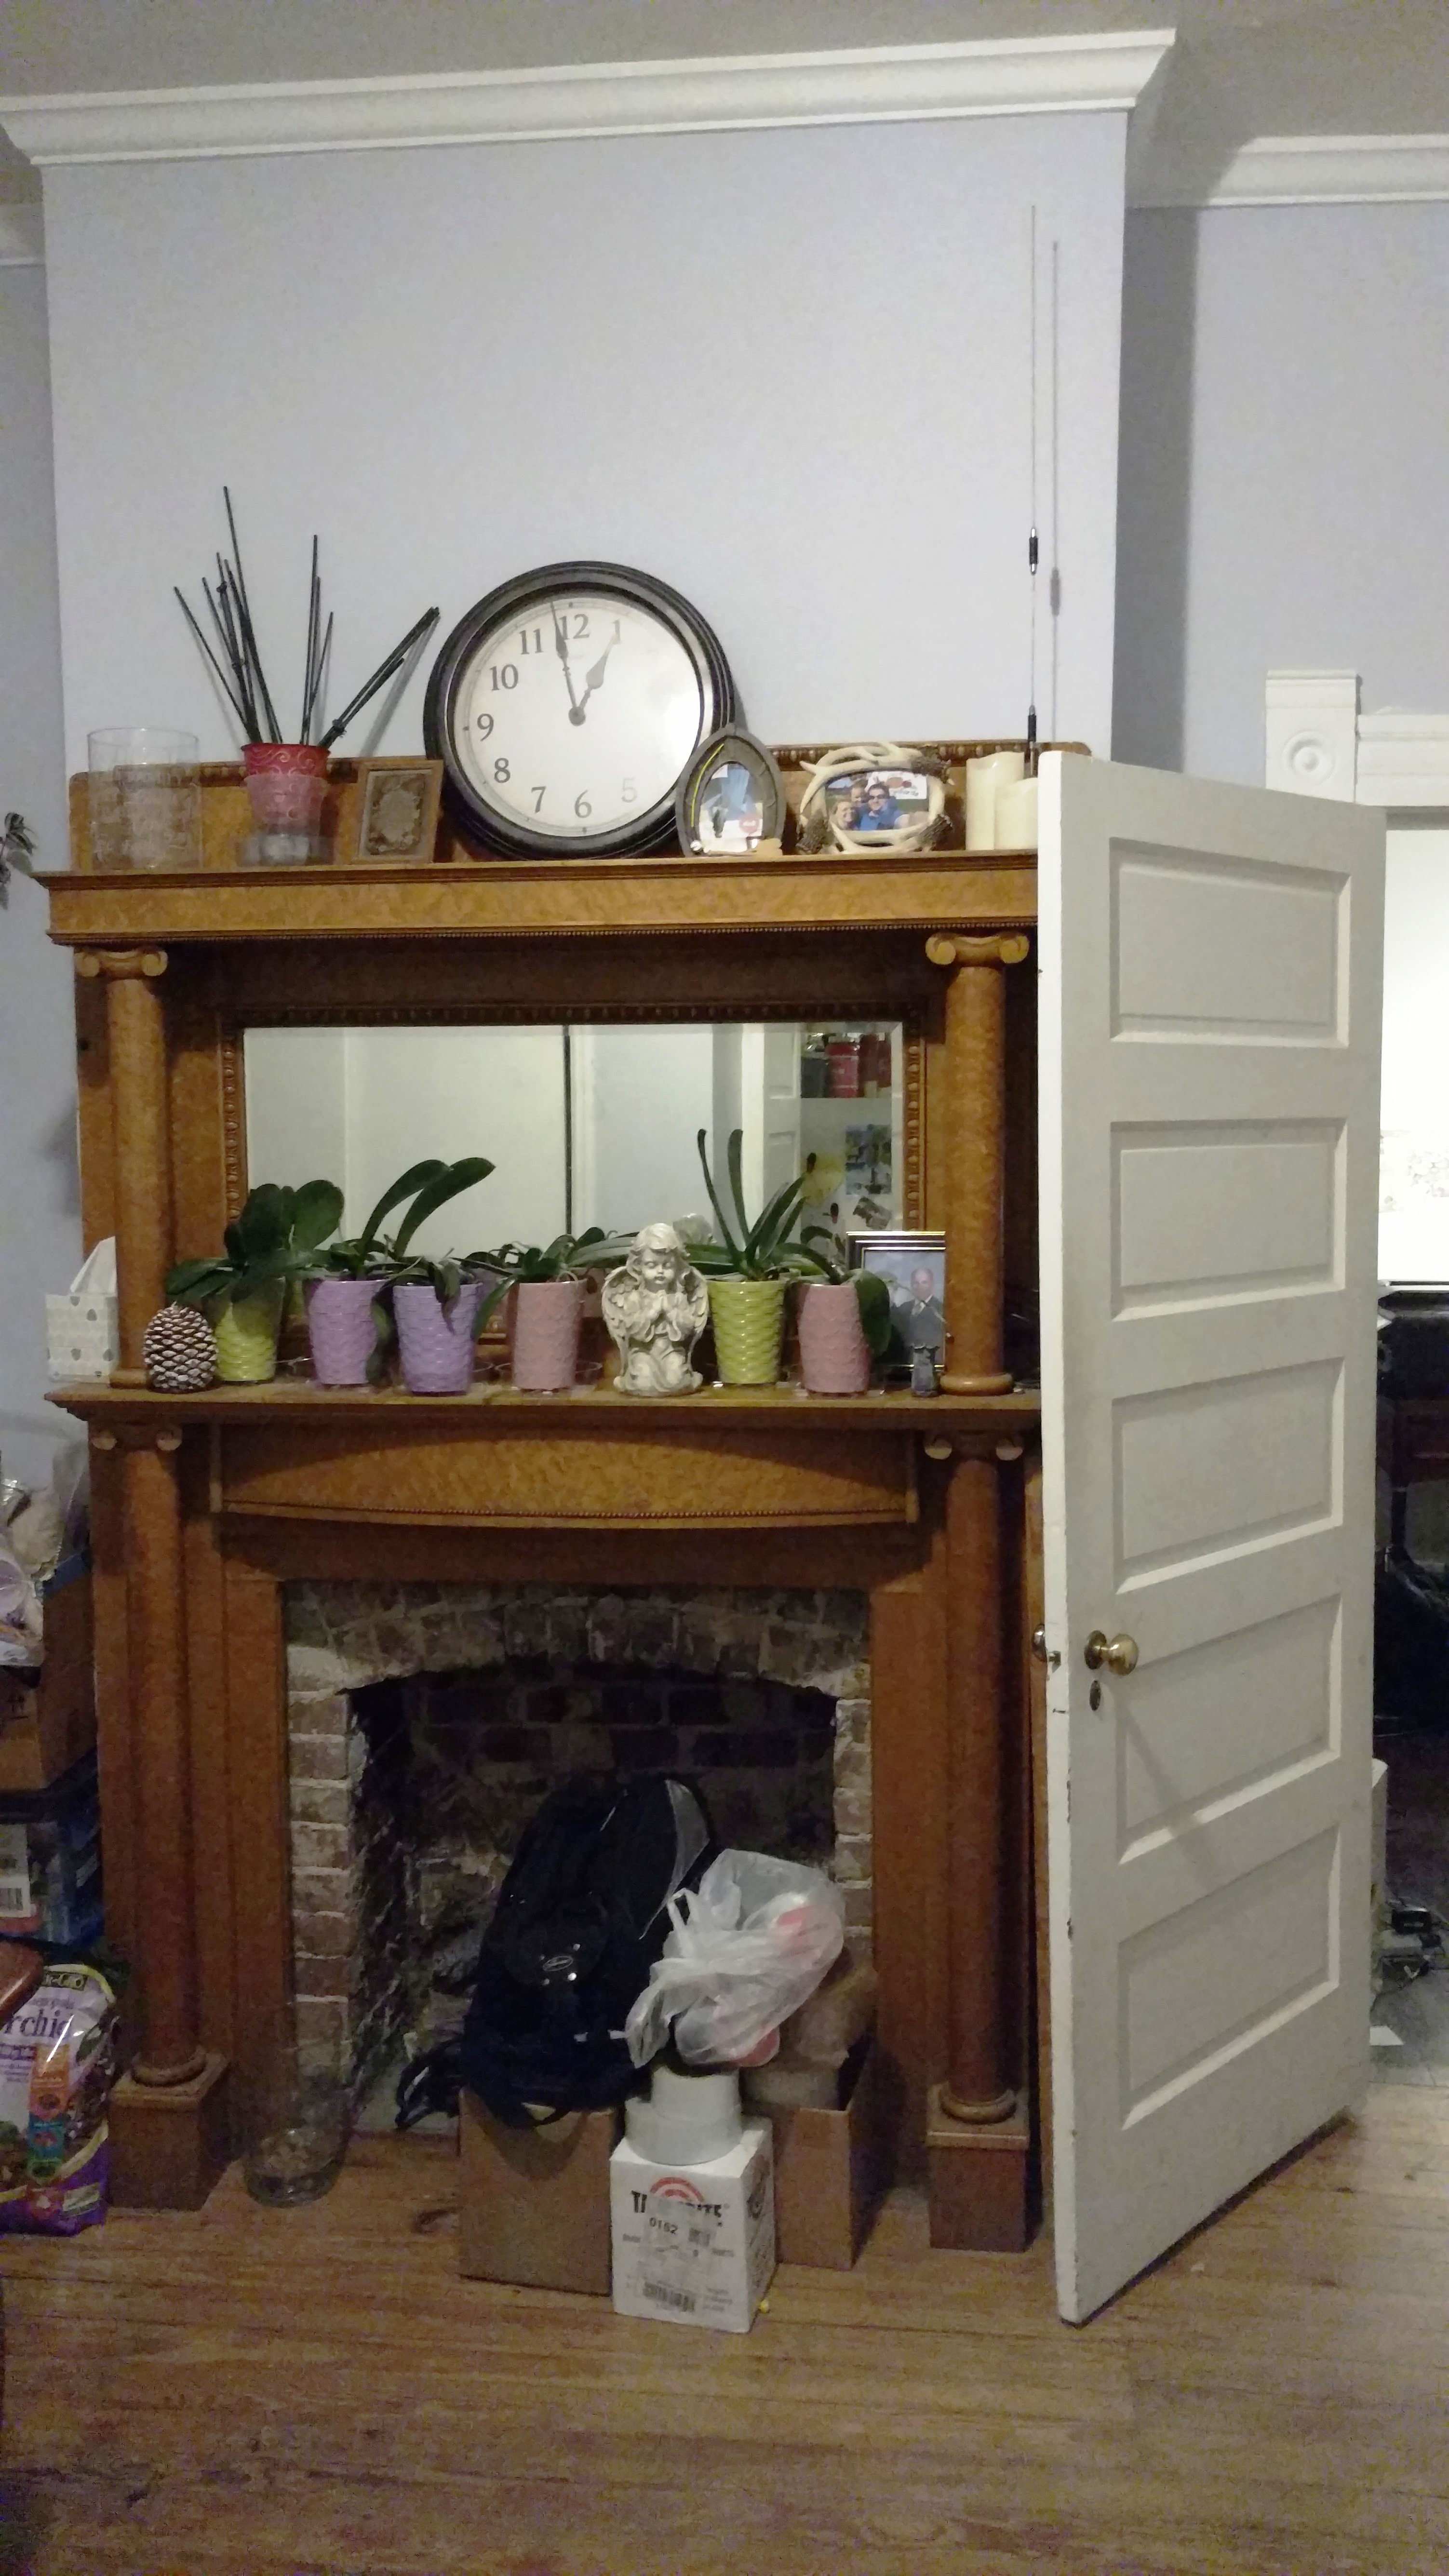
|
|
|
|
|
[#15]
Originally Posted By Kitties-with-Sigs:
Yep, when you said plaster over brick, you went beyond what I have done. I do know that those structures are what people cable together with those stars (you know..like the ones people use to decorate now? ). Those are how restoration people pull bulging walls in and hold them stable. ETA: (for anybody reading who doesn't get it...you do NOT use those decorative stars to hold walls. You would use the real thing.) |
|
|
|
|
[#16]
Originally Posted By Kitties-with-Sigs:
Our front porch is exactly that. Gotta tear it down, then bust up the concrete and remove the fill, then support the floor joists while we replace that mudsill, then jack the house up a bit, then build the foundation under that part, then set the house back down on it (there will be much prayer involved) and THEN put on the new front porch. One that...you know...is NOT supported by the freaking front wall and is NOT pulling the damn house down. Grrrrr.
|
|
|
|
|
[#17]
OST
|
|
|
|
|
[#18]
Originally Posted By SWIRE:
It's just a couple loose/rotten boards and a bit of sagging right? Surely you could bust it out one weekend and rebuild it the next.
|
|
|
|
|
[#19]
Originally Posted By SWIRE:
The two story is brick and then multiple coats of stucco with the last coat set to blend in with the new walls. The new walls are 2x6 exterior walls, plywood, tyvec, and then stucco. The 1903 house has a wall similar to the wall on the far left. It is called a 1 brick wall with a flemish bond. https://fet.uwe.ac.uk/conweb/house_ages/early%20walls1lr.jpg This image isn't of my 1903 brick but it could be as it looks just like it. http://blog.classicist.org/wp-content/uploads/2011/11/Figure-14-Glennmary-Halifax-County-Virginia-detail-Loth-1024x691.jpg The walls on the Craig house are thicker. I found this drawing of a 1 1/2 brick wall and I believe that is how the walls are built. They could have an air gap instead of bricks but I think the house is too old for that. The air gap was a newer design feature. http://www.theconstructioncivil.org/wp-content/uploads/2013/04/4-Flemish-Bond.jpg The plaster was spread right onto the brick on the inside about an inch thick. I only have one picture that sort of shows this. It is plaster and brick. Up stairs I also can see this as the two rows of bricks end and there are no studs. http://www.afterhourtechs.com/millspring/inside_wall_brick.jpg I previously mentioned a hidden fireplace. Since I pulled my old pictures I also pulled out pictures related to that. The left side is how I found the house. The right side is with the mantel I got from a neighbor. I coated the entire room with drywall mud after patching all the cracks. Then I painted it. The room looks terrible in these pictures but now it looks great. http://www.afterhourtechs.com/millspring/hidden_fireplace.jpg Here is what the room looked like after coating the walls and sanding the floor but before painting. This is the 1903 house not the Craig house. http://www.afterhourtechs.com/millspring/hidden_fireplace_refinished.jpg Why'd you choose drywall mud for the finish? I've heard yays and nays about mud as opposed to plaster. I haven't tried subbing one for the other...yet. |
|
|
|
|
[#20]
Originally Posted By Kitties-with-Sigs:
That mantel is freaking AWESOME. Why'd you choose drywall mud for the finish? I've heard yays and nays about mud as opposed to plaster. I haven't tried subbing one for the other...yet. Originally Posted By Kitties-with-Sigs:
Originally Posted By SWIRE:
The two story is brick and then multiple coats of stucco with the last coat set to blend in with the new walls. The new walls are 2x6 exterior walls, plywood, tyvec, and then stucco. The 1903 house has a wall similar to the wall on the far left. It is called a 1 brick wall with a flemish bond. https://fet.uwe.ac.uk/conweb/house_ages/early%20walls1lr.jpg This image isn't of my 1903 brick but it could be as it looks just like it. http://blog.classicist.org/wp-content/uploads/2011/11/Figure-14-Glennmary-Halifax-County-Virginia-detail-Loth-1024x691.jpg The walls on the Craig house are thicker. I found this drawing of a 1 1/2 brick wall and I believe that is how the walls are built. They could have an air gap instead of bricks but I think the house is too old for that. The air gap was a newer design feature. http://www.theconstructioncivil.org/wp-content/uploads/2013/04/4-Flemish-Bond.jpg The plaster was spread right onto the brick on the inside about an inch thick. I only have one picture that sort of shows this. It is plaster and brick. Up stairs I also can see this as the two rows of bricks end and there are no studs. http://www.afterhourtechs.com/millspring/inside_wall_brick.jpg I previously mentioned a hidden fireplace. Since I pulled my old pictures I also pulled out pictures related to that. The left side is how I found the house. The right side is with the mantel I got from a neighbor. I coated the entire room with drywall mud after patching all the cracks. Then I painted it. The room looks terrible in these pictures but now it looks great. http://www.afterhourtechs.com/millspring/hidden_fireplace.jpg Here is what the room looked like after coating the walls and sanding the floor but before painting. This is the 1903 house not the Craig house. http://www.afterhourtechs.com/millspring/hidden_fireplace_refinished.jpg Why'd you choose drywall mud for the finish? I've heard yays and nays about mud as opposed to plaster. I haven't tried subbing one for the other...yet. The biggest reason was the paint on the walls. That tan color that looks like it was tore off in strips wasn't wall paper. It was latex paint over lead based paint. The walls themselves weren't that rough other than some isolated cracks. After I dug out and patched all the cracks I used the mud to smooth everything out. It was still difficult with the drywall mud. I've watched a stucco guy on YouTube who just did the inside of his house with plaster. It looks like it applies about the same way. He is amazing at applying both of those. However, all his patching videos that he did, he used various forms of drywall mud to patch. Look back up a few posts. I added a modern day picture of the fireplace and mantle. I'm trying to remember if I paid $300 or $500 for the mantle. Either way, 14 years ago that was a steal. The people were crazy for ripping it out of the old house when they remodeled. |
|
|
|
|
[#21]
I spoke with the former owner on the history of the house. Elijah Craig built 3 houses along the spring. The house I have now was built to support operations at his mill. It is also the last known remaining house that he built. However, it is not a house that he used as his primary residence. That was further up the spring and no longer exists. So when I refer to the "Ejiah Craig House" it is in the context of the last remaining house that Elijah Craig had built.
|
|
|
|
|
[#22]
Originally Posted By SWIRE:
I spoke with the former owner on the history of the house. Elijah Craig built 3 houses along the spring. The house I have now was built to support operations at his mill. It is also the last known remaining house that he built. However, it is not a house that he used as his primary residence. That was further up the spring and no longer exists. So when I refer to the "Ejiah Craig House" it is in the context of the last remaining house that Elijah Craig had built. You have the creek and the house...that's some serious history and if *I* were interested in the Bourbon Trail and had some extra time and saw a brochure, I would want to come by your house for a tasting of whatever you offer, and a tour with old photos and a history of what went on there at that time. Standing in the last known house that Elijah Craig built, tasting some yummy beverage, and learning about the history.. Honestly that's my kind of vacation. It's alcohol and history/ museum combined. |
|
|
|
|
[#23]
Garden Update
Everything I have is finally in the ground. I'm burnt out on the garden work due to the soil being terrible. I still need to extend the drip irrigation lines but right now I am able to manually water. I'm not sure how things will turn out but I did put in a lot of effort to help them along. The majority of the plants were put into holes filled with compost and fertilizer. However, I ran out of space and compost so the last 16 or so tomato plants got planted straight into the ground underneath a walnut tree. I don't expect much from those plants but at least they are in the ground. I just got a new toy/camera and have a couple pictures from my first test flights. Here is the main area. Landscape fabric covering most of the ground, 4 rows of strawberry plants in the back, 4 pepper plants behind that, 3 rows of tomatoes in front of the strawberries, and 3 rows of peppers in front of that. You can tell by how I crowded the front row that I just wanted to get the plants in the ground. The bed is about 30 feet wide. 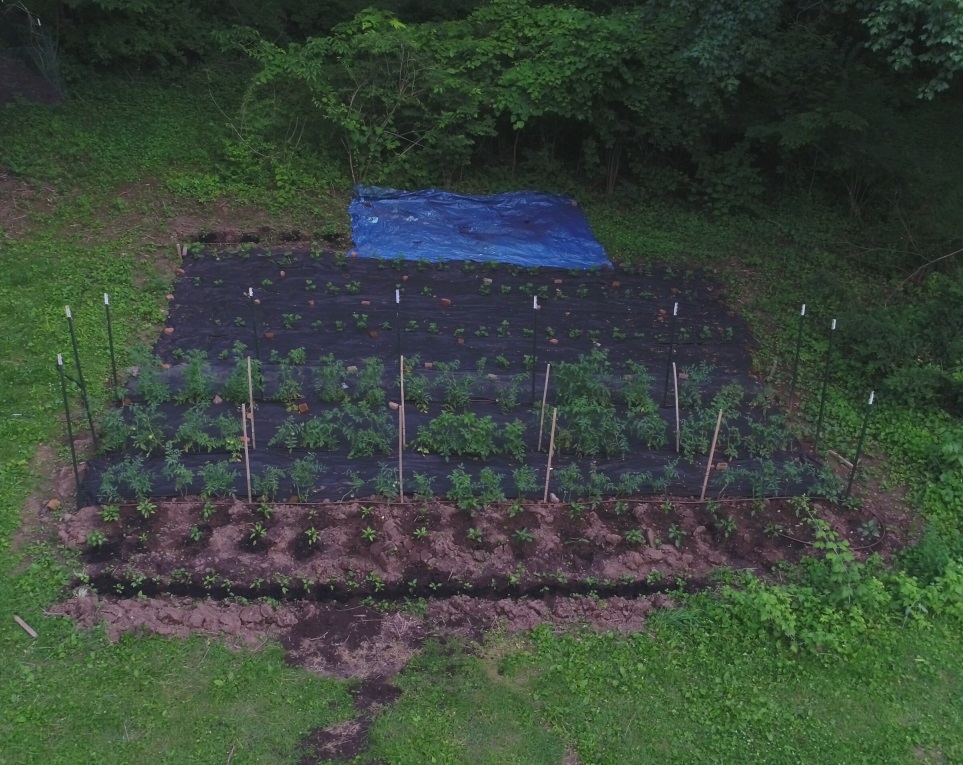
This is mainly an existing flower bed. Some of the plants at the bottom or bulbs we planted last fall. The 3 rows at the top going left to right are 1 row of peppers and 2 rows of tomatoes. The rows going mostly up and down are flower seeds that I just planted. 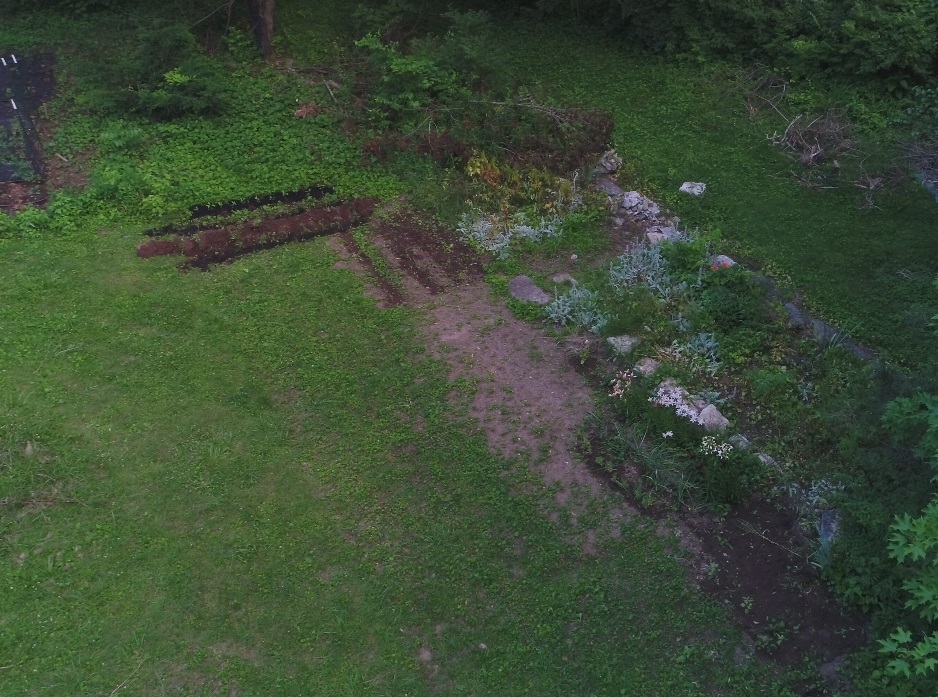
This is a newly cleared patch this year. I used the Teramite to dig out all sorts of honeysuckle. I bought seeds from a 1,200 pound giant pumpkin, the plants you see came from those seeds. The leaves are massive. To the left of the pumpkins there is a row of 10 blackberry bushes, thornless Triple Crown. To the right is another row of 10 Prime Ark blackberry bushes. To the right of that is a dozen or so watermelon plants. Above that is a cucumber plant, some peas, and 3 tomato plants. The front row is tomato plants. The tight grid on the right are all the left over tomato plants that I wanted to get in the ground. Call them a control group if you will, they received no compost and no fertilizer, just straight into the juglone rich soil. There were walnut shells all over the place. The tree in the top right of the picture is the black walnut. I trimmed it way back so that more light could reach the ground below it. 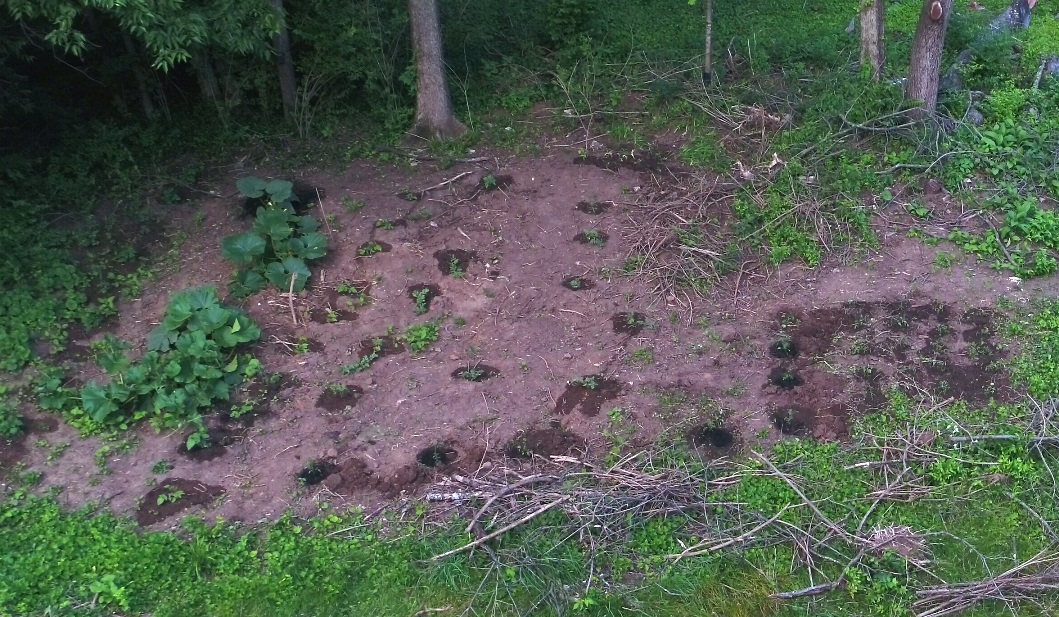
Here is a picture of the current mess in my back yard. All sorts of honesuckle bushes that I still need to run through my wood chipper. The tree pruned very high up in the center of the picture is the same black walnut tree as the previous picture. I'm debating on removing both those trees from that location. They are in the center of the yard and I have plenty of other trees. 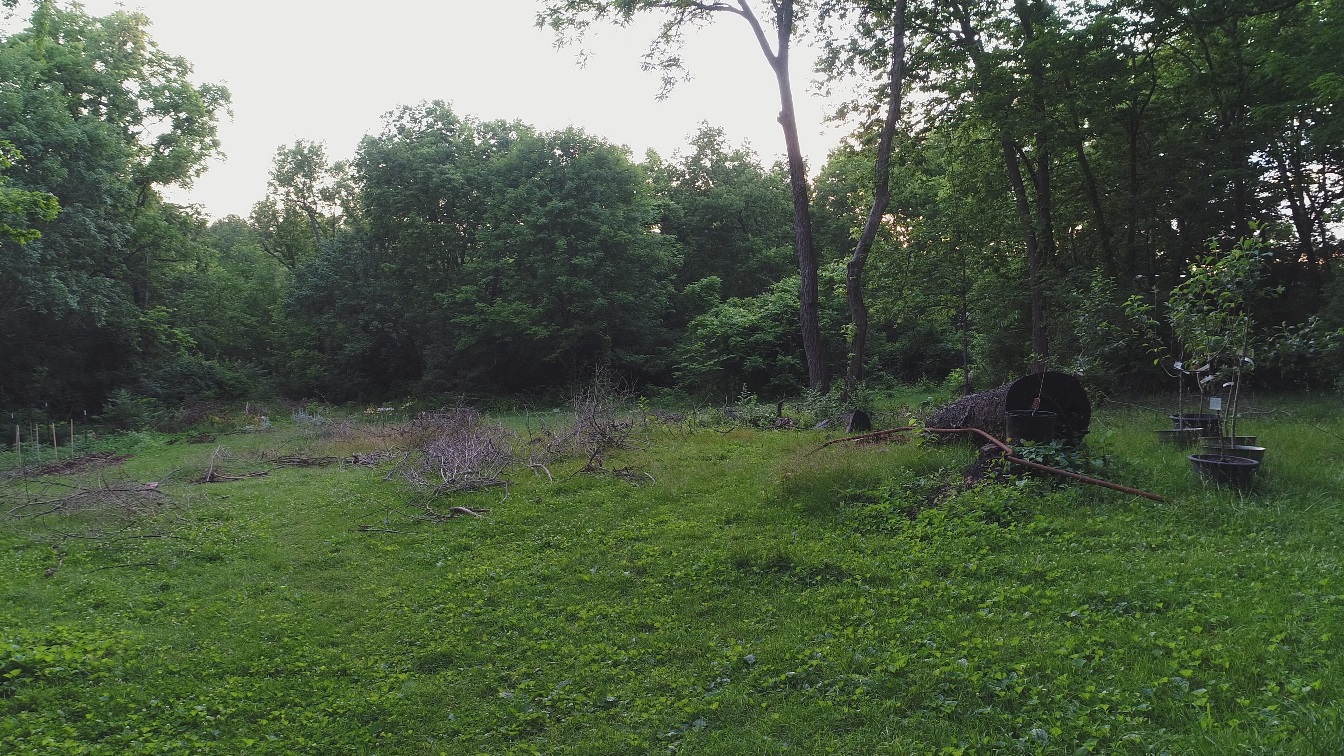
A reminder of what the backyard used to look like. The black cherry tree was still standing and you can see all the branches on the walnut behind it as well as all the honeysuckle surrounding it. 
|
|
|
|
|
[#24]
Originally Posted By SWIRE:
Garden Update Everything I have is finally in the ground. I'm burnt out on the garden work due to the soil being terrible. I still need to extend the drip irrigation lines but right now I am able to manually water. I'm not sure how things will turn out but I did put in a lot of effort to help them along. The majority of the plants were put into holes filled with compost and fertilizer. However, I ran out of space and compost so the last 16 or so tomato plants got planted straight into the ground underneath a walnut tree. I don't expect much from those plants but at least they are in the ground. I just got a new toy/camera and have a couple pictures from my first test flights. Here is the main area. Landscape fabric covering most of the ground, 4 rows of strawberry plants in the back, 4 pepper plants behind that, 3 rows of tomatoes in front of the strawberries, and 3 rows of peppers in front of that. You can tell by how I crowded the front row that I just wanted to get the plants in the ground. The bed is about 30 feet wide. http://www.afterhourtechs.com/millspring/garden/garden_drone1.JPG This is mainly an existing flower bed. Some of the plants at the bottom or bulbs we planted last fall. The 3 rows at the top going left to right are 1 row of peppers and 2 rows of tomatoes. The rows going mostly up and down are flower seeds that I just planted. http://www.afterhourtechs.com/millspring/garden/garden_drone2.JPG This is a newly cleared patch this year. I used the Teramite to dig out all sorts of honeysuckle. I bought seeds from a 1,200 pound giant pumpkin, the plants you see came from those seeds. The leaves are massive. To the left of the pumpkins there is a row of 10 blackberry bushes, thornless Triple Crown. To the right is another row of 10 Prime Ark blackberry bushes. To the right of that is a dozen or so watermelon plants. Above that is a cucumber plant, some peas, and 3 tomato plants. The front row is tomato plants. The tight grid on the right are all the left over tomato plants that I wanted to get in the ground. Call them a control group if you will, they received no compost and no fertilizer, just straight into the juglone rich soil. There were walnut shells all over the place. The tree in the top right of the picture is the black walnut. I trimmed it way back so that more light could reach the ground below it. http://www.afterhourtechs.com/millspring/garden/garden_drone3_walnut.JPG Here is a picture of the current mess in my back yard. All sorts of honesuckle bushes that I still need to run through my wood chipper. The tree pruned very high up in the center of the picture is the same black walnut tree as the previous picture. I'm debating on removing both those trees from that location. They are in the center of the yard and I have plenty of other trees. http://www.afterhourtechs.com/millspring/garden/backyard_mess_drone1.JPG A reminder of what the backyard used to look like. The black cherry tree was still standing and you can see all the branches on the walnut behind it as well as all the honeysuckle surrounding it. http://www.afterhourtechs.com/millspring/backyard_before.JPG 2-If you get good growth and development and fruit out of the stuff under those walnuts, you need to bottle whatever you are doing. And I really appreciate your detailed accounting of what you planted where. If you find certain things do okay under walnuts, that's a good bit of experimentation that a lot of people like me can use. |
|
|
|
|
[#25]
I planted some cucumbers in the ground, not near a walnut that I know of. The vines got about 2 feet long and now they just shriveled up like they are wilting due to lack of moisture. I'm going to assume that is from the juglone. They were planted in straight dirt as well. Almost everything else is getting a good supply of new dirt/compost which should help. The pumpkins might be far enough away that the juglone isn't really in that area. The grid of tomatoes however had walnut shells falling into the holes that I was digging. It will be interesting to watch how the plants grow but I'm not holding out any hopes for a magical formula. I am keeping in mind the tomatoes only need to grow for 5 months. From my previous experience the main root balls get around the size of a basketball and that is how large I tried to make the holes that were filled with compost. Towards the end it more the size of a volleyball.
I was looking at getting a tractor but for the price I'm good with just renting the Teramite. In 10 hours of use I gave myself 10 weeks of clean up. Long term a tractor would be good though as I have more time consuming projects on my to do list. |
|
|
|
|
[Last Edit: Kitties-with-Sigs]
[#26]
Originally Posted By SWIRE:
I planted some cucumbers in the ground, not near a walnut that I know of. The vines got about 2 feet long and now they just shriveled up like they are wilting due to lack of moisture. I'm going to assume that is from the juglone. They were planted in straight dirt as well. Almost everything else is getting a good supply of new dirt/compost which should help. The pumpkins might be far enough away that the juglone isn't really in that area. The grid of tomatoes however had walnut shells falling into the holes that I was digging. It will be interesting to watch how the plants grow but I'm not holding out any hopes for a magical formula. I am keeping in mind the tomatoes only need to grow for 5 months. From my previous experience the main root balls get around the size of a basketball and that is how large I tried to make the holes that were filled with compost. Towards the end it more the size of a volleyball. I was looking at getting a tractor but for the price I'm good with just renting the Teramite. In 10 hours of use I gave myself 10 weeks of clean up. Long term a tractor would be good though as I have more time consuming projects on my to do list. You need a tractor. I will look forward to your updates on how all that garden is doing. In my experience, death from juglone looks like "failure to thrive" followed by yellowing, then sort of wasting away-- a shriveling wilt, sort of. It's not pretty. |
|
|
|
|
[#27]
I'll have more pictures and updates shortly. A quick note on the tomato plants, they are having a rough life. After planting the tomatoes in my previous post a couple neighborhood dogs decided it would be fun to come on my property and dig a bunch of them up. Then a neighbor asked if I had any plants, so I had to go back and dig 5 of them up for him. The trees have really filled in and there is way too much shade, all the plants look spindly. Last summer and this year the tops of some of my plants have been nipped off. I looked for worms but didn't find any. My suspicions were confirmed this morning. She ran off for a bit and jumped down to the next tier of yard but kept sticking her head up to see if I had left so that she could get back to eating the tomato plants.

|
|
|
|
|
[Last Edit: Kitties-with-Sigs]
[#28]
Originally Posted By SWIRE:
I'll have more pictures and updates shortly. A quick note on the tomato plants, they are having a rough life. After planting the tomatoes in my previous post a couple neighborhood dogs decided it would be fun to come on my property and dig a bunch of them up. Then a neighbor asked if I had any plants, so I had to go back and dig 5 of them up for him. The trees have really filled in and there is way too much shade, all the plants look spindly. Last summer and this year the tops of some of my plants have been nipped off. I looked for worms but didn't find any. My suspicions were confirmed this morning. She ran off for a bit and jumped down to the next tier of yard but kept sticking her head up to see if I had left so that she could get back to eating the tomato plants. http://www.afterhourtechs.com/millspring/garden/tomato_deer.jpg http://www.afterhourtechs.com/millspring/garden/tomato_deer_head.jpg |
|
|
|
|
[#29]
Originally Posted By Kitties-with-Sigs:
That's brazen as all heck. You will be interested in the garden pictures that I will post later today. They involve walnuts... |
|
|
|
MI, USA
|
[Last Edit: jchewie1]
[#30]
Originally Posted By Kitties-with-Sigs:
Our front porch is exactly that. Gotta tear it down, then bust up the concrete and remove the fill, then support the floor joists while we replace that mudsill, then jack the house up a bit, then build the foundation under that part, then set the house back down on it (there will be much prayer involved) and THEN put on the new front porch. One that...you know...is NOT supported by the freaking front wall and is NOT pulling the damn house down. Grrrrr. ETA, great thread OP. Write the history of the place down. The cable installer that came to our house had lots of stories about the crick just to the back of our property and hunting rabbits when growing up. Some day I would like to run into someone who grew up on the farm that the property I own was split from. |
|
|
|
[#31]
Originally Posted By jchewie1:
Patience. It will all be fixed right up and look great when you are ready to sell. I fixed up an A frame built in the 1970s out of barn beams hewn by hand in the 1870s, a couple portions had rotten sills. I am currently fixing a 1990s house with foreclosure frost heave foundation problems, and also found a portion of rotten wall and sill that was a surprise to me. I lived in both houses while the work was going on. Not taking time to play, and not placing family before the never ending sequential vortex of house projects and problems will create tremendous amount of resentment and won't make anything go faster. We've been at this house since 2000, and we have no plans to sell. We plan to die here. They'll haul our cold, dead bodies out someday I guess. I hope they find us before the cats get hungry enough to eat us. |
|
|
|
|
[#32]
Today I picked up another cubic yard of leaf compost. $15 a local company which is a great price.
Here are the peppers before and after. 

The blackberries, pumpkin, and watermelon patch. I will need to get another aerial shot of this area. 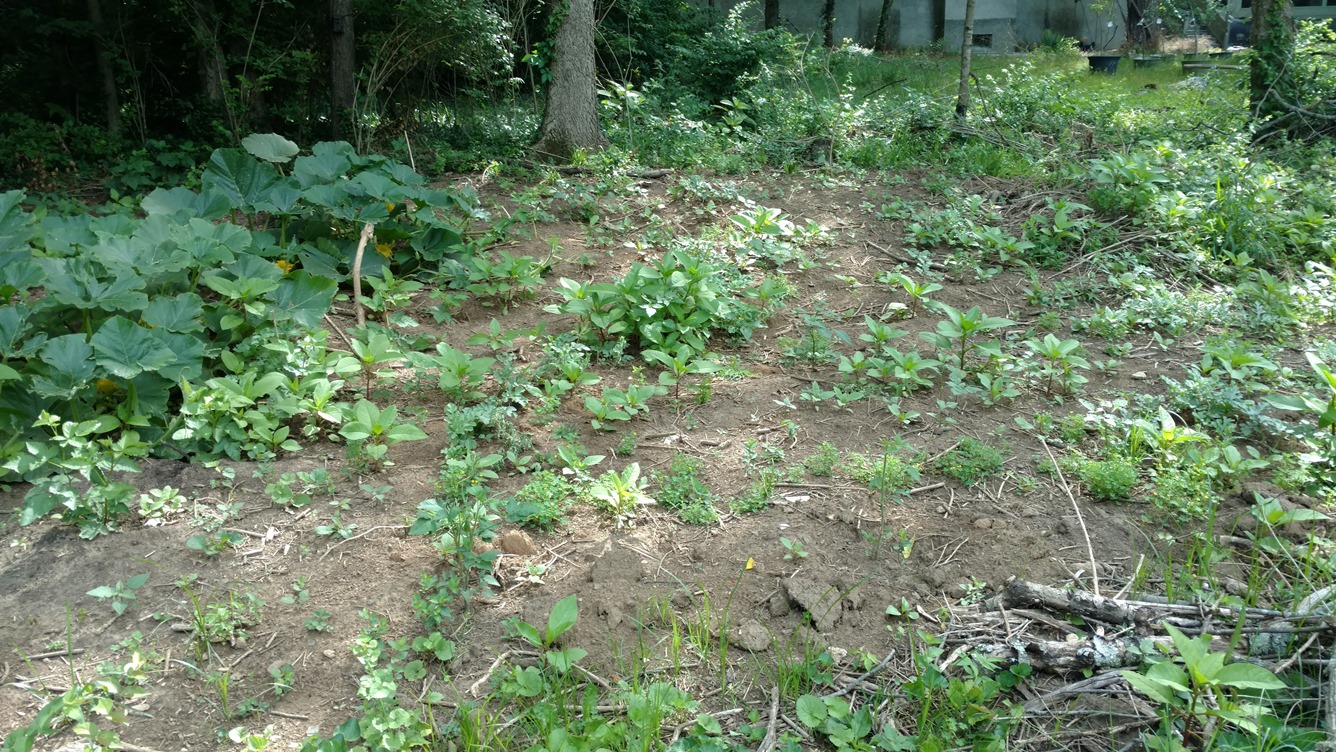

Now the interesting part. Back on 5/29 I posted about running out of compost and space, so I just put my last set of tomato plants straight into the ground, under a walnut tree. Not looking too shabby for no compost and no fertilizer, just straight up walunt dirt. 
As for evidence that it is under a walnut tree, there are a few old walnuts in this picture and one new walnut. I highlighted five but there is at least 7 walnuts or walnut shells in that area. I did put compost on them today for the first time. 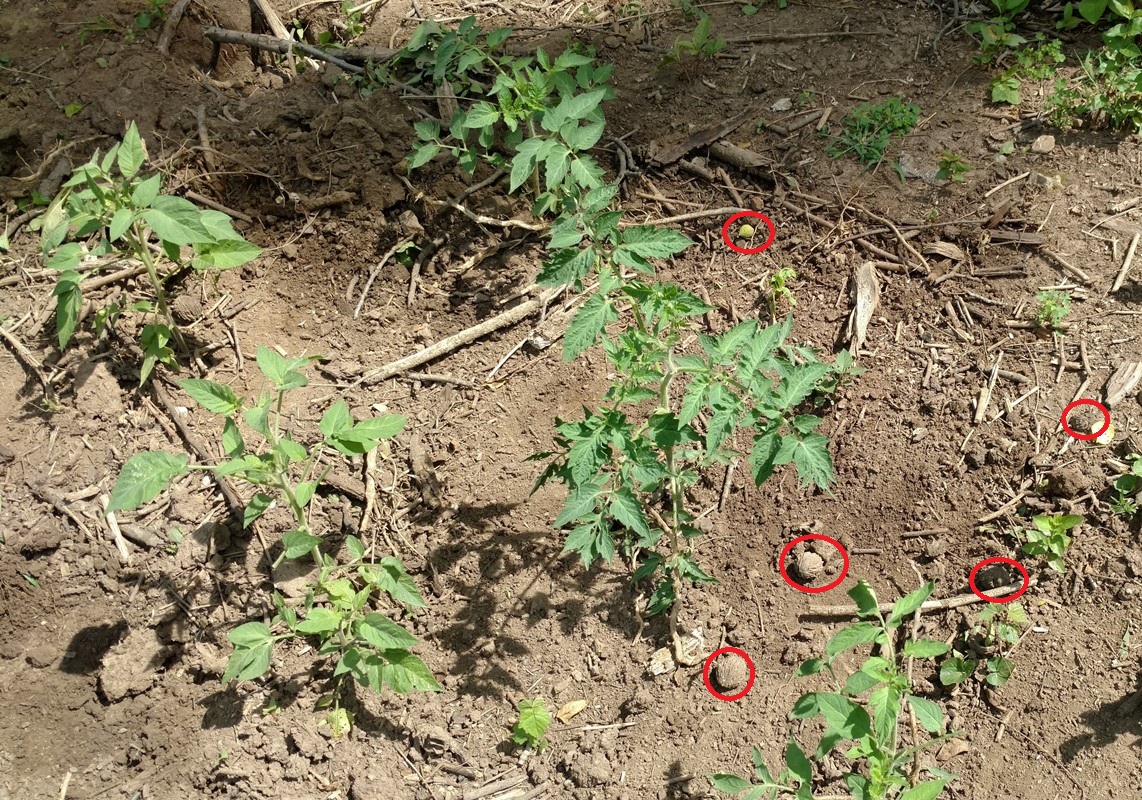
|
|
|
|
|
[#33]
I am interested to know how they progress.
I've noticed something over the years. If you look for lists of which plants are "juglone tolerant" every list is different. I have the ones I know will make it from my own yard, but the other lists...they are interesting to me. I hope you keep a written list/record of what does well, including the variety of tomato/pepper, etc. I am getting the idea that "tolerance" might be a little more complex than we have thought. Nandina domestica is supposed to be pretty tolerant. But I had one die at the corner of my house two seasons ago. I have to factor in that although that nandina always got a fair dose of walnut drainage, the big walnut tree at the side of my house has finally spread a huge branch right over the peak of the roof, and is dripping hydrojuglone onto the roof, and right onto that planting bed. I don't know that this is it, as Nandina is growing elsewhere under walnuts, but I have to wonder just HOW much it can take, and for how long. The three hollies on that side of the porch petered out and died over the past three years. I ripped them out last summer. The hollies on the other side...are thriving. Resistance and tolerence to juglone is one of my interests. |
|
|
|
|
[#34]
I'm surprised the tomato plants have done as well as they have. However, what I'm seeing is juglone toxicity takes time to build up. Also as you mentioned some varieties of the same species are more tolerant than others. In the main garden I have several tomato plants that are now wilting, as if they have not been watered. They look just like the cucumber plants I had that I died off. Even after watering the plants they still seems to be dying, despite no evidence of any other damage or disease. I will take some pictures.
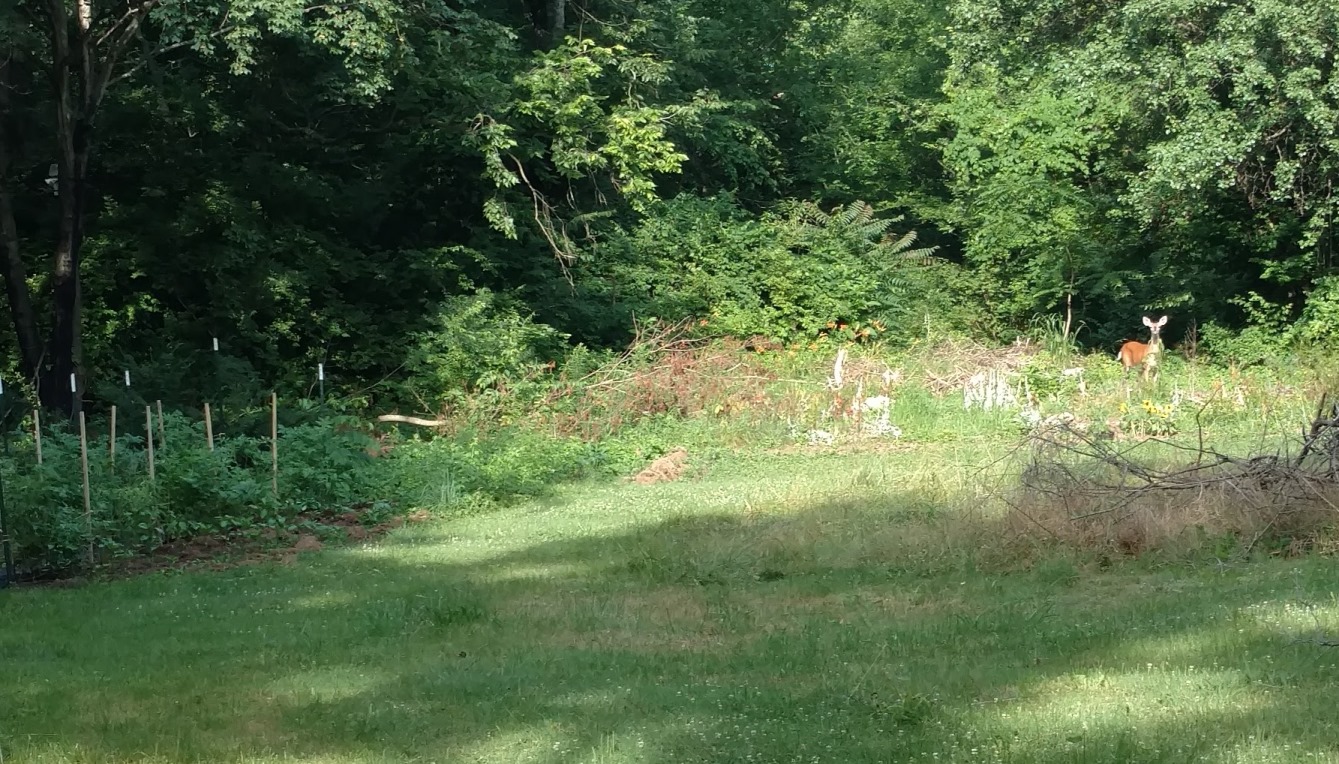
Speaking of pictures, I finally a minute to go through the game camera pictures looking over the garden. First up are the "neighborhood dogs" that dug up half a dozen tomatoes plants after I planted them. Those dogs need to go. 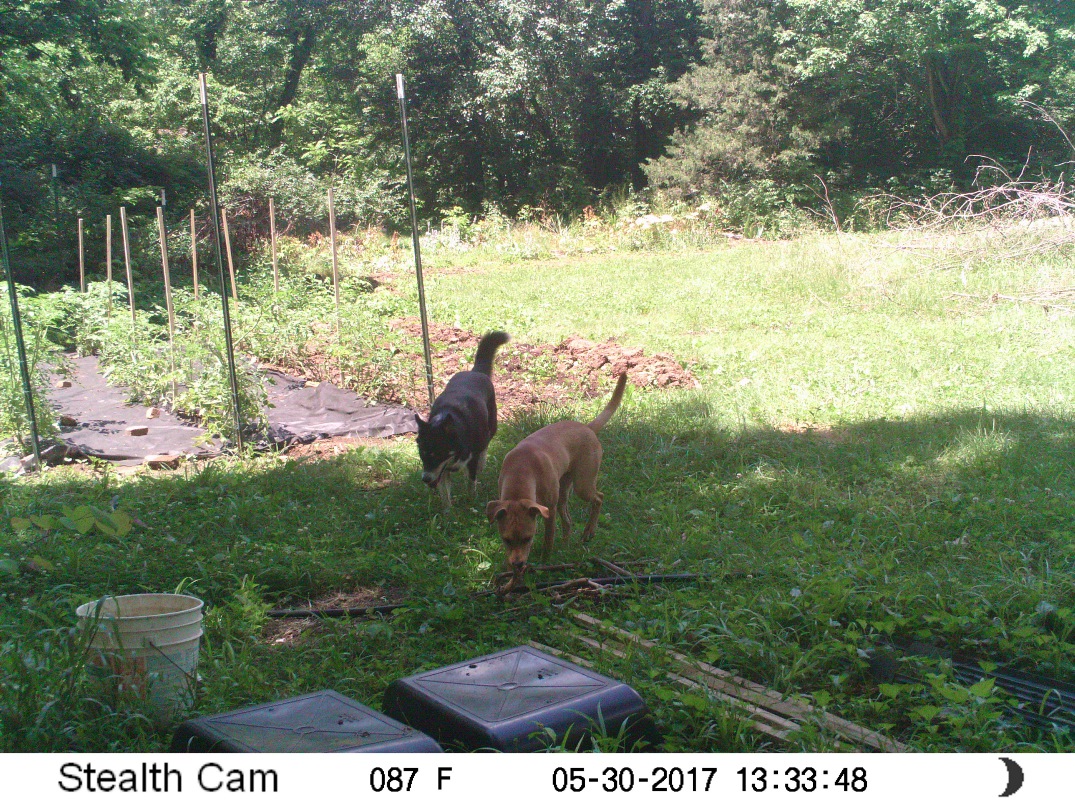
Next up is a better picture of the deer by the garden....and her little fawn. 
|
|
|
|
|
[#35]
Originally Posted By SWIRE:
I'm surprised the tomato plants have done as well as they have. However, what I'm seeing is juglone toxicity takes time to build up. Also as you mentioned some varieties of the same species are more tolerant than others. In the main garden I have several tomato plants that are now wilting, as if they have not been watered. They look just like the cucumber plants I had that I died off. Even after watering the plants they still seems to be dying, despite no evidence of any other damage or disease. I will take some pictures. Speaking of pictures, I finally a minute to go through the game camera pictures looking over the garden. First up are the "neighborhood dogs" that dug up half a dozen tomatoes plants after I planted them. Those dogs need to go. http://www.afterhourtechs.com/millspring/garden/dogs.jpg Next up is a better picture of the deer by the garden....and her little fawn. http://www.afterhourtechs.com/millspring/garden/doe_fawn.jpg
|
|
|
|
|
[#36]
Originally Posted By Kitties-with-Sigs:
Oh yeah posting THAT will win friends to the "meat in the freezer" solution. |
|
|
|
|
[#37]
I believe these are examples of juglone toxitity in my garden plants. I planted the tomatoes in batches by variety using the stakes as a separator. The fact that all the plants in one section are showing the same symptoms tells me that the variety of tomato is highly sensitive to juglone. The watermelons are also multiple varieties. Several of one type of dying off while the other seems to be going fine. The plants are falling over because there is too much shade and they are growing very spindly. Even with multiple strings woven around the plants they can't stay upright.
I also found a new wildlife enemy, crows. I walked out to the garden today and a murder of crows was in the tomato rows eating all the tomatoes. Now I want to murder some crows but I think that is illegal. I need a six foot tall electric chain link fence with a full net across the top of it if I want to get anything from the garden this year. 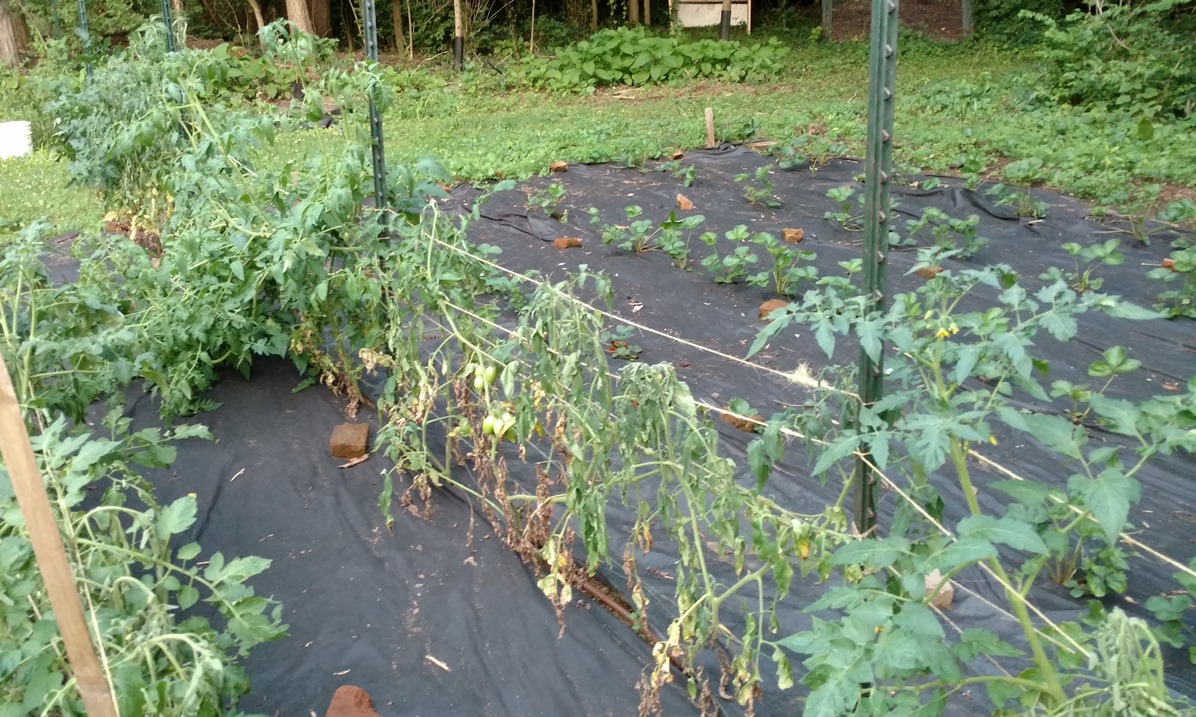

|
|
|
|
|
[#38]
Originally Posted By SWIRE:
I believe these are examples of juglone toxitity in my garden plants. I planted the tomatoes in batches by variety using the stakes as a separator. The fact that all the plants in one section are showing the same symptoms tells me that the variety of tomato is highly sensitive to juglone. The watermelons are also multiple varieties. Several of one type of dying off while the other seems to be going fine. The plants are falling over because there is too much shade and they are growing very spindly. Even with multiple strings woven around the plants they can't stay upright. I also found a new wildlife enemy, crows. I walked out to the garden today and a murder of crows was in the tomato rows eating all the tomatoes. Now I want to murder some crows but I think that is illegal. I need a six foot tall electric chain link fence with a full net across the top of it if I want to get anything from the garden this year. http://www.afterhourtechs.com/millspring/garden/juglone_tomatoes.jpg http://www.afterhourtechs.com/millspring/garden/juglone_watermelon.jpg |
|
|
|
|
[Last Edit: SWIRE]
[#39]
The fabric is 4 foot wide Scotts Pro Landscape Fabric is a 1.5 oz. product from Home Depot. So far I've been really happy with the main fabric that I chose. I chose it for the weight and size more than anything, not knowing much about fabric at the time. It didn't initially let water penetrate much but now it seems to do just fine.
I'm very impressed with its ability to eliminate the weeds. As you can see in the top right of the picture where is no fabric the weeds are thick. Other than some small weeds coming through the holes I made in the fabric for the plants there was no signs of weeds even trying to push up the fabric. Most fabric comes in a 3 foot width; however, I was wanting 4 food wide fabric for the strawberry beds so I could grow them to a 2 foot wide row and not have to worry about fabric edges right next to each side of the rows. I ran out of the fabric and bought some cheaper stuff from Lowes. That stuff sort of works but you can almost see through it. It might work for a year or two but I don't expect it to last very long. Scott's products can be purchased anywhere but Home Depot was the only place I found the 4 foot wide heavy fabric. http://www.homedepot.com/p/Scotts-4-ft-x-220-ft-Landscape-Fabric-204133/203074617 
|
|
|
|
|
[#40]
Some more wildlife captured by my cameras. Hard to believe all these animals exist 3 blocks from the middle of town.
First up are a couple raccoons eating the block and corn I put out for deer. Never saw a single deer all fall or winter. 
Next up are 2 different coyotes. One has a hurt leg and I've previously caught it on camera. This one is not hurt, so that means there are at least 2 of them. 
I caught this one on camera close to a year ago further up in the yard. I'm surprised it has made it with the hurt leg. Although I'm sure there is plenty of garbage in town that it can scavenge versus chasing down prey. 
|
|
|
|
|
[#41]
Originally Posted By SWIRE:
I believe these are examples of juglone toxitity in my garden plants. I planted the tomatoes in batches by variety using the stakes as a separator. The fact that all the plants in one section are showing the same symptoms tells me that the variety of tomato is highly sensitive to juglone. The watermelons are also multiple varieties. Several of one type of dying off while the other seems to be going fine. The plants are falling over because there is too much shade and they are growing very spindly. Even with multiple strings woven around the plants they can't stay upright. I also found a new wildlife enemy, crows. I walked out to the garden today and a murder of crows was in the tomato rows eating all the tomatoes. Now I want to murder some crows but I think that is illegal. I need a six foot tall electric chain link fence with a full net across the top of it if I want to get anything from the garden this year. http://www.afterhourtechs.com/millspring/garden/juglone_tomatoes.jpg http://www.afterhourtechs.com/millspring/garden/juglone_watermelon.jpg There are a lot of lists out there with names of plants that are tolerant or intolerant. Hard data is hard to find. I could offer some...like...Nandina Domestica is VERY tolerant. But....in ground that's been dripped on for 150 years...yeah, even a tolerant plant can last only only last so long... Allelopathy is interesting. I think, with something like juglone, which persists in the soil, it is a very complex interaction. I'm still after a list of hard-core plants that can withstand heavy doses. I've got a small list going. Will be interested in what you find. I am impressed that some of your tomatoes are holding out |
|
|
|
|
[#42]
Originally Posted By SWIRE:
Some more wildlife captured by my cameras. Hard to believe all these animals exist 3 blocks from the middle of town. First up are a couple raccoons eating the block and corn I put out for deer. Never saw a single deer all fall or winter. http://www.afterhourtechs.com/millspring/wildlife/raccoons_feeding.jpg Next up are 2 different coyotes. One has a hurt leg and I've previously caught it on camera. This one is not hurt, so that means there are at least 2 of them. http://www.afterhourtechs.com/millspring/wildlife/coyote1.gif I caught this one on camera close to a year ago further up in the yard. I'm surprised it has made it with the hurt leg. Although I'm sure there is plenty of garbage in town that it can scavenge versus chasing down prey. http://www.afterhourtechs.com/millspring/wildlife/coyote2.gif I know....I'm a softie. |
|
|
|
|
[#43]
I should have some documentation on which tomato plants were planted where, at least in the main patch. It might not matter much as others are starting to die off as well. That garden might end up being a complete bust this year. The pepper plants are doing ok so far. Not growing much, so I'm not sure what I will get from them. The area is really shaded now, which is making all the problems worse. I'm also noticing more and more walnut trees around that garden. I'll keep notes of anything that does produce.
|
|
|
|
|
[Last Edit: Kitties-with-Sigs]
[#44]
Front yard..."Edible Garden as Ornamental Element"...
I'm just sayin. |
|
|
|
|
[#45]
Hopefully I have time to get caught up on some things this holiday weekend. Work decided to cancel our 1/2 day Christmas eve holiday and give us July 3rd in addition to July 4th. I still haven't posted all my "before" photos from last year.
I did put another cubic yard of compost down tonight. I moved back the fabric in the strawberry patch and put it under it. The fabric in spots has become very weak, almost like a wet napkin. I have pictures but that will come later. On the tomatoes surviving the juglone I found my pictures and I have identified most of the plants in one row. One of the better performing varieties is the Abraham Lincoln Heirloom Tomato. I need to re-string the tomatoes up to see what is still left and will take pictures when I do. |
|
|
|
|
[#46]
So much for getting caught up over the long weekend. GoDaddy decided to move my site to a different server but it hung in the process and was not accessible for over 24 hours. Then after they moved it the IP changed so all my pictures broke. Everything should be resolved and working again or at least coming online soon.
|
|
|
|
|
[Last Edit: Kitties-with-Sigs]
[#47]
Originally Posted By SWIRE:
So much for getting caught up over the long weekend. GoDaddy decided to move my site to a different server but it hung in the process and was not accessible for over 24 hours. Then after they moved it the IP changed so all my pictures broke. Everything should be resolved and working again or at least coming online soon. I've got a BUNCH of sites through GoDaddy. Crap. *runs off to look* |
|
|
|
|
[Last Edit: SWIRE]
[#48]
Originally Posted By Kitties-with-Sigs:
Are you freaking kidding me? I've got a BUNCH of sites through GoDaddy. Crap. *runs off to look* Originally Posted By Kitties-with-Sigs:
Originally Posted By SWIRE:
So much for getting caught up over the long weekend. GoDaddy decided to move my site to a different server but it hung in the process and was not accessible for over 24 hours. Then after they moved it the IP changed so all my pictures broke. Everything should be resolved and working again or at least coming online soon. I've got a BUNCH of sites through GoDaddy. Crap. *runs off to look* I have a Windows shared hosting package btw. |
|
|
|
|
[#49]
Originally Posted By SWIRE:
Normally they notify me ahead of time and then it is only an hour or so of down time. This time the server hung mid way through and the IP changed. I changed the IP when I posted that message and things still weren't resolving. I called them back and the tech informed me that another process had hung. Both that tech and the first tech told me "the things happen with the older servers". WTF am I on the older servers? At least it is working now. I don't really need GoDaddy any more, running my own VMs from home including a hosted site. I just like not being reponsible for some of the configuration and maintenance, as I do that all day long at work. I have a Windows shared hosting package btw. I hope it stays that way and it's not some rotational thing they're doing. |
|
|
|
|
[#50]
Originally Posted By Kitties-with-Sigs:
Mine seem to be fine. I hope it stays that way and it's not some rotational thing they're doing. Originally Posted By Kitties-with-Sigs:
Originally Posted By SWIRE:
Normally they notify me ahead of time and then it is only an hour or so of down time. This time the server hung mid way through and the IP changed. I changed the IP when I posted that message and things still weren't resolving. I called them back and the tech informed me that another process had hung. Both that tech and the first tech told me "the things happen with the older servers". WTF am I on the older servers? At least it is working now. I don't really need GoDaddy any more, running my own VMs from home including a hosted site. I just like not being reponsible for some of the configuration and maintenance, as I do that all day long at work. I have a Windows shared hosting package btw. I hope it stays that way and it's not some rotational thing they're doing. |
|
|
|
 Win a FREE Membership!
Sign up for the ARFCOM weekly newsletter and be entered to win a free ARFCOM membership. One new winner* is announced every week!
You will receive an email every Friday morning featuring the latest chatter from the hottest topics, breaking news surrounding legislation, as well as exclusive deals only available to ARFCOM email subscribers.

AR15.COM is the world's largest firearm community and is a gathering place for firearm enthusiasts of all types.
From hunters and military members, to competition shooters and general firearm enthusiasts, we welcome anyone who values and respects the way of the firearm.

Subscribe to our monthly Newsletter to receive firearm news, product discounts from your favorite Industry Partners, and more.
Copyright © 1996-2024 AR15.COM LLC. All Rights Reserved.
Any use of this content without express written consent is prohibited.
AR15.Com reserves the right to overwrite or replace any affiliate, commercial, or monetizable links, posted by users, with our own.


