|
[#1]
Congrats Man, looks great!
|
|
|
|
[#2]
Sweet tractor.
Pardon the silly question, but you have to drive backwards to use the snowblower. Doesn't that hurt your neck after a while? |
|
|
|
[#3]
Nice, good looking tractor!
|
|
|
|
[#4]
I miss our John Deere B, not so much the 4020 .......I've moved a lot of tree's and dirt with the mini series .. I love using my heel to lock it in AWD
|
|
|
|
[#5]
Very nice!
mm |
|
|
|
[#6]
Wow - That is just plain gorgeous.
Congrats! |
|
|
|
[#7]
Quoted:
Pardon the silly question, but you have to drive backwards to use the snowblower. Doesn't that hurt your neck after a while? it beats having your back sore from shoveling! |
|
|
|
[#8]
Quoted:
Sweet tractor. Pardon the silly question, but you have to drive backwards to use the snowblower. Doesn't that hurt your neck after a while? You don't know much about tractor do you 
That's the only place to access the power on most tractors to power the blower. |
|
|
|
[#9]
Quoted:
Sweet tractor. Pardon the silly question, but you have to drive backwards to use the snowblower. Doesn't that hurt your neck after a while? Time will tell i guess, but I don't think it will be too bad. The 2R and 3R series tractors have a mid-PTO option so you can use a front mount snow blower but then you can't have a loader on at the same time. For me having the loader and blower both available is more important. Plus the R series tractors are a bit more $$$$. |
|
|
|
[#10]
Quoted:
You don't know much about tractor do you
That's the only place to access the power on most tractors to power the blower. no. you don't know much about tractors. many tractors of the OP's size have forward facing PTO's (located at the rear transmission) which power the MMM (mid-mount mower) when it is belly mounted. my Kubota has this arrangement, for example. the MMM PTO -- via a jackshaft -- can be used to power the augers in a front mount snowblower. note that front mount snowblower setups are usually somewhat more expensive than a rear mount setup, because of several factors including the need for a mount customized to the specific chassis. on the rear, the mount to the chassis comes "for free" because of the standardized three point hitch (TPH) setup. hence, for reasons of economics, many folks in "occasional heavy snow" areas choose a rear mount snowblower. eta one other point: on a hydrostatic (hydraulic transmission) tractor, you can "plumb" power to wherever you need it. in addition to the "spin the augers via MMM jackshaft approach", a front mounted snowblower could also be powered by one or more hydraulic motors looped into the tractor hydraulics. within the constraints of the pressure and flow rates offered by the hydrostatic system, you can run all sorts things -- including a snowblower. remember that a hydrostatic system is basically a large hydraulic pump attached to the tractor's engine -- all of the things that need power (like the drive motors and hydraulic cylinders) "steal" pressure/flow from the fluid loop. and, this can be expanded as needed -- hence the common term "power beyond" for the hydraulic ports which are used to power outboard systems (the most common such accessories in my parts is a TPH log splitter and/or a downforce toplink). ar-jedi 

|
|
|
|
[#11]
Ar, notice where I said "most"? Had a BX and understand moving the mid PTO forward for a blower and the possibility for hydrolic blowers...though not many small tractors have enough flow to power a blower. But cost of that vs. a rear mount blower makes 3-point make a lot of sense
|
|
|
|
[#12]
I know of a couple of manufacturers that sell rear -> front adapter kits for three point hitch snow blowers. They include a PTO drive shaft that runs rear to front from a gear box (w/gear or chain drive) attached to the rear PTO.
Nick |
|
|
|
[#13]
Quoted:
it beats having your back sore from shoveling! Quoted:
Quoted:
Pardon the silly question, but you have to drive backwards to use the snowblower. Doesn't that hurt your neck after a while? it beats having your back sore from shoveling! Rear camera + VR goggles = ... ...well, either a lot of win, or some pretty spectacular accidents!
|
|
|
|
[#14]
We got a little snow and wind yesterday, so I had a chance to try out the blower and loader this morning. I think I will like this much better than plowing with the Rzr. I didn't go too crazy because the rear SCV's aren't installed yet so I couldn't turn the chute, but it did a good job with the drifts we had. I think I will probably need to order a set of chains though since our driveway has gone from snow to packed snow to hockey rink ice over the past couple of months.
|
|
|
|
[#15]
Tire chains will make a big difference while driving on hard packed snow, but, you can still get yourself into trouble with them.
I'd look in to getting your rear tires filled with ballast. It'll help the chains "bite" into the ice. |
|
|
|
[#16]
Nice! I got a 3038 in mid 2015. Its a good little tractor for small tasks around the farm that's not worth using a full size for. Runs a 6ft cutter really well and last year I planted most of the food plots with it. Make sure to fill your tires and keep an implement on the back for ballast if you do much loader work. The loader is just tall enough to hang a deer from.
Look on the back above the PTO you'll see a wire harness with a couple plugged wires. If you cut the plugs in half, you'll see they're electrical connectors. You can wire in any led work lights you want and plug them into the connectors. That harness will power on when your factory light switch is in the work light position. I ran my wiring inside the roll bar and out the hole on top. I have 2 led floods facing forward and one rearward. They're held on by earth magnets so I can twist them or remove them if needed. Also check out kens bolt on hooks. We put them on all our buckets. Some 3" plumbing plugs will fit in the cross tube on your loader. You can store chains in there so you'll always have them. ETA after getting in some mud my pedals were a little sticky and didn't want to release as quickly. If you oil the hinge points for the pedal links under the floor board it will prevent them from sticking. |
|
|
|
[#17]
Quoted:
Nice! I got a 3038 in mid 2015. Its a good little tractor for small tasks around the farm that's not worth using a full size for. Runs a 6ft cutter really well and last year I planted most of the food plots with it. Make sure to fill your tires and keep an implement on the back for ballast if you do much loader work. The loader is just tall enough to hang a deer from. Look on the back above the PTO you'll see a wire harness with a couple plugged wires. If you cut the plugs in half, you'll see they're electrical connectors. You can wire in any led work lights you want and plug them into the connectors. That harness will power on when your factory light switch is in the work light position. I ran my wiring inside the roll bar and out the hole on top. I have 2 led floods facing forward and one rearward. They're held on by earth magnets so I can twist them or remove them if needed. Also check out kens bolt on hooks. We put them on all our buckets. Some 3" plumbing plugs will fit in the cross tube on your loader. You can store chains in there so you'll always have them. ETA after getting in some mud my pedals were a little sticky and didn't want to release as quickly. If you oil the hinge points for the pedal links under the floor board it will prevent them from sticking. Thank you, some good info there. I actually found the extra wires in the harness for lights yesterday morning. Before the tractor even got delivered I ordered a 22" LED light bar and a pair of LED flood lights off of Amazon and have been thinking on how to hook them up. The Deere harness is basically an all on or all off type of deal from what I can see. I would prefer to have them on separate switches from the headlights, so I ordered some 12V relays and a fused distribution block. I think I will go battery >fuse > relay > dist. block > switches > lights, and use the purple and black wires in the stock harness as the "signal" for the relay. So when the knob is turned on for the headlights it will power the relay and allow the extra switches to turn on the light bar and floods. I'll take some pictures and draw up a wiring diagram during the install to help out anyone looking to do the same in the future. Chain hooks are high on the list too, I've had Ken's website open in my browser for a while and just need to get around to ordering them. I was debating between bolt on or weld on, but the bolt on hooks will involve less paint touchup. I got a pair of wheel weights for each rear tire, and the ballast box for the 3pt. We'll see how that does with the loader this summer, if it needs more weight the Cenex Ag Co-op is a bit over a mile from our house and can fill the tires for me in their shop. |
|
|
|
[#18]
Love this snowblower. |
|
|
|
[#19]
Any reason why you went the 3038E over the 3039R?
|
|
|
|
[#20]
Quoted:
Any reason why you went the 3038E over the 3039R? For us, the 3038E seemed like a good fit with our budget, what we wanted it for and it's capabilities. I originally went in wanting a 3032E but this one worked out better price and availability wise. According to the Build Your Own tool on the Deere website, the hydro transmission option is only available on the 3039R with a cab, which is an $8K+ addition, standard on the 3038E. I mow with a zero turn and have no intention of using a mid mount mower deck or front mount snowblower that would require a mid-PTO. HP at the engine and PTO is close enough to the same between the two to not matter. The 3039R has a little more loader and 3pt capacity but for the price difference I can live with the 3038E capacity. We're not farming, full time landscaping or taking care of a mile of gravel driveway, so the lighter duty frame and loader on the 3038E should work just fine for us. All in with the tractor, loader, 64" snow blower with hydro chute rotate, ballast box, block heater, wheel weights & rear SCV kit we were into it for $25,6xx before taxes. I think I would barely be able to touch a base 3039R with a loader for that, definitely not one with a hydro trans if you have to add a cab. |
|
|
|
[#21]
Quoted:
For us, the 3038E seemed like a good fit with our budget, what we wanted it for and it's capabilities. I originally went in wanting a 3032E but this one worked out better price and availability wise. According to the Build Your Own tool on the Deere website, the hydro transmission option is only available on the 3039R with a cab, which is an $8K+ addition, standard on the 3038E. I mow with a zero turn and have no intention of using a mid mount mower deck or front mount snowblower that would require a mid-PTO. HP at the engine and PTO is close enough to the same between the two to not matter. The 3039R has a little more loader and 3pt capacity but for the price difference I can live with the 3038E capacity. We're not farming, full time landscaping or taking care of a mile of gravel driveway, so the lighter duty frame and loader on the 3038E should work just fine for us. All in with the tractor, loader, 64" snow blower with hydro chute rotate, ballast box, block heater, wheel weights & rear SCV kit we were into it for $25,6xx before taxes. I think I would barely be able to touch a base 3039R with a loader for that, definitely not one with a hydro trans if you have to add a cab. Quoted:
Quoted:
Any reason why you went the 3038E over the 3039R? For us, the 3038E seemed like a good fit with our budget, what we wanted it for and it's capabilities. I originally went in wanting a 3032E but this one worked out better price and availability wise. According to the Build Your Own tool on the Deere website, the hydro transmission option is only available on the 3039R with a cab, which is an $8K+ addition, standard on the 3038E. I mow with a zero turn and have no intention of using a mid mount mower deck or front mount snowblower that would require a mid-PTO. HP at the engine and PTO is close enough to the same between the two to not matter. The 3039R has a little more loader and 3pt capacity but for the price difference I can live with the 3038E capacity. We're not farming, full time landscaping or taking care of a mile of gravel driveway, so the lighter duty frame and loader on the 3038E should work just fine for us. All in with the tractor, loader, 64" snow blower with hydro chute rotate, ballast box, block heater, wheel weights & rear SCV kit we were into it for $25,6xx before taxes. I think I would barely be able to touch a base 3039R with a loader for that, definitely not one with a hydro trans if you have to add a cab. Understandable. Their tool online sucks. I have built a 3039R without a cab, with the eHydro, mid PTO, rear SCVs, H165 loader, industrial tires, bucket and pallet forks comes out to $29,899. Will never run a belly mower on it but have to have the mid PTO to get another SCV to be able to run a grapple on the loader. for me I think it's going to come down to the increased loader capacity with the H165 over the loader on the 3038E. |
|
|
|
[#22]
Quoted:
Understandable. Their tool online sucks. I have built a 3039R without a cab, with the eHydro, mid PTO, rear SCVs, H165 loader, industrial tires, bucket and pallet forks comes out to $29,899. Will never run a belly mower on it but have to have the mid PTO to get another SCV to be able to run a grapple on the loader. for me I think it's going to come down to the increased loader capacity with the H165 over the loader on the 3038E. Have you looked into an electric diverter valve to run the grapple? Flip a switch or hold a button down on the loader joystick and it diverts flow from some other function to extend/retract the grapple cylinders. Let off of the button and it's back to normal functions. http://www.artillian.com/Hydraulics.htm |
|
|
|
[#23]
Quoted:
Have you looked into an electric diverter valve to run the grapple? Flip a switch or hold a button down on the loader joystick and it diverts flow from some other function to extend/retract the grapple cylinders. Let off of the button and it's back to normal functions. http://www.artillian.com/Hydraulics.htm That is what it is. The joystick comes with the button on it. The option for the valve, which they call out as a rear SCV IIRC, requires the mid PTO. |
|
|
|
[#24]
Ahh, ok. I didn't dig that far into the configuration tool to see that. In that case an aftermarket diverter valve kit that ties into the loader hydraulic circuit may still be quite a bit cheaper than what Deere would want for the mid-PTO option plus diverter/SCV option to get what you want.
|
|
|
|
[#25]
Sexy. That would be cool just to cruise around the 'hood.
|
|
|
|
[#26]
Quoted:
Ahh, ok. I didn't dig that far into the configuration tool to see that. In that case an aftermarket diverter valve kit that ties into the loader hydraulic circuit may still be quite a bit cheaper than what Deere would want for the mid-PTO option plus diverter/SCV option to get what you want. If I end up buying it I will probably order it without the mid PTO and diverter/SCV as I won't be getting a grapple right away. Will look hard at an aftermarket diverted kit. Deere wants just under $900 for the mid PTO and diverter/SCV kit which isn't terrible for all you are getting. |
|
|
|
[#27]
Finally had a chance last weekend to get some wiring done and hook up my light bar and rear work lights. Here is some info for anyone looking to do something similar in the future.
Parts List: Cheap 22" LED Light Bar 2 pk. Cheap LED Spot Lights Light Harness #1 Fuse Block Relays HD In-Line Fuse Holder Ground Bar Approx: 12ft of 8 AWG Red wire Approx: 8ft of 8 AWG Black wire Approx: 25ft of 16 AWG Red Wire Approx. 25ft of 16 AWG Black Wire Approx. 30ft of black split plastic wire loom Assortment of heat shrink wire terminals Ratcheting terminal crimper Lots of zip ties On to the install. I didn't take as many pictures as I had originally planned since most of the time was spent just pulling wires and trying to route everything in the neatest and most stock looking way possible. The tractor came with some work light wiring already in place zip tied to the ROPS under the seat. The plugs are sealed and bundled out of the way. The problem with those wires is that they are tied to the main headlight switch and it's an all on or all off deal, and I wanted to be able to turn my lights on or off depending on the task and where I needed light at the time. I decided that I would rather pull 12v keyed power from somewhere else and use that to activate a relay that would put +12V to the fuse block and onto the switches & lights. After some digging around online I found a diagram on JDParts for the rear wiring harness. I noticed on the diagram it included a cruise control plug for the optional cruise control switch that can be conveniently located by the PTO switch. I took the switch panel off and the plug was there. Adding a fuse to the one empty spot in the fuse block had power going to that plug when the key was turned on. Here's a basic diagram of my plan for wiring everything. 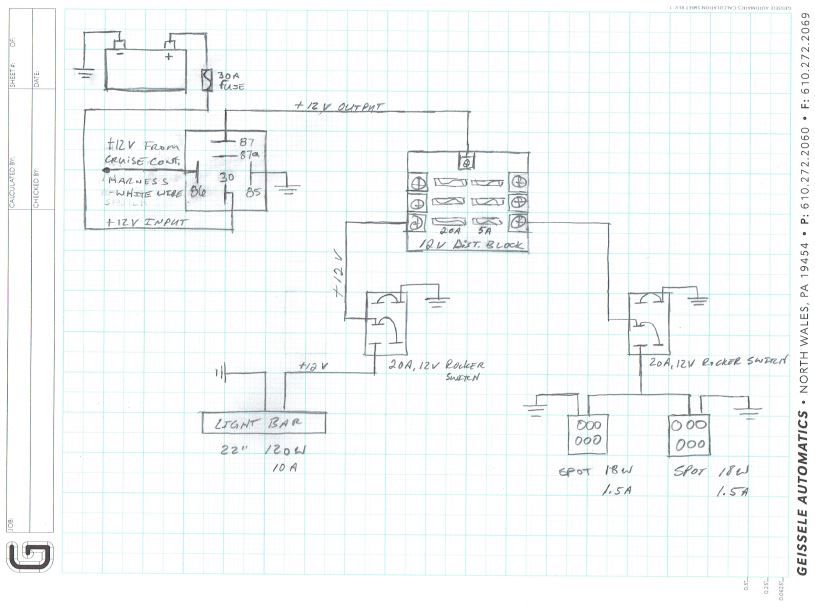
Some info I found helpful while planning everything out: Wiring for a standard "Bosch Style" 12V relay 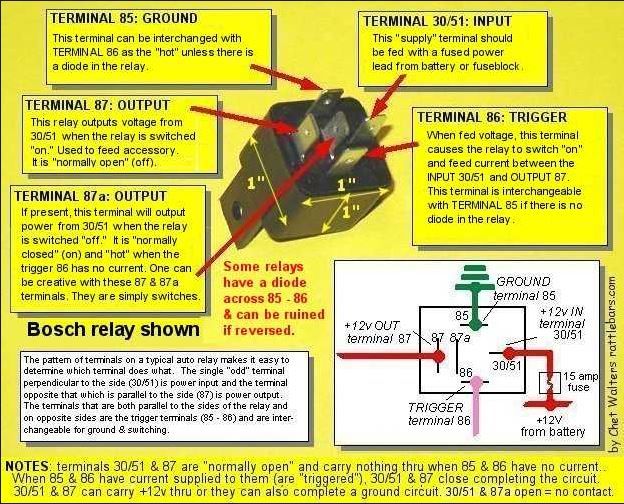
Wiring for my particular 12V rocker switches 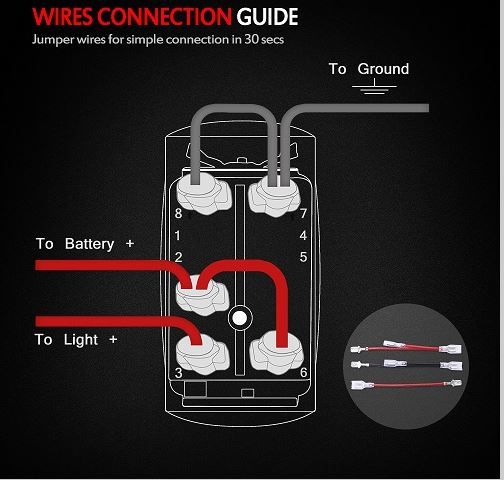
I was wandering through Mac's Hardware (small HW store chain usually full of some random yet useful and hard to find hardware and stuff) and happened to find some trailer suspension U-Bolts that were the perfect size to fit over the ROPS tubing. So those plus some 2"x2"x1/8" steel angle were all I needed to make the light mounting brackets up. Once I got the lights mounted and figured out my wire routing everything else was pretty straight forward. Light bar mounts: 
Rear spot light mounts: 
Fuse Block. The empty spot is for a fuse for the cruise control option and puts power to the plug that is otherwise taped up in the harness by the PTO switch. 
New switch location: 

Luckily the area beneath that panel is large enough I could fit my fuse block, relay and ground bus bar in there and have it neatly out of sight. There is a access hole in the RH rear fender just behind the seat, and a small wiring run up at the top of the fender connecting that to the area below the panel. Here is everything in place before I did the final wiring clean up and heat shrinked the +12V connectors and ground bar. I didn't wind up using the full light wiring harnesses from Amazon, I cut them apart for bits and pieces that I wanted. It worked out well, especially for connecting to the switches since all of the correct terminals and pigtails were there. 
Ground location on the frame. There is a threaded boss on the RH side just in front of the foot rest area that all of the grounds are tied to. 
Buttoned back up: 
I used a leftover switch I had from wiring the light bar on my Rzr, and didn't realize it was white until I turned the power on for the first time. I'm contemplating getting a couple of the same switches but with green backlighting... 
And here is why I wanted the lights: The stock headlights aren't much help... 
Especially when you raise the bucket a foot off the ground... 
No headlights, front light bar only. And yes, that was a 14ft deep snow drift covered in dog prints. They love it, though after a week of 40 degree sunny days it has melted down to about 10ft. 
View out the back for moving snow: 
With the rear works lights turned on: 
All lit up: 
If anyone has any questions on the wiring or wants any other pictures, I can do my best to help out. |
|
|
|
[#28]
Quoted:
Finally had a chance last weekend to get some wiring done and hook up my light bar and rear work lights. Here is some info for anyone looking to do something similar in the future. Parts List: Cheap 22" LED Light Bar 2 pk. Cheap LED Spot Lights Light Harness #1 Fuse Block Relays HD In-Line Fuse Holder Ground Bar Approx: 12ft of 8 AWG Red wire Approx: 8ft of 8 AWG Black wire Approx: 25ft of 16 AWG Red Wire Approx. 25ft of 16 AWG Black Wire Approx. 30ft of black split plastic wire loom Assortment of heat shrink wire terminals Ratcheting terminal crimper Lots of zip ties On to the install. I didn't take as many pictures as I had originally planned since most of the time was spent just pulling wires and trying to route everything in the neatest and most stock looking way possible. The tractor came with some work light wiring already in place zip tied to the ROPS under the seat. The plugs are sealed and bundled out of the way. The problem with those wires is that they are tied to the main headlight switch and it's an all on or all off deal, and I wanted to be able to turn my lights on or off depending on the task and where I needed light at the time. I decided that I would rather pull 12v keyed power from somewhere else and use that to activate a relay that would put +12V to the fuse block and onto the switches & lights. After some digging around online I found a diagram on JDParts for the rear wiring harness. I noticed on the diagram it included a cruise control plug for the optional cruise control switch that can be conveniently located by the PTO switch. I took the switch panel off and the plug was there. Adding a fuse to the one empty spot in the fuse block had power going to that plug when the key was turned on. Here's a basic diagram of my plan for wiring everything. Some info I found helpful while planning everything out: Wiring for a standard "Bosch Style" 12V relay Wiring for my particular 12V rocker switches I was wandering through Mac's Hardware (small HW store chain usually full of some random yet useful and hard to find hardware and stuff) and happened to find some trailer suspension U-Bolts that were the perfect size to fit over the ROPS tubing. So those plus some 2"x2"x1/8" steel angle were all I needed to make the light mounting brackets up. Once I got the lights mounted and figured out my wire routing everything else was pretty straight forward. Light bar mounts: Rear spot light mounts: Fuse Block. The empty spot is for a fuse for the cruise control option and puts power to the plug that is otherwise taped up in the harness by the PTO switch. New switch location: Luckily the area beneath that panel is large enough I could fit my fuse block, relay and ground bus bar in there and have it neatly out of sight. There is a access hole in the RH rear fender just behind the seat, and a small wiring run up at the top of the fender connecting that to the area below the panel. Here is everything in place before I did the final wiring clean up and heat shrinked the +12V connectors and ground bar. I didn't wind up using the full light wiring harnesses from Amazon, I cut them apart for bits and pieces that I wanted. It worked out well, especially for connecting to the switches since all of the correct terminals and pigtails were there. Ground location on the frame. There is a threaded boss on the RH side just in front of the foot rest area that all of the grounds are tied to. Buttoned back up: I used a leftover switch I had from wiring the light bar on my Rzr, and didn't realize it was white until I turned the power on for the first time. I'm contemplating getting a couple of the same switches but with green backlighting... And here is why I wanted the lights: The stock headlights aren't much help... Especially when you raise the bucket a foot off the ground... No headlights, front light bar only. And yes, that was a 14ft deep snow drift covered in dog prints. They love it, though after a week of 40 degree sunny days it has melted down to about 10ft. View out the back for moving snow: With the rear works lights turned on: All lit up: If anyone has any questions on the wiring or wants any other pictures, I can do my best to help out. Very nice! Clean professional install. I just bought that exact same rocker switch to power the sprayer on our ZTR
|
|
|
 Win a FREE Membership!
Sign up for the ARFCOM weekly newsletter and be entered to win a free ARFCOM membership. One new winner* is announced every week!
You will receive an email every Friday morning featuring the latest chatter from the hottest topics, breaking news surrounding legislation, as well as exclusive deals only available to ARFCOM email subscribers.

AR15.COM is the world's largest firearm community and is a gathering place for firearm enthusiasts of all types.
From hunters and military members, to competition shooters and general firearm enthusiasts, we welcome anyone who values and respects the way of the firearm.

Subscribe to our monthly Newsletter to receive firearm news, product discounts from your favorite Industry Partners, and more.
Copyright © 1996-2024 AR15.COM LLC. All Rights Reserved.
Any use of this content without express written consent is prohibited.
AR15.Com reserves the right to overwrite or replace any affiliate, commercial, or monetizable links, posted by users, with our own.


