|
Posted: 12/8/2015 9:40:45 PM EDT
OK, figured there might be some interest in this hobby here. Thought I would journal my foray into this adventure here if anyone might be interested. Have done a ton of reading over at Iforgeiron forums and feel like making the commitment to start. Will start with the basics. I decided to build a sideblast forge from scraps and such I have here. Ended up costing about 35 bucks, mostly for the PVC. So for what its worth, here we go.
Started by building a frame for my fire pan. 
Plan on putting wheels on the front two legs when I get them made. The fire pan itself is an OLD cast iron kitchen sink. 
Add a couple of old pavers for insulation on the bottom. 
Next was to get into the good ole southeast Texas crawfish gumbo clay and start packing the cracks. 
More |
|
|
|
[#1]
Added two more border pavers to help align and protect the air tube.

Then test fit for my PVC air pipe. 
Then mounted the valve to control the air flow. That was the most expensive piece I have in the forge today. 7.50 for the valve. I just drilled two holes in it and screwed it directly to the 2X6 cross member; 
Inside view of the mounting of the valve. 
The rest of the PVC assembled. 
More |
|
|
|
[#2]
And now for some more gumbo packing.


Now the exciting part!! Add the coal for the first fire!! I purchased several bags of anthracite "Rice Coal" from Tractor supply. Since I live in SE Texas and we have no coal around here, this is going to be my source. They will order it for you and it runs 6.00 a bag. Ordered Nut Coal, was shipped Rice coal. Have been told by folks that it will work just as well. 
And for the biggest fail of the day. No joy on the first fire!! I attached a 10 yr old hair dryer for my blower. 
It ran a total of about 2 minutes before burning up  Oh well, so goes my life!! Will update when I have first fire and start hammering things. Oh well, so goes my life!! Will update when I have first fire and start hammering things.
Doc |
|
|
|
[#3]
It's pretty fun, the wife and I have been hammering for a few years now. Find the local blacksmith association. If there is one, there will be folks who can give pointers and help finding the right equipment. I bought my first forge at a garage sale in the county. It wasnt for sale, but after asking the old geezer if he had seen one, he lets me know he has one, but never uses it. I got the forge and blower for $50. I later bartered for a 125 lb anvil. Then acquired a post vise from a neighbour that heard the noise, and said hey can you use this? It was my grandpa's..... Hammers are easy to come by at flea markets and garage sales. I finally dropped the coin for a Hoffi style hammer. It made a huge difference in the fatigue from long swinging sessions.
Have fun with it. Oh and just so you know, cold rolled steel moves like butter when it's hot. High carbon steel ( like coil springs) does not , therefore knives are not as easy as they look!
|
|
|
|
[#4]
This is a great idea for a thread!
I have my grandfather's old forge sitting in my mom's garage right now. It may be irretrievably rusted, as I haven't seen it in a few years. But when I put in in there after he died, it still functioned as a fan. The pan is long ago rusted through. He taught me to use this when I was about ten, and I don't remember the particulars except I ruined some good bits for a brace and bit set when he wasn't looking.
I've always been fascinated with this art and can't wait to see what you do with it. OP, what is the mud stuff you use to pack the cracks? Is it truly just clay mud? |
|
|
|
[#5]
Quoted:
This is a great idea for a thread! I have my grandfather's old forge sitting in my mom's garage right now. It may be irretrievably rusted, as I haven't seen it in a few years. But when I put in in there after he died, it still functioned as a fan. The pan is long ago rusted through. He taught me to use this when I was about ten, and I don't remember the particulars except I ruined some good bits for a brace and bit set when he wasn't looking.
I've always been fascinated with this art and can't wait to see what you do with it. OP, what is the mud stuff you use to pack the cracks? Is it truly just clay mud? Yes sir, just plain old clay gumbo mud. Will see. If that doesn't hold, I may mix up some of the vermiculite (?) like they do for the small gas forges. Supposedly if you have enough clay content, it does just fine. Again, I am trying to do this on the cheap so will be posting what problems/successes I have as I go. Would love to see a picture of the old family forge! Doc |
|
|
|
[#6]
Great idea, but I would be concerned if the pvc piping gets hot and starts putting off fumes. Those fumes could lead to serious health issues down the road. Use it in a well ventilated space, preferably outside and stay upwind.
|
|
|
|
[#7]
OK, first fire tonight!! Thanks to a suggestion from the forum I hooked up the exhaust from my shop vac;

Takes a bit to get the anthracite going, but built up a small (6"dia fire with small sticks) and she fired right up. 
Had a nice coal bed within about 10 minutes; 
Ended up putting another paver across the top to help focus the air flow down onto the pile; 
Here is the end of the PVC after about an hour of playing with the forge. Held up for the first run. The clay around the opening is hard as stone now also; 
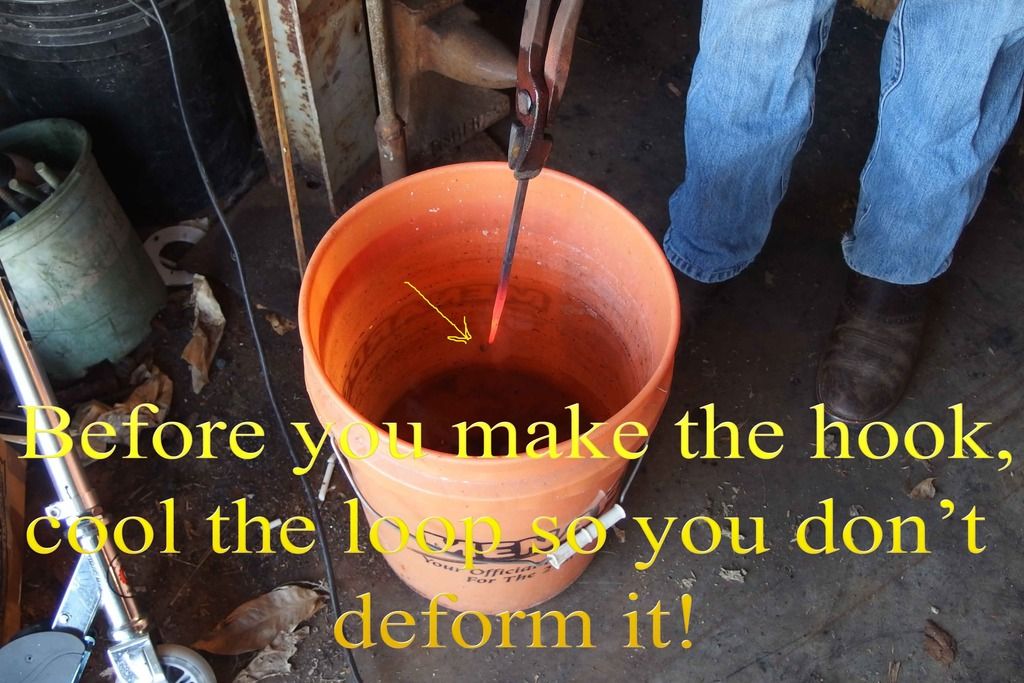
A bolt I was pounding into a pitiful little "S" hook. 
And here is the results of the evenings piddling around (pitiful as it is, a fire poker and a sad littel "S" hook). 
Probably be a couple weeks till I get back into the shop with time to tinker, but will post more when I get to. Doc |
|
|
|
[#8]
That's really cool.
Not pitiful at all in my view. You just altered metal using a forge you MADE in your garage. I think that's awesome. |
|
|
|
[#9]
Ya, you did it yourself, so it's a good start. I would have suggested an electric leaf blower form Craigslist, but if the ShopVac works...
|
|
|
|
[#10]
Awesome thread.
I'm slowly scrounging scrap steel and the tools to get started too. I got the idea while cleaning out my 100 plus year old barn. I found under some hay and dirt where an old farmer dumped his ash. I also found hand forged steel pins that were used to pin some logs together. |
|
|
|
[#11]
recognize that gumbo clay anywhere... we must be neighbors lol
had no idea tractor supply could get coal in |
|
|
|
[#12]
Quoted:
That's really cool. Not pitiful at all in my view. You just altered metal using a forge you MADE in your garage. I think that's awesome. This, exactly! Won't the PVC pipe eventually burn up, being that close to a hot coal fire? Why not iron pipe? Same for the wooden frame, does the brick & clay keep the wood from getting hot given enough time? Very cool project, please post some more pictures as you create more goodies. |
|
|
|
[#13]
Quoted:
This, exactly! Won't the PVC pipe eventually burn up, being that close to a hot coal fire? Why not iron pipe? Same for the wooden frame, does the brick & clay keep the wood from getting hot given enough time? Very cool project, please post some more pictures as you create more goodies. Quoted:
Quoted:
That's really cool. Not pitiful at all in my view. You just altered metal using a forge you MADE in your garage. I think that's awesome. This, exactly! Won't the PVC pipe eventually burn up, being that close to a hot coal fire? Why not iron pipe? Same for the wooden frame, does the brick & clay keep the wood from getting hot given enough time? Very cool project, please post some more pictures as you create more goodies. Roger, Were my thoughts exactly, but read a thread where a guy used one like this for seven years. Had the PVC on hand and thought "what the heck". No change in the PVC I could tell. Bottom of the sink was mildly warm to the touch, but nowhere near flaming hot. Could hold my hand on it with no discomfort. Don't have any black iron pipe on hand, but would cost about 30 bucks at Ace to replace. Will probably make a bottom draft forge if/when I replace the PVC with BIP. Will play with this and learn while it lasts. Doc |
|
|
|
[#14]
I wonder how the concrete pavers will hold up. You can buy fire brick from TSC as well. That might hold up over the long term better than the pavers.
|
|
|
|
[#15]
Was cleaning the front part of our old garage this weekend and nearly fell over my grandfather's anvil. Thought of this thread.
Don't know if I'll ever get to do anything with it, but really interested in your projects and progress, OP. |
|
|
|
[#16]
Quoted:
I wonder how the concrete pavers will hold up. You can buy fire brick from TSC as well. That might hold up over the long term better than the pavers. Especially if they have a significant amount of moisture in them. |
|
|
|
[#17]
Ok... I am admittedly totally an amateur. I was interested in Blacksmithing and took a four day class on the subject last April. A few points of interest that I hope help you...
Do a little research and discover was "coking" is. Has nothing to do with white lines on a mirror. Has everything to do with how you build a fire, how the coal reacts, your fuel consumption and the workability of your metal. Basically you are cooking your coal, turning it into coke, and its the coke that you use as fuel for actually burning. We kept coal on the sides of the fire, cooking (coking), and basically continued to make coke for the next project as we worked this project. Your fire looks like straight up coal. Your forge has a problem. As it burns, you are going to get ash and clinker. Your fire is going to get dirtier and dirtier and harder to feed air to. In a normal forge, you'd got a drop tube with a shaker that you jiggle to remove ash and such. I cannot figure out how you are going to do that except to tear down and rebuild the fire. If you get a handle on coking, you're gonna be happier. The tip of your S hook looks sorta pitted. If you pull that work from the fire, and its sparking like a sparkler, you're burning steel. Too hot (ask me how I know). One thing I did learn that was really quick and neat: once done, heat the work. Once heated (not hot, just nicely warmed up), quickly brush scale off with wire wheel on grinder, then use floor paste wax on a rag to wipe it down. Wax melts, and covers the steel, giving you a nice finish that doesn't flash rust in minutes like exposed steel does. |
|
|
|
[#18]
My son and I joined the blacksmiths at the local historical society and have learned a lot. It would be a good thing for you to look at ABANA or your local area for a group like that.
I recommend a book called "The New Edge of the Anvil" by Jack Andrews. It has great info on setting up shop and good instructions for making all kinds of tools. It really gives good information on all the techniques you need to be successful. Once we joined the blacksmith shop, we started going to hammer-ins. Demonstrators come out and show how to make something. We take pictures and notes. Usually many people will travel to hammer-ins, and many have stuff to sell. You can pick up a fire pot, post vise, anvils, tongs, and everything else for a reasonable price. Here's a pic of my son turning an old ferrier's rasp into a tomahawk. We bought an old fire pot that had a small crack and mounted it to a used tuyere. I picked up some castable refractory cement and lined the firepot to prevent further damage. We picked up an old furnace blower and wired it to a dimmer switch (the switch doesn't work as well as it sounds, but it works) I had an old fuel tank that I cut to pieces to make the table and mounted the pot into it. Works pretty well. Hard to pull klinkers out of the fire because the cement made the firepot a little more vertical than I would like in the bottom, but it all works. 

|
|
|
|
[#19]
Quoted:
My son and I joined the blacksmiths at the local historical society and have learned a lot. It would be a good thing for you to look at ABANA or your local area for a group like that. I recommend a book called "The New Edge of the Anvil" by Jack Andrews. It has great info on setting up shop and good instructions for making all kinds of tools. It really gives good information on all the techniques you need to be successful. Once we joined the blacksmith shop, we started going to hammer-ins. Demonstrators come out and show how to make something. We take pictures and notes. Usually many people will travel to hammer-ins, and many have stuff to sell. You can pick up a fire pot, post vise, anvils, tongs, and everything else for a reasonable price. Here's a pic of my son turning an old ferrier's rasp into a tomahawk. We bought an old fire pot that had a small crack and mounted it to a used tuyere. I picked up some castable refractory cement and lined the firepot to prevent further damage. We picked up an old furnace blower and wired it to a dimmer switch (the switch doesn't work as well as it sounds, but it works) I had an old fuel tank that I cut to pieces to make the table and mounted the pot into it. Works pretty well. Hard to pull klinkers out of the fire because the cement made the firepot a little more vertical than I would like in the bottom, but it all works. <a href="http://s1119.photobucket.com/user/ajroyer/media/20151108_170619_resized_zps1wfl2270.jpg.html" target="_blank">http://i1119.photobucket.com/albums/k637/ajroyer/20151108_170619_resized_zps1wfl2270.jpg</a> <a href="http://s1119.photobucket.com/user/ajroyer/media/20151108_171139_resized_zps0wzetaar.jpg.html" target="_blank">http://i1119.photobucket.com/albums/k637/ajroyer/20151108_171139_resized_zps0wzetaar.jpg</a> I love that the anvil is set on a chunk of log! just like my grandfather's was. I hope you guys keep this thread going.. I'm learning just reading your stuff. I didn't know about the ABANA or hammer-ins, and didn't realize there were so many folks interested in smithing. I've wanted to do this my whole life, but have no idea when I'll get to pursue it because of time. Was at my mom's this spring, digging/tilling her a spot for a bean patch she can see from her bedroom window, since she can't really get out to garden anymore. It was a spot that had not been turned over in my lifetime and (I'm guessing) for many years before. I kept digging up old bits of rusted metal things, which always fascinate me, and mom told me this is a spot where her dad (my grandfather who was the smith) had his shop when she was a little girl. She's 88. Of course, I had to haul the stuff home. I seriously doubt he made the iron, but the other stuff...maybe. Next time I'm there I'll have to check on the blower for his forge and see how it fares in her garage. 
|
|
|
|
[#20]
I've been wanting to see a blacksmithing forum on here. The next time I'm out playing around, I'll try to take some pics for project tutorials....
|
|
|
|
[#21]
To me, this is a perfect addition to homesteading. I just marked this to not archive so even if it drops down the page, it won't disappear.
|
|
|
|
[#22]
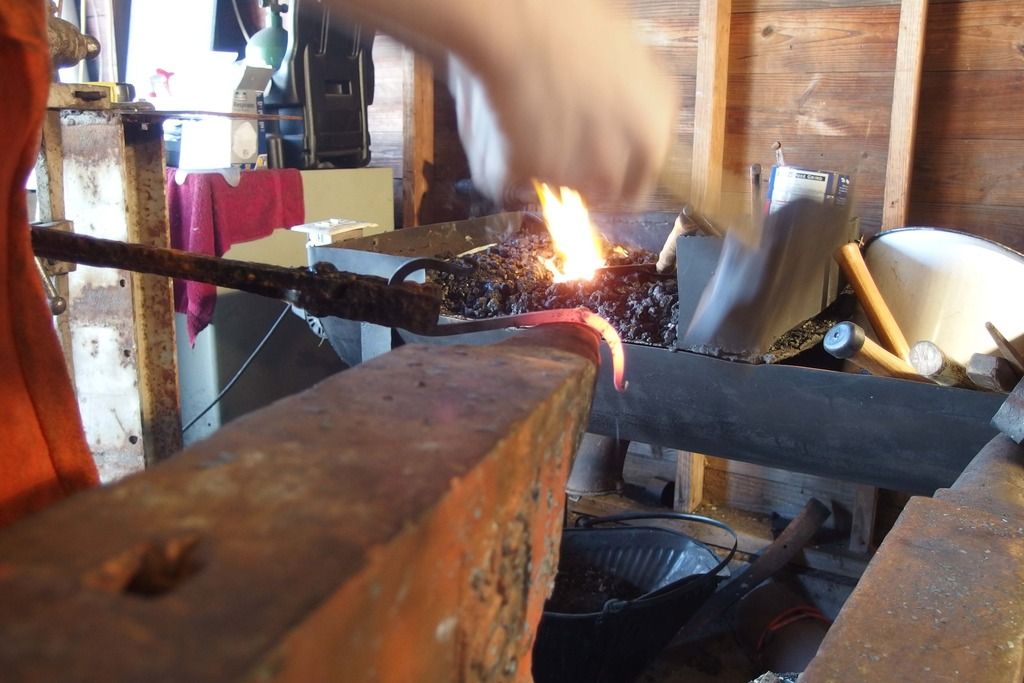
Finally had a day after holidays have settled down. Got back on the forge. Have been reading and considering all opinions. Rechecked the forge after sitting for the holidays. The gumbo clay is now dry and as hard as concrete. There is no sign of change in the pvc pipe at this time. I was having a bit of an issue with the air from the pipe blowing up and over the coal, so I added a piece of 1 1/2" angle iron to force the air flow down into the coal. Worked great, however my attempt to start the rice coal with the propane was not a success;

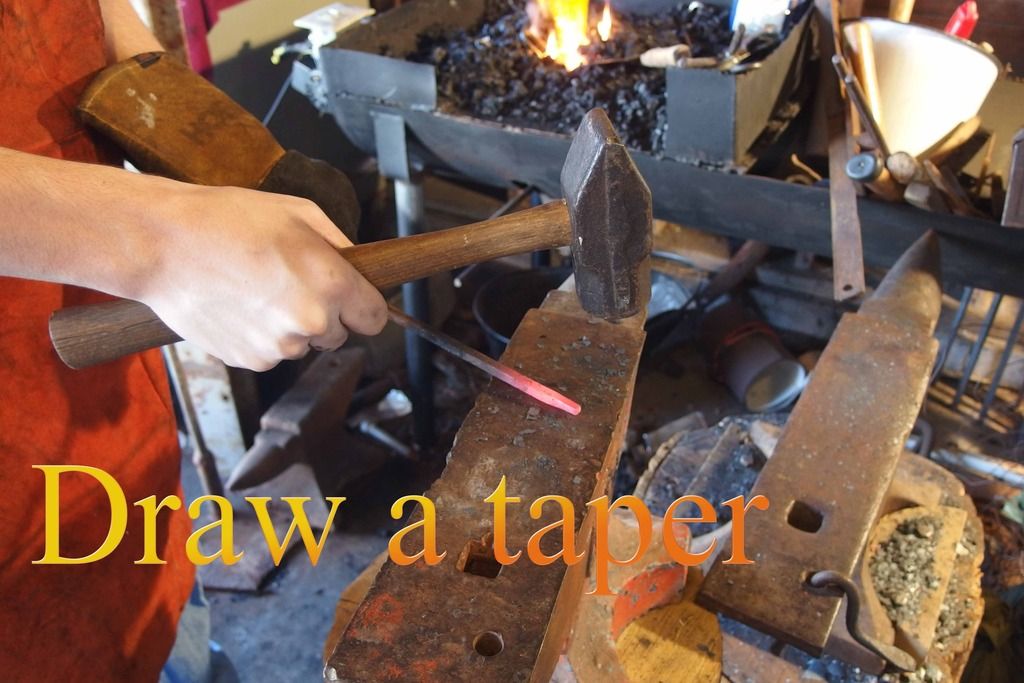
Worked much better to start a fire with wood and then slowly turn up the air flow. This had a nice coal bed with about 15 minutes. My goal for today was to try a squirrel cooker. Many thanks to Dave Canterbury for his "How To" video. I started with a 4' piece of 3/8" mild steel picked up from my local Ace hardware for 6 bucks, cold chiseled into 2 pieces; 
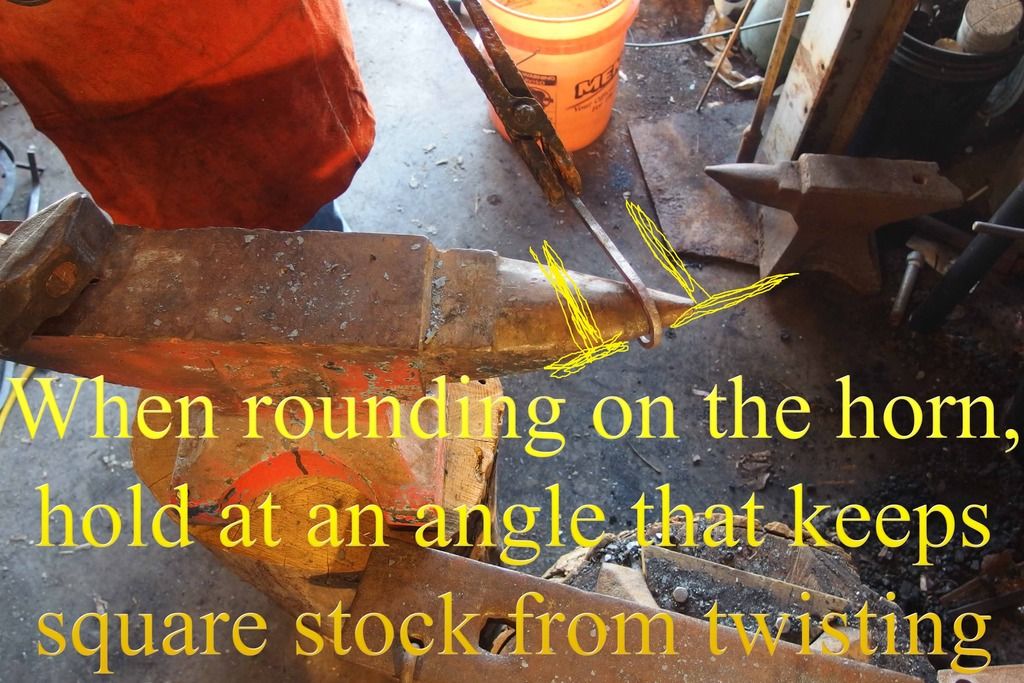
I heated up one end and just hammered it to a square point. I am not trying to do anything decorative. I am just trying to get the feel for the hammer and the steel at this point. Practice drawing out the steel, and getting a feel for the angles that the face of the hammer meet the anvil. I am just starting to get the feel for these things. 

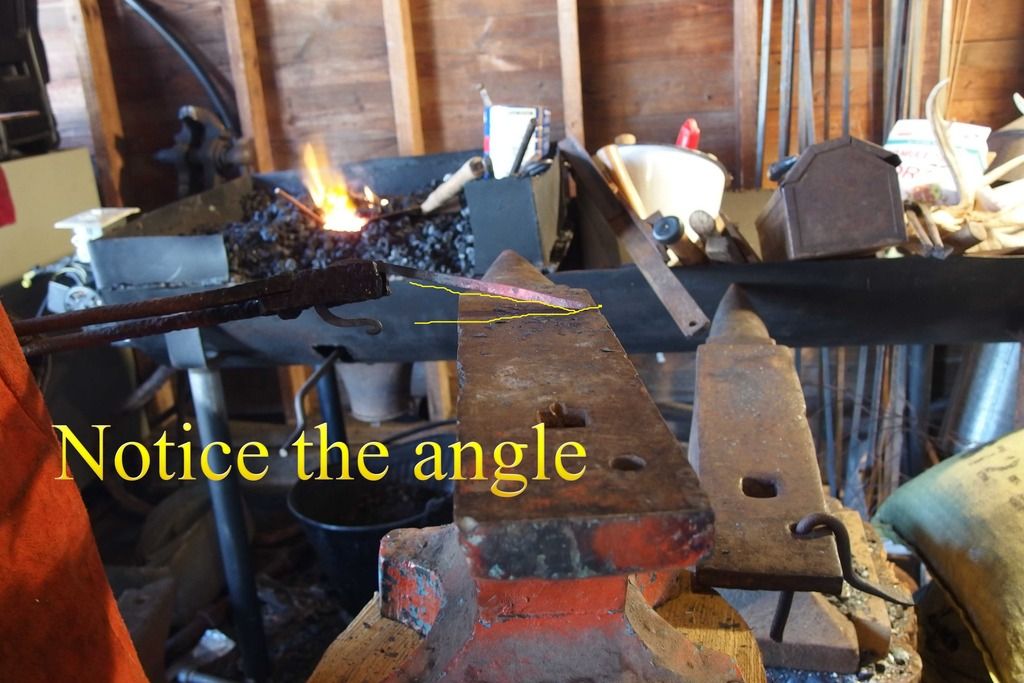
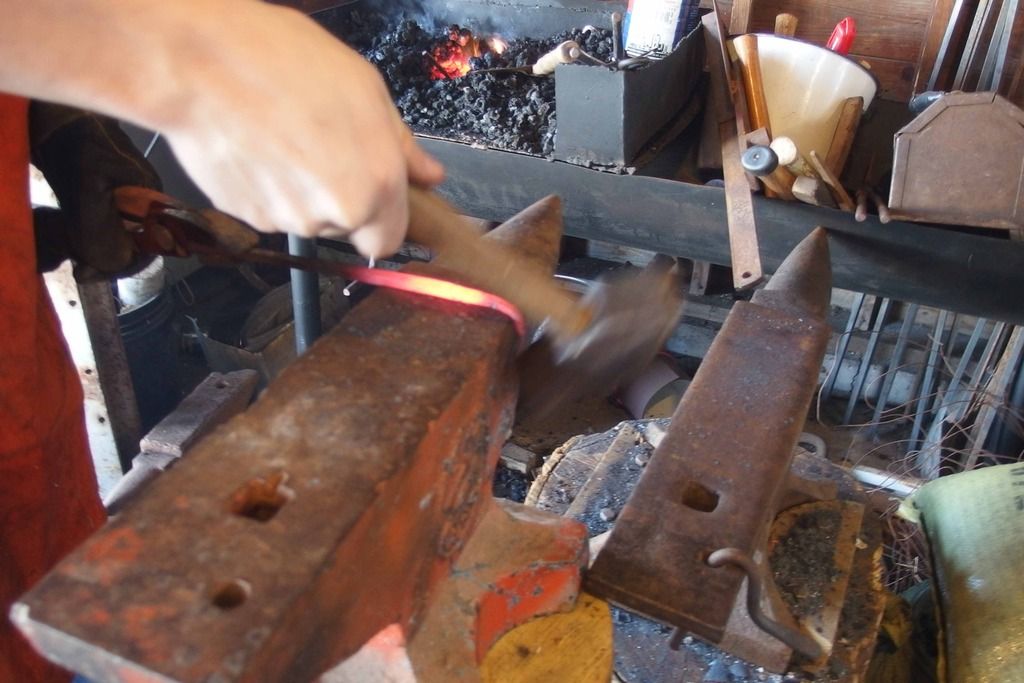
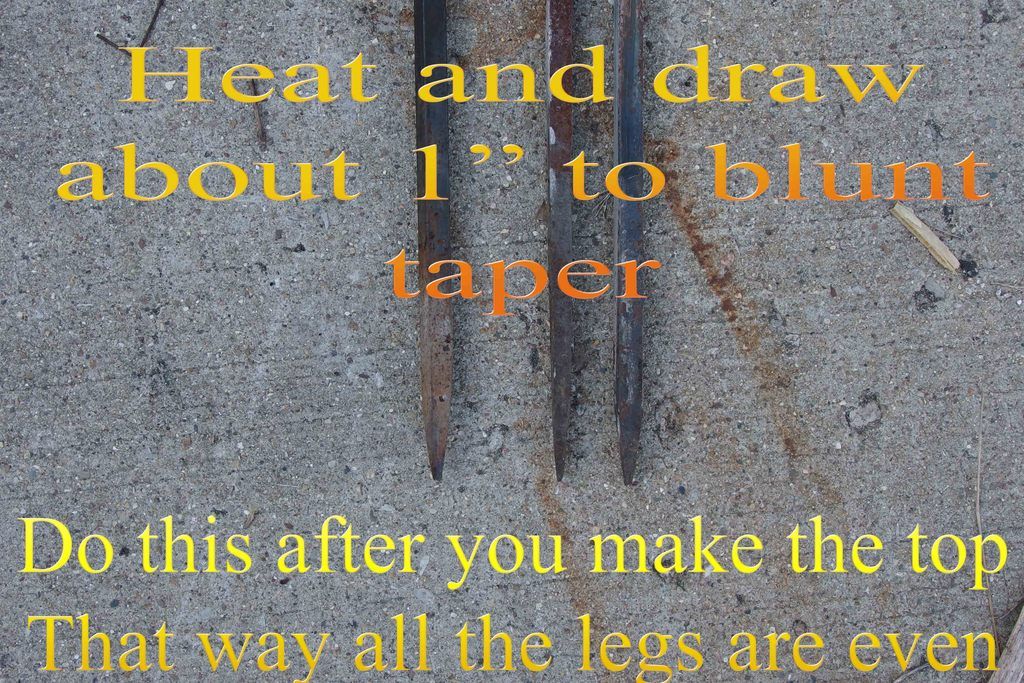
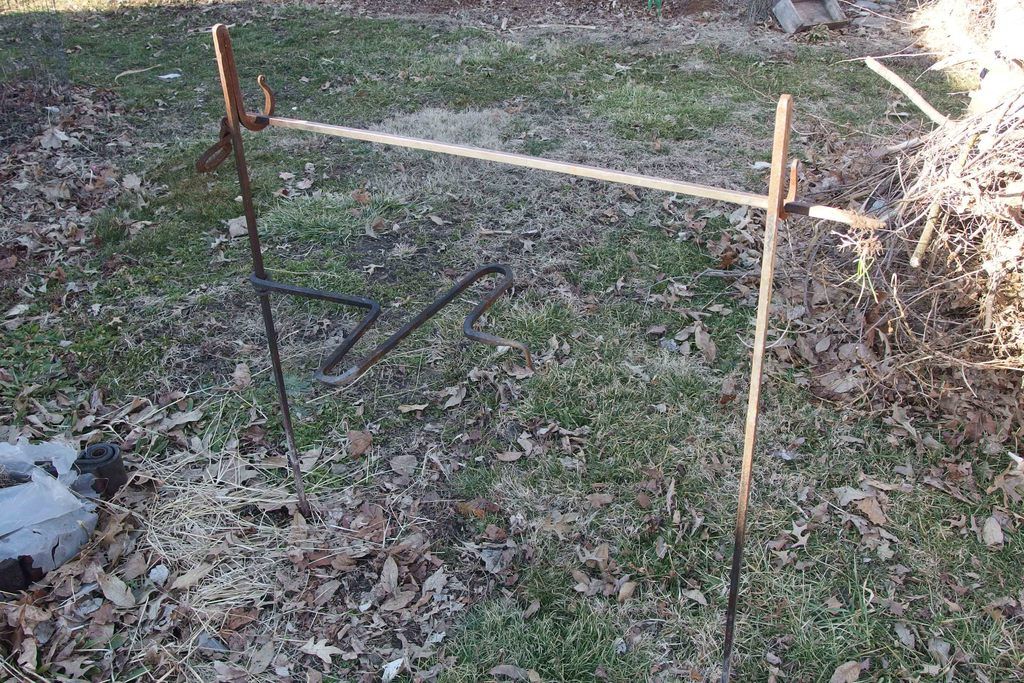
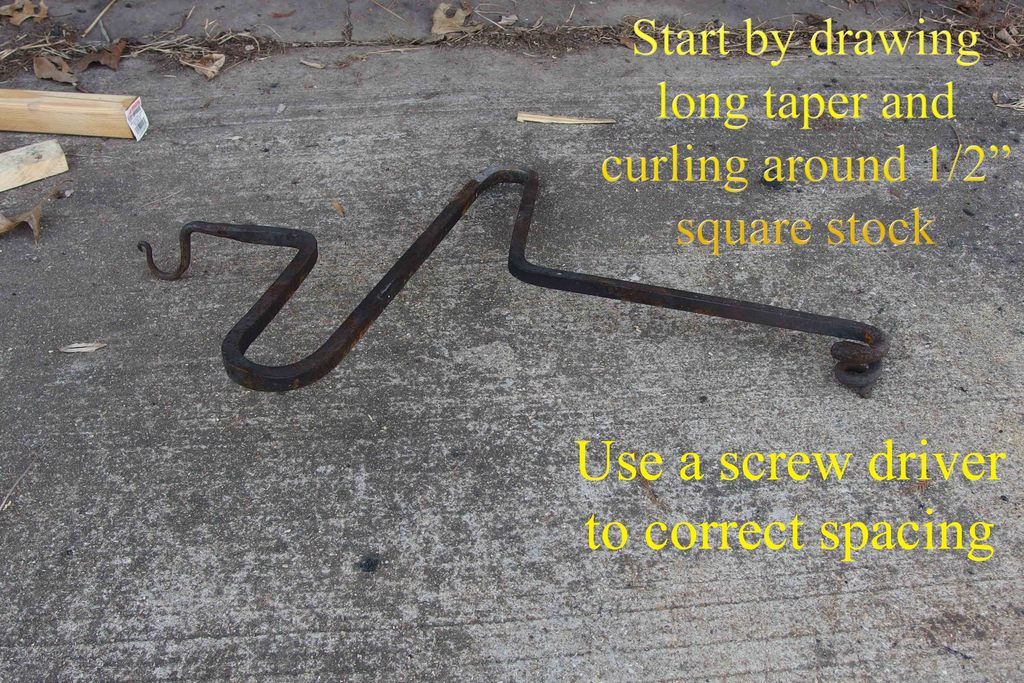
Beginnings of the point. Hammered it on out in another heat. Now for the other end. Had to heat a larger portion of the rod, hammer it square, and start it into a pigtail to form the support for the fork arm. 

Ended up coiling up a bit more than I meant, so had to unroll some of it with my large channel locks. Then used the other rod to adjust the angle they meed until I got a good 90 degrees. 
Finished pigtail; 
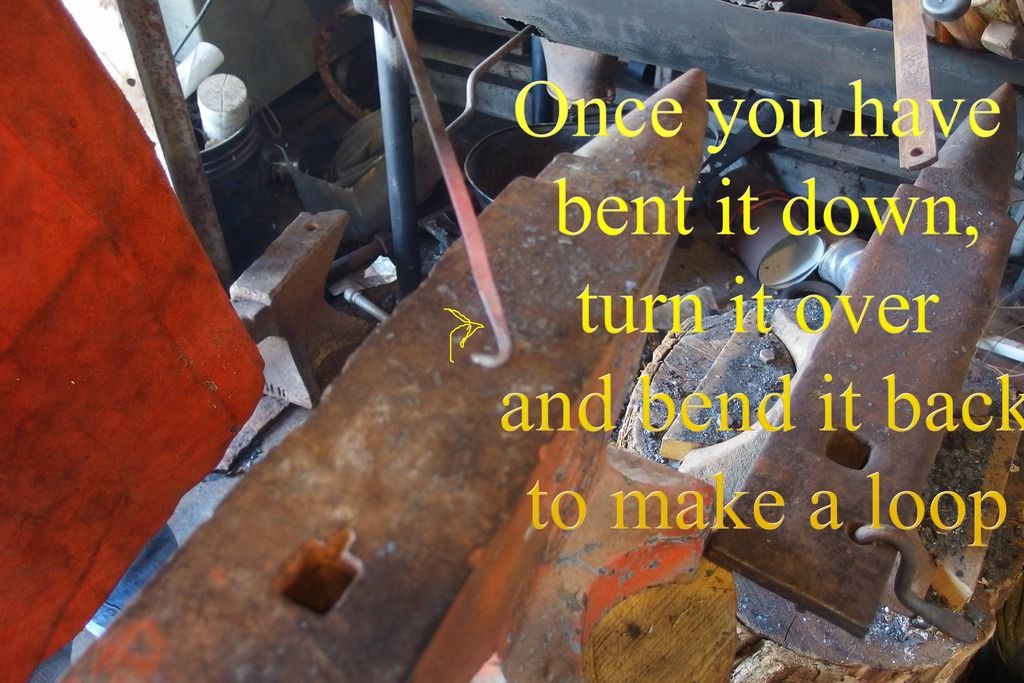
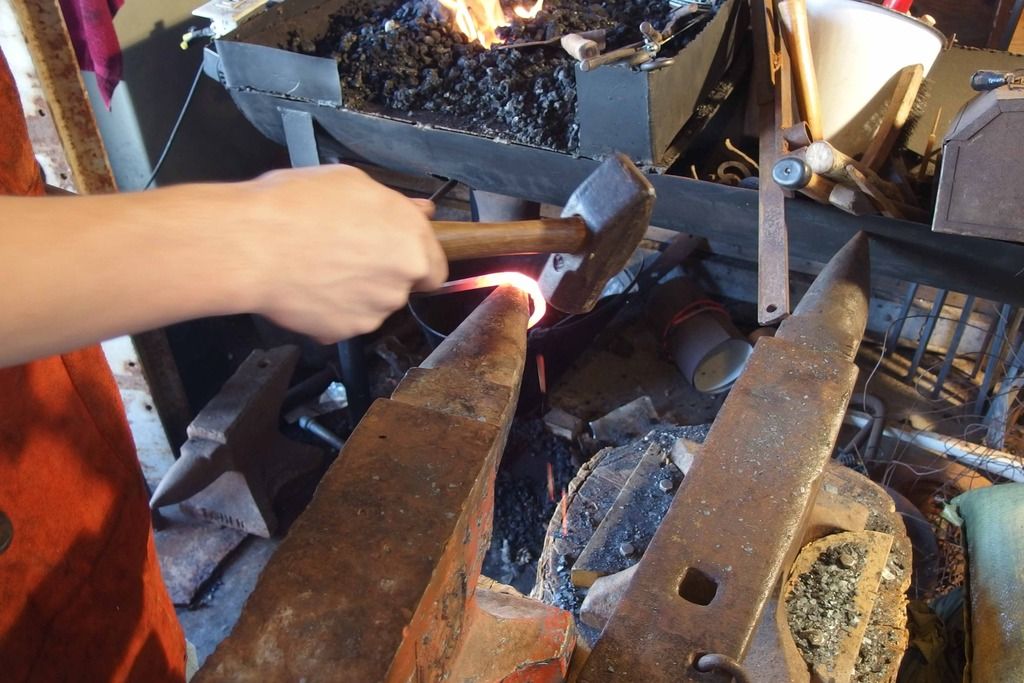
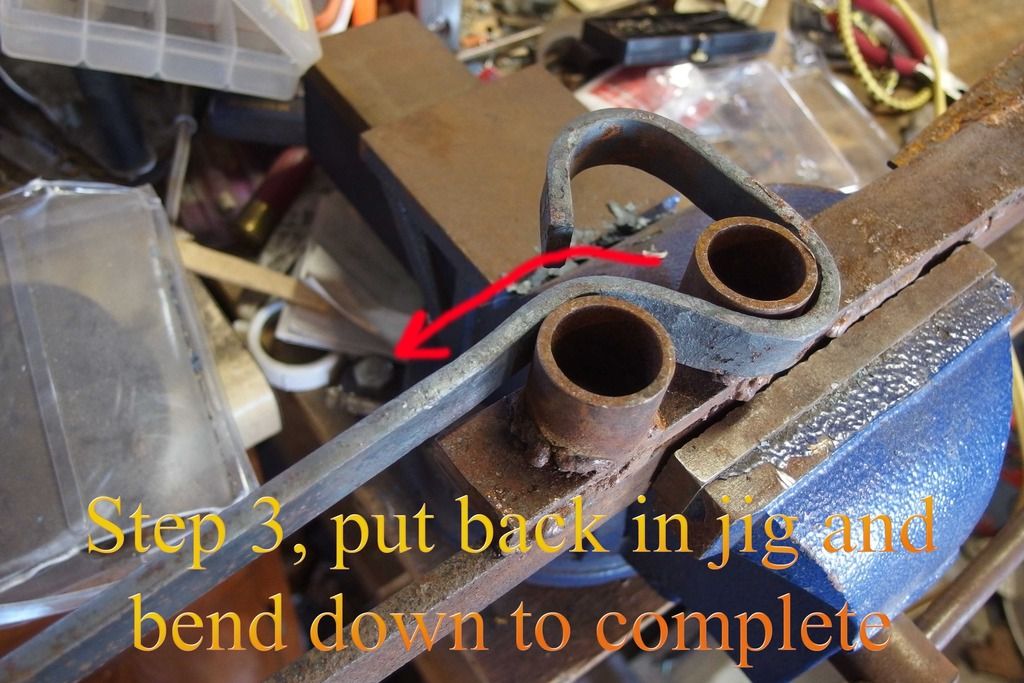
Next was to hammer out one end of the fork rod and put a bend in it for a pot hook; 
More |
|
|
|
[#23]
inally on to the actual fork. I heated about 4" of the other end up and flattened it;

Split it with a cold chisel 
Then heat up the halves, fold them out and hammer them into long, slender points; 
Bend the points into a fork; 
Finished product; 
Such as it is. Spent about 2 hrs playing at the forge. I think I am just starting to be able to feel things through the hammer. Once again checked my forge after the round. After about an hour, the bottom of the old sink was too warm to comfortably keep your hand on it, but I could still touch it. The angle iron worked well to redirect the air, although with the rice coal, I am not able to totally open the air flow. It blows the small pieces of glowing coal out of the pit if I do. With the valve about 2/3 open, it works perfectly. No noticeable change in the PVC after this round either. Small shop vac is working great as an air source. Can't really tell that I burned much coal. Still working from the first bucket full in the forge pan. Hope some find this interesting. Will post again when I get to play again. Doc |
|
|
|
[#24]
Neat. That looks fun!
|
|
|
|
[#25]
When you are making a pigtail like that you can adjust the coil by using a flat screw driver to spread the coils apart. You're motivating me to get out on the forge and add some stiff to this thread!
|
|
|
|
[#26]
OST
|
|
|
|
[#27]
Woohoo, got a line on a free anvil. Sonds like a decent one. Will post pics when I get it.
Doc |
|
|
|
[#28]
Quoted:
Woohoo, got a line on a free anvil. Sonds like a decent one. Will post pics when I get it. Doc If it's in good condition, nice score. Getting a hold of a quality anvil is my major issue. I keep trying to convince my neighbor to sell me one of his three, but he's hoarding them. (not that I blame him) |
|
|
|
[#30]
This thread inspires me!
|
|
|
 Win a FREE Membership!
Sign up for the ARFCOM weekly newsletter and be entered to win a free ARFCOM membership. One new winner* is announced every week!
You will receive an email every Friday morning featuring the latest chatter from the hottest topics, breaking news surrounding legislation, as well as exclusive deals only available to ARFCOM email subscribers.

AR15.COM is the world's largest firearm community and is a gathering place for firearm enthusiasts of all types.
From hunters and military members, to competition shooters and general firearm enthusiasts, we welcome anyone who values and respects the way of the firearm.

Subscribe to our monthly Newsletter to receive firearm news, product discounts from your favorite Industry Partners, and more.
Copyright © 1996-2024 AR15.COM LLC. All Rights Reserved.
Any use of this content without express written consent is prohibited.
AR15.Com reserves the right to overwrite or replace any affiliate, commercial, or monetizable links, posted by users, with our own.