|
Posted: 9/8/2014 6:34:08 PM EDT
My wife and I got 5 acres in April. It is all forest, boarders a creek, and has a couple neighbors. We have big plans, and I hope to document some of our journey here on Arfcom.
Since April I have cleared 2 sections, one to be our future garden, the other the spot where our cabin will reside. Note: I have never built anything like this. I'm sure there are loads of mistakes and things I could have done better. I welcome suggestions and critique, but keep in mind I had no idea what I was doing going into this. On 8/25/14 I started the cabin. I laid out 9 concrete corner post blocks and leveled them. It created a foundation of four 8'x8' joined quadrants, for a total footprint dimension of 16'x16'. 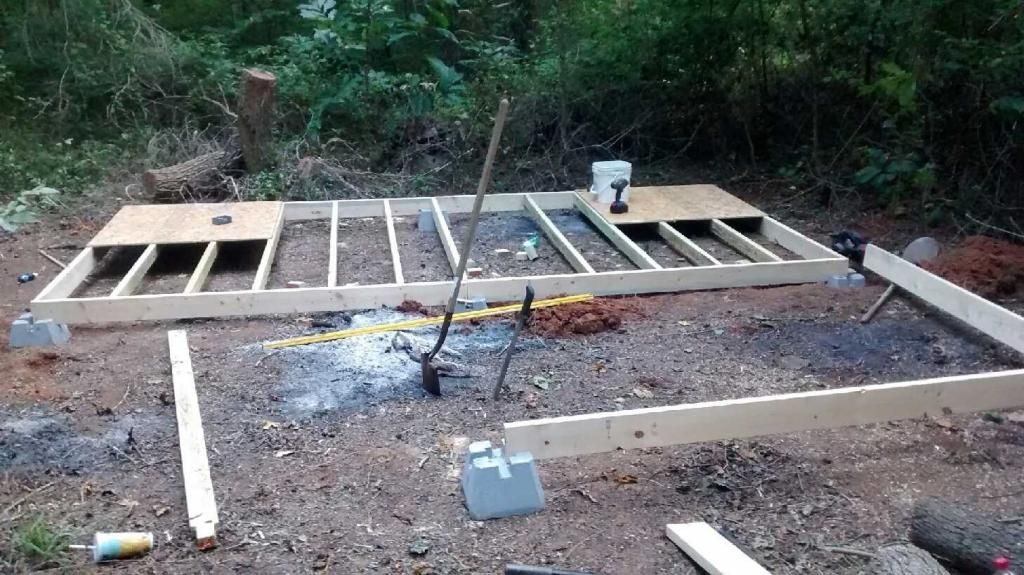
2 days later the sub-floor was put down and the walls started going up. I built them laying down, added one sheet of plywood per 8 foot run of wall to help stabilize as I stood the walls up (I didn't have a helper). 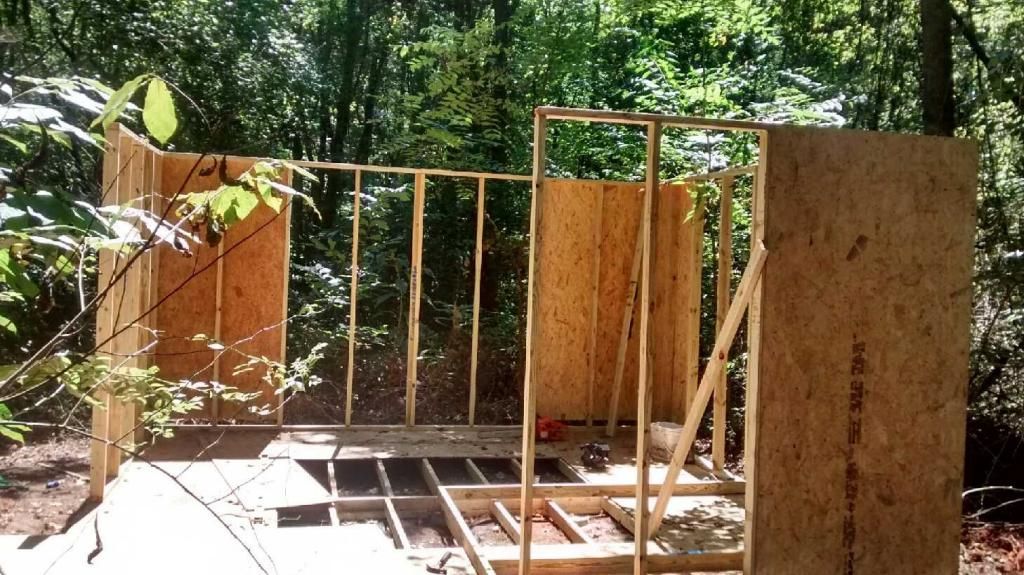
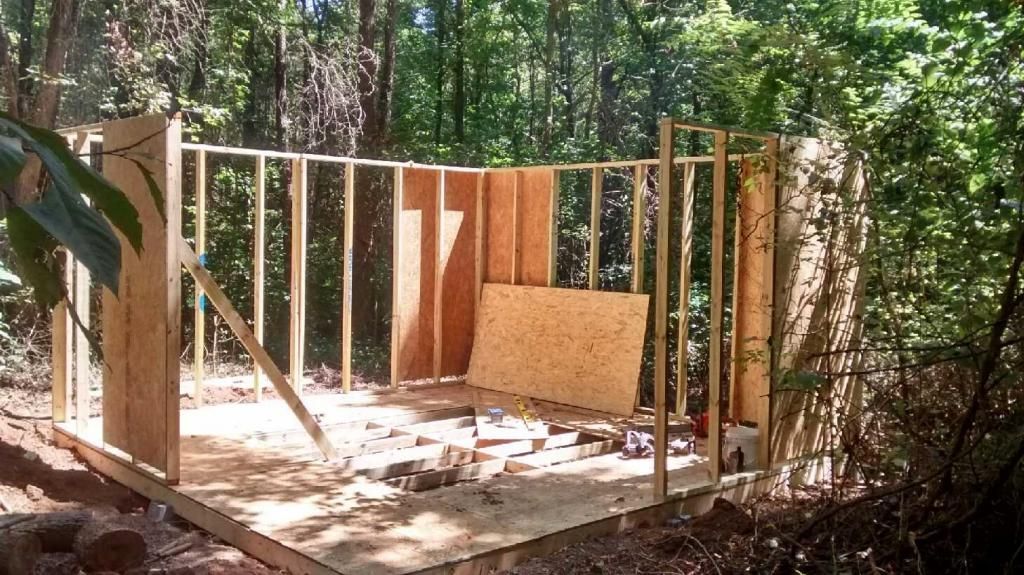
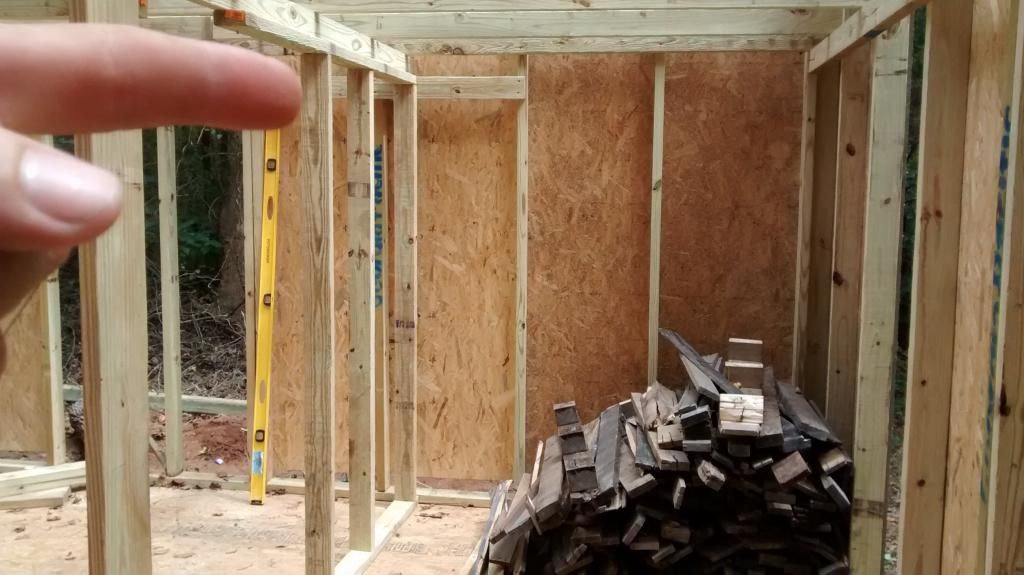
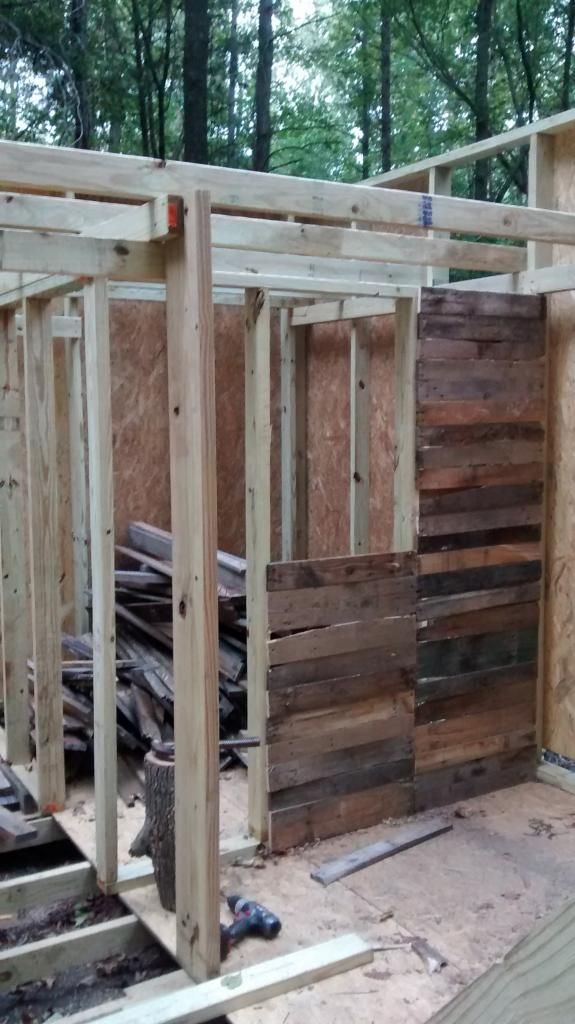
The corner of the house has been left unframed due to the nontraditional door I'll be putting in. Next came some interior walls, and framing to accommodate the loft. Many of the materials I'm using are recycled and re-purposed things, This wall shows some dismantled pallets being put to use. 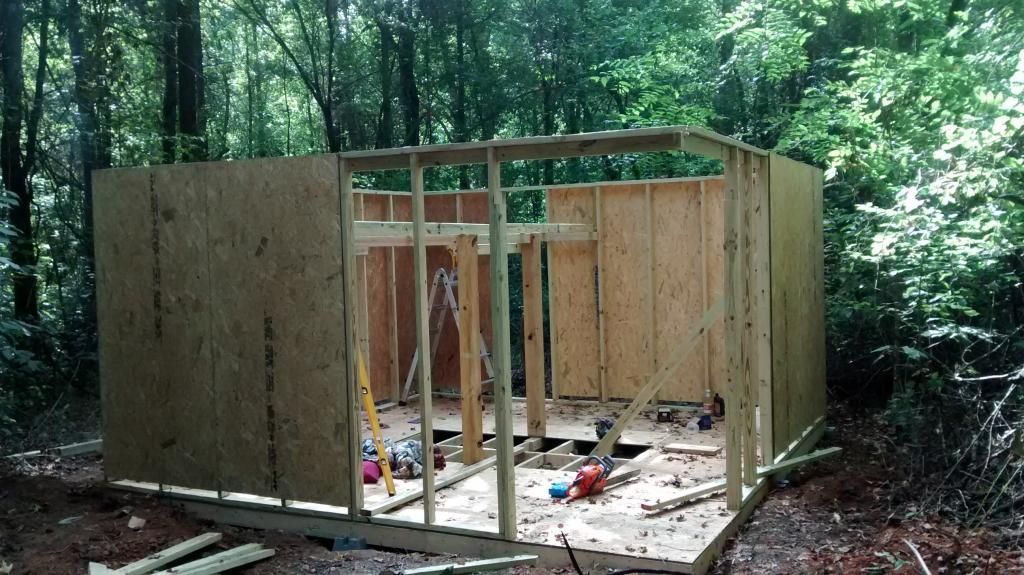
Sadly on 9/4/2014 I had to take some of that pallet paneling down. I picked up a free cabinet and it fit perfectly in that space. 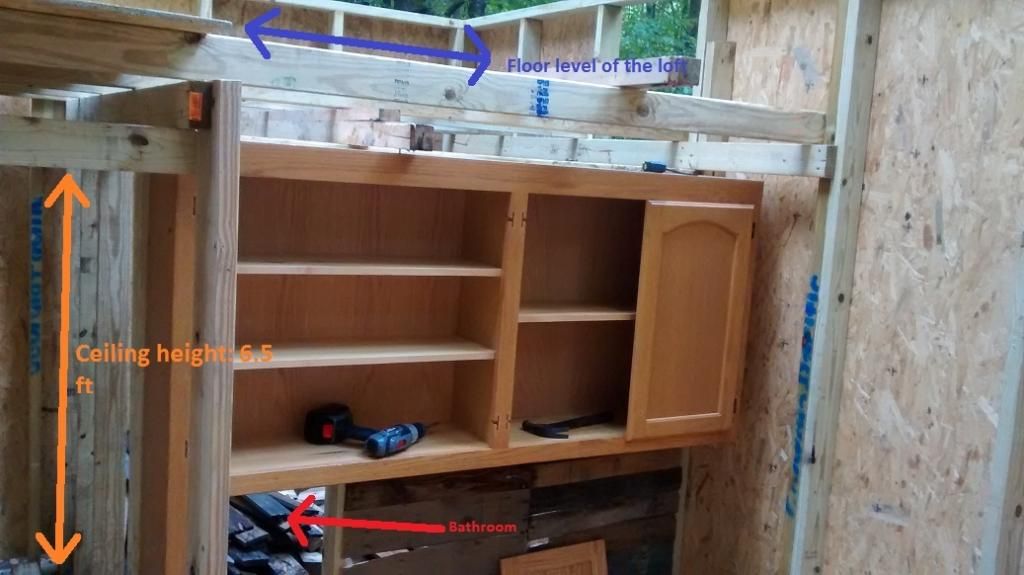
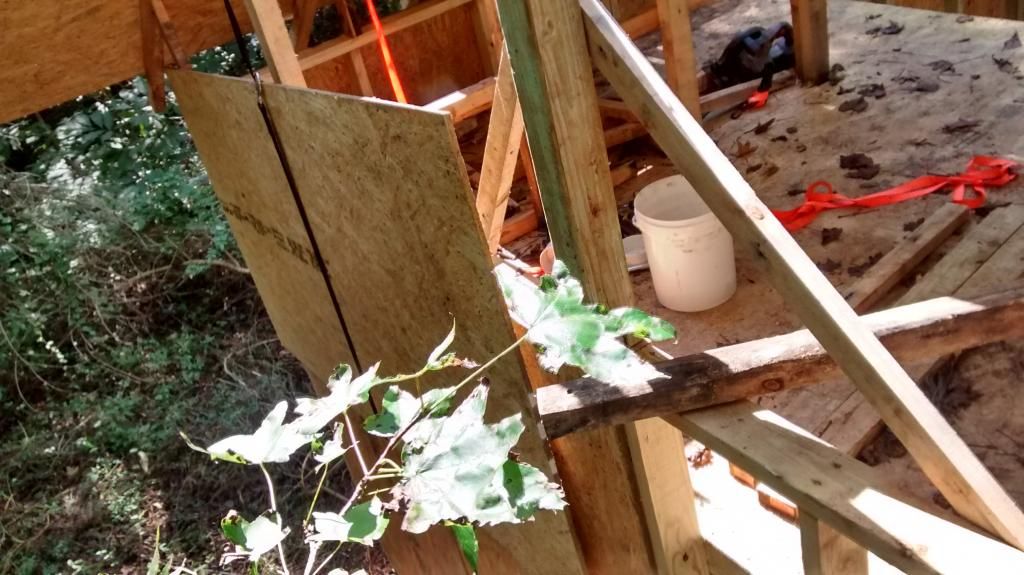
Here is a shot from a tree I climbed to help show the projected layout. The orange text designates the bathroom. I have modified the plan slightly, and that space will be the shower/bathtub room, the toilet and sink will be in an adjoining room next to it, which has yet to be started. 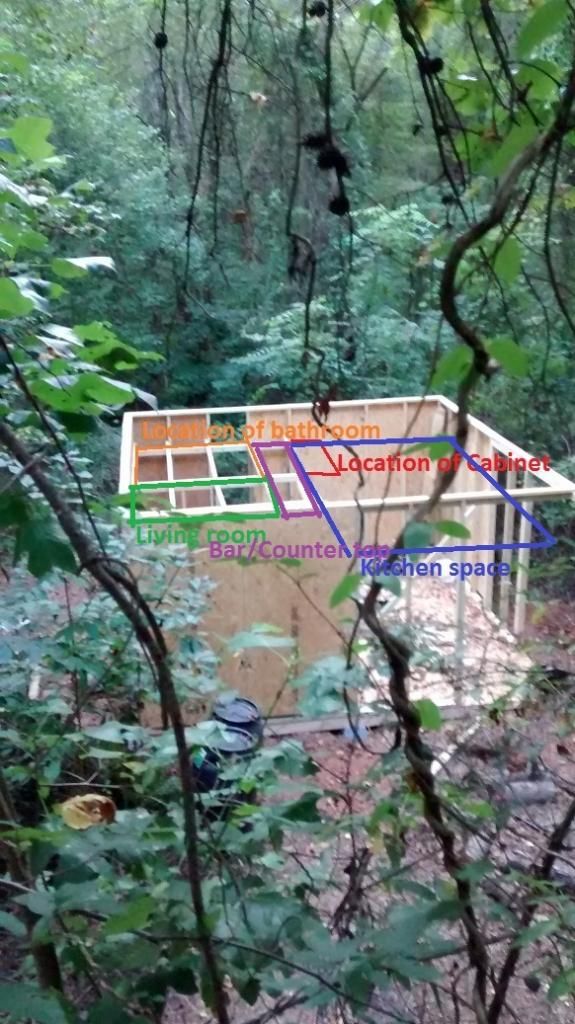
|
|
|
|
[#1]
9/6/2014
The framing for the loft started. All the lumber for this loft was salvaged from a warehouse that gets slabs of granite shipped in on lumber frames. 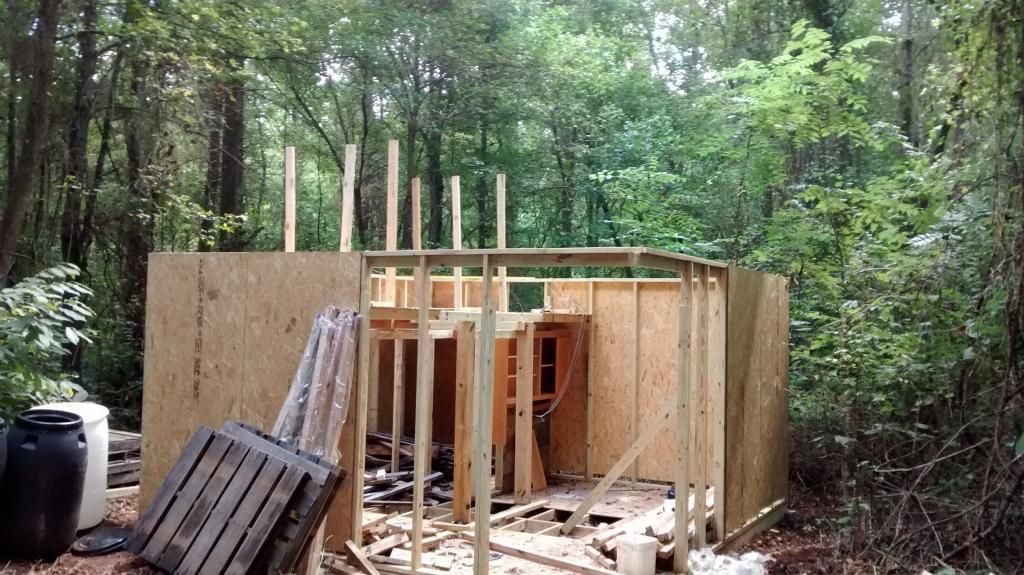
Here's where, if any, I will get lots of opinions telling me I should have done it differently. I think it'll work though. 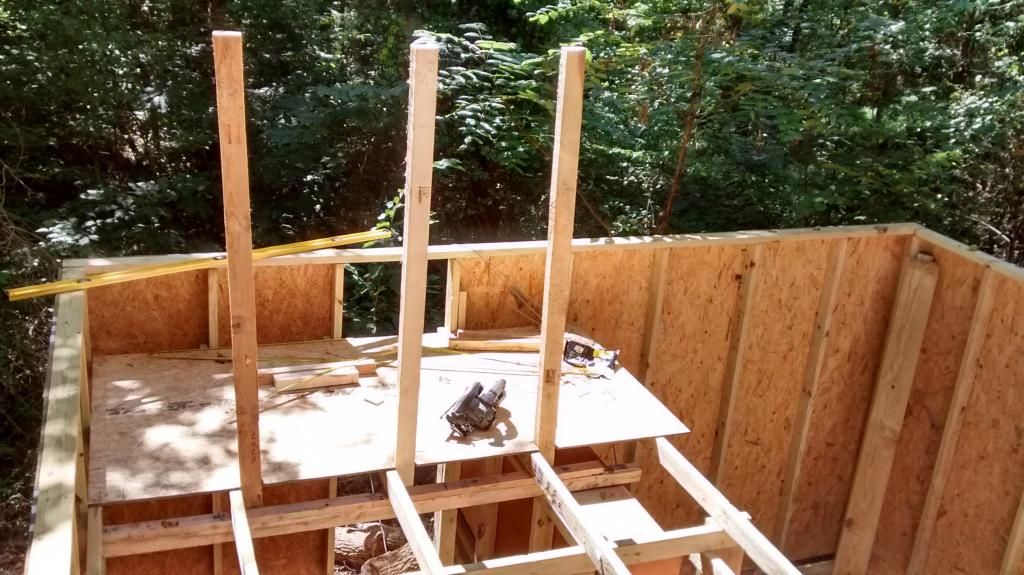
9/7/2014 Loft floor down, and more framing up. 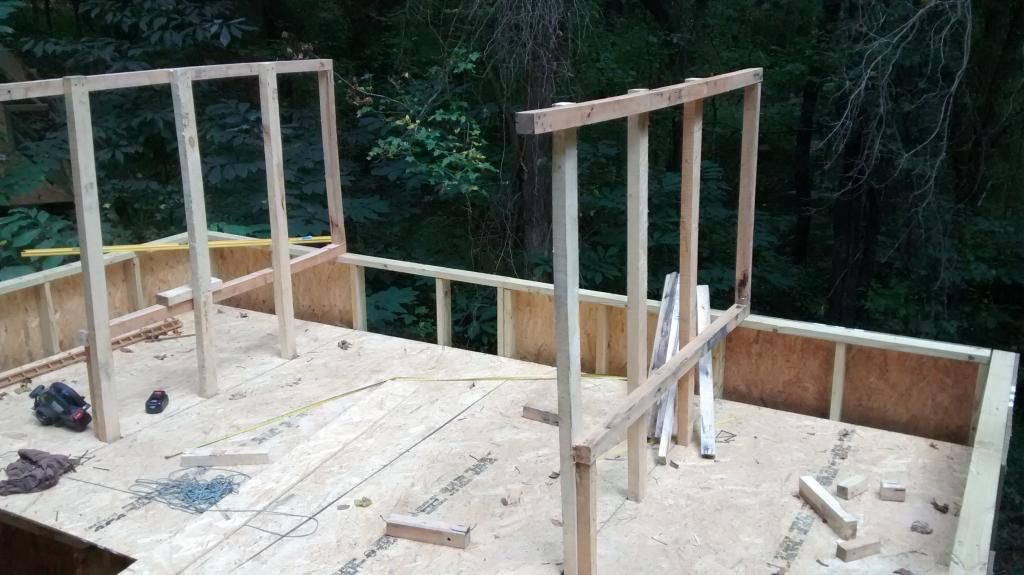
9/8/2014 First part of the roof frame is going up. 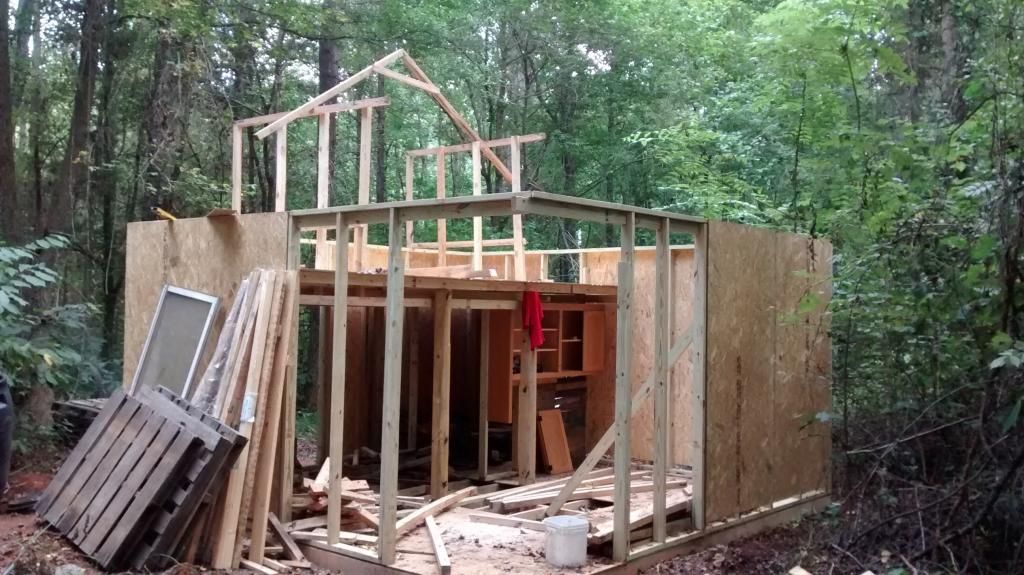
I got 4 of the "trusses" up today, and forgot to snap a picture on my way out. I will be out of town for the coming week so follow up will have to wait. |
|
|
|
[#2]
It's yours, build it how you want it.
|
|
|
|
[#3]
Great project keep the pics coming. I will advise there's not much chance of it staying level those concrete block will sink/shift.
|
|
|
|
[#4]
Quoted:
Great project keep the pics coming. I will advise there's not much chance of it staying level those concrete block will sink/shift. |
|
|
|
[#5]
Hey bud,
you might check out this book, a lot of good basic knowledge in here that will help you as you homestead. amazon link to book There are a bunch more just like it as well. This one is a broad overview with a lot of gotchas that we have lost in these modern times. |
|
|
|
[#6]
Yeah, should have bored some holes down 4' and poured concrete in the bottom, then pilings on top. |
|
|
|
[#7]
Love seeing the pics.
Thoughts....is the wood that's in contact with the concrete blocks untreated? If so, it's not going to last long. Termites are going to be feasting pretty soon...especially in FL. |
|
|
|
[#8]
Quoted: Great project keep the pics coming. I will advise there's not much chance of it staying level those concrete block will sink/shift. This. In addition, while I'm no builder, I can say that that looks like an area that gets a bit of rainfall, and having untreated wood that close to the dirt in your floor foundation will not take too many seasons to start rotting out. I know you've gone a ways with this already, but honestly, if I were doing it, and wanted it to last more than a year or two, I'd rip the whole thing out right now, lay a solid foundation first, then start building from there with treated wood anywhere that may be exposed to the elements (you could at least stain it for some small amount of protection). Moisture is an enemy to wooden structures. |
|
|
|
[#9]
Quoted:
This. In addition, while I'm no builder, I can say that that looks like an area that gets a bit of rainfall, and having untreated wood that close to the dirt in your floor foundation will not take too many seasons to start rotting out. I know you've gone a ways with this already, but honestly, if I were doing it, and wanted it to last more than a year or two, I'd rip the whole thing out right now, lay a solid foundation first, then start building from there with treated wood anywhere that may be exposed to the elements (you could at least stain it for some small amount of protection). Moisture is an enemy to wooden structures. Quoted:
Quoted:
Great project keep the pics coming. I will advise there's not much chance of it staying level those concrete block will sink/shift. This. In addition, while I'm no builder, I can say that that looks like an area that gets a bit of rainfall, and having untreated wood that close to the dirt in your floor foundation will not take too many seasons to start rotting out. I know you've gone a ways with this already, but honestly, if I were doing it, and wanted it to last more than a year or two, I'd rip the whole thing out right now, lay a solid foundation first, then start building from there with treated wood anywhere that may be exposed to the elements (you could at least stain it for some small amount of protection). Moisture is an enemy to wooden structures. Agreed. That wood won't last, and it'll be much easier to deal with this now than later. If you do decide you're past the point of no return, at least get yourself underneath there (if you can) and spray some stuff on there to provide some durability. Truck Bedliner or maybe one of the new deck-restoration projects should at least get you a decade or so of use. |
|
|
|
[#10]
Nice projected, OP. Looking forward to additional motivation from your future updates.
Keep 'em coming. |
|
|
|
[#11]
I have an update with more pictures, but first let me address some of the questions.
The framing for the floor is mostly pressure treated, though the pictures don't display that ugly green color too well. There are a few pieces that are not, and I think I will take the suggestion of one of the posters in this thread and get under there and coat it with some deck sealer just to bump up the expected life of the structure. This is in an area that gets a moderate amount of rainfall, however, it's not in FL as my member status reflects. I obviously would like this thing to last as long as it is capable of, but it is meant as a temporary "bridge the gap" cabin, to provide a base camp, so I can focus more efforts on the permanent structure. There is a good chance that this will all be dismantled in the next 3-5 years. I am building it to accommodate possible dismantling, using mostly screws instead of nails, especially where the plywood meets the framing. The future permanent cabin will be a pretty unique design that I won't discuss much here just to stay on topic, but it will be a hybrid between the "Earthship" building design, and a Wofati. Stay tuned for an update with pictures in just a few minutes. |
|
|
|
[#12]
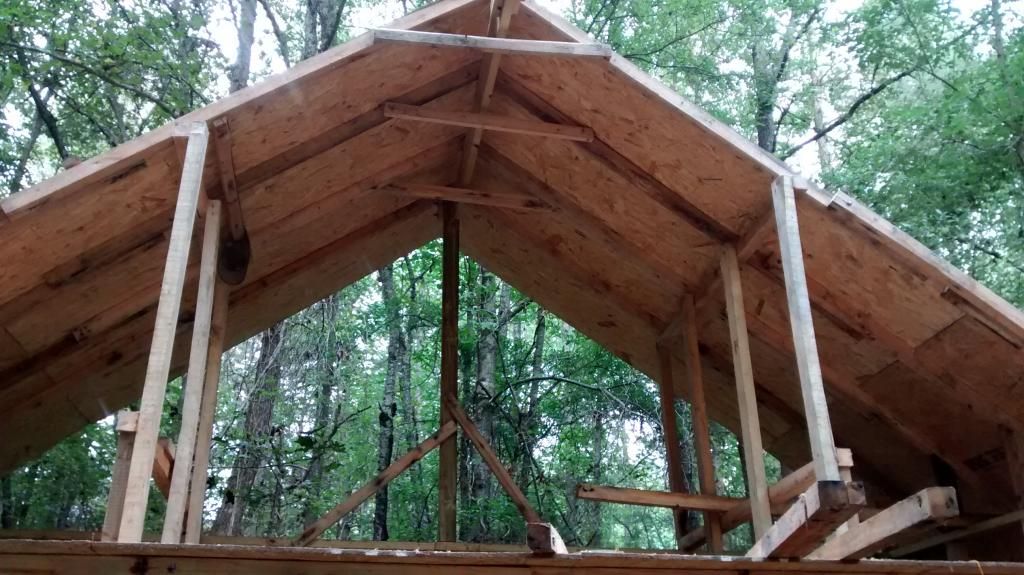
This beam here, going down the spine of the roof is what I got done today. It's two pieces of 2"x8"x8ft PT that has been scabbed together in the middle to create a 16 foot span. The problem as you can see, is I already had some plywood up so I had to work around that.
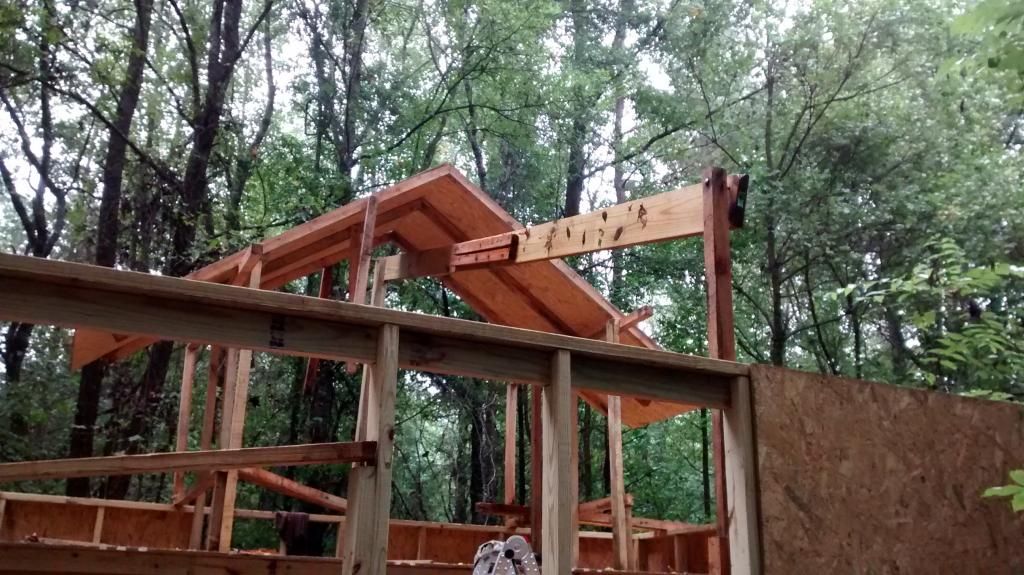
This was scabbed together on the loft, so it was already towards the top of the structure, but getting the whole thing up that last 6 feet was tricky. Because I was by myself I had to incrementally push one side up, then the other. This was made easier by pushing from the bottom with a piece of lumber then tacking it once it was at a height I was OK with. 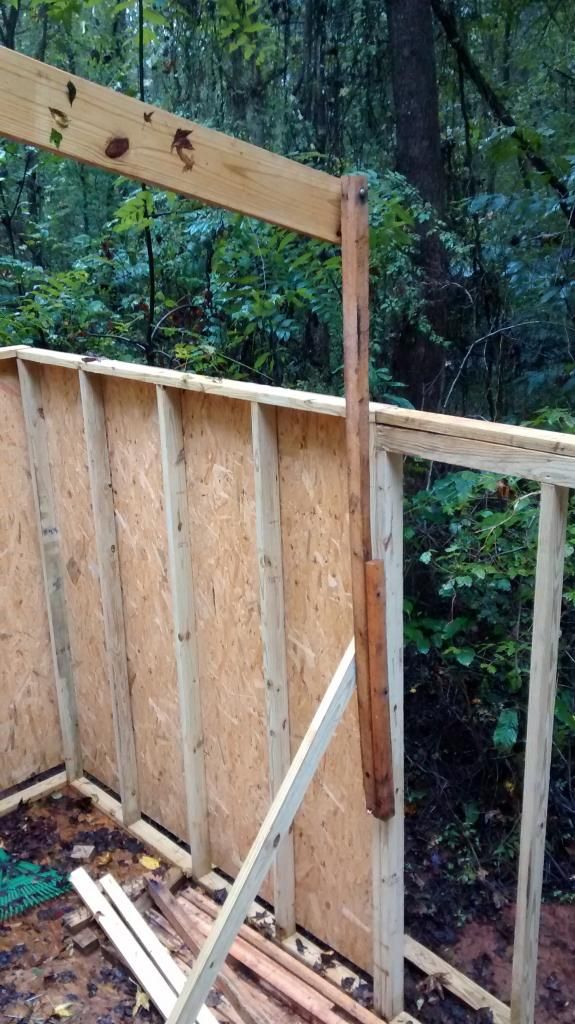
The left side was the first side to go all the way up. It was bolted in place, then the right side was pushed up the final 2-3 feet, the posts leveled and squared and bolted as well. 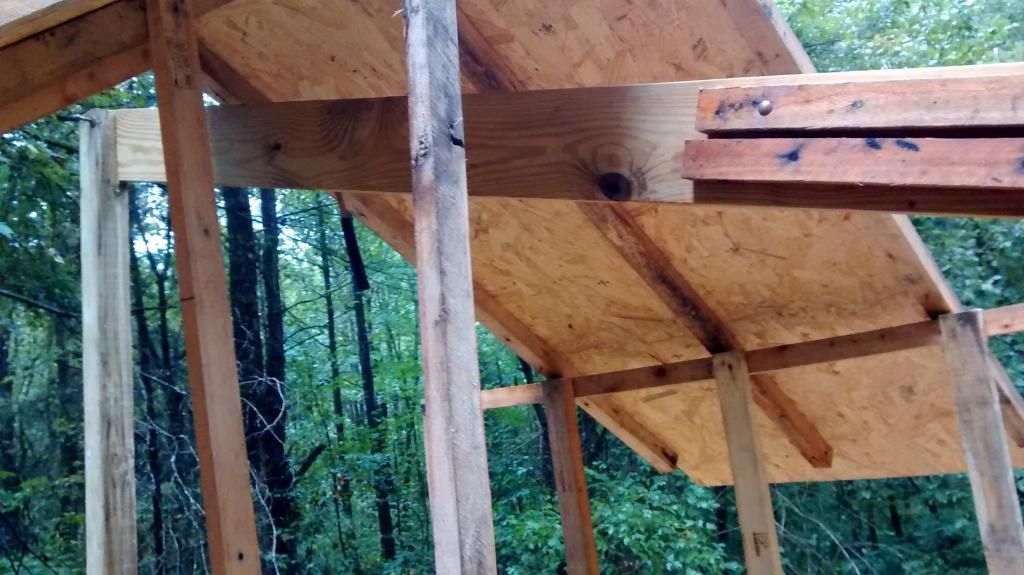
The finished product. Not bad for half a day all by myself, if you ask me. 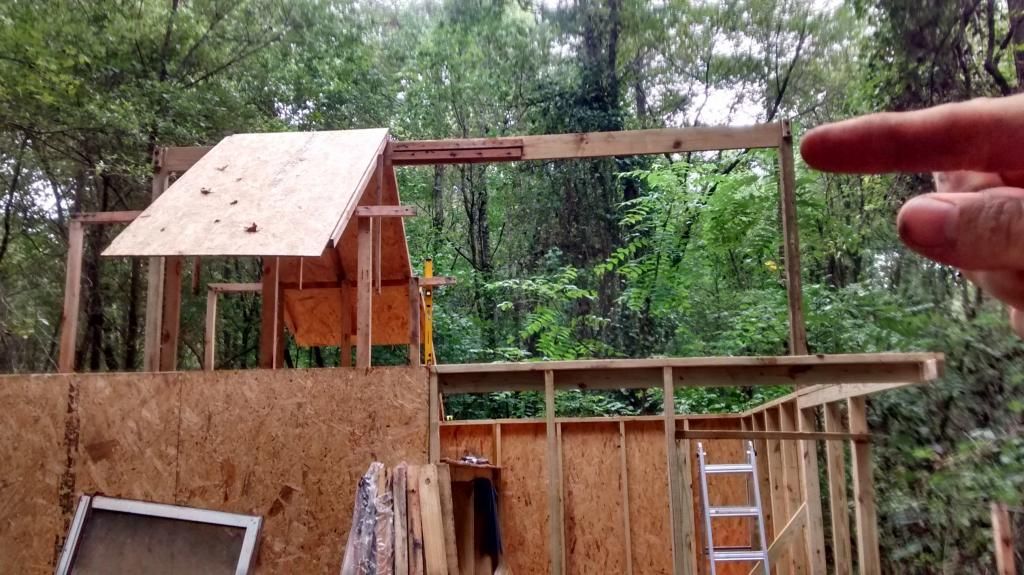
|
|
|
|
[#13]
Do you have any wolves in the area?
Especially any that resemble: 
|
|
|
|
[#14]
Your giving my inner shop teacher a heart attack!


Or if you want a quick, easy to dismantle option that will go up fast and won't collapse onto you, 
|
|
|
|
[#15]
Quoted:
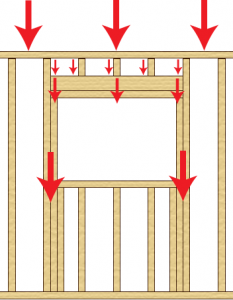
Your giving my inner shop teacher a heart attack! http://housecraft.ca/wp-content/uploads/2013/01/Wall_Frame_Showing_Forces_-233x300.png http://www.homecents.com/images/gloss_imgs/Framing/ExteriorWallL.gif http://www.homecents.com/images/gloss_imgs/Framing/RafterCuts.gif Or if you want a quick, easy to dismantle option that will go up fast and won't collapse onto you, http://w.creativeshelters.com/images/Blitz/Shed-Kit/90192-300.jpg It looks like I'm doing things correctly based on the second picture with the exception of where my unique styled door is going. I don't have windows, so based on that picture all I need to pay attention to is the bottom plate, top plate, studs, and corner post. I don't need to worry about window headers, trimmer studs, king studs, cripple studs. Based on that assessment I'd say i'm doing well. I've never seen blocking, fill bracing, let in brace. Are those for certain situations only? If not, why does only the right side of the wall have it, and the left side is left void of those features? Is it for the ease of reading the animation? Your first picture is window detail, but I don't have windows..... The last picture of the little assemble-yourself-shed looks like what I'm doing. I thought about one of those kits, but I couldn't get a 16x16 with a loft for $1,500 (roughly what I have in my build currently, plus what I plan to spend to finish it) Plus I wouldn't learn nearly as much or get the satisfaction for building a kit. So what am I missing that's making you about to have cardiac arrest? |
|
|
|
[#16]
Quoted:
Do you have any wolves in the area? Especially any that resemble: http://www.chicagonow.com/wee-windy-city/files/2014/02/big_bad_wolf1.jpg If you're suggesting my cabin is going to blow away at the first 10 mph gust I get, I'd love some feedback on what in particular catches you eye that I need to do differently, that's much more helpful than ambiguously alluding to feelings that it is being built unsafe. So far most people seem to think the pilings are a weak point, or the wood close to the ground, did you see something different that needs attention? |
|
|
|
[#17]
You obviously have moisture in the soil there, how are you going to keep your structure from rotting due to soil contact, both at the sides and from underneath?
|
|
|
|
[#18]
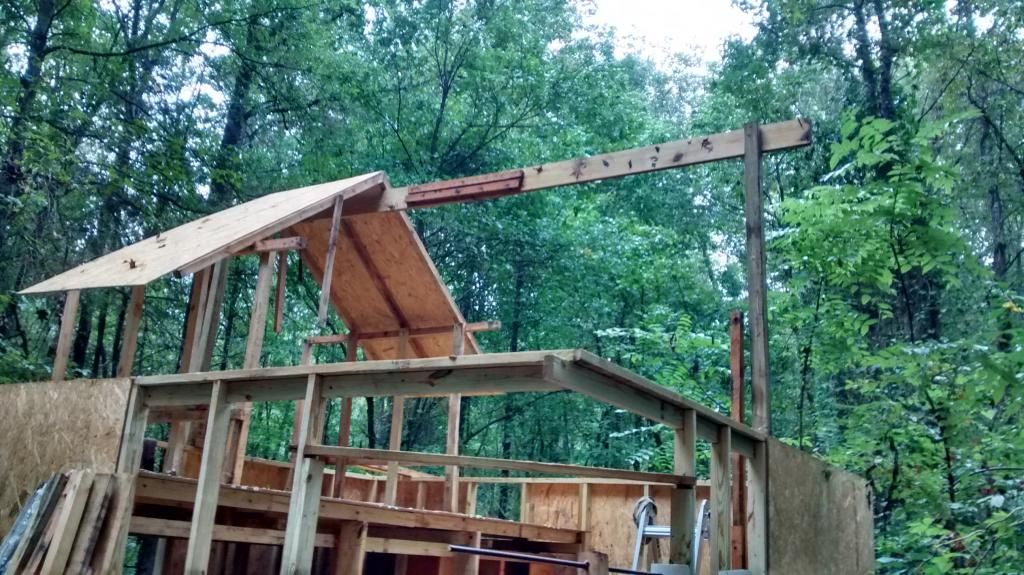
Another busy day at the BOL.
The focus was the roof, not a super easy task when done solo. Luckily I had a hand crank winch laying around and a few come-alongs. 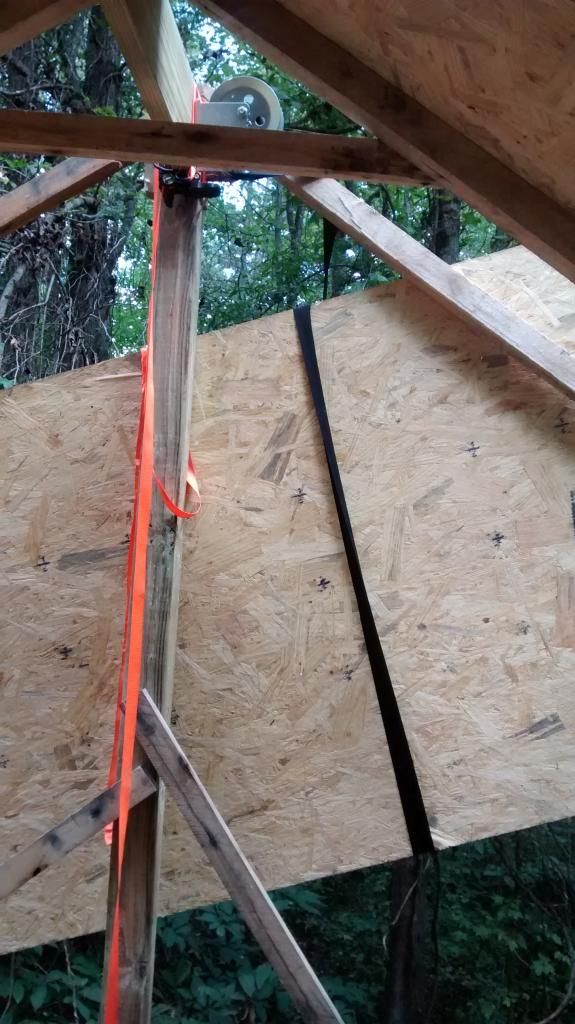
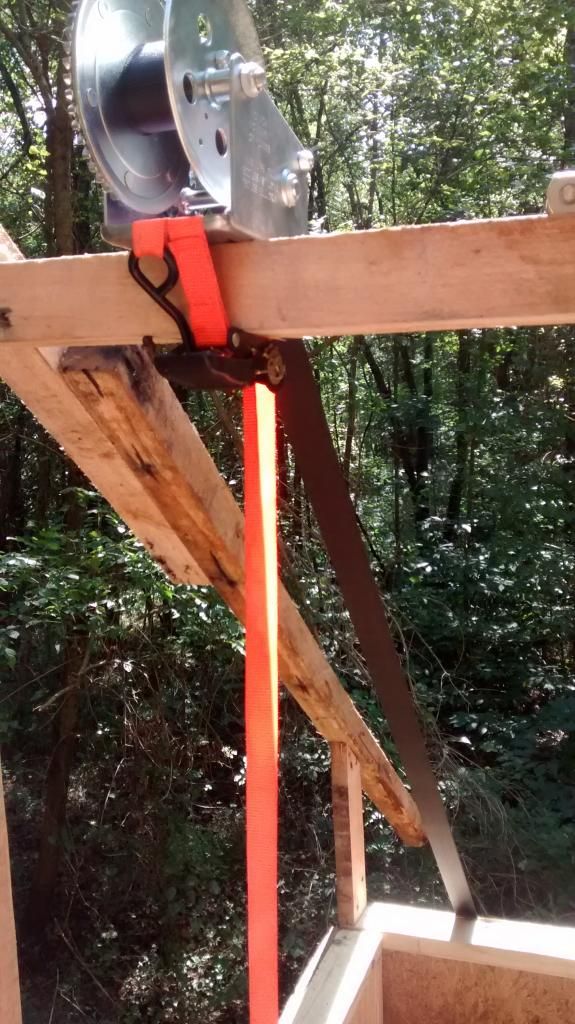
Setting the sheets in place wasn't too bad. I'd get the corner that was closest to where it's final resting place would be, tack it, then let the winch have slack and pivot the opposite corner to its place and nail down. Go back to the starting corner untack it, shift into place, then screw it. 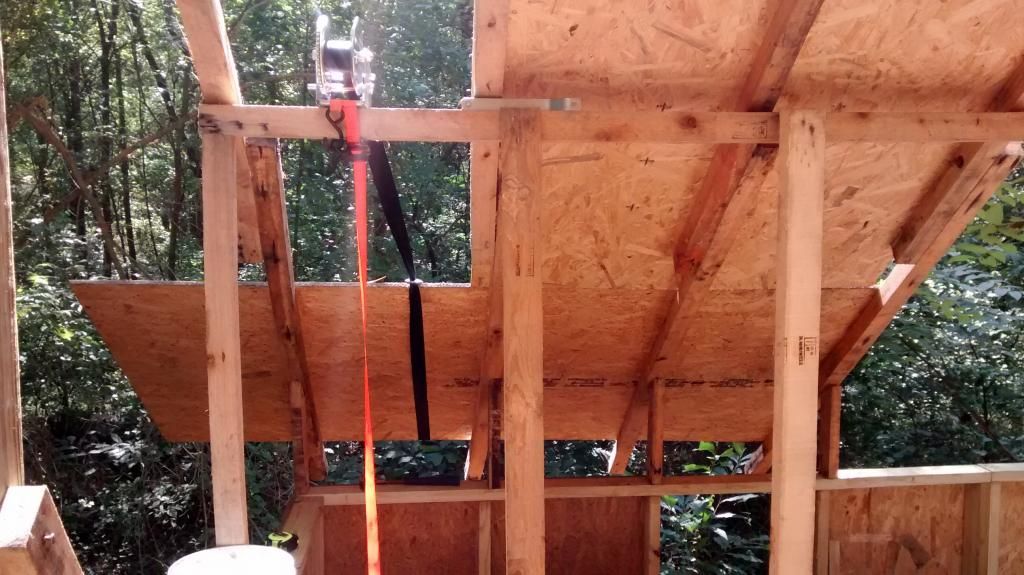
So far 6 of the 15 total sheets are up in place. Here's the results. 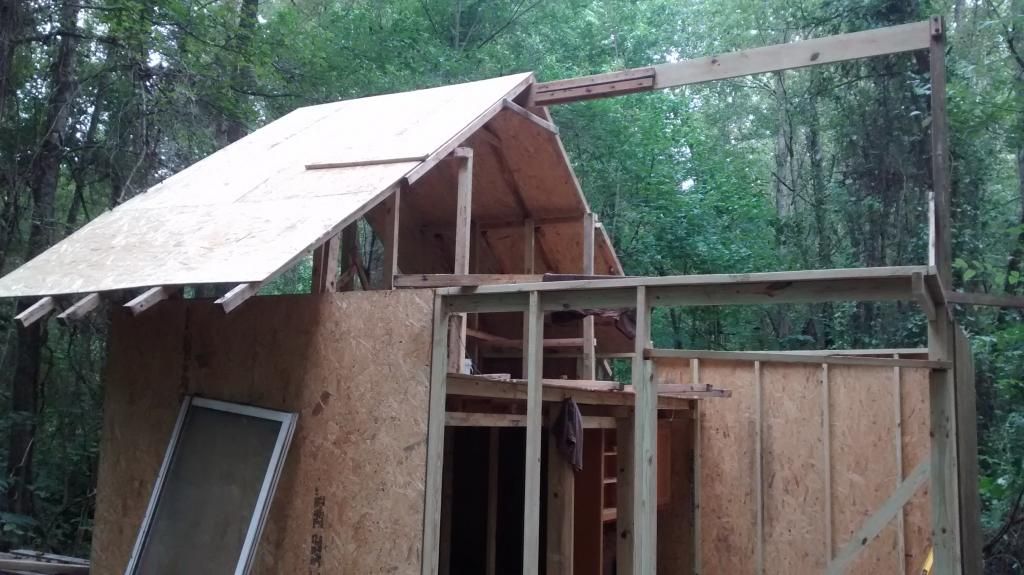
|
|
|
|
[#19]
Quoted:
If you're suggesting my cabin is going to blow away at the first 10 mph gust I get, I'd love some feedback on what in particular catches you eye that I need to do differently, that's much more helpful than ambiguously alluding to feelings that it is being built unsafe. So far most people seem to think the pilings are a weak point, or the wood close to the ground, did you see something different that needs attention? Quoted:
Quoted:
Do you have any wolves in the area? Especially any that resemble: http://www.chicagonow.com/wee-windy-city/files/2014/02/big_bad_wolf1.jpg If you're suggesting my cabin is going to blow away at the first 10 mph gust I get, I'd love some feedback on what in particular catches you eye that I need to do differently, that's much more helpful than ambiguously alluding to feelings that it is being built unsafe. So far most people seem to think the pilings are a weak point, or the wood close to the ground, did you see something different that needs attention? What some might be driving at is your "beam". The way you have it now, just kinda pushed up underneath the finished roof, will not do much. If you notice the pic above of the garden shed, you'll see that it uses a ridge beam properly--with each rafter attached to it. You are building what appear to be individual 2x2 "trusses", with no strong backing or webbing of any kind, and just a random beam underneath. In your application this beam-- especially scabbed together and unsupported in the middle-- doesn't do much. Your idea of a ridge beam is there, however the individual rafters must each be fastened to it. I've seen 1x6 ridge beams even for heavy snow load areas--it simply acted as the "spine" of the roof, and receives equal weight from each side, rendering it almost stress free structurally. Yours, if anything will be an added burden on an already weak looking roof |
|
|
|
[#20]
Quoted:
You obviously have moisture in the soil there, how are you going to keep your structure from rotting due to soil contact, both at the sides and from underneath? Most of the lumber I've used is PT. There are a few boards that are not and from the advice of someone here, I'll probably hit it with a few coats of deck sealer just to squeeze a little more lifespan from the lumber. As time permits I think I'll probably dig back a lot of the dirt away from the foundation area. I started at the lowest point and dug down all the others so it'd be level. In hindsight I should have started at the highest point and built up to reach level, and as Waldo pointed out, I should have gotten some cement under the pilings. These are all things I'm glad to have learned and will incorporate next time. |
|
|
|
[#21]
Quoted:
What some might be driving at is your "beam". The way you have it now, just kinda pushed up underneath the finished roof, will not do much. If you notice the pic above of the garden shed, you'll see that it uses a ridge beam properly--with each rafter attached to it. You are building what appear to be individual 2x2 "trusses", with no strong backing or webbing of any kind, and just a random beam underneath. In your application this beam-- especially scabbed together and unsupported in the middle-- doesn't do much. Your idea of a ridge beam is there, however the individual rafters must each be fastened to it. I've seen 1x6 ridge beams even for heavy snow load areas--it simply acted as the "spine" of the roof, and receives equal weight from each side, rendering it almost stress free structurally. Yours, if anything will be an added burden on an already weak looking roof Quoted:
Quoted:
Quoted:
Do you have any wolves in the area? Especially any that resemble: http://www.chicagonow.com/wee-windy-city/files/2014/02/big_bad_wolf1.jpg If you're suggesting my cabin is going to blow away at the first 10 mph gust I get, I'd love some feedback on what in particular catches you eye that I need to do differently, that's much more helpful than ambiguously alluding to feelings that it is being built unsafe. So far most people seem to think the pilings are a weak point, or the wood close to the ground, did you see something different that needs attention? What some might be driving at is your "beam". The way you have it now, just kinda pushed up underneath the finished roof, will not do much. If you notice the pic above of the garden shed, you'll see that it uses a ridge beam properly--with each rafter attached to it. You are building what appear to be individual 2x2 "trusses", with no strong backing or webbing of any kind, and just a random beam underneath. In your application this beam-- especially scabbed together and unsupported in the middle-- doesn't do much. Your idea of a ridge beam is there, however the individual rafters must each be fastened to it. I've seen 1x6 ridge beams even for heavy snow load areas--it simply acted as the "spine" of the roof, and receives equal weight from each side, rendering it almost stress free structurally. Yours, if anything will be an added burden on an already weak looking roof Thanks for the advice. I will say, even though some of the "trusses" were up prior to the beam going up, once it was put into place the trusses do make contact and have been nailed to the beam. Optimally I'm sure there is some form of a Simpson strong tie that is meant for the task, but I did pay attention to make sure that the beam was making contact with the trusses and the future ones to go up will do the same. As far as being scabbed together, that was advice from a neighbor, which I cannot vouch for his expertise other than he works on a residential construction crew. I never figured scabbing something like that together would suffice, he swears it will. I did make the scabbing pretty solid, which I will get pictures of tomorrow if I remember. If there are problems that appear with it sagging, or showing signs of stress or inability to hold, then I'll look at options for bolstering it from underneath with a column of some sort. |
|
|
|
[#22]
Quoted:
Thanks for the advice. I will say, even though some of the "trusses" were up prior to the beam going up, once it was put into place the trusses do make contact and have been nailed to the beam. Optimally I'm sure there is some form of a Simpson strong tie that is meant for the task, but I did pay attention to make sure that the beam was making contact with the trusses and the future ones to go up will do the same. As far as being scabbed together, that was advice from a neighbor, which I cannot vouch for his expertise other than he works on a residential construction crew. I never figured scabbing something like that together would suffice, he swears it will. I did make the scabbing pretty solid, which I will get pictures of tomorrow if I remember. If there are problems that appear with it sagging, or showing signs of stress or inability to hold, then I'll look at options for bolstering it from underneath with a column of some sort. Quoted:
Quoted:
Quoted:
Quoted:
Do you have any wolves in the area? Especially any that resemble: http://www.chicagonow.com/wee-windy-city/files/2014/02/big_bad_wolf1.jpg If you're suggesting my cabin is going to blow away at the first 10 mph gust I get, I'd love some feedback on what in particular catches you eye that I need to do differently, that's much more helpful than ambiguously alluding to feelings that it is being built unsafe. So far most people seem to think the pilings are a weak point, or the wood close to the ground, did you see something different that needs attention? What some might be driving at is your "beam". The way you have it now, just kinda pushed up underneath the finished roof, will not do much. If you notice the pic above of the garden shed, you'll see that it uses a ridge beam properly--with each rafter attached to it. You are building what appear to be individual 2x2 "trusses", with no strong backing or webbing of any kind, and just a random beam underneath. In your application this beam-- especially scabbed together and unsupported in the middle-- doesn't do much. Your idea of a ridge beam is there, however the individual rafters must each be fastened to it. I've seen 1x6 ridge beams even for heavy snow load areas--it simply acted as the "spine" of the roof, and receives equal weight from each side, rendering it almost stress free structurally. Yours, if anything will be an added burden on an already weak looking roof Thanks for the advice. I will say, even though some of the "trusses" were up prior to the beam going up, once it was put into place the trusses do make contact and have been nailed to the beam. Optimally I'm sure there is some form of a Simpson strong tie that is meant for the task, but I did pay attention to make sure that the beam was making contact with the trusses and the future ones to go up will do the same. As far as being scabbed together, that was advice from a neighbor, which I cannot vouch for his expertise other than he works on a residential construction crew. I never figured scabbing something like that together would suffice, he swears it will. I did make the scabbing pretty solid, which I will get pictures of tomorrow if I remember. If there are problems that appear with it sagging, or showing signs of stress or inability to hold, then I'll look at options for bolstering it from underneath with a column of some sort. If used correctly, as in diagram of rafter in bigpolskas post, yes, a ridge board can be, and often must be, scabbed together. If one makes a 30 foot garage with overhangs, one cannot simply purchase a 34 foot 2x6. But again, no uneven forces are at play on said ridge, unlike yours |
|
|
|
[#23]
Quoted:
So what am I missing that's making you about to have cardiac arrest? *sigh* I posted up a link to a good book, and others also made similar suggestions. I hate to be a jerk on the internet, but I will give suggestions on just 1 of the many photos you placed. Bear in mind without an adequate foundation, the best made structure will shift, bind, and crumble in time (as others have mentioned). If you are lucky, it will be after you decide to raze it. If you are unlucky, you are someone you love, or property you value, will be hurt or destroyed. In this picture:
1. There is no double plate involved at all. None. See that seam in the bottom right corner? If you built properly, your double plate would have reinforced that top plate, and you would not have needed to waste another stud. The bottom left corner is another example, a double plate would have locked that corner in, because nails or screws won't do it. Your entire structure depends on 1.5 inch of wood to hold up the entire weight of the roof, both live and dead loads. It may or may not transfer down your wall stud, but without cross bracing, the wall has very little shear strength, even with the sheeting thrown up, which really needed to tie into the base plates...(as in this picture illustrates it is not http://i201.photobucket.com/albums/aa54/grenade4lunch/17_zps0f4ba2bb.jpg) I assumed you had windows because your sheeting is not continuous, I can see daylight. This makes the entire wall weak. Sheeting always runs horizontally, like a belt, it is stronger that way. It reminds me of a house of cards. Stable, until one link is lost 2. Nails or screws keep things from moving- but wood shrinks, twists and moves. If you are scabbing, you need to scab properly. A few screws will work for now, but.... Ever see an old pallet? Floppy and twisty? You can not rely on just the fastners to hold up the structure and carry weight. That is why there are bird mouths, etc. That was the point of the red force arrow illustration. The entire structure must work together. Two nails in each of your "wall/stud" (not sure what to call it) will not carry the roof load when it presses down on that mid-point for very long. 3. Lumber works in better ways- you will support more weight with your "rafters" orientated vertically then horizontally. The sheeting waste- pro tip, make a plan and make sure it is in 2' increments. Again, have the sheeting work for you by staggering seams and using clips. 4. You remind me of my brother in law. I know how this will end, and I have a feeling I am wasting my breath. Or this is an epic troll post. You pick. |
|
|
|
[#24]
in
|
|
|
|
[#25]
Quoted:
If you're suggesting my cabin is going to blow away at the first 10 mph gust I get, I'd love some feedback on what in particular catches you eye that I need to do differently, that's much more helpful than ambiguously alluding to feelings that it is being built unsafe. So far most people seem to think the pilings are a weak point, or the wood close to the ground, did you see something different that needs attention? Quoted:
Quoted:
Do you have any wolves in the area? Especially any that resemble: http://www.chicagonow.com/wee-windy-city/files/2014/02/big_bad_wolf1.jpg If you're suggesting my cabin is going to blow away at the first 10 mph gust I get, I'd love some feedback on what in particular catches you eye that I need to do differently, that's much more helpful than ambiguously alluding to feelings that it is being built unsafe. So far most people seem to think the pilings are a weak point, or the wood close to the ground, did you see something different that needs attention? For your own safety you really need to take a pause and go to Lowes and get a book on basic residential framing. Almost nothing you are doing is appropriate - and I don't mean you aren't doing it "the best way", I mean you aren't in the neighborhood of even "good enough". You seem to have the time, material and motivation - which is great - but apply a bit of that to the study of basic framing. You might also want to revisit the complexity of your building - you are clearing over extending beyond your ability. I wish you luck and applaud your efforts. |
|
|
|
[#26]

May I suggest getting a 40' cargo container instead? |
|
|
 Win a FREE Membership!
Sign up for the ARFCOM weekly newsletter and be entered to win a free ARFCOM membership. One new winner* is announced every week!
You will receive an email every Friday morning featuring the latest chatter from the hottest topics, breaking news surrounding legislation, as well as exclusive deals only available to ARFCOM email subscribers.

AR15.COM is the world's largest firearm community and is a gathering place for firearm enthusiasts of all types.
From hunters and military members, to competition shooters and general firearm enthusiasts, we welcome anyone who values and respects the way of the firearm.

Subscribe to our monthly Newsletter to receive firearm news, product discounts from your favorite Industry Partners, and more.
Copyright © 1996-2024 AR15.COM LLC. All Rights Reserved.
Any use of this content without express written consent is prohibited.
AR15.Com reserves the right to overwrite or replace any affiliate, commercial, or monetizable links, posted by users, with our own.


