|
[#1]
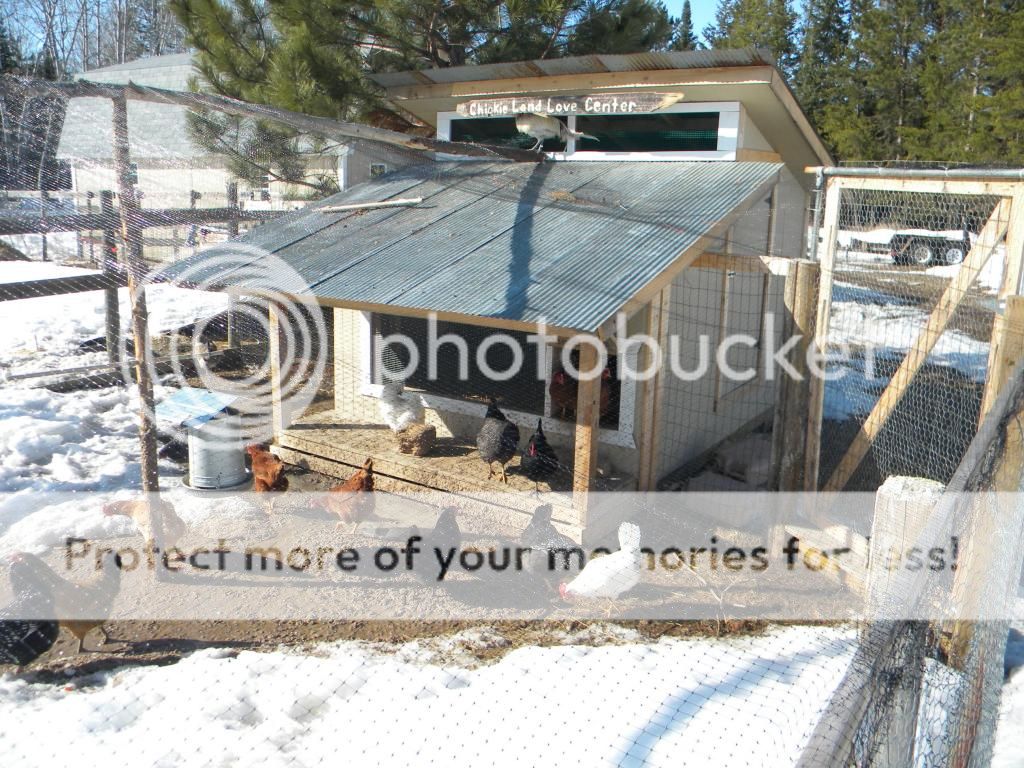
Photos 26 / 289 / 290 / 292 /293. It was an old 'play house' at a local park that was being scrapped - I asked for it and they gave it to me - even loaded it on my truck. Built out of old railroad ties. I sealed the inside with plywood -added on a little side room - roofed it - and it's wired for a 250 watt heat lamp for winter. The blue tarps everywhere are for extra shade and wind breaks - they get replaced every 2 years or so. Fucker has been through hurricanes Ivan and Katrina - several tropical storms and God only knows how many summertime thunder storms. Never moved an inch. Go Here
|
|
|
|
[#2]
Tagged! Going to start a flock once I close on my house. Bring on the fresh eggs!!
|
|
|
|
[#3]
Coop building in progress
 With current tenants  |
|
|
|
[#4]
Very nice. Is the one in the second pic masonry ?? |
|
|
|
[#5]
Quoted: Very nice. Is the one in the second pic masonry ?? Quoted: Very nice. Is the one in the second pic masonry ?? |
|
|
|
[#6]
This was 5 or 6 years ago. It's been moved a couple times since and now houses turkeys. We moved the chickens to the barn.
 |
|
|
|
[#7]
 Meat birds left and layers right, both open to the outside.
|
|
|
|
[#8]
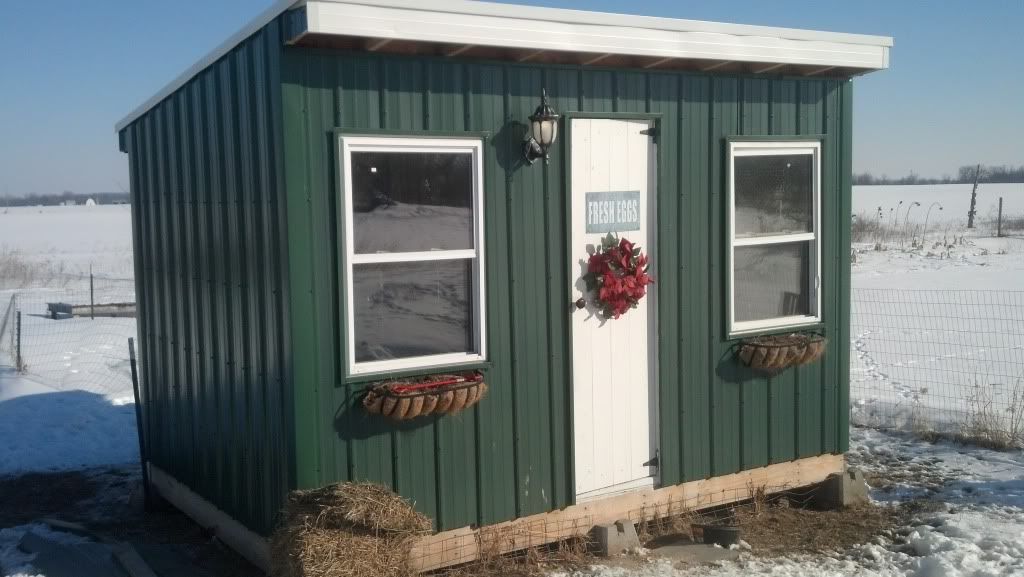
Front View
Back view 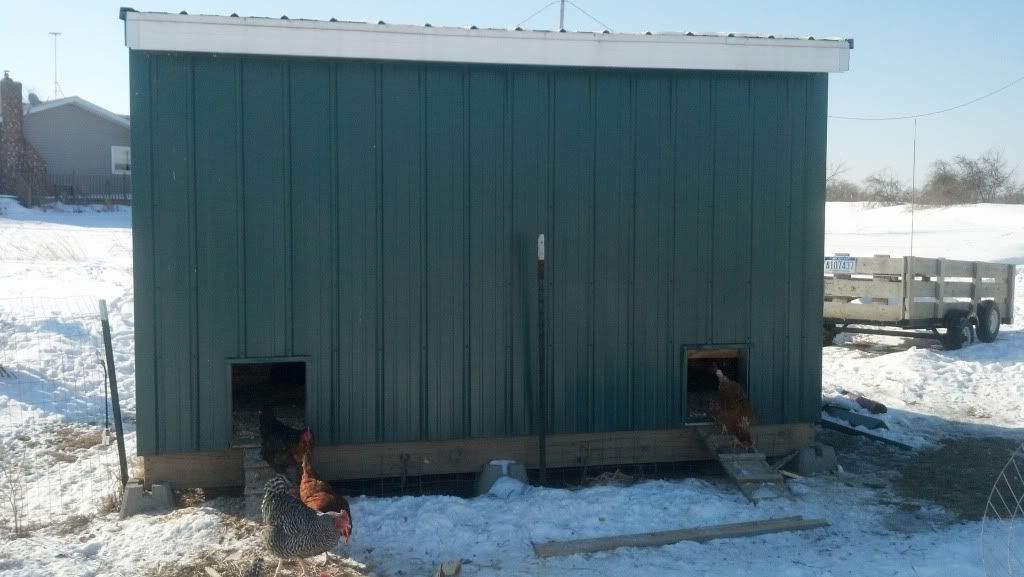
Nest box in left side 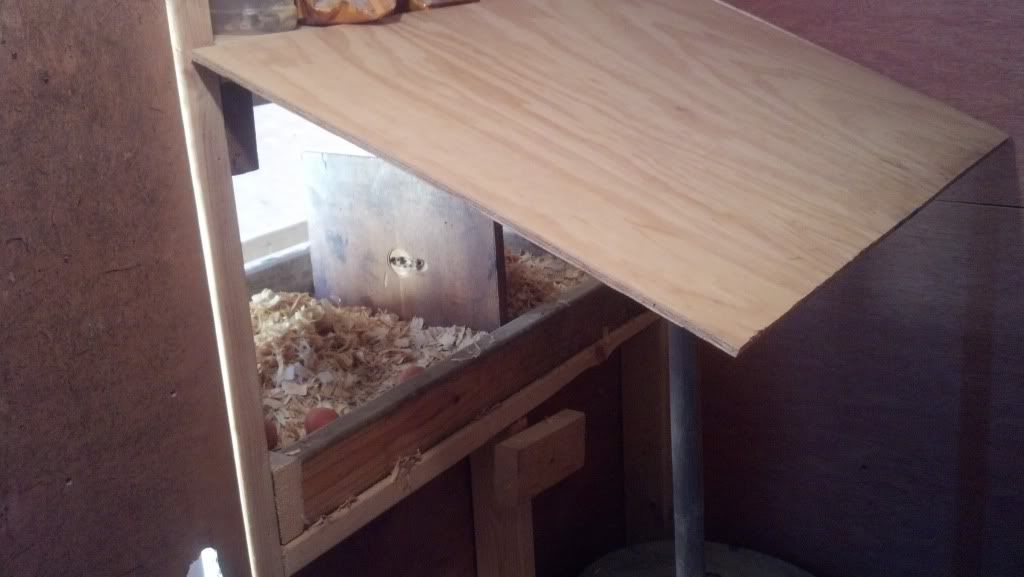
View through door. Feed, bedding is stored here and access to nest boxes and both coops is from here. The strings at the top of the picture pull the outside doors open. Wanted 2 areas so I could raise meat chickens or more layers and keep them separated from the older hens. 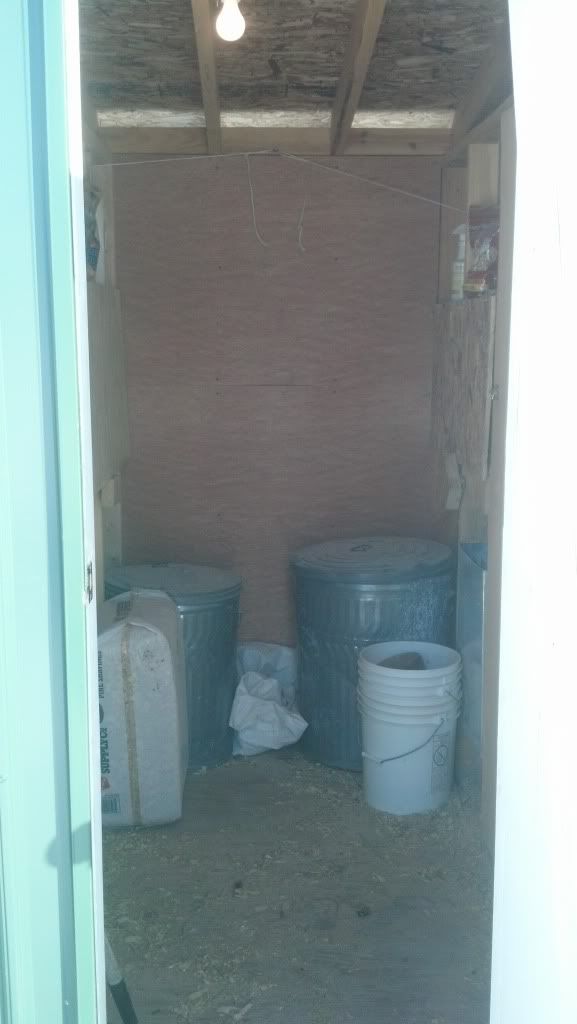
|
|
|
|
[#9]
http://atheisthomesteader.files.wordpress.com/2013/10/dsc07412.jpg
8'x18' floor, 8' high walls, 10' apex. Run behind it is 18'x24' and will be completely fenced in. I have the materials, but there is 3' of snow out there... gotta wait. All of the area behind it will be our vegetable garden so the chooks can run through it in the spring and fall to eat bugs and fertilize for us. Winter caught me before I could finish it. Our chicks aren't coming until June, so hopefully I can crank out the rest before they come. I got it primed, and the outside is finished, but I need to paint it, get some dividers up, and get the inside emptied out. It's being used as a storage shed now for tools, some small appliances, and the snow thrower. Love seeing everyone else's coops! |
|
|
|
[#10]
  |
|
|
|
[#11]

|
|
|
|
[#12]
DAMN - those are some nice setups !!!!!
|
|
|
|
[#13]
http://www.ar15.com/forums/t_10_19/669486_chicken_coop_w__pics.html
Things I would do differently other than what I mention in the thread are: - Build it larger to incorporate a brooding area. - Design and fabricate a "pull out shelf" for the droppings. Envision standing outside the coop, pulling out the dropping board and scraping the droppings directly into a wheelbarrow. As it is now I have to work around the roosts while scraping the droppings into a bucket. I am also going to finally build a roof over the run. The chickens hate going out in the snow and it's been great fun shoveling out the run after every snow storm. Not to mention the sand will stay drier in the warmer months and that will help with their health as well as cleaning out the run. You've probably seen the following site, but just in case you haven't, here it is. They have a section with a ton of coops of all sizes and designs here. |
|
|
|
[#14]

|
|
|
|
[#15]

Siding is rough-cut oak from a local sawmill. The windows in the front are removable; we swap out some glass storm windows (winter) with a couple of pieces of framed hardware cloth in the summer. One thing I would definitely do differently if I was doing it again: I thought I'd be nice to the chickens and insulate it. So the construction, from outside-in, is rough oak, roofing felt, studs with batt insulation, then an interior surface of white bathroom wallboard (the stuff you can use for whiteboards). I thought the interior wall would help make it easier to keep clean, but overall it's just been a pain in the butt. The insulation and closed-in walls make a great place for mice to nest. |
|
|
|
[#16]
Thanks everyone, this gives me a lot of ideas.
Would anyone mind posting pictures of the inside of their coop? That'd be wonderful... |
|
|
|
[#17]
|
|
|
|
[#19]
Quoted:
Thanks everyone, this gives me a lot of ideas. Would anyone mind posting pictures of the inside of their coop? That'd be wonderful... 

|
|
|
|
[#20]
  |
|
|
|
[#21]
I was going to post a pic of mine but after seeing all these nice setups... I will just say my little chicken tractor works good and was cheap to build
|
|
|
|
[#22]
Here is my mostly complete chicken coop. I had to get it in working order before I deployed. It's a 6'x10' coop with an automatic door and 8 nesting boxes. I still need to enclose the run area with wire fencing and install an automatic waterer.


|
|
|
|
[#23]

|
|
|
|
[#24]
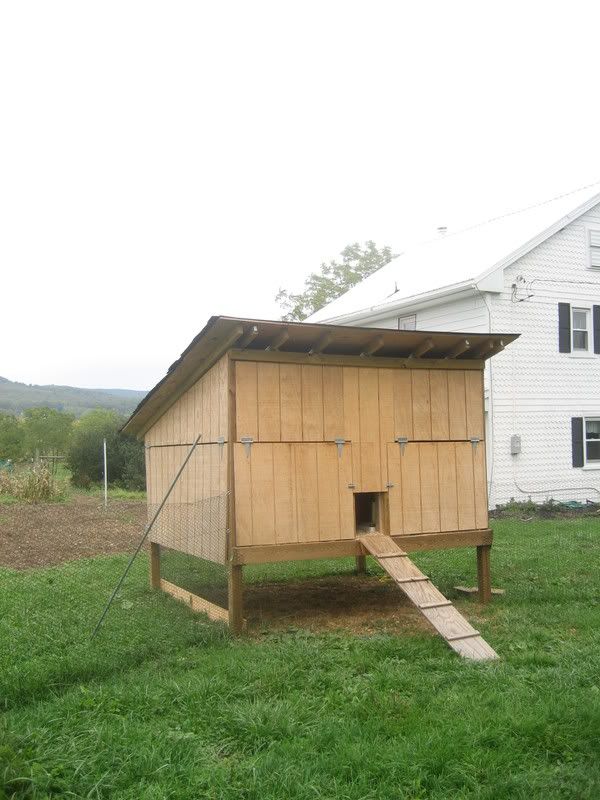
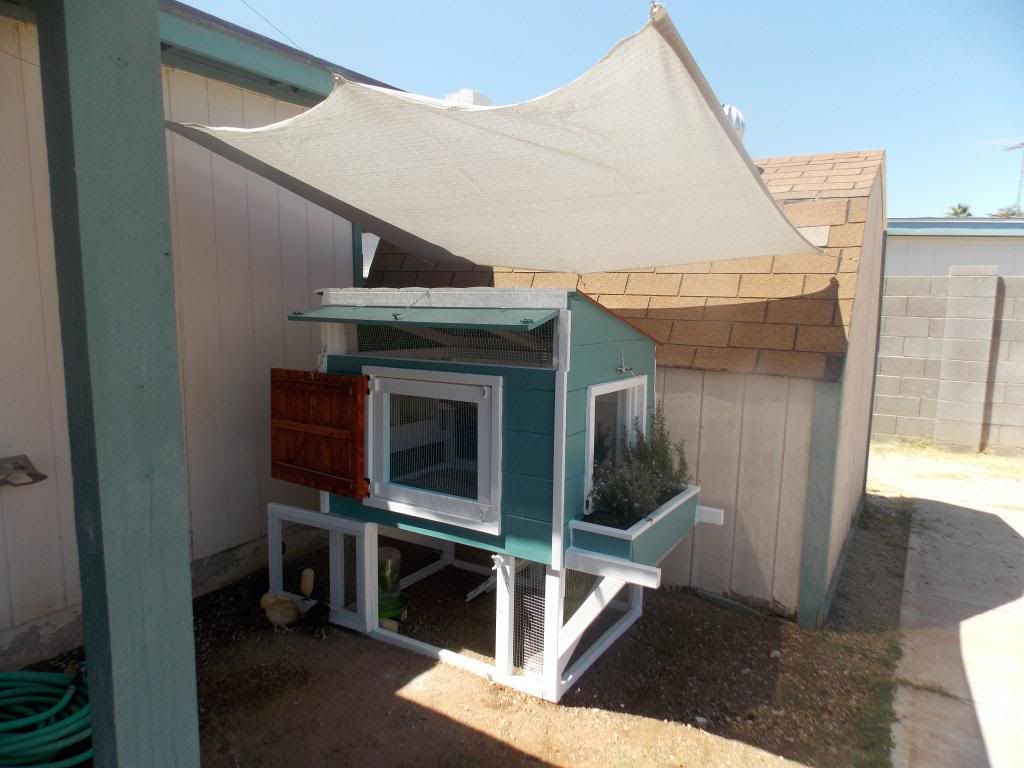
This is the open front design adapted from the book on poultry housing by Dr P Woods. My chickens have been using this coop for two years now. When I first posted about it, many responded saying the chickens would freeze to death. This winter has proven the design concept. No freezing to death, no frostbite, just healthy chickens. And this winter has been brutal.
 One feature that has proven very useful is the elevation off the ground. The chickens take shelter under there from rain, snow, wind, strong sunlight, and overhead predators. It effectively doubles the floor space of the coop.     The roost swings upward and attaches to a rafter to ease cleaning.  Linoleum on the floor makes cleanup easier also.  |
|
|
|
[#25]
Bubbles? Is that you?? |
|
|
|
[#26]
tag, need nest box ideas
turned a quail pen into a mobile chicken tractor but that has been a failure in "recycling" too heavy, too small picked up a 10x10' dog kennel made in predator resistant but have nothing for nest boxes or shelter ideas |
|
|
|
[#27]
I've seen people have success with milk crates. You can cut a "U" in the front and put straw in the crate for the chickens to lay eggs.
|
|
|
|
[#28]
Quoted: This is the open front design adapted from the book on poultry housing by Dr P Woods. My chickens have been using this coop for two years now. When I first posted about it, many responded saying the chickens would freeze to death. This winter has proven the design concept. No freezing to death, no frostbite, just healthy chickens. And this winter has been brutal. http://www.fototime.com/9FAF86B7BA63E96/standard.jpg One feature that has proven very useful is the elevation off the ground. The chickens take shelter under there from rain, snow, wind, strong sunlight, and overhead predators. It effectively doubles the floor space of the coop. http://www.fototime.com/B3084FE01F9B219/standard.jpg http://www.fototime.com/D51F2682AAA9FD2/standard.jpg http://www.fototime.com/51833C90A6CC7D9/standard.jpg http://www.fototime.com/EDD69A2DA692346/standard.jpg The roost swings upward and attaches to a rafter to ease cleaning. http://www.fototime.com/09FD3B60EAF4476/standard.jpg Linoleum on the floor makes cleanup easier also. http://www.fototime.com/ED91E0D6101071D/standard.jpg After reading Wood's book Fresh Air poultry, I've been looking around for scaled down examples, I saw your coop over on BYC, and given the size, 8X12 it will fit perfectly in what I want to build. I've a couple of questions about the interior. Starting with picture #4, I see you have a "bump out" on the right side, is this access to the nesting boxes in the picture beneath? if so, what is the structure in the following picture to the left of the roosting area? I really like the idea of the elevation, beacoup hawks in my area, a quick hiding place will be essential. Thanks. |
|
|
|
[#29]
Uh ya the guy with the heat lamps. I hope you have fire insurance. Because a fire is in your future. |
|
|
|
[#30]
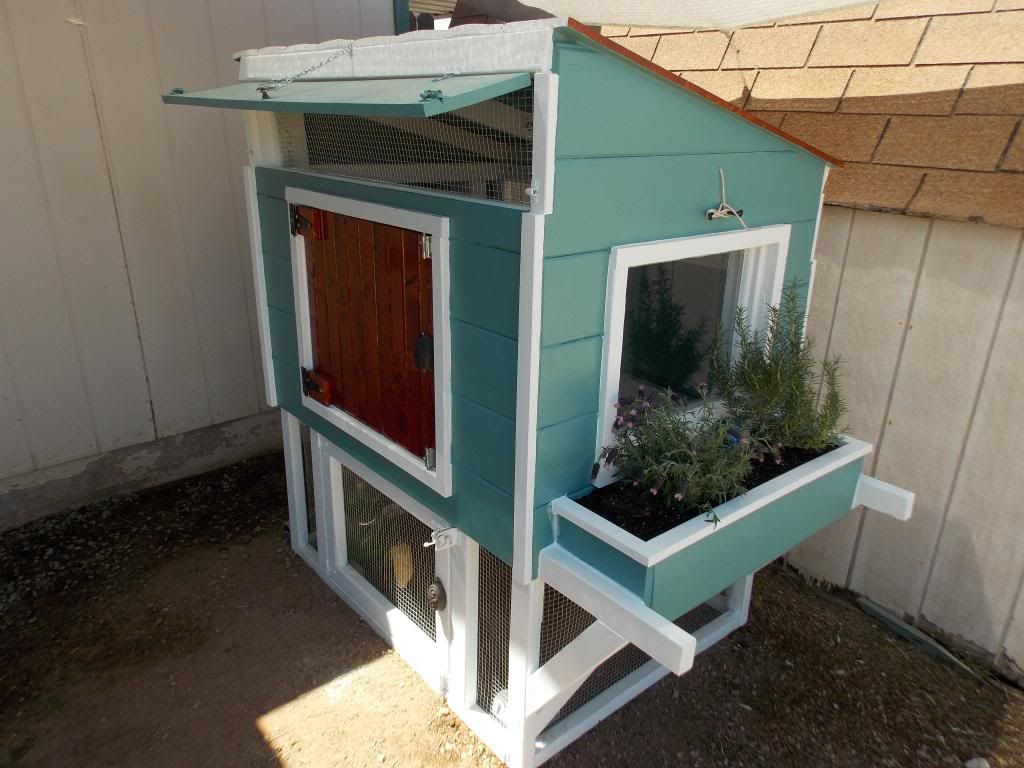
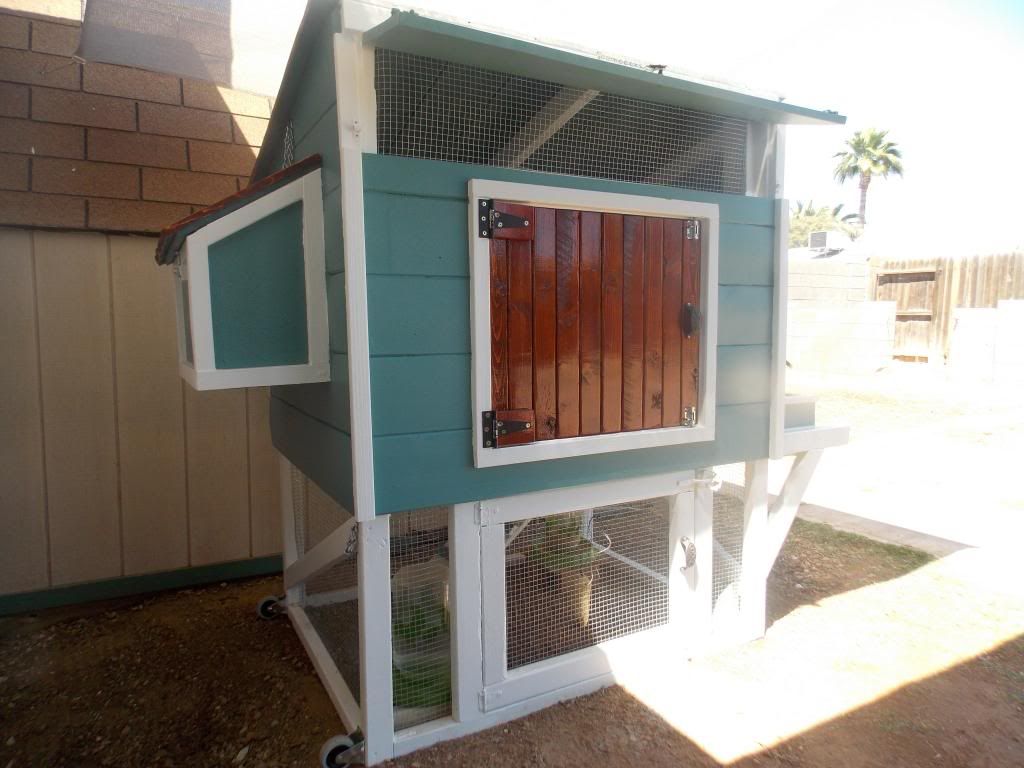
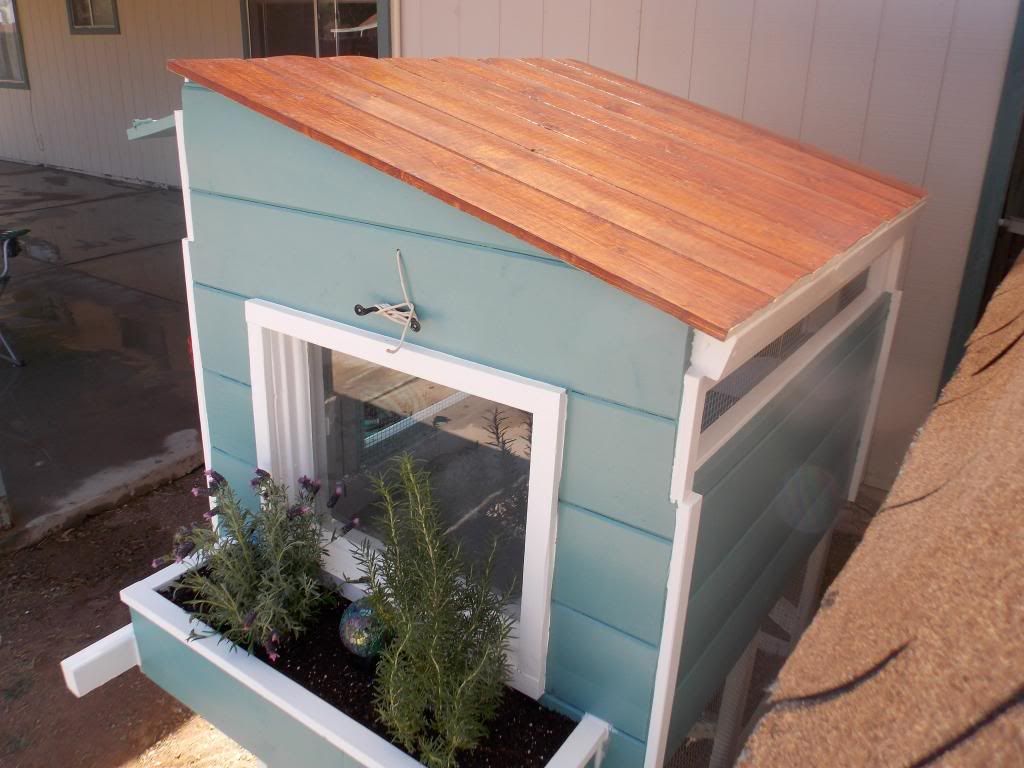
50-140
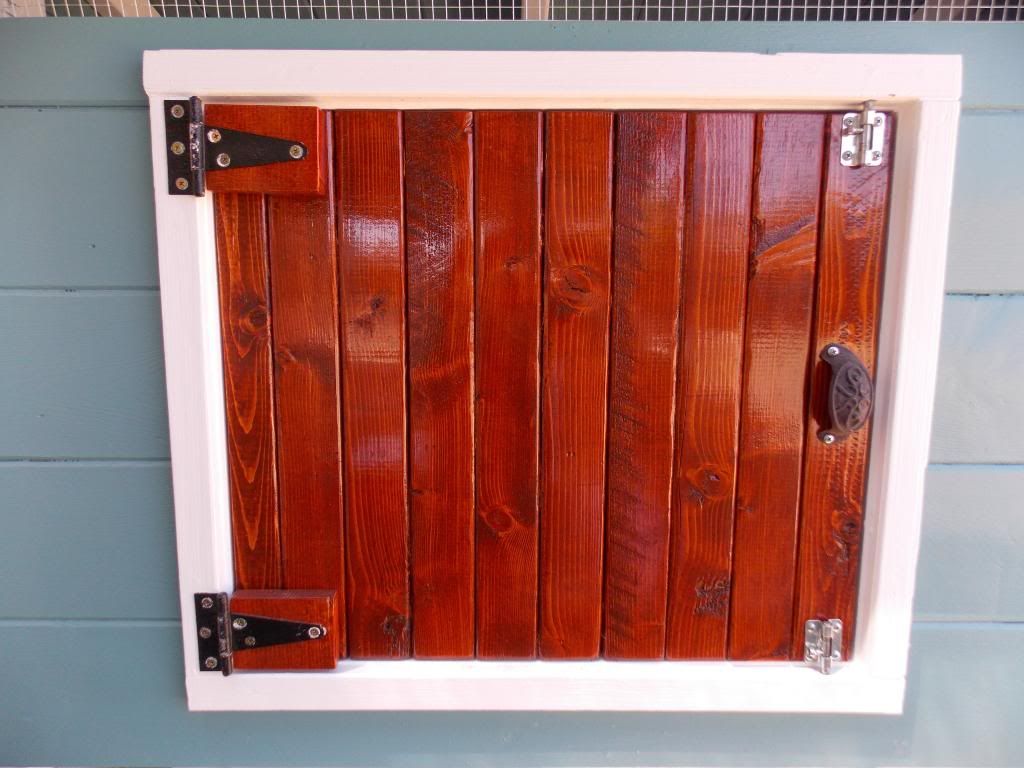
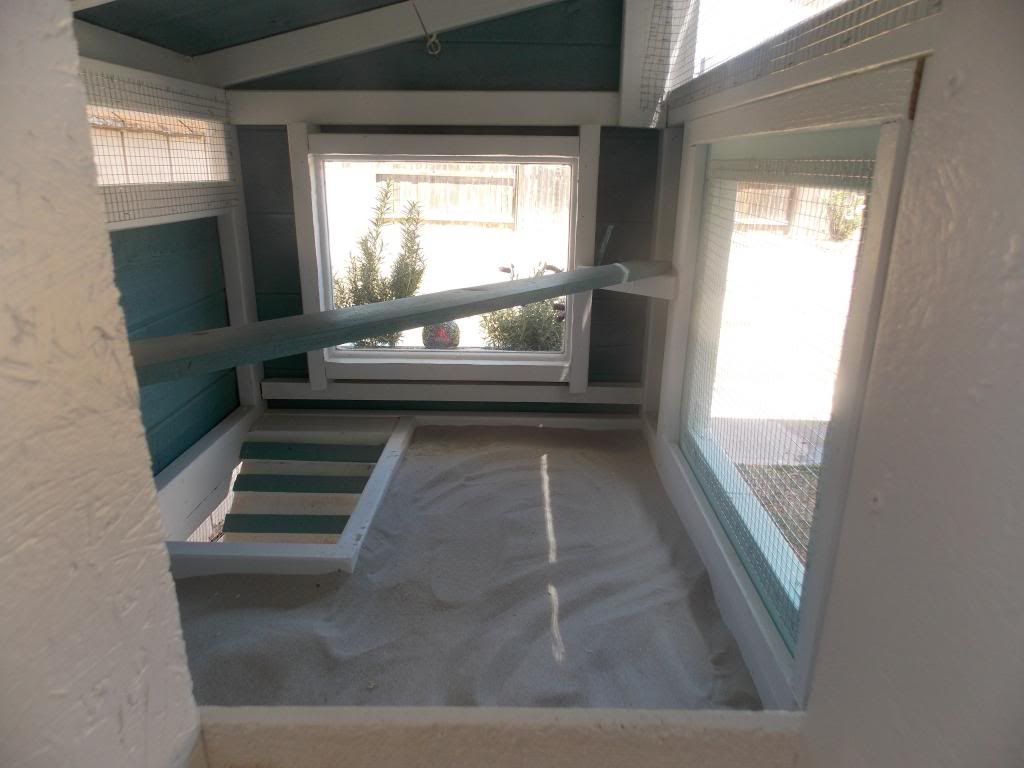
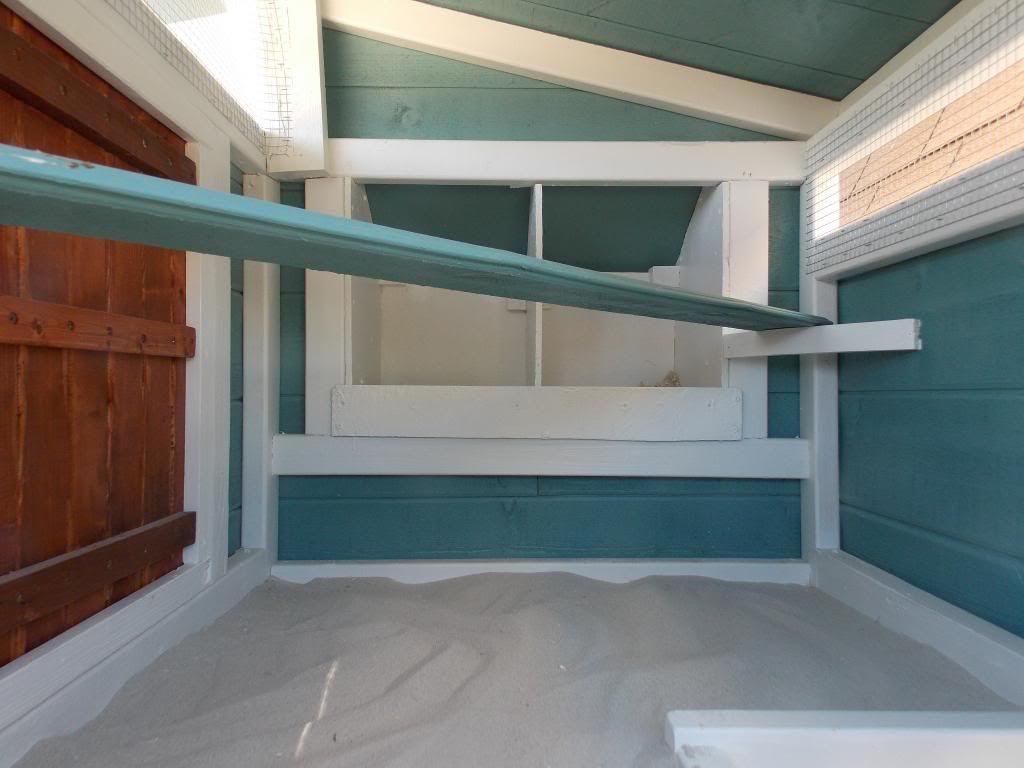
Hello. Yes, the "bump" on the outside wall is access to the nesting boxes ( 4 ) from the outside. The structure you see in the next photo to the left of the roosts is the interior portion of those same nesting boxes. I built them between the wall studs, and roughly sit 1/3 inside and 2/3 outside.  This is the view from the front window looking in. On the left wall is the interior portion of the nest boxes. There is cardboard covering the boxes because at the time the photo was taken, then birds were too young to lay and they would go in there and poop. Other points... the back two windows do not open. I had extra windows so I used them. The girls do like to sit on the roosts and look out those windows. The two side windows are removable, to leave only hardware cloth for good ventilation in summer. Edit to add - above the slanted interior "roof" over the nest boxes you can see the two windows in black brackets. That is the storage position when they are not mounted in the side windows. Keeps them out of the way and handy when it comes time to install them. |
|
|
|
[#31]
Thanks for the quick response, it was the cardboard that threw me, now it all makes sense.
Great idea on slanting the board over the nesting boxes, I hadn't thought of that at all, but I'll be doing it the same way. ETA I don't know if plagiarism exists in the coop building world, but if so I'll be guilty, I'm going to use yours as a model for what I'm starting on this weekend. |
|
|
|
[#32]
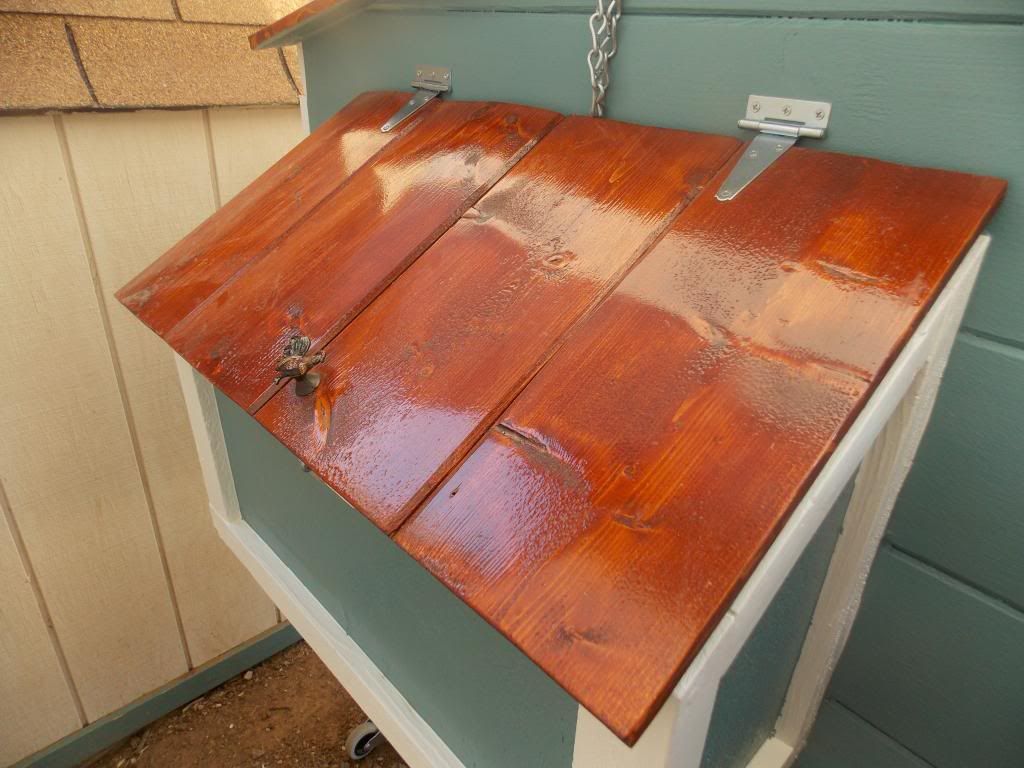
Quoted: Thanks for the quick response, it was the cardboard that threw me, now it all makes sense. Great idea on slanting the board over the nesting boxes, I hadn't thought of that at all, but I'll be doing it the same way. ETA I don't know if plagiarism exists in the coop building world, but if so I'll be guilty, I'm going to use yours as a model for what I'm starting on this weekend. And even though we are all taking the principle of coop from Dr Wood's book, there is still room to add your own touch. How to do the roosts, the nest boxes, the pop door, the people door, etc, the builder can add his own touch. The nest boxes -  And yes, the water leak got fixed. Leaked at a seam between two panels. This winter was a great test of the concept. Worked as designed.  |
|
|
|
[#33]
Quoted:
Thanks for the quick response, it was the cardboard that threw me, now it all makes sense.Great idea on slanting the board over the nesting boxes, I hadn't thought of that at all, but I'll be doing it the same way. ETA I don't know if plagiarism exists in the coop building world, but if so I'll be guilty, I'm going to use yours as a model for what I'm starting on this weekend. You wouldnt be the first... 
|
|
|
|
[#34]
My suggestion is if you build one make sure it's tall enough when you walk in you don't hit your head on a rafter. My uncle built one that was for a bunch of bantams so he made it about 4 ft tall. Was a complete pain to go into for anything.
|
|
|
|
[#35]
I really like that open air design...
Posted Via AR15.Com Mobile |
|
|
|
[#36]
I built this coop at our old house. I liked it so much that I brought it to our property where we built the new house.
Pics from last spring. I've expanded it as needed. There's a man-door to the run and and access/cleanout door to the nesting coop in the run. Eggs can be gathered from the outside via the little door below the window. The bucket shelf has now been converted to run/roost space and an old wooden dog house was added on to the end of it for the younger birds. It'll probably get further modified if/when we get more chickens. 13 hens and 1 rooster ... so far. 


Some of my threads at backyardchickens.com http://www.backyardchickens.com/t/839811/poor-mans-chicken-powered-automatic-door http://www.backyardchickens.com/t/482411/circle-p-coop |
|
|
|
[#37]
Cute girls! That is a great photo.
|
|
|
|
[#38]
Incredibly simple and cheap.

|
|
|
|
[#39]
Quoted:
Incredibly simple and cheap. Pretty much sums up raising chickens IMHO. |
|
|
|
[#40]
I just did a pretty lengthy writeup of my stationary coop and run here:
Grand Chicken Coop Tour I'm a huge fan of mobile tractors, and I'm building one right now for some eggs that will hopefully hatch currently sitting under a hen... but for my primary flock I wanted a stationary coop/run in order to build compost for my gardens. The whole structure and run is 8x12 and the elevated coop is 8x4. 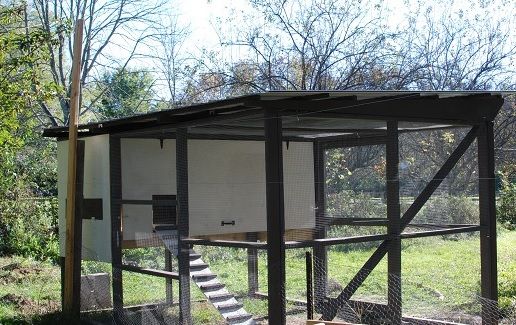
|
|
|
|
[#41]
Reading... Thanks for posting that link MS! |
|
|
|
[#42]

Had this one for a couple years. Very easy to clean and maintain. |
|
|
|
[#43]


|
|
|
|
[#44]
New coop I just got done building for my three hens.

|
|
|
|
[#45]
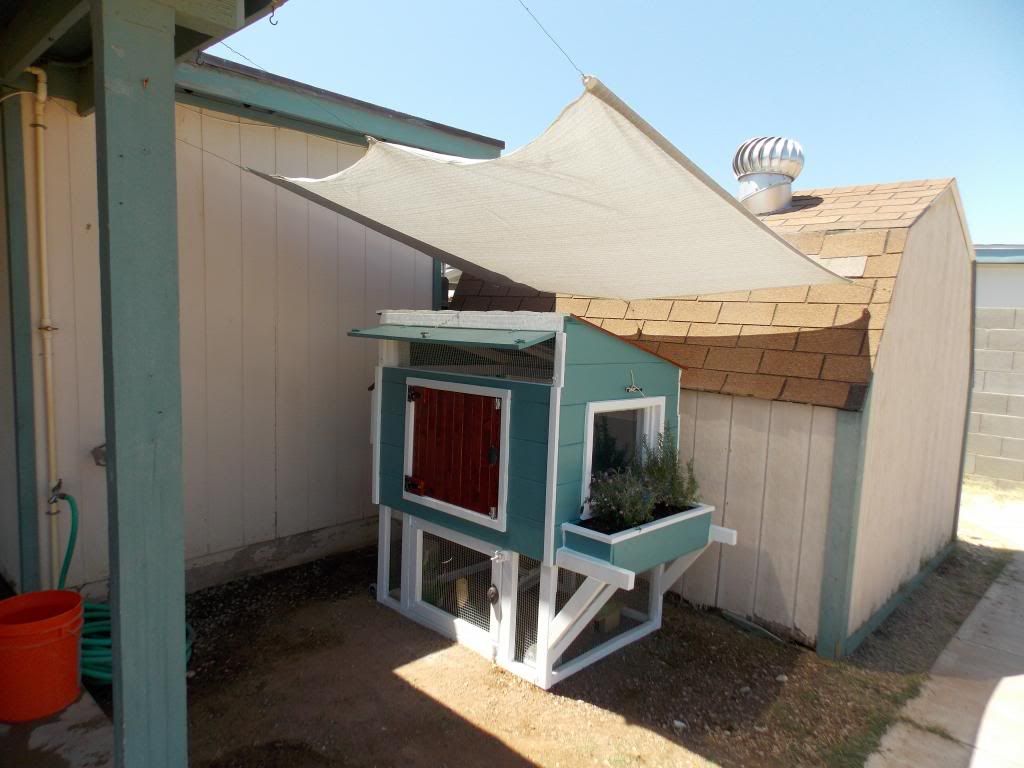
I just added a run to the side of my shed (8'x16') and made one end of the shed the coop (4'x10'. It's fully insulated, all the windows, floors and doors are insulated as well, but has been designed for good ventilation. Sorry about the poopy pics, I hadn't finished cleaning out and washing out the inside of the coop. The floor of the coop is aluminum to make it easy to clean.


|
|
|
|
[#46]
Quoted:
<a href="http://s43.photobucket.com/user/jlshooter/media/imagejpg1-1.jpg.html" target="_blank">http://i43.photobucket.com/albums/e375/jlshooter/imagejpg1-1.jpg</a> Had this one for a couple years. Very easy to clean and maintain. JL, that looks awesome! Got any more pics? |
|
|
|
[#47]
Tag
|
|
|
 Win a FREE Membership!
Sign up for the ARFCOM weekly newsletter and be entered to win a free ARFCOM membership. One new winner* is announced every week!
You will receive an email every Friday morning featuring the latest chatter from the hottest topics, breaking news surrounding legislation, as well as exclusive deals only available to ARFCOM email subscribers.

AR15.COM is the world's largest firearm community and is a gathering place for firearm enthusiasts of all types.
From hunters and military members, to competition shooters and general firearm enthusiasts, we welcome anyone who values and respects the way of the firearm.

Subscribe to our monthly Newsletter to receive firearm news, product discounts from your favorite Industry Partners, and more.
Copyright © 1996-2024 AR15.COM LLC. All Rights Reserved.
Any use of this content without express written consent is prohibited.
AR15.Com reserves the right to overwrite or replace any affiliate, commercial, or monetizable links, posted by users, with our own.


