|
[#1]
Here's a picture of the first iteration of the camera and macerator pump assembly.
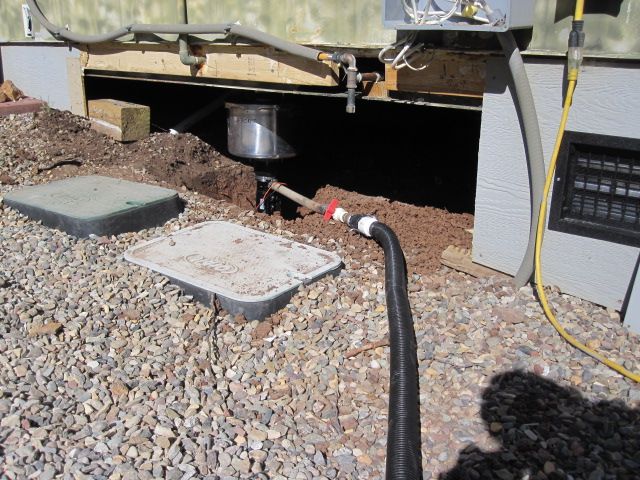
The pump is connected to a repurposed hot water heater tank  with the long corrugated hose so we could use the bathroom. with the long corrugated hose so we could use the bathroom.
This next pix shows the revised canner tank/macerator pump assembly. I stupidly wasn't considering the seal in the pump would leak over time with the pump UNDER the canner tank. It did in a few hours. SO I re-engineered the assembly and mounted the pump ABOVE the max expected fill of the first holding tank. Per this pix... 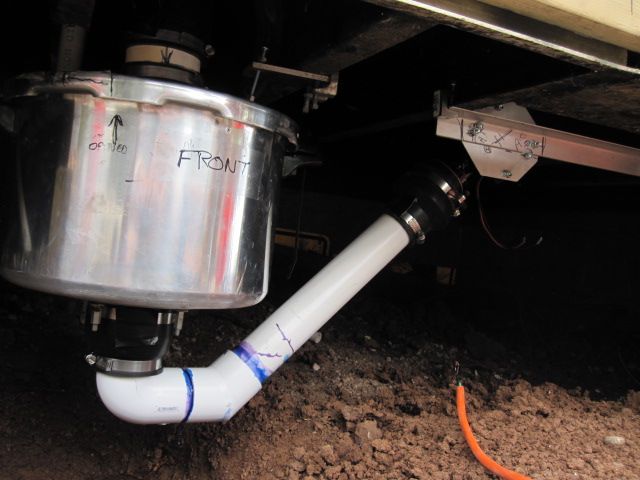
Works GREAT now. More to come... Have to spray some trees in the dark if the wind stops blowing. |
|
|
|
[#2]
Some redesign has been required on the system above.
The macerator pumps were leaking where the 3" Fernco's clamped to them because it looks like during the molding process of the plastic housing, there were several raised/non-uniform areas of the plastic that wouldn't seal. The solution was to put some caulk around the housing and then secure the Fernco to it. What we've found to be a GREAT sealant, that we use to seal all sorts of stuff, penetrations, etc, from water leakage ---is the grey URETHANE concrete crack sealer. It used to be available from masonry supply companies, now it's in the box stores. Previously we used Geosel, a solvent based sealer, however, the Urethane stuff is much better. The Urethane sealer comes in two viscosities, a runny material that fills in small openings and is self leveling... Called SL1 ---wonder why
The normal stuff is sometimes labeled PL 1 Anyhow, we put a NTSC camera that looks at a plastic tube that goes between the bottom of the 35 gallon collector tank up to the SECOND macerator pump [the one that pumps the waste externally for disposal. The monitor is a little TV with an 8" screen we mounted in our little bathroom in the container. There's 2 push button switchs on the power switch grey conduit box mounted to the upper right of the toilet. Pressing the little button powers up the camera and the TV/monitor in abt 2 seconds and you can see the waste level in the plastic tube. Pushing the big red button with a safety cover powers the FIRST macerator pump that transfers waste from the 4 gallon Pressure Cooker pot the poop falls into, over to the top inlet of the 35 gallon storage plastic tank. Outside under the front of the container is another plastic pushbutton with a safety cover so the animals can't push it that powers the SECOND macerator pump [that pumps the storage tank to a tank on the trailer for disposal. We learned that the macerator pumps need to be mounted ABOVE the highest point of liquid level they are exposed to... Or they will drip Previously, with the first toilet system, we used an RV sliding gate valve and didn't have much of a problem with the pump mounted low. The macerator pumps have a 'cutter' blade and a rubber impeller in series and the rubber impeller is well capable of lifting liquid at least 4 feet and is self priming. The small clear plastic 'sight' tube seemed too small and restricted the flow the first time we emptied the plastic tank. So we replaced it with a larger tube that has reinforcement threads in it, but the level can still be seen with the camera, it's darking there with everything buttoned up and the cam has IR capability. The cam is also inexpensive. Business/left side of the system, directly below the RV toilet, showing the Canner pot and that part of the system. There's a stainless bowl under the canner to catch any drips from the seal at the top of the pot. All in all it's working very well, no odor. The rubber is roofing membrane --- very handy stuff to keep around... The macerator pump is sort of hidden on top of the PVC from the pot. The 1 1/2" PVC was changed from 2" PVC to make the macerator pump 'suction' more effective purging the pot. The pot is vented well above the container, with a piece of stainless pot scrubber to keep fly's from finding their way down into the pot and flying out inside the container when the toilet is 'flushed' [the sliding valve on the toiled operated] Both the pot and the storage tank are vented so that if there is a failure or clog, the big tank can't blow up, and instead, macerated poop is etected over EVERYTHING out the vent,.

Right hand side of system, showing the bigger sight tube that goes up to the 2nd macerator pump, and the camera. Macerator pump is half visible at the top. Waste level in the vertical tube [now larger] is monitored by the camera. There is no positive pressure in that tube. Discharge quick connection and ball valve is at the far left. Push button for the 2nd pump is outside there and hard to get to, I may change it to a receptacle and put a switch on a cord to make it easier to dump, at lot's going on during the dumping process... 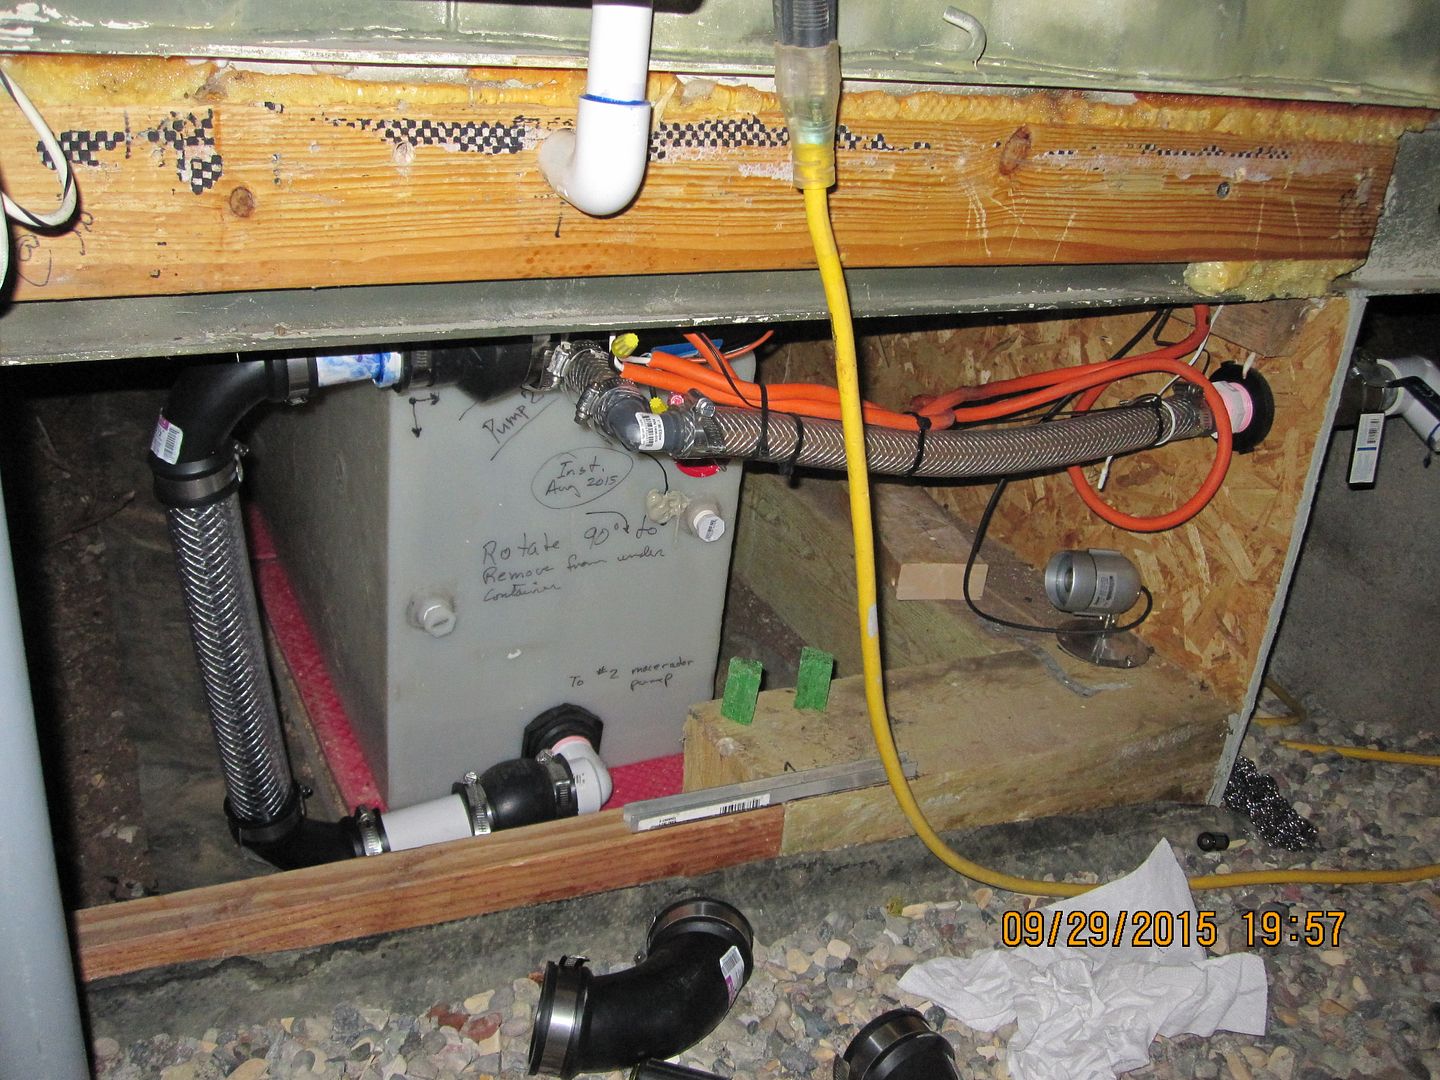
Hope someone gets some ideas from this... |
|
|
|
[#3]
Just gave the left hand part of the system a HUGE functional test.
Damn... Lost 2 pounds ---need to patent this for weight loss... It worked fine too! It's fun to look down with a flashlight [don't DROP it] thru the toilet flush valve into the canner pot and push the eject button and see the waste being sucked out. Then push the little button and see how much the storage tank filled up ---on the monitor... |
|
|
|
[#4]
I... Yeah... no idea what your talking about.
Cool crapper story bro.
|
|
|
|
[#5]
Quoted:
Anyhow, we put a NTSC camera that looks at a plastic tube that goes between the bottom of the 35 gallon collector tank up to the SECOND macerator pump [the one that pumps the waste externally for disposal. The monitor is a little TV with an 8" screen we mounted in our little bathroom in the container. There's 2 push button switchs on the power switch grey conduit box mounted to the upper right of the toilet. Pressing the little button powers up the camera and the TV/monitor in abt 2 seconds and you can see the waste level in the plastic tube. You are aware of the existence of holding tank level gauges, right?
|
|
|
|
[#6]
Quoted:
You are aware of the existence of holding tank level gauges, right?
Quoted:
Quoted:
Anyhow, we put a NTSC camera that looks at a plastic tube that goes between the bottom of the 35 gallon collector tank up to the SECOND macerator pump [the one that pumps the waste externally for disposal. The monitor is a little TV with an 8" screen we mounted in our little bathroom in the container. There's 2 push button switchs on the power switch grey conduit box mounted to the upper right of the toilet. Pressing the little button powers up the camera and the TV/monitor in abt 2 seconds and you can see the waste level in the plastic tube. You are aware of the existence of holding tank level gauges, right?
Yes... The application criticality and the fact my SO needs to manage the capacity of the holding tank, dictates a positive visual readout. The new larger 'sight glass' is reinforced and plays havoc with the video camera IR mode. It's very difficult to see the level in the sight tube with IR but if the side panel is opened to let 'regular' light in, the waste level is easily seen. So today I took a 12 vdc LED MR16 lamp... Like this one... Soldered some 2 conductor wire to the terminals and insulated them by pressing on some 1/4 OD urethane pneumatic tubing... And connected the lamp to the power for the video monitor and camera, via the push button in the BR. You can sit on the toilet and push the button and see the monitor mounted in the upper far corner of the tiny BR. You can push the safety protected big red button and activate the #1 macerator pump underneath. Makes it easy to watch the function of the first half of the system. It took trying different locations for the lamp and the one that works great is behind the poly tank, allowing the camera to 'see' the tank level and the sight glass level [both the same, except for camera angle. The fluid level stands out dramatically. |
|
|
|
[#7]
Quoted:
You are aware of the existence of holding tank level gauges, right?
Quoted:
Quoted:
Anyhow, we put a NTSC camera that looks at a plastic tube that goes between the bottom of the 35 gallon collector tank up to the SECOND macerator pump [the one that pumps the waste externally for disposal. The monitor is a little TV with an 8" screen we mounted in our little bathroom in the container. There's 2 push button switchs on the power switch grey conduit box mounted to the upper right of the toilet. Pressing the little button powers up the camera and the TV/monitor in abt 2 seconds and you can see the waste level in the plastic tube. You are aware of the existence of holding tank level gauges, right?
As a part time RV tech.. may I say, those gauges are notoriously inaccurate. |
|
|
|
[#8]
You truly are the king of the "cob job".
|
|
|
|
[#9]
Tag,
Hell ya! |
|
|
|
[#10]
Today we were replacing the battery cable terminals at the container prepping for winter and smelled the strong smell of 'waste',
Took off the quick detach siding from the container The big bowl under the pressure cooker tank was half full of 'liquid' waste, about 2 qts. We put old rags in and sopped up the liquid so I could remove the bowl and find out what's going on. We didn't pump the canner pot soon enough and the seal around the top allowed the liquid to leak out. I was afraid of this happening ---but in the finest American Tradition, I had... FOOLED MYSELF into thinking the seal wouldn't leak...
So, it was a messy lengthy process and it was cold but finally got everything cleaned up about 45 minutes before sundown. It had snowed and the top of the container, because its insulated, preserves the snow for a long time, and it was running off the edge and onto me as I was working on the system. I scrubbed the inside of the lid of the canner [that's attached to the underside of the container] where the seal lies, and my SO cleaned the pot... And I used that great Urethane Concrete Crack Sealer that's now available most everywhere and put it on the seal and both mating surfaces of the canner. This is going to be hell to get off later, prolly will use a small torch to break down the sealant and remove the lid after detaching all the mounting hardware from the container frame. I always try to engineer things to be as serviceable as possible and the large lower section of the canner pot came right out after loosening the Fernco on the bottom and twisting the section from the lid. I noticed some corrosion, just a bit on the aluminum canner and expected that. After this winter, if it works OK, I think I'll change the canner out to one made from stainless steel and a better seal. I've got a spare canner and the fittings to quickly modify it, in case this one cracks from freezing, or fails in some way. If I can't find a SS canner with a good seal, maybe a large diameter SS pot with a plastic plate [HDPE cutting bd?] on top with stainless threaded rod about 6 locations around, holding it all together will work... Sort of like a hydraulic cylinder... It's all put back together now and I think I'll let it fill back up and see it it leaks again. We use Clorox to sanitize the area after we do maintenance and also rubber gloves. This is really good training for my SO so she isn't squeamish... |
|
|
|
[#11]
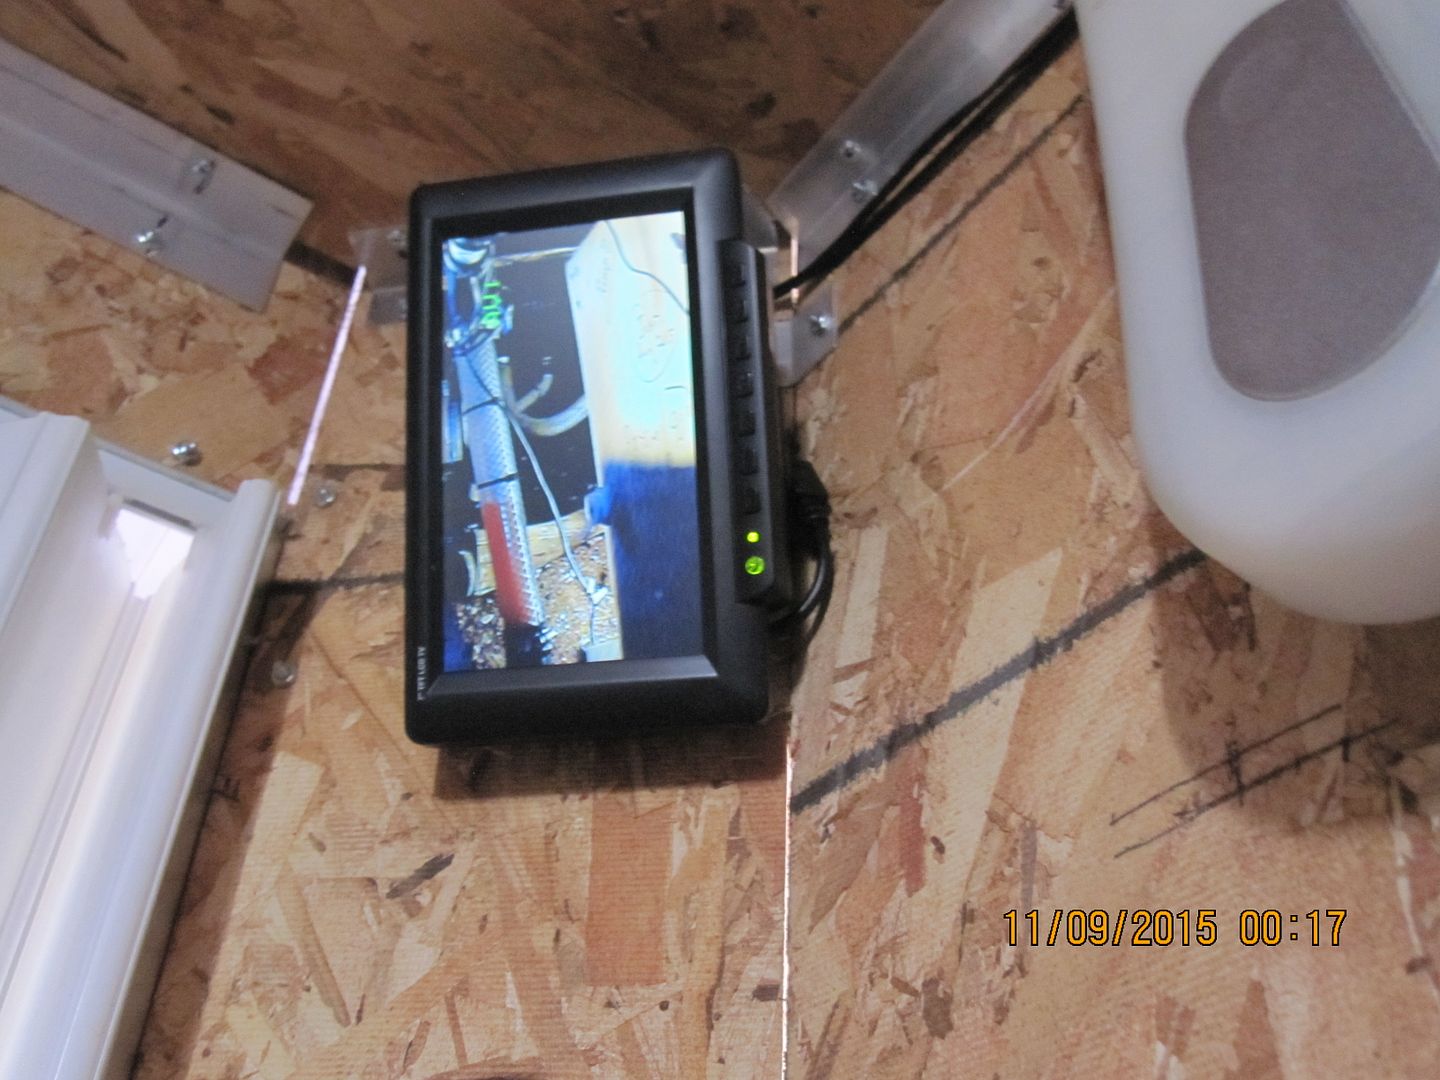
I took a pix of the monitor screen today.
|
|
|
|
[#12]
Here's a couple pix of the NTSC monitor in the upper right corner of the tiny bathroom.
The vertical vinyl tubing is a 'sight glass' like in old timey steam engines that shows the level of liquid in the secondary holding tank There's a grey PVC electrical box on the right side of the toilet with a covered big red button that activates #1 macerator pump, and a smaller white button/switch that turns on the LED light, camera and monitor, anytime it's pressed. Entertaining... Also note the method of construction/fastening of interior walls that we devised for fast, lightweight installation --same system used in the Stealth Trailer. Extensive use of aluminum angle, aluminum channel track to set the panels in at the bottom, and formed sheet metal clips. The OSB sheet above the monitor and bathroom scales is a shelf, with abt 10 inches of clearance SO uses for storing paper items like TP, paper tiles, etc. Above that is 2" of pink rigid insulation, an Astro-Foil layer, and maybe another layer of insulation to insulate the top of the container. The panel walls and structure of the bathroom can be completely removed if necessary in a few minutes, the longest time being the removal of the 10-24 screws. Better mark everything to remember how to put it back together. The cheap accordion closet door works great for many years. There's a remote controlled Fantastic Vent behind the camera to exhaust the B-R and also the Coleman single burner propane stove under the microwave, keep the container cooler in summer, and to de-humidify the container as necessary in cold wx. We generally leave it open with the fan not running in very cold wx and close the BR door at night. Adding the vented Toyotomi kerosene heater and not having to run the noisy RV propane heater at night allows doing this. My SO's kitchen is in the background... She runs the microwave with a Honda 2000 that we have to drag out from another container and hook up each trip. The Champion remote controlled 3500 watt genny will soon replace it and all she has to do is push a button ---hopefully it will be that easy. She had me install wire shelving almost everywhere around the container above my head height -several layers, tremendous storage. 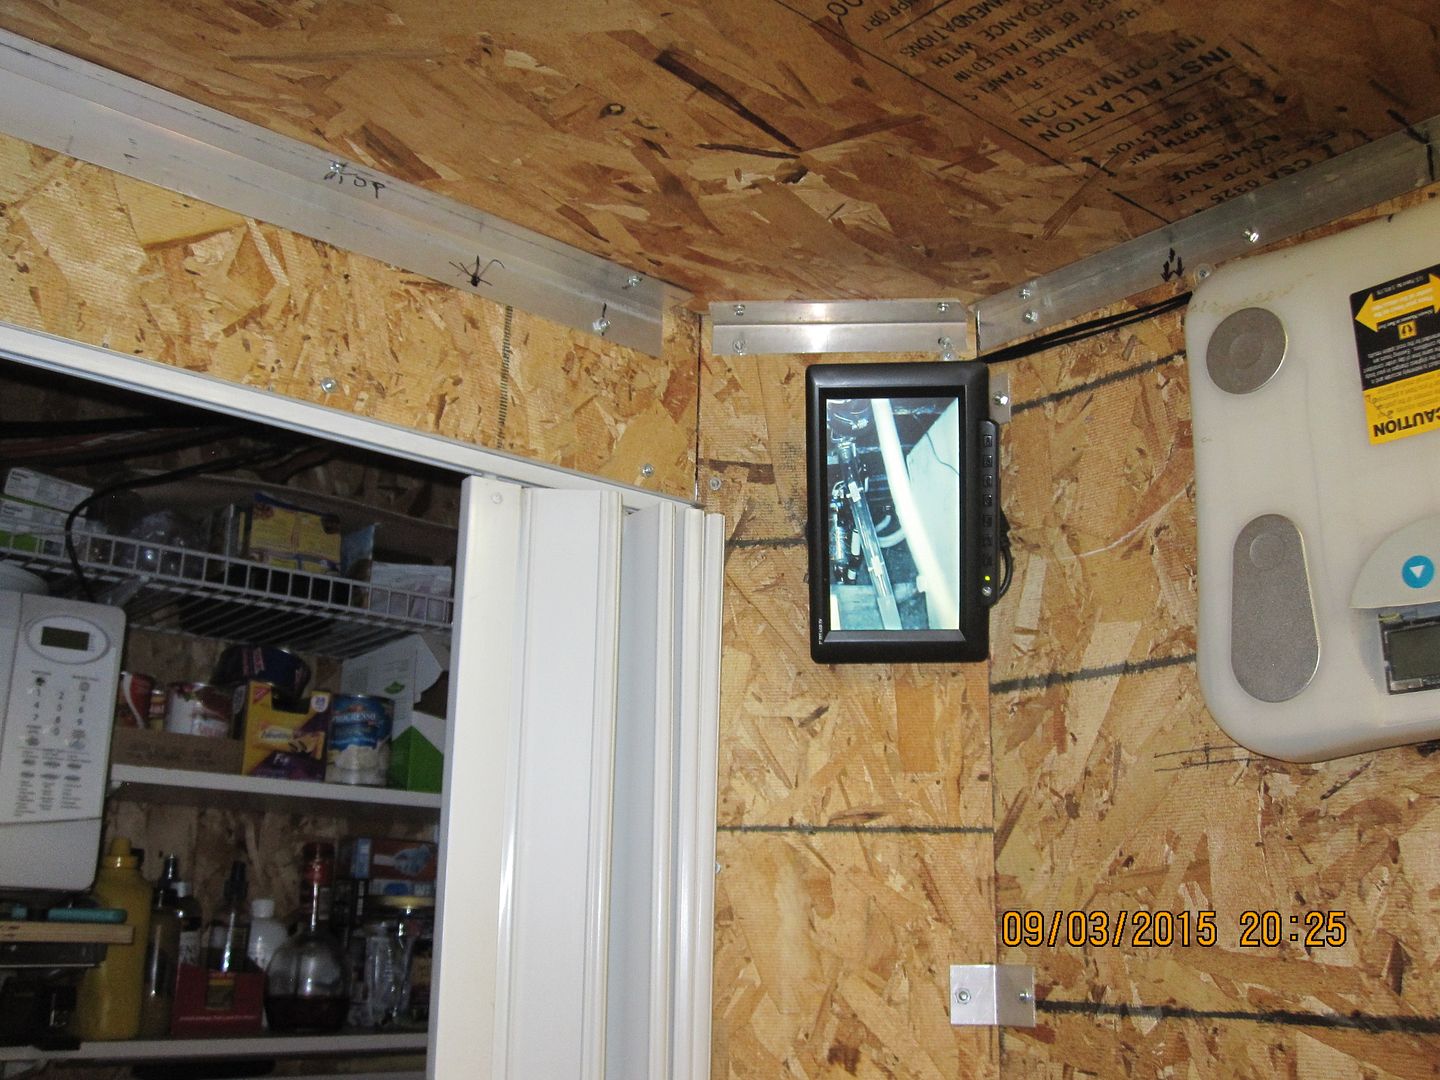
|
|
|
|
[#13]
Here's the vent that connects to both the pressure canner and the big holding tank.
The connections to each are combined with a plastic 'Tee' and then run up the side of the container. We used to have the vent straight up and rain could go into the toilet system as well as flies. Occasionally, we'd have a fly fly out of the toilet when we operated the foot valve to dump waste in the tank. Also, there was an odor when wind blew over the container due to the turbulence, even when I was rebuilding the system per the pix above it was annoying. Sooo, the solution was to extend the vent up a few more feet to get it out of the turbulent region and that worked fine. We took down the Hughes Satellite Internet dish since I run a bridge to someplace where there's a REAL fast net conx, and used the mount to attach the 3/4" PVC to with stainless hose clamps.. Then to eliminate the fly issue, and to make the vent pretty robust regarding other bugs that would try to clog it, I hit on the idea of using a Fernco adapter ---small on one end and larger on the other. As I've suggested here many times for closing gaps to keep critters out, I put a piece of copper scrub pad in the other end of the ferncao. Works perfectly, as one would expect
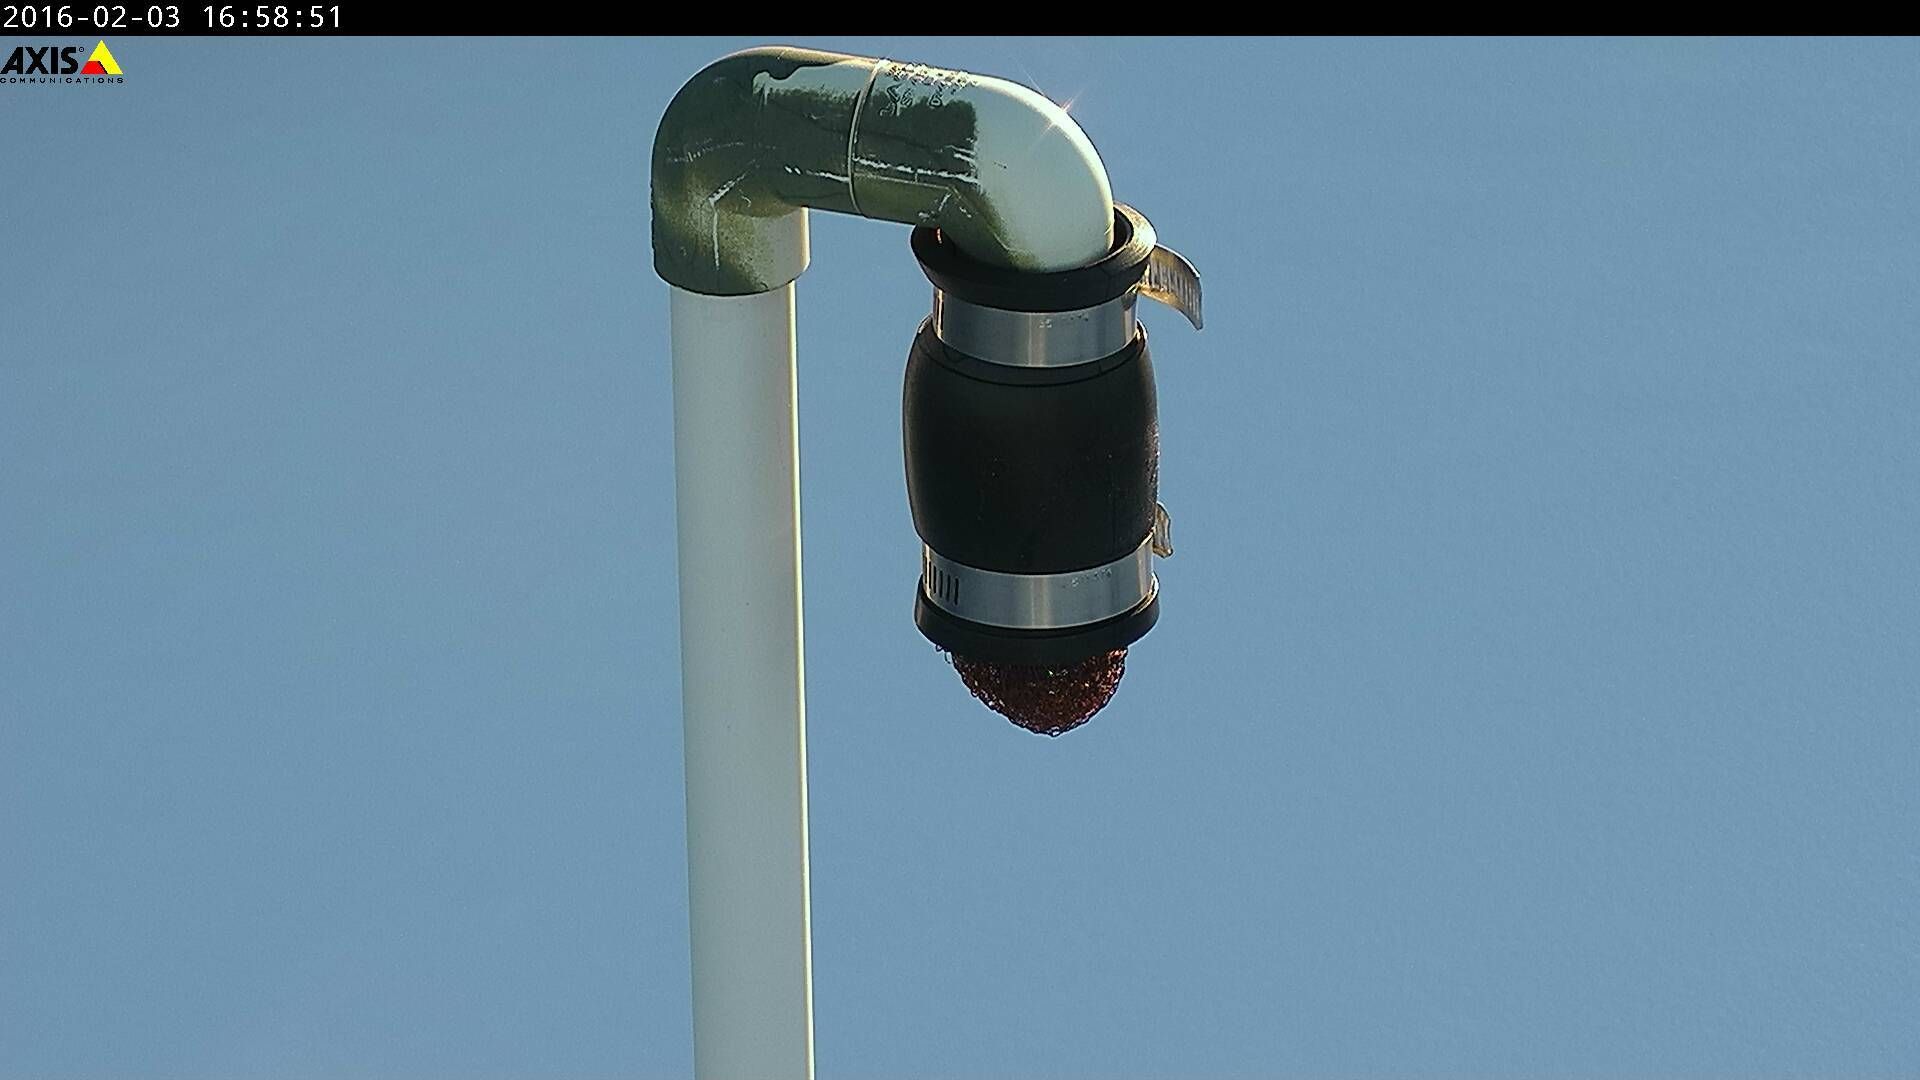
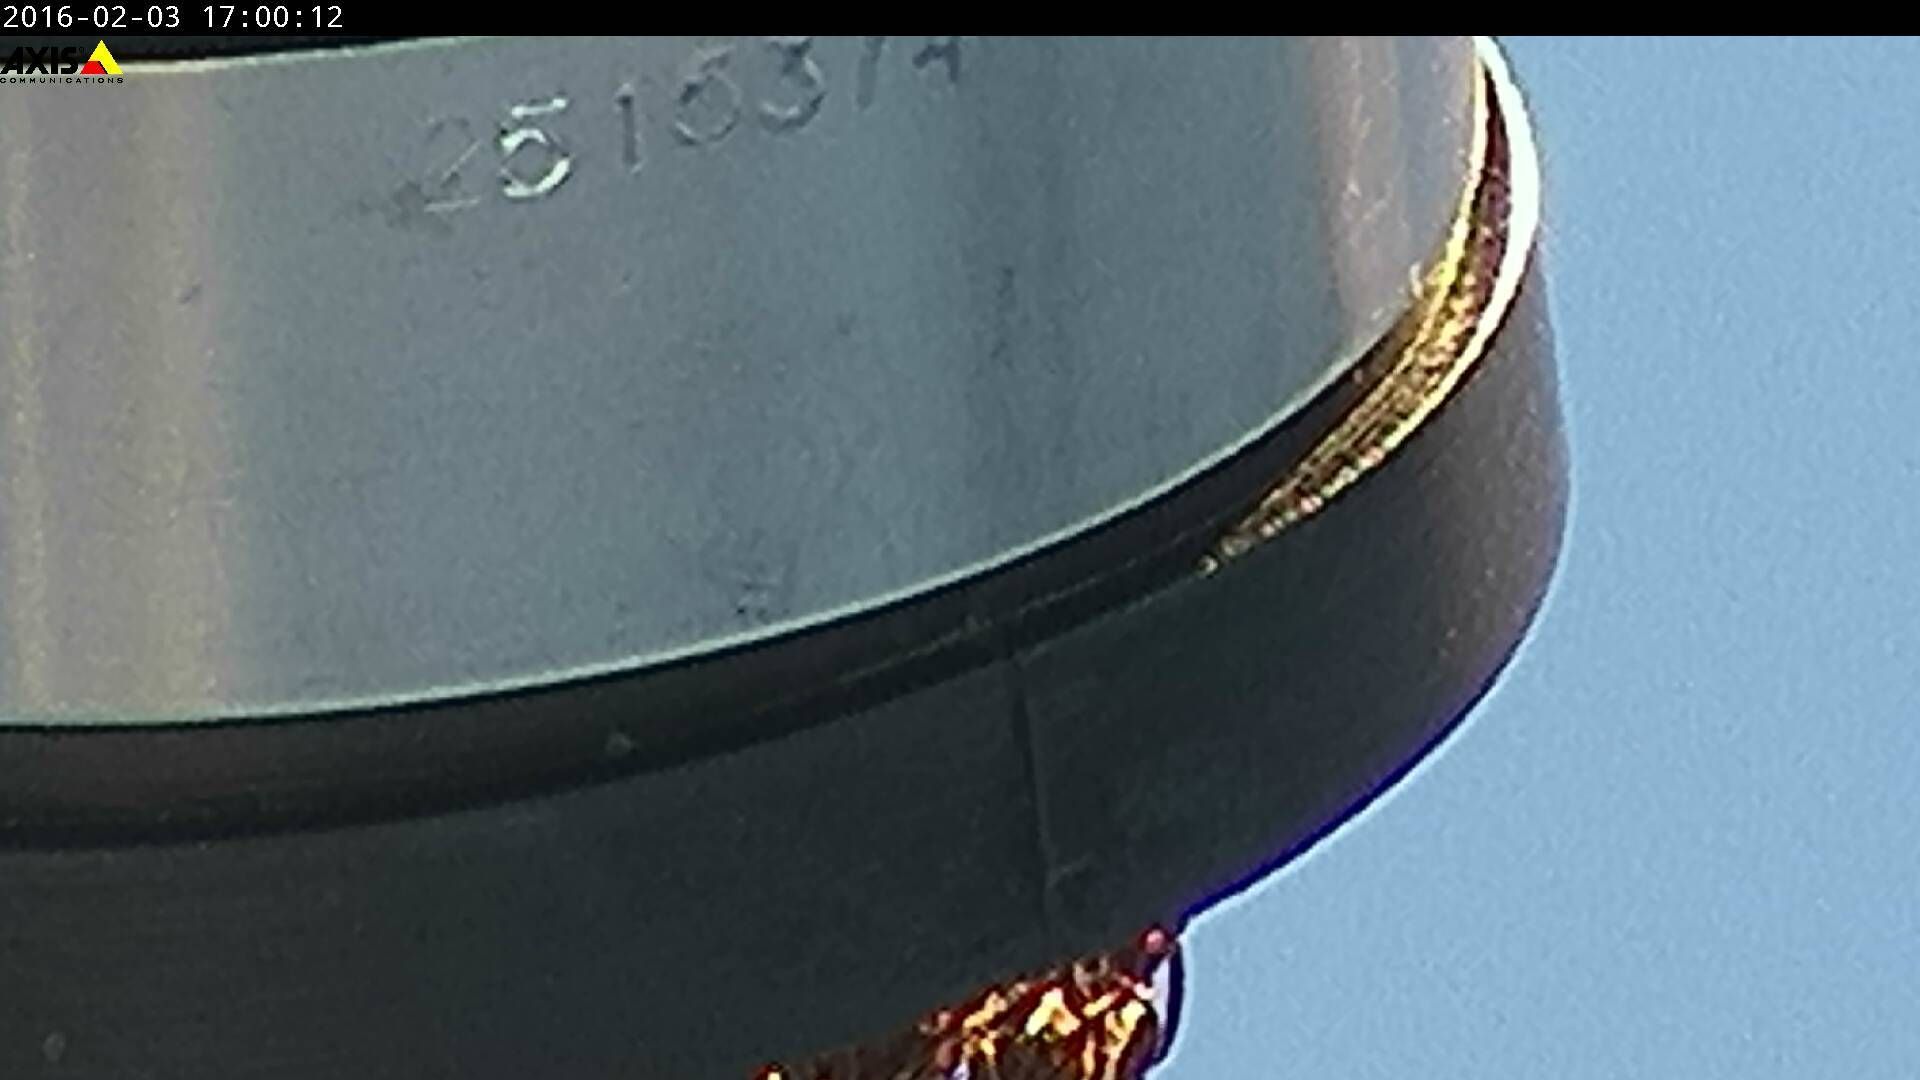
To show the capability of the PTZ cam, the last pix is zoomed in on the copper and the hose clamp. Fortunately, I'm sitting in my lab where it's warm and cozy, many miles away, and downloaded these pix remotely. 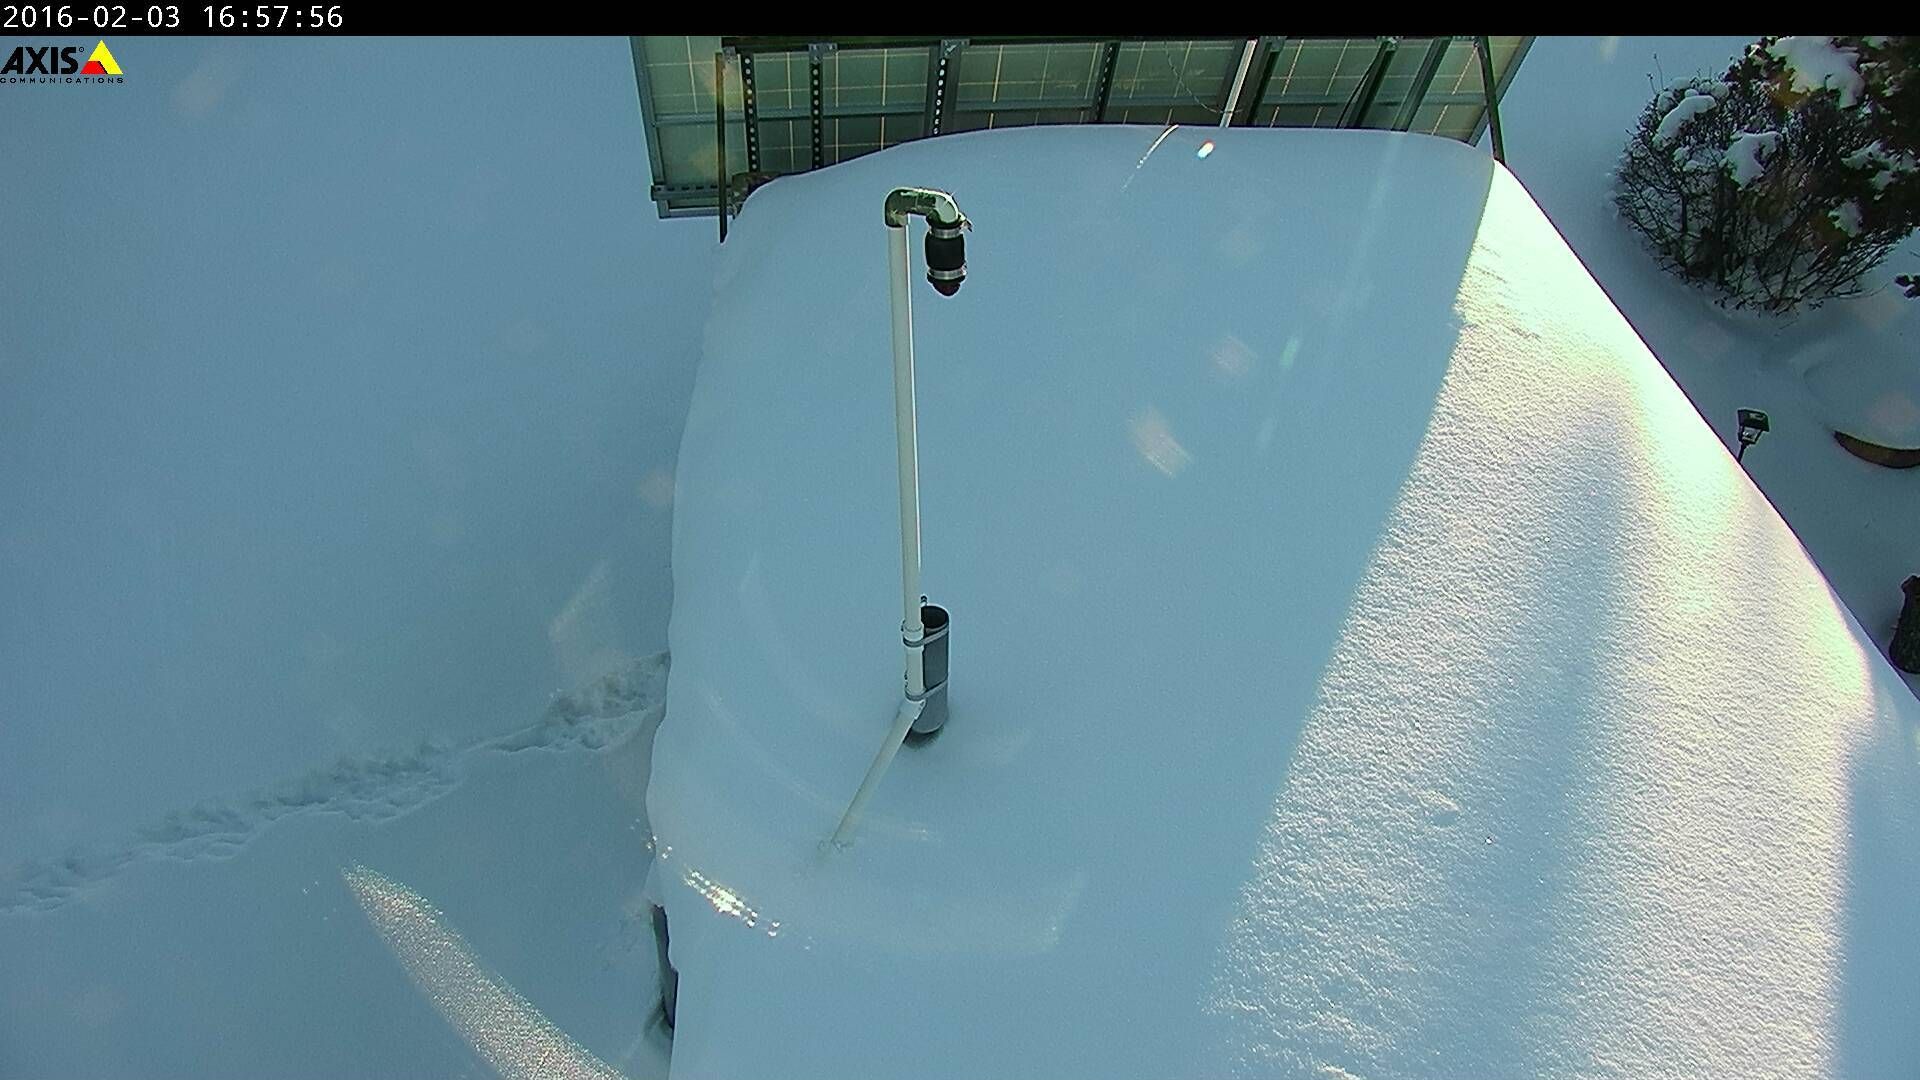
|
|
|
|
[#14]
While I was in P-B, here's the 120 gallon propane tank that keeps the container ~38F inside all winter long.
There's the original RV furnace, an Atwood 18,000 BTU that is controlled with an ordinary Honeywell mercury switch thermostat, I modified for lower temperatures... [Another mechanical open contact switch burned up the anticipator resistance early on, so I went with the mercury sw, no issues in many years] And there's the Toyotomi kero/ULS diesel vented heater we installed a year and 1/3 ago, that's now our primary heater when we're there because it's so quiet and has the ability for a low, steady heat in the well insulated container. Doesn't look big being buried as it is, but it's a 120 gallon tank and a hell bigger than the bears Even buried and real cold, it's keeping the container warm... 
|
|
|
|
[#15]
Even though the new toileting system is sort of complex, it has held up well over the winter freeze-thaw cycles and snow/precipitation.
All systems, heating, solar, and electrical, networking, cams, etc., have performed flawlessly -with no intervention, other than load shedding a few times during snow covered panels. If we were there, it would have been easy to clear most of them... Snow is sinking into the ground and the soil is soft and muddy in places. Not much fun to be there... I realize this toileting system is somewhat complex, but I can't think of a way to do it more easily and get the same results Most of the snow is gone, the propane tank that's covered in the pix above is clear... The toileting system is on the ESE side of the container, with the propane tanks, outside electrical, etc and warms quickly in the morning sunshine. The opposite side stays much cooler and snow is a lot deeper. In the summer, the solar panels and solar water box help shade the container to reduce heat inside. It would help it some sort of additional shading could be figured out for the 'roof'. Using a lot of flexible Fernco coupling to break up rigid points of potential damage from freezing, seems to have worked well... These techniques can be applied to other systems besides 'toileting' |
|
|
|
[#16]
After the post above, wouldn't you know it but the Atwood RV furnace failed in the container. I routinely checked the temperature data and saw the temp had fallen in the container to 36F, the next evening.
The Honeywell mercury switch thermostat [best kind for this application] is re-calibrated to operate the furnace at abt 38F and shut off abt 44F Pointing a PTZ cam that's inside the dark container, there was a flash from the furnace's diagnostic LED --once every 3 seconds. Looking that up, it indicates an over-temperature or air-flow problem, like a failed fan motor, blocked duct, failed OT switch, or air sail switch. So yesterday I started to diagnose the issue, the over-temp sw was closed, the sail switch seems to operate the micro-switch OK, and when I first turned the heater on after checking everything -without changing symptoms, the furnace started up and ran. After a couple minutes, it failed with the same LED indication. So, checked everything again and all looked OK, but furnace wouldn't run. Installed a spare control board and it ran OK. Inspected the original board and there was a cold solder joint where the fan relay contact pin is soldered to the PCB. A little about 'cold solder joints'--- Anytime a relatively heavy current [few amps and up] flows thru a solder connection there is the potential for the joint to become 'crystalized' by the heating-cooling cycles. Eventually, the resistance of the joint increases and the heat-cool temperature differential becomes greater, until failure, either intermittent or total. This failure mode is applicable to most any piece of electrical/electronic equipment. I saw it on the last alternator I replaced in an SUV. Some diode solder joints were cracked... You'll find this issue in PC's, furnace and AC control boards, TV's, auto electronics, all sort of items. Looking a PCB or soldered connections over with a good light and eye loupe, the trouble is spotted as a frosty, crystalized looking joint. On a PCB, there will usually be concentric lines in the solder looking like fine cracks. Sometimes --like in this case-- there will be a visible sign of heating, not always. In this case the PCB is coated with a conformal coating to protect against moisture, and in the picture below, the brownish over-heated coating is visible. To repair these sorts of issues, it's best if an additional path for heat can be created to keep the joint cooler. Note in the picture the joint that failed is the short pad and trace --the longer trace was fine... Today, I added some high quality fine stranded #24 ga or so hookup wire around the relay pin and onto the trace down to the terminal to help dissipate heat. Did this to all the high current pads [Fan motor draws 2.5 or 3 amps at 12vdc ---not much] I missed uploading the best pix of the repair, but you can get an idea from the last picture of two boards and the hookup wire. I modified both the original and the spare [from another furnace] at the same time... This week the air suspension compressor failed -dealer cost ~$850. I took the compressor apart and the connecting rod bearing [too small for the ap IMO] failed. I'll replace it for abt $10 and that will likely save some $$. The Atwood board IIRC is about $100... In a survival situation when there's no alternative replacement, being able to spot this sort of common failure could be real handy... Atwood furnace control board repaired 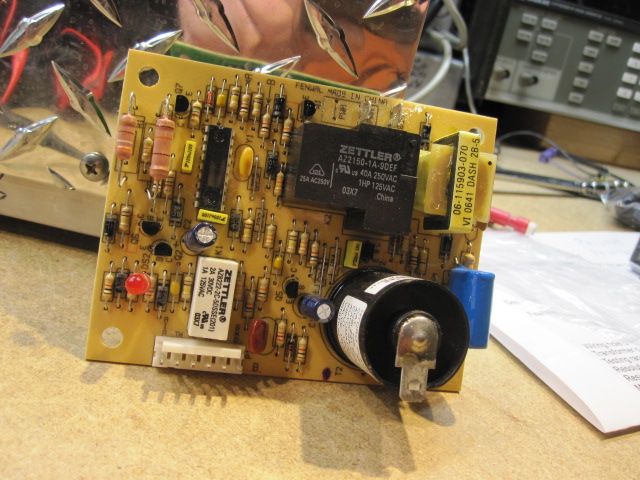
"COLD SOLDER" joint, showing over heated conformal coating and the relay pin is essentially isolated from the PCB pad 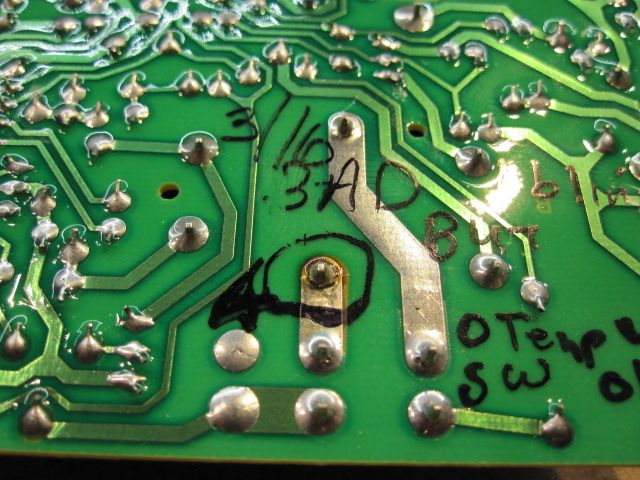
Poor pix of the repair of the PCB -see text for details... The actual repair has wire going from the relay terminal all along the trace to help DISSIPATE heat at the relay PCB soldered connection 
|
|
|
|
[#17]
Regarding 'cold colder joints', a Vector VEC1093A Smart Charger had this issue after a long period of use in the stealth trailer to charge the two golf cart batteries and also power the trailer when the 1000 watt genny was running.
I first noticed lights flickering and the digital voltmeter would fluctuate. So one night while camped I took the charger apart and found numerous 'crystalized' joints. Re-soldered them all and the charger has worked fine, time in service about 10 years until I replaced the Vector with a Truecharge [because it has an equalization function]. Now the Vector is a backup to the Truecharge... |
|
|
|
[#18]
Regarding the:
"This week the air suspension compressor failed -dealer cost ~$850. I took the compressor apart and the connecting rod bearing [too small for the application IMO] failed. I'll replace it for abt $10 and that will likely save some $$." Last week put a new bearing [$8] in the little aluminum connecting rod and the compressor works smooth... Vehicle is back in service... Between the board and the compressor [at quoted prices I would never have paid but others seem to] I saved ~$1000 That's the price of 1/3 acre of land, tax bill, 1/3 the cost of a vehicle service lift, etc... For a couple hours work ---Think abt it... NOT to mention the 'investment' in knowledge ---and confidence gained... AND! ---that it is Tax Free $$$ |
|
|
|
[#19]
Both the furnace board and SUV compressor have worked fine.
|
|
|
|
[#20]
Quoted:
For a couple hours work ---Think abt it... NOT to mention the 'investment' in knowledge ---and confidence gained... AND! ---that it is Tax Free $$$ I do the same stuff all the time.... Microwave died. Took it out to the bench and pulled the cover. Turns out it was the input fuse. $3 bucks from Mouser and it is still working 18 mo later. Most people would just toss it and head to the store. Cold solder joint: The digital display in my Caravan started flashing on and off. Pulled it and re-flow'd all the pads on the connector. Works great.... Saved $$$ Tax Free: I know! I've owned my business(es) for 35 yrs. Figured out a long time ago that you have to earn approx. 2x of the cost to be able to pay for it. ie: you need to earn $200 to be able to pay somebody else $100 to fix it by the time you pay taxes, overhead, etc. Plus as you said -> It's now your system - you understand it... Great piece of mind. |
|
|
|
[#21]
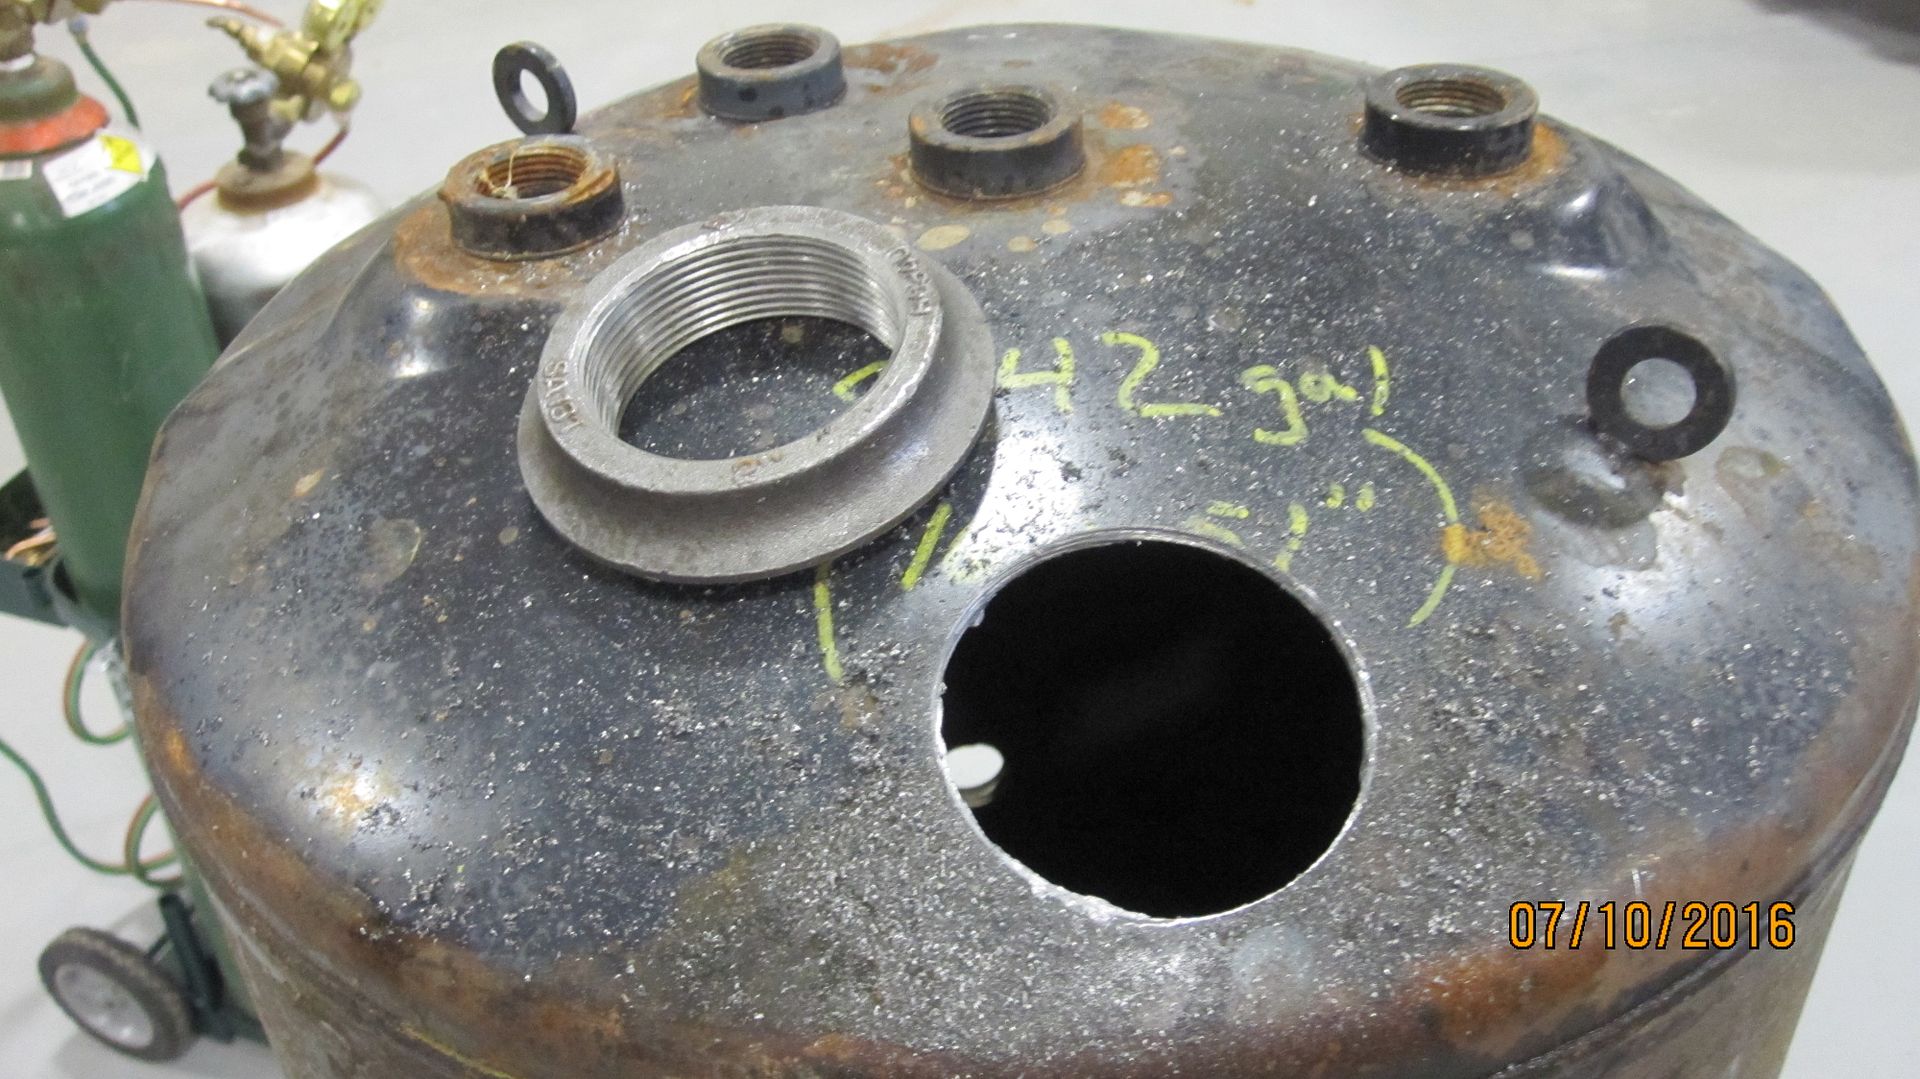
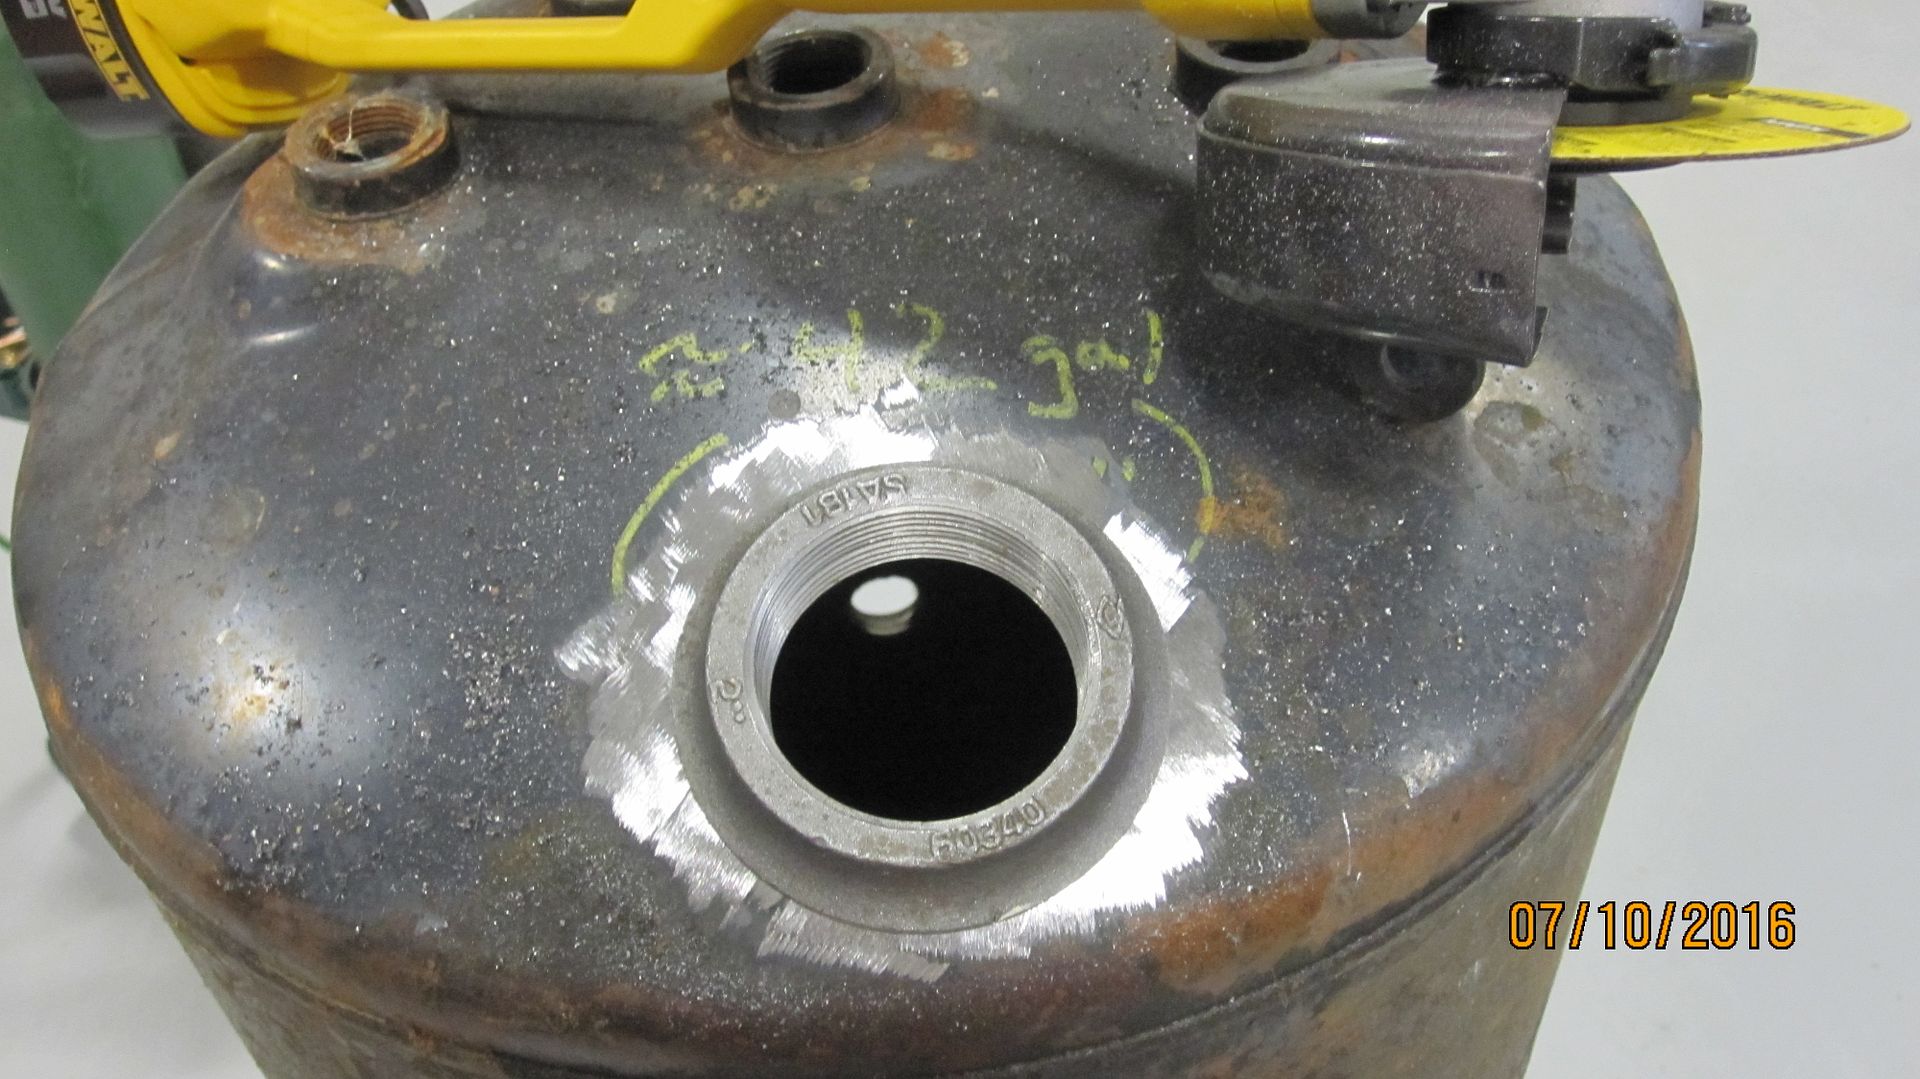
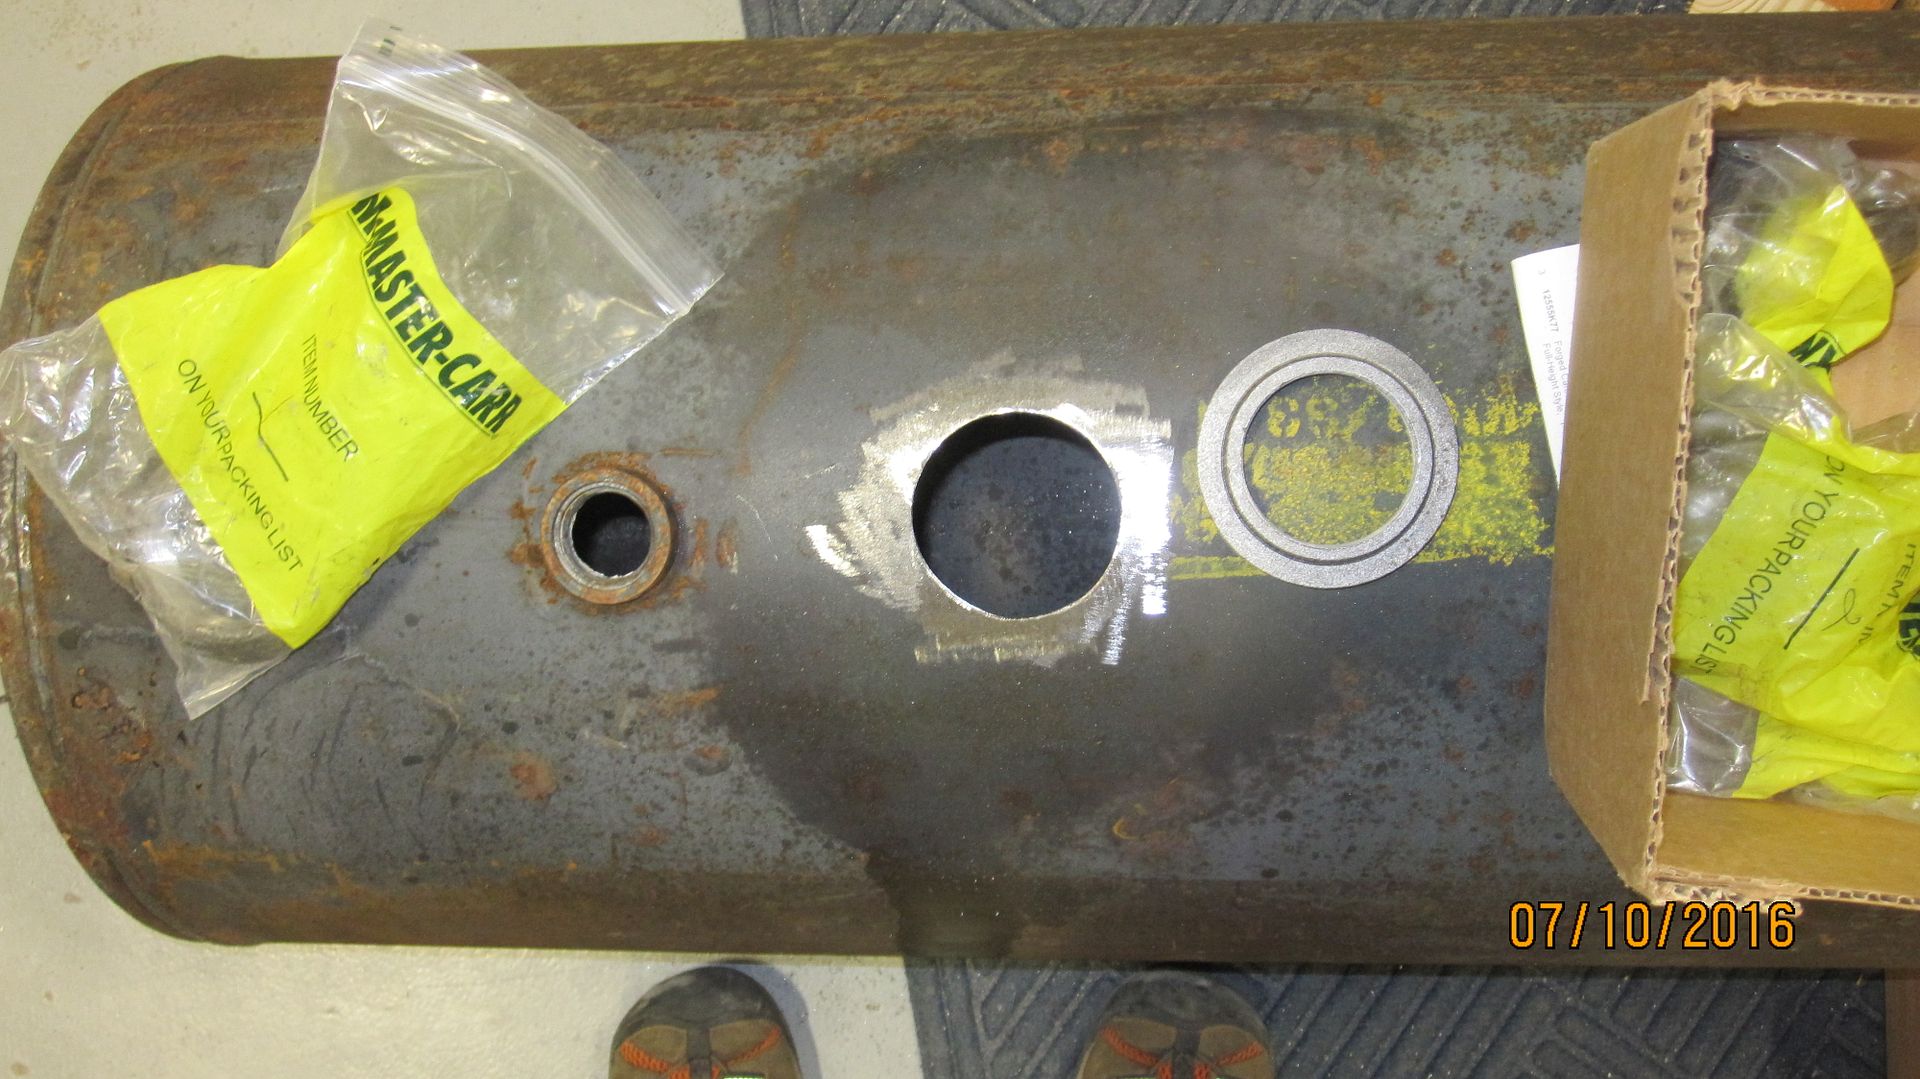
Finally got around to adding two 2" threaded weldments to one of the repurposed hot water tanks.
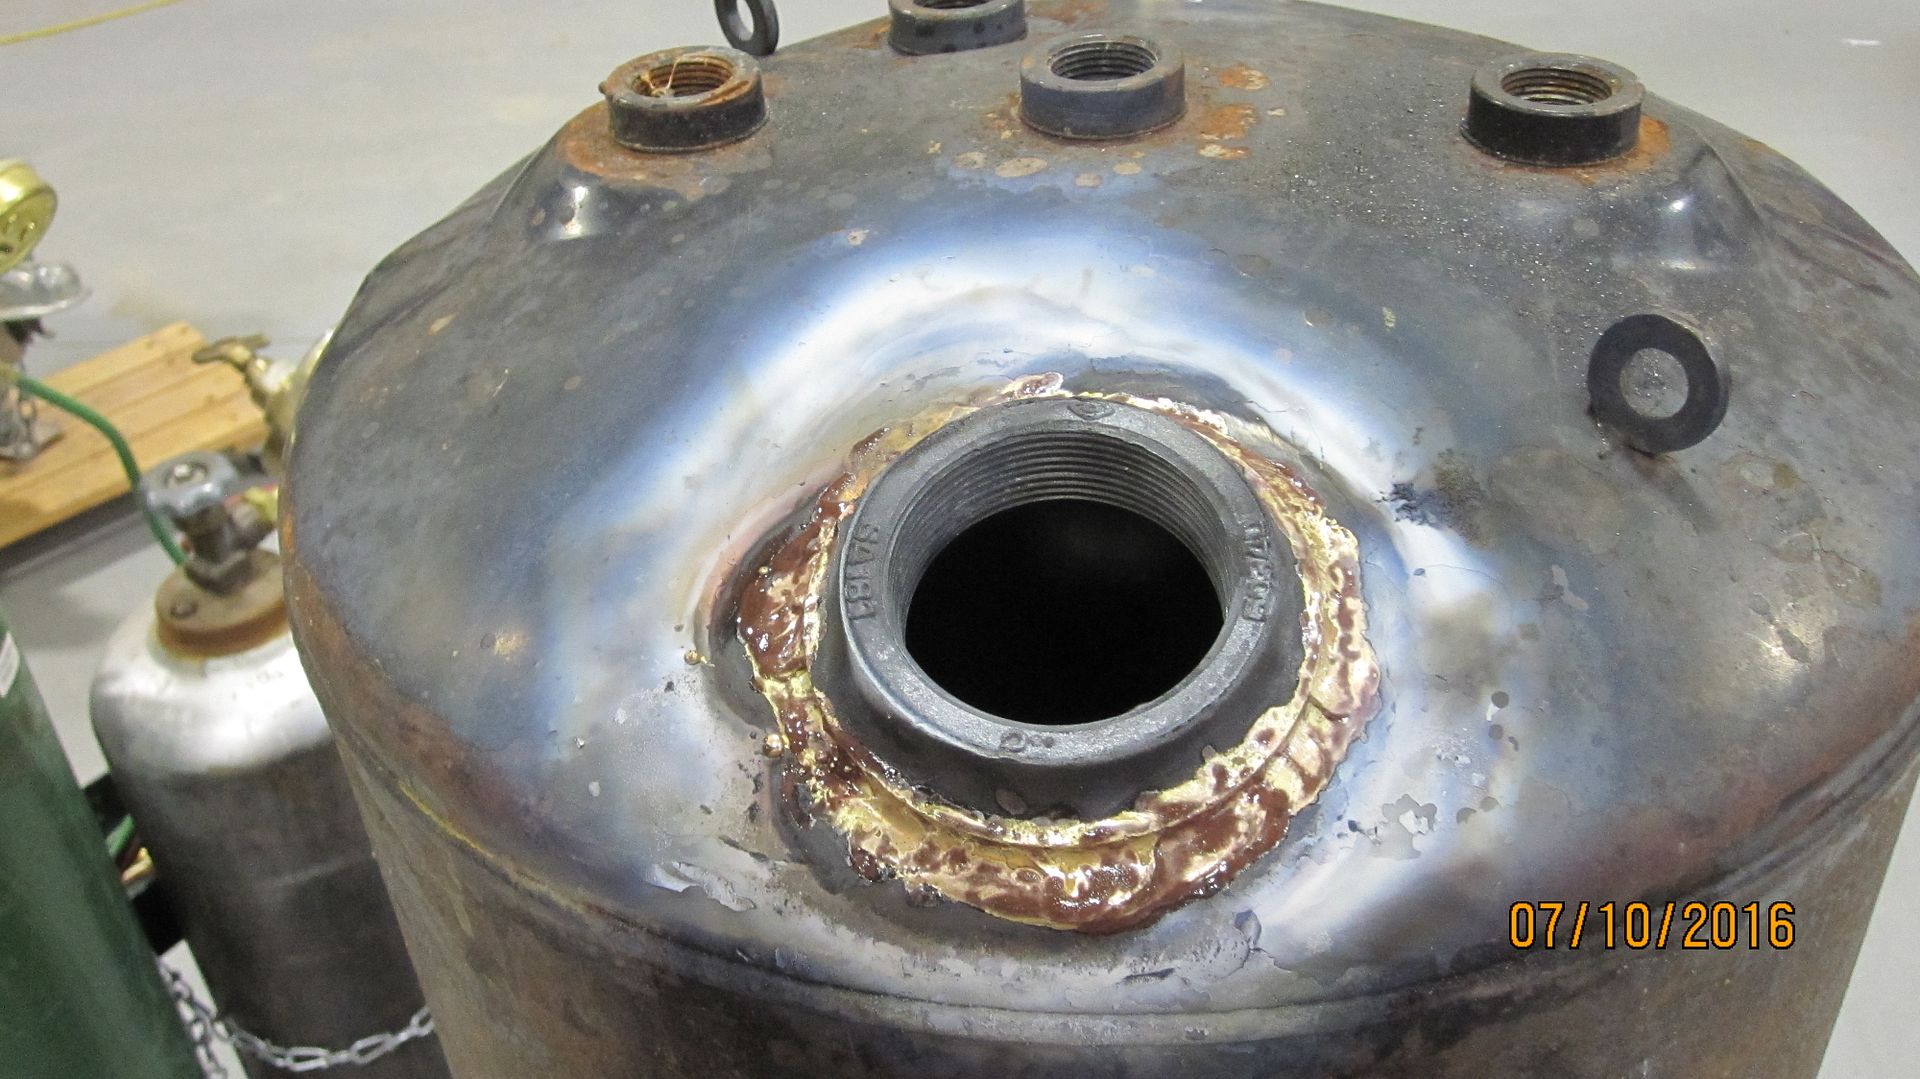
The reason is, I need to more rapidly and with less back pressure ---transfer waste from the holding tank under the container to the hot water tank for transport to the dump station... Initially started with a garden hose years ago and that blew the seals -eventually- on the macerator pump. So, we progressed to 1 1/2" corrugated sump pump 'tubing' and now to the blue flat looking trash pump exit hose, with the usual 1 1/2" quick connect fittings. The quick connects are very nice to have. The weldments came from McMaster-Carr. I brazed them to the tank because that's the fastest and neatest way to do it and get good fill in the gaps between the tank and fitting and not risk burning a hole in the work pieces. My SO mentioned abt the big gaps in the side of the tank/fitting so I 'formed' the tank with a big hammer to make a more 'flat' surface to attach the fitting. 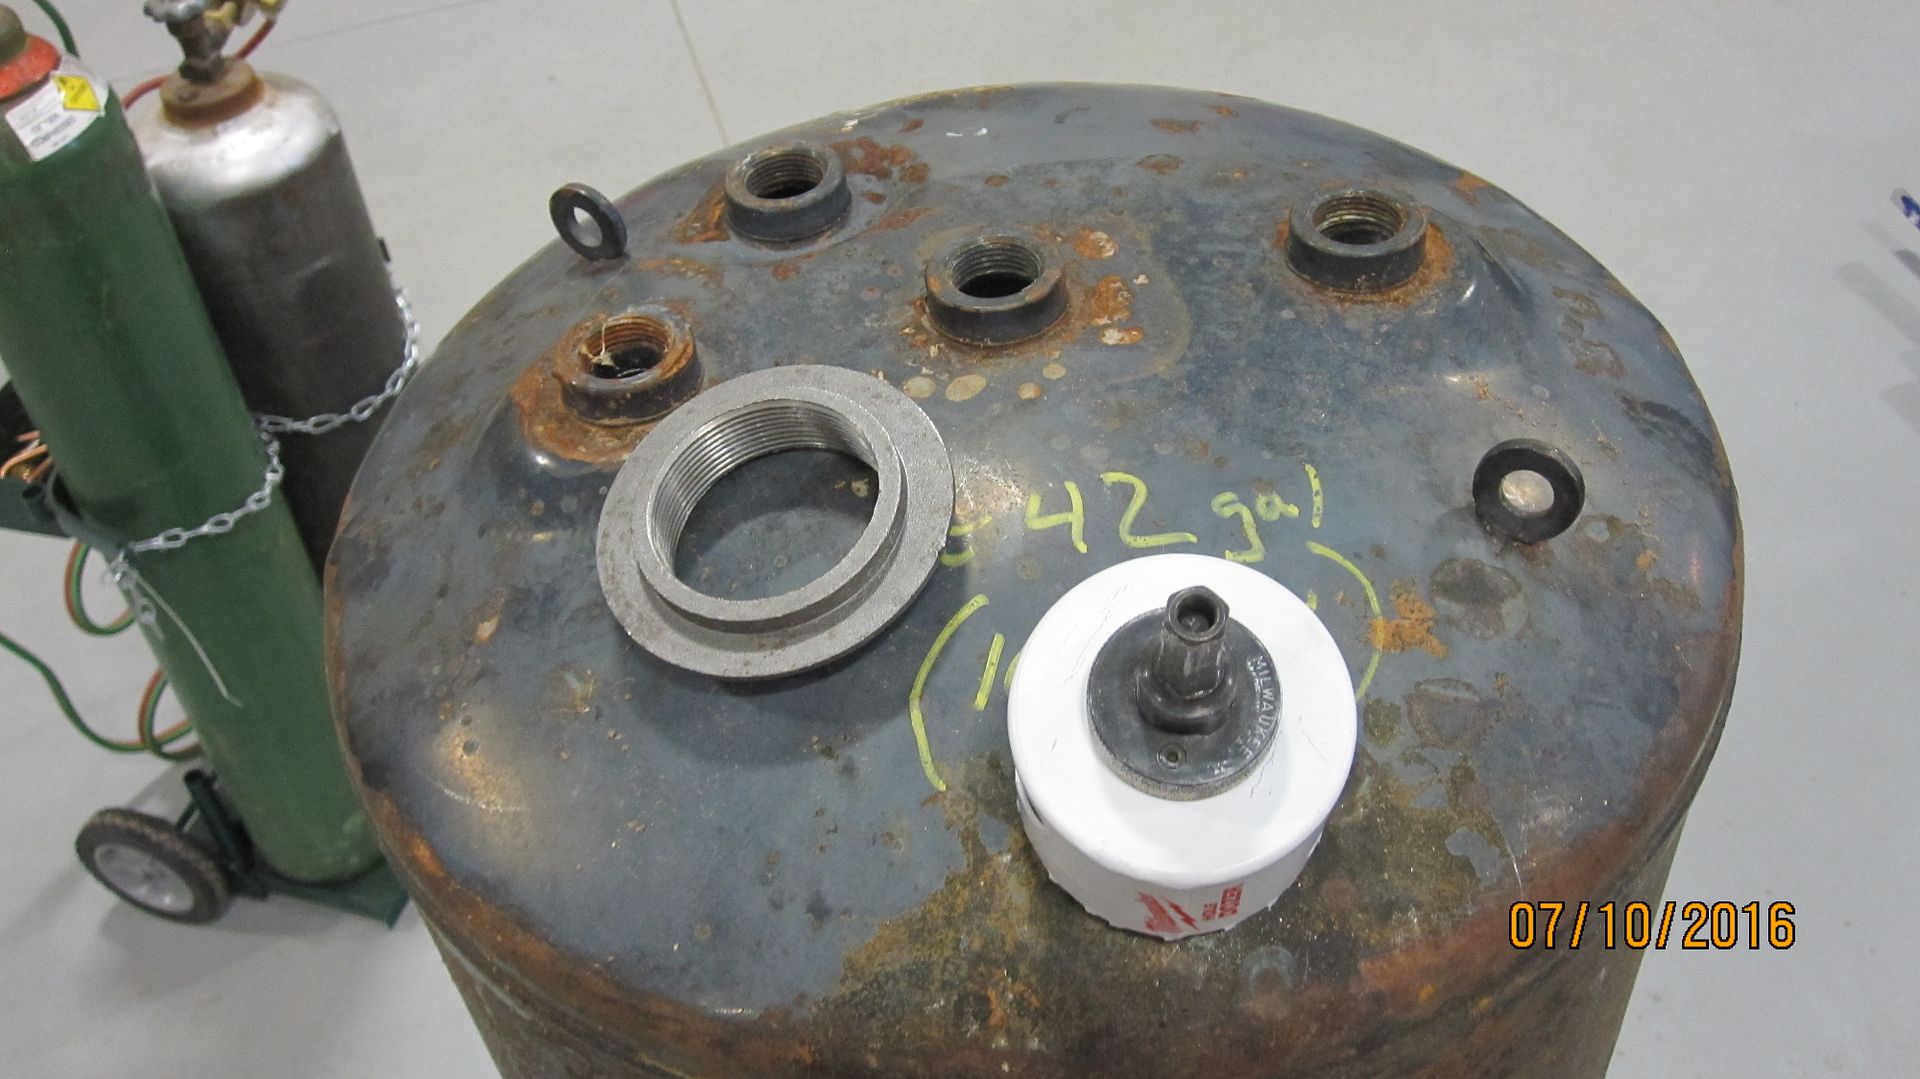
|
|
|
|
[#22]
Couple more pictures...
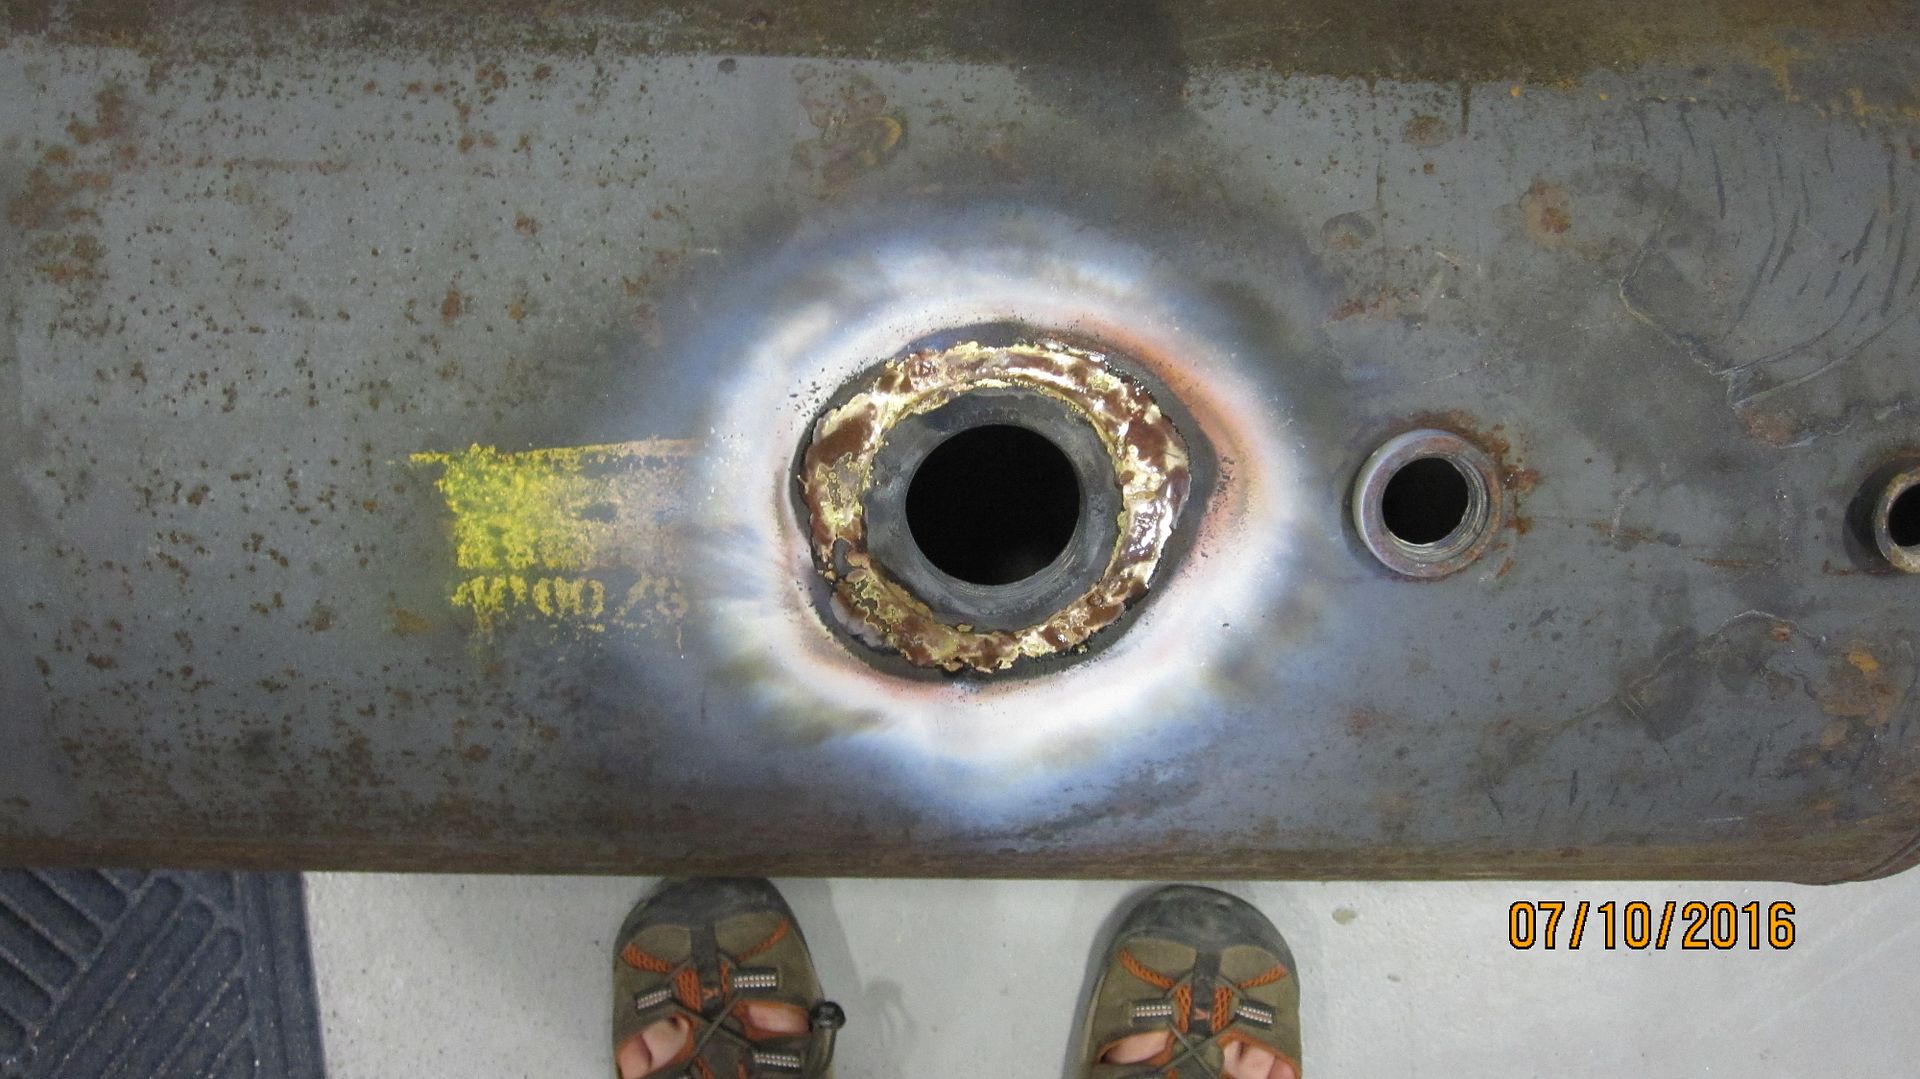
Braze will be pretty when flux cleaned up... I love brazing... 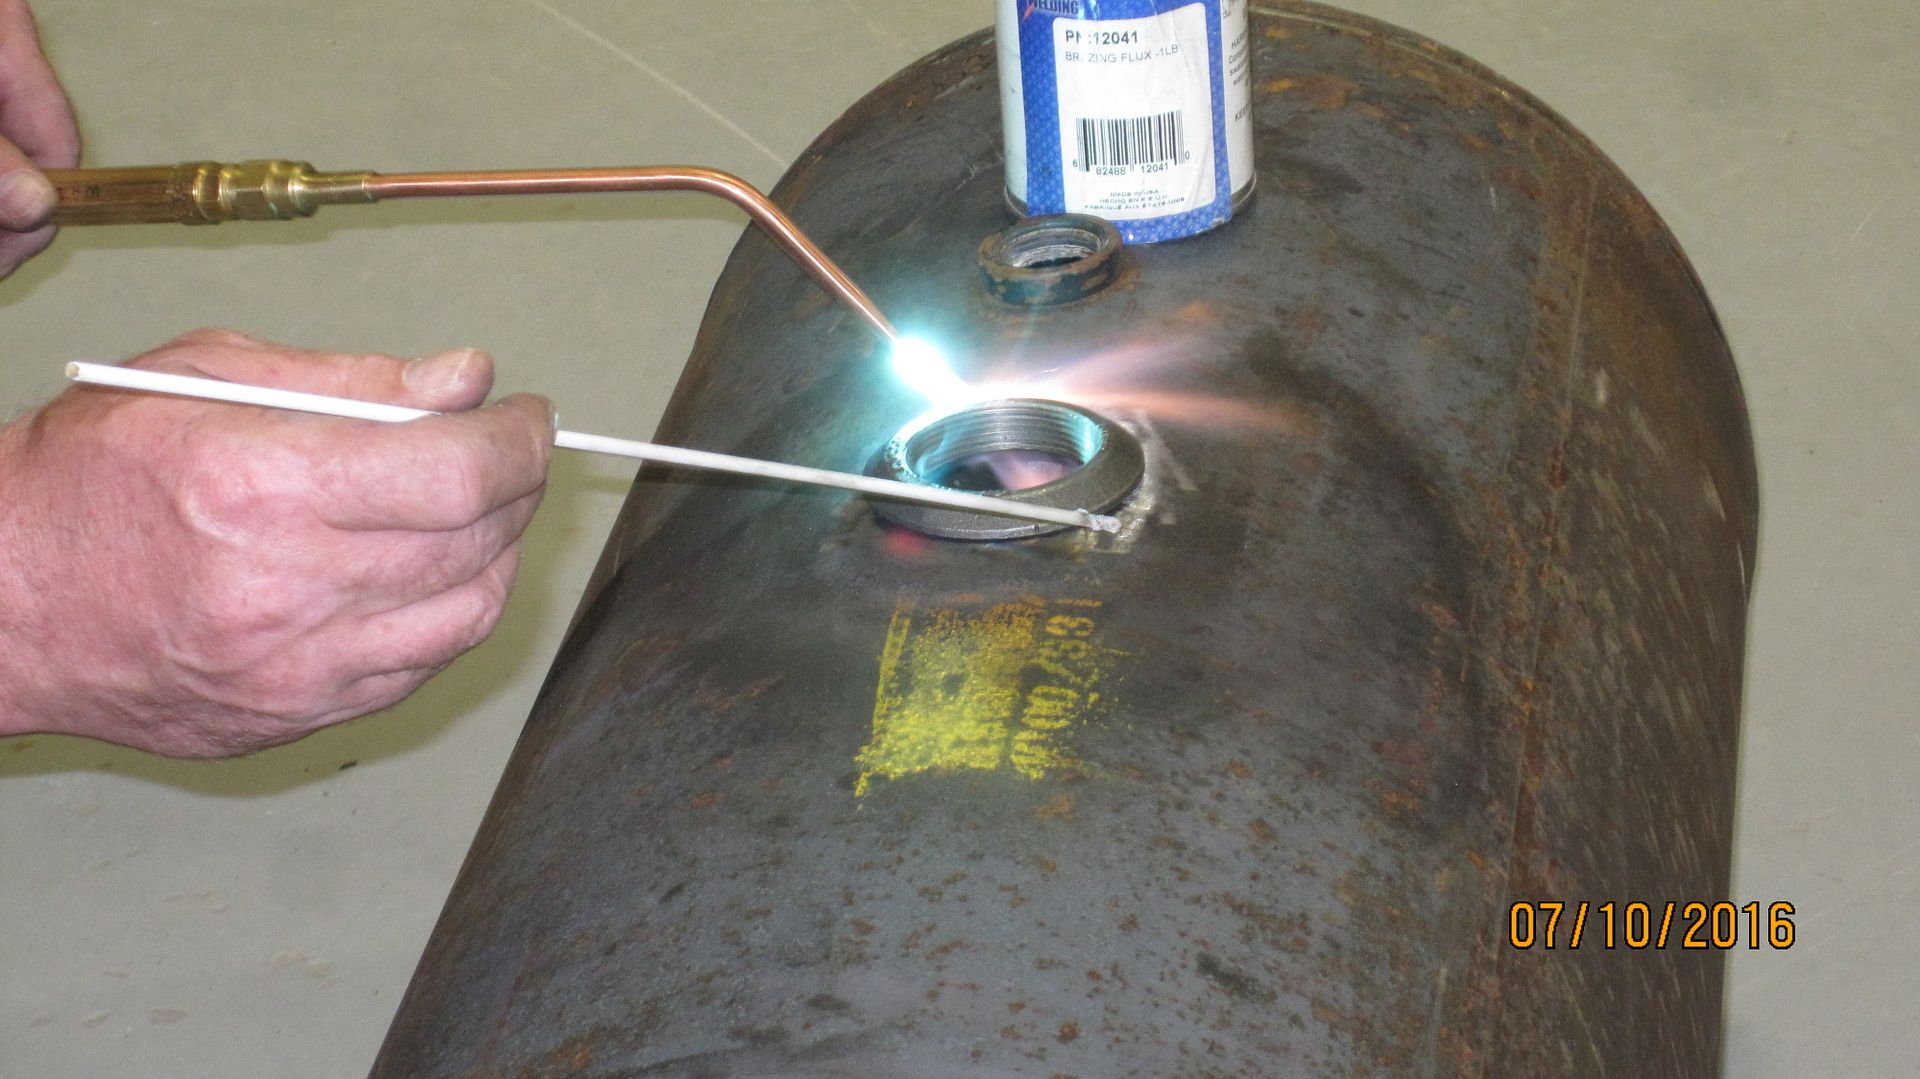
Tank will be transported horizontally with the end fitting being the 'emptying' port... |
|
|
|
[#23]
Made a base for the tank...
Pretty nice compact design... SO wanted me to test the tank for leaks and found this... Ground a little and re-brazed... 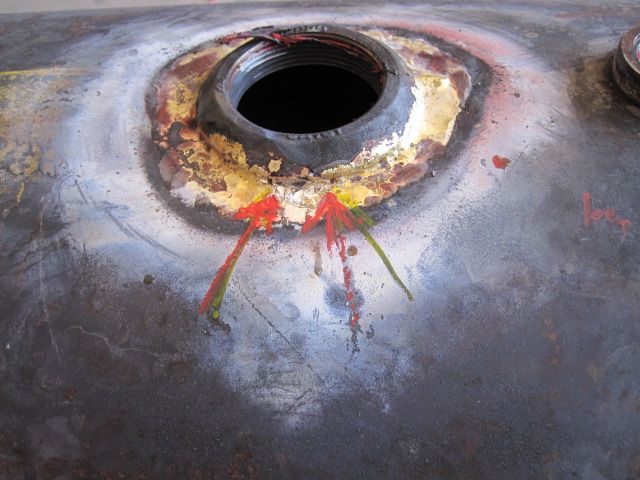
Stand for trailer... 
|
|
|
|
[#24]
If anyone is trying to monitor liquid level of a translucent poly tank, here's an idea...
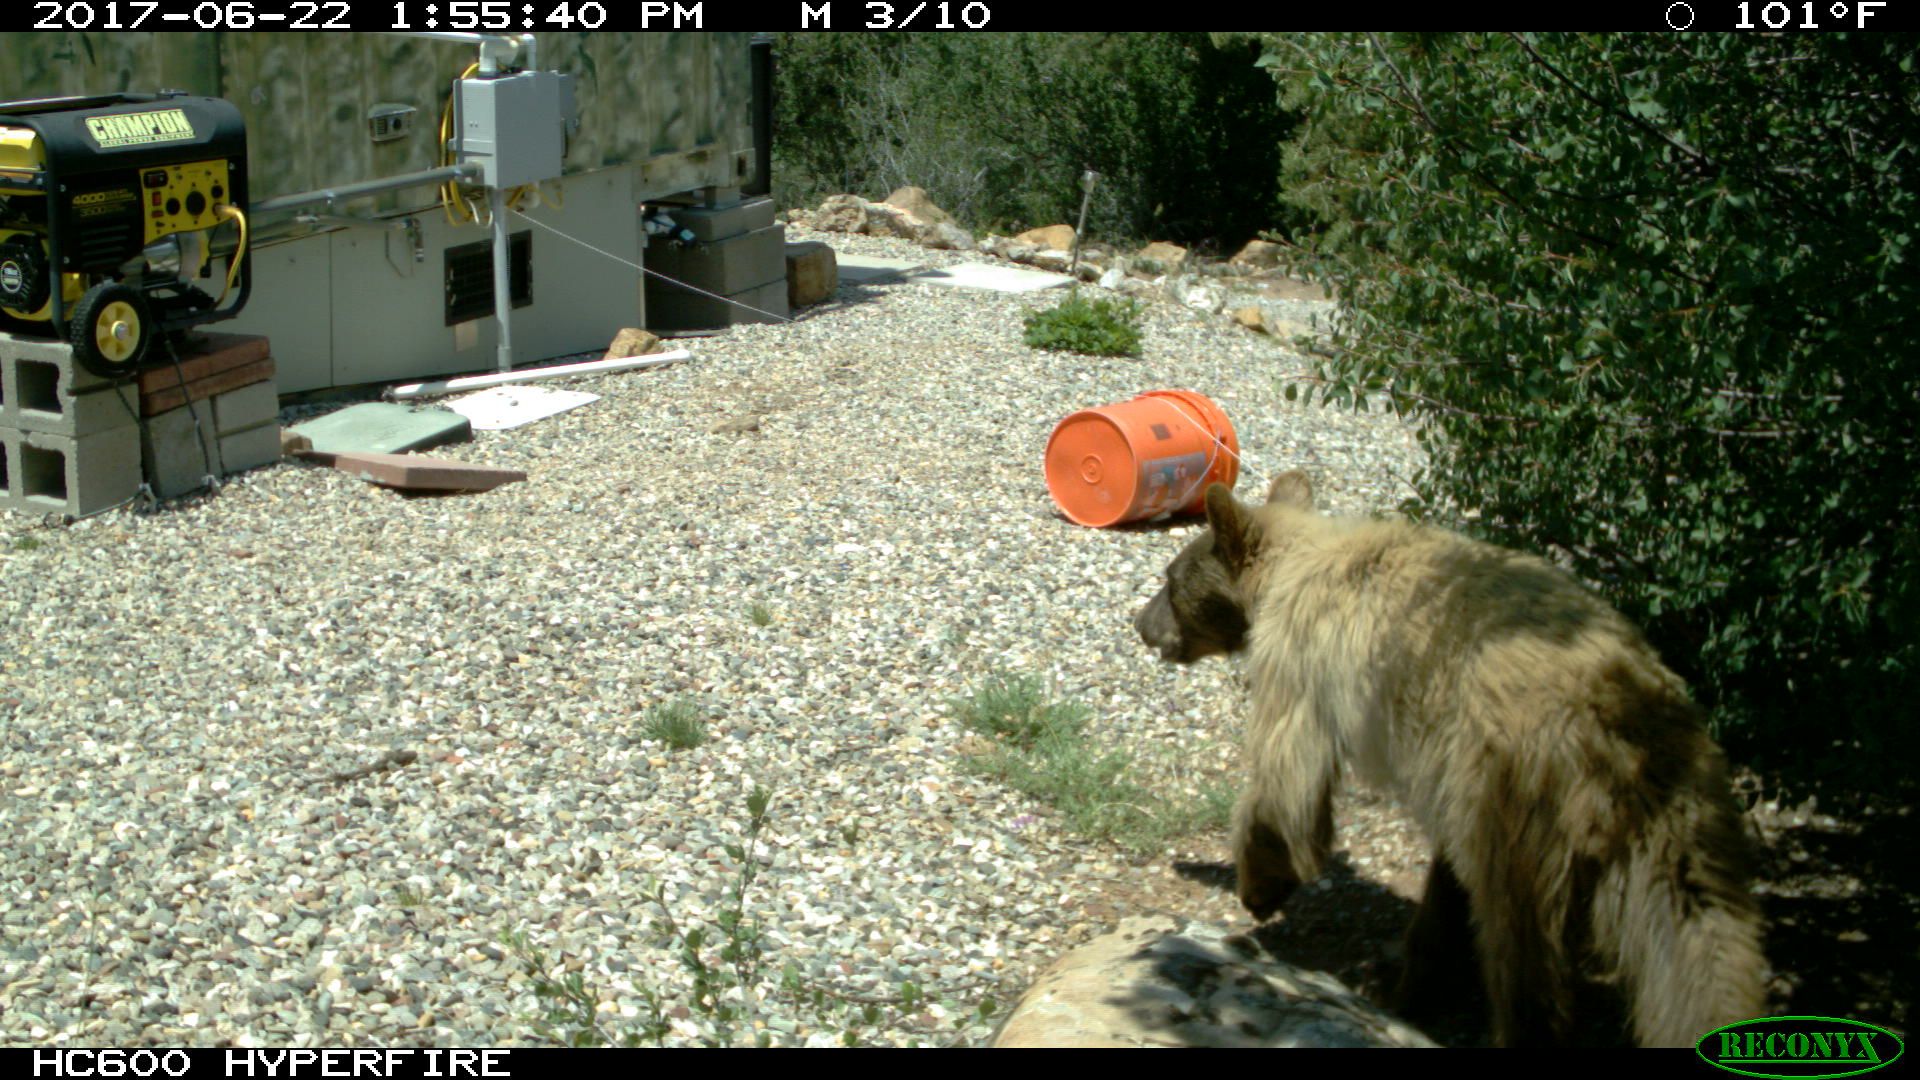
We were shining a 12 volt LED track light into the back side of the waste tank and monitoring the liquid level with a NTSC camera on the other side via. a small 7" monitor in the bathroom. After the bear tore up the toileting system a little, and I had to replace some Fernco's, I tried shining the LED down thru the top of the yank near the corner. This works a lot better. Camera is on the far right bottom. Bear pulled the reinforced 2" heavy wall tubing out and a week after I fixed everything and decided to pull the 2 screws and remove the basement vent to adjust the camera lighting, there was an odor and the bear had punctured the upper Fernco elbow and it was leaking vapor and had to be replaced. Bear pulled the genny extension cord from the short plug -twice. The area of the vent is now guarded by strings and poppers. |
|
|
|
[#25]
The strings and poppers have deterred the bears and no more trouble!
In the pix above there's a small bit of the underground 'yard box' showing... There's two of them and that's where the batteries for the container are located. Conduit runs from the boxes to the NEMA box on the side of the container and there's a vent in top of it. |
|
|
|
[#26]
Something has happened to some pix and posts in this thread...
Incidentally, the toileting system is -as expected- sensitive to freezing. Even with the skirts around the base of the container, and the warmth of the floor above and the ground temp, the outlet 1 inch tube of the No 1 macerator pump is subject to getting clogged with TP and freezing I think where there is a 90 degree bend into the secondary ~40 gallon storage tank. Undated pix... The tube enters the tank way to the back and can't be seen... Maybe I should relocate it toward the front. I'm going to cut an access opening into the floor above the system to direct warm air from the RV Atwood furnace onto the system to take care of the occasional freezing issue if the problem persists. Before bear tore it up...
After bear finished w/ it... 
|
|
|
|
[#27]
Can't relocate to the front and the reason became clear again- the tank is sloped toward the front and the tube has to enter at the higher area toward the rear.
|
|
|
|
[#28]
The Nevertrumpers were thrilled with the quality of my brazing skillz...
My SO had the tank loaded on the ATV and some poo splashed out of the vent on the right on her... Should listen when I tell her to understand systems and to close valves as necessary... Works perfectly! She did save me some embarrassment when she mentioned maybe I should open the vent while I was pumping poo into the tank... Before the flimsy hose blew off the fittings...
|
|
|
|
[#29]
Darn buttons and fingers...
|
|
|
|
[#30]
Had a problem with the hose that feeds from the 1st macerator pump to the 40 gallon repurposed RV water storage tank...
Actually the 90 degree fitting that goes from the hose and threads into the tank bushing on top... We have to monitor the temperature under the container in the winter to make sure when we empty the very short term pressure cooker holding tank that's right under the RV toilet, that the pump and hoses aren't frozen. Even if temps are 5 or 8 degrees above freezing for a day, as monitored, ice/waste slurry [I presume] forms and after a second or two of the pump running there's a blockage. The slurry is enough to block the right angle fitting because it's a close radius bend. I'd suggest anyone planning on running 'stuff' thru hoses in cold wx keep to large diameter tubing and large radius fittings. |
|
|
|
[#31]
Bears ought to be out of hibernation any day, time to protect the toileting system with poppers again...
|
|
|
|
[#32]
Bears are out and "poppers" deployed to protect the toileting system.
|
|
|
|
[#33]
Quoted:
Bears are out and "poppers" deployed to protect the toileting system. Explain? |
|
|
|
[#34]
Quoted:
Popper? Explain? http://www.ar15.com/forums/t_10_17/666943_Creating-havoc-at-the-BOL-----Bears-----and-Fiber-optic-networking.html&page=5&anc=11791778#i11791778 |
|
|
|
[#35]
Bear got close to tearing up toileting system a week or so ago...
Over-watch popper was deployed... Days latter popper activated. Toileting system not disturbed. Bear likely was... Camera ran out of memory and didn't take action... 32 meg card... 
Popper rebuilt and redeployed... Latest pix--- Sneaky bear watching to see if we're home... 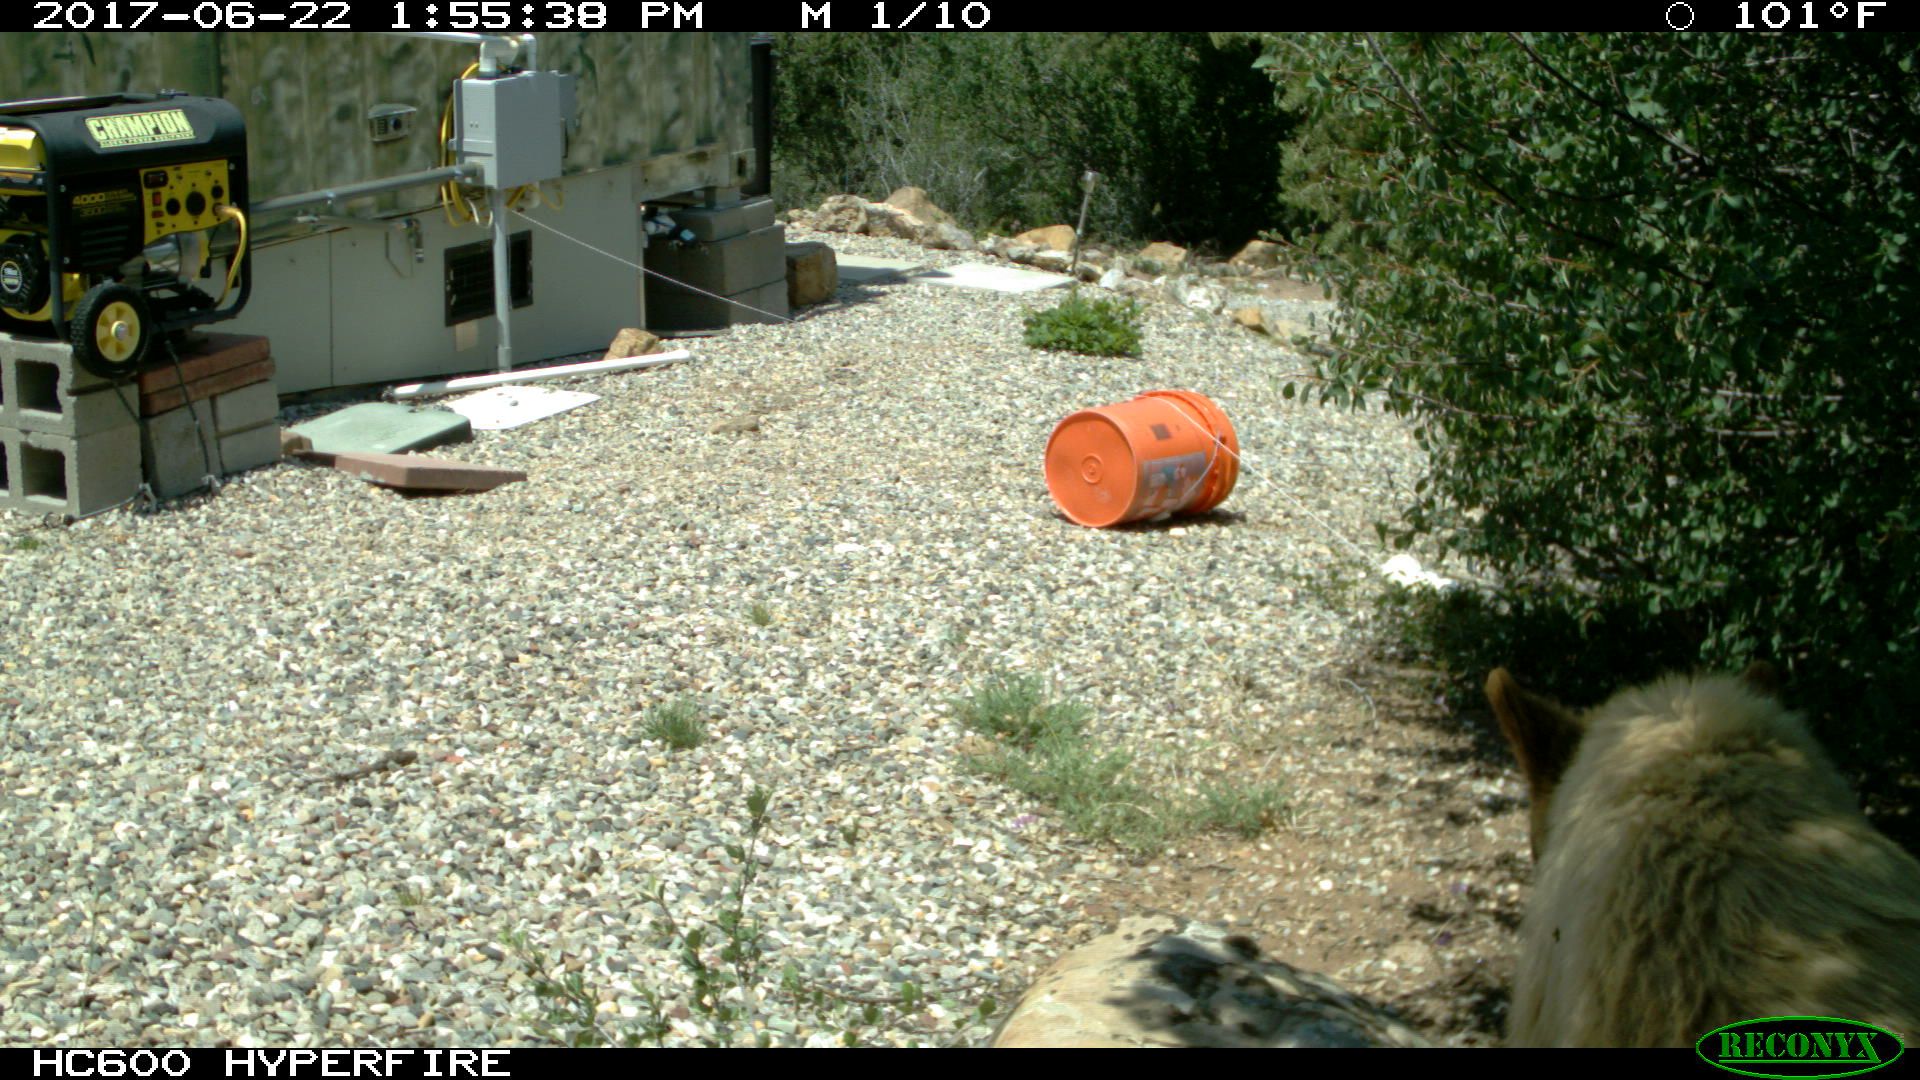
Crossing trip string.... 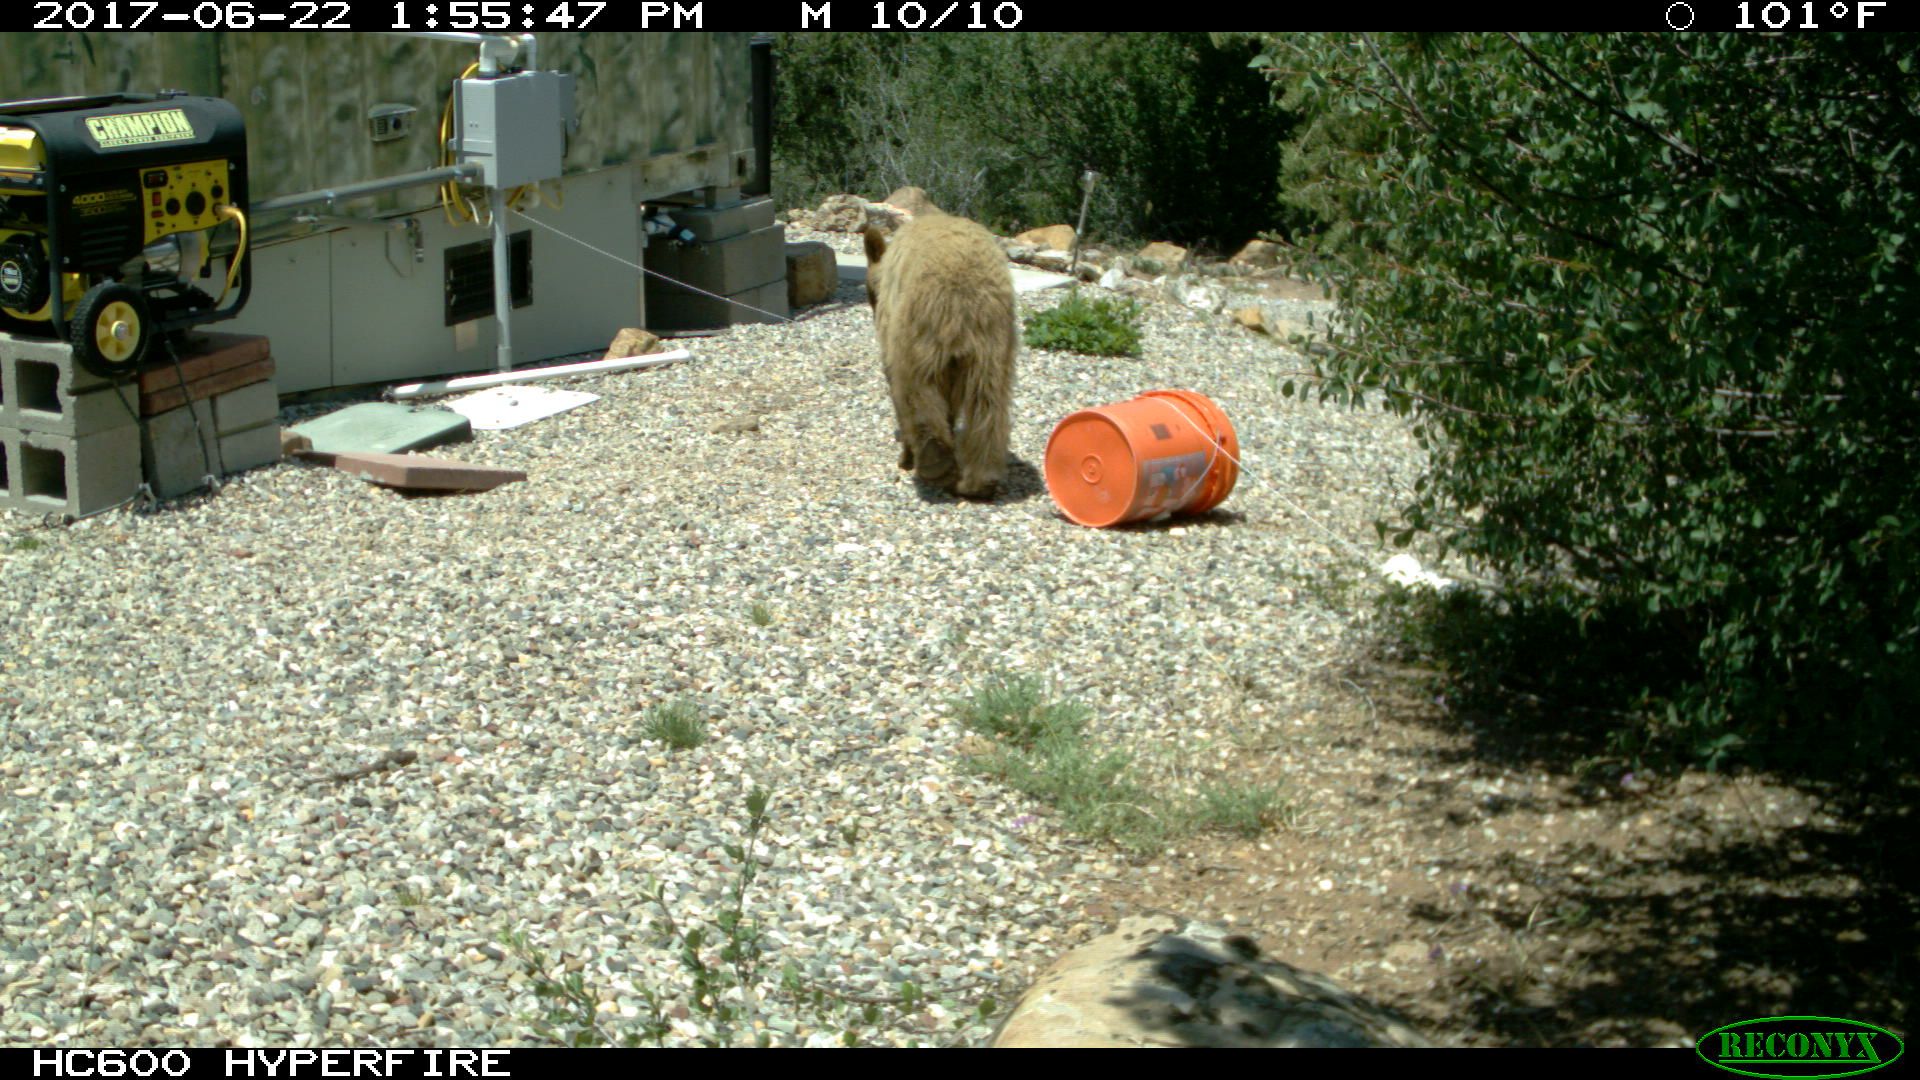
Approaching toileting system behind shipping container skirt... 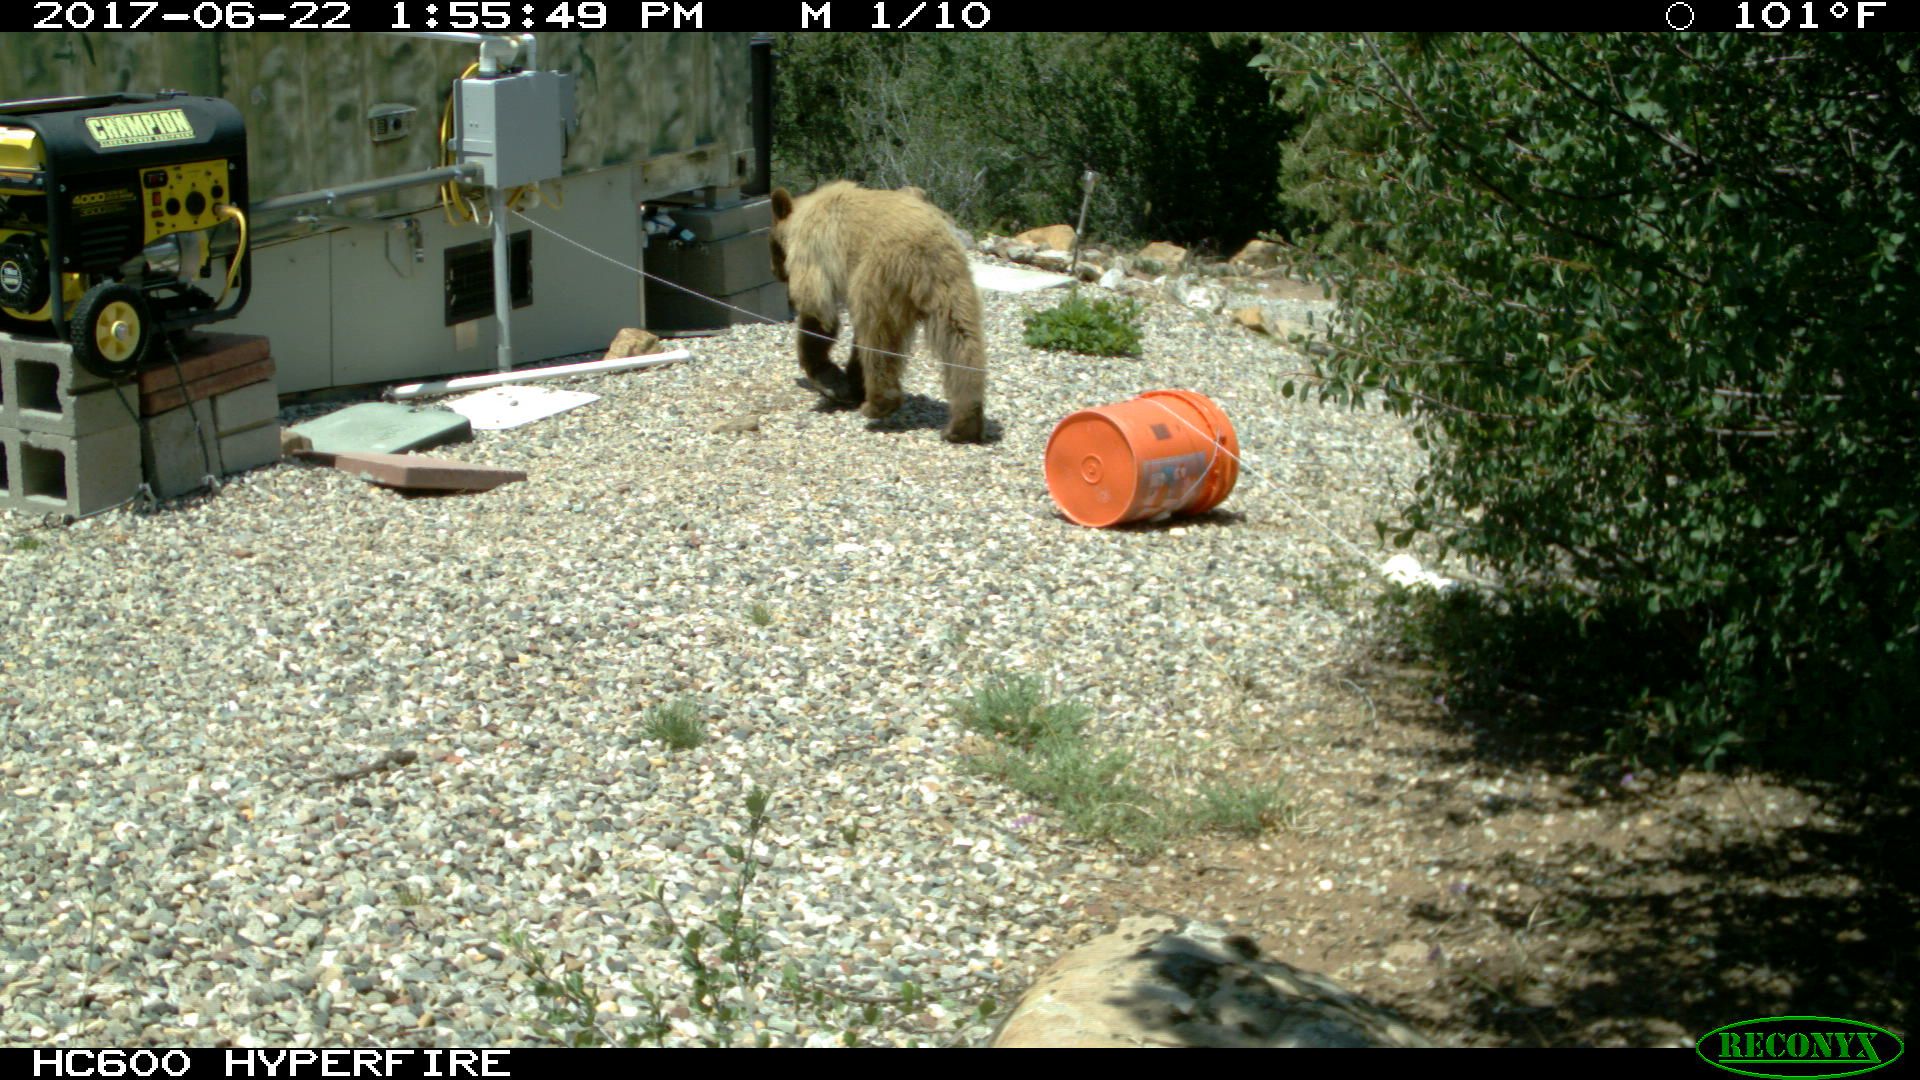
Bear sniffed vent that is their first target and then the following pictures show it wandering off... 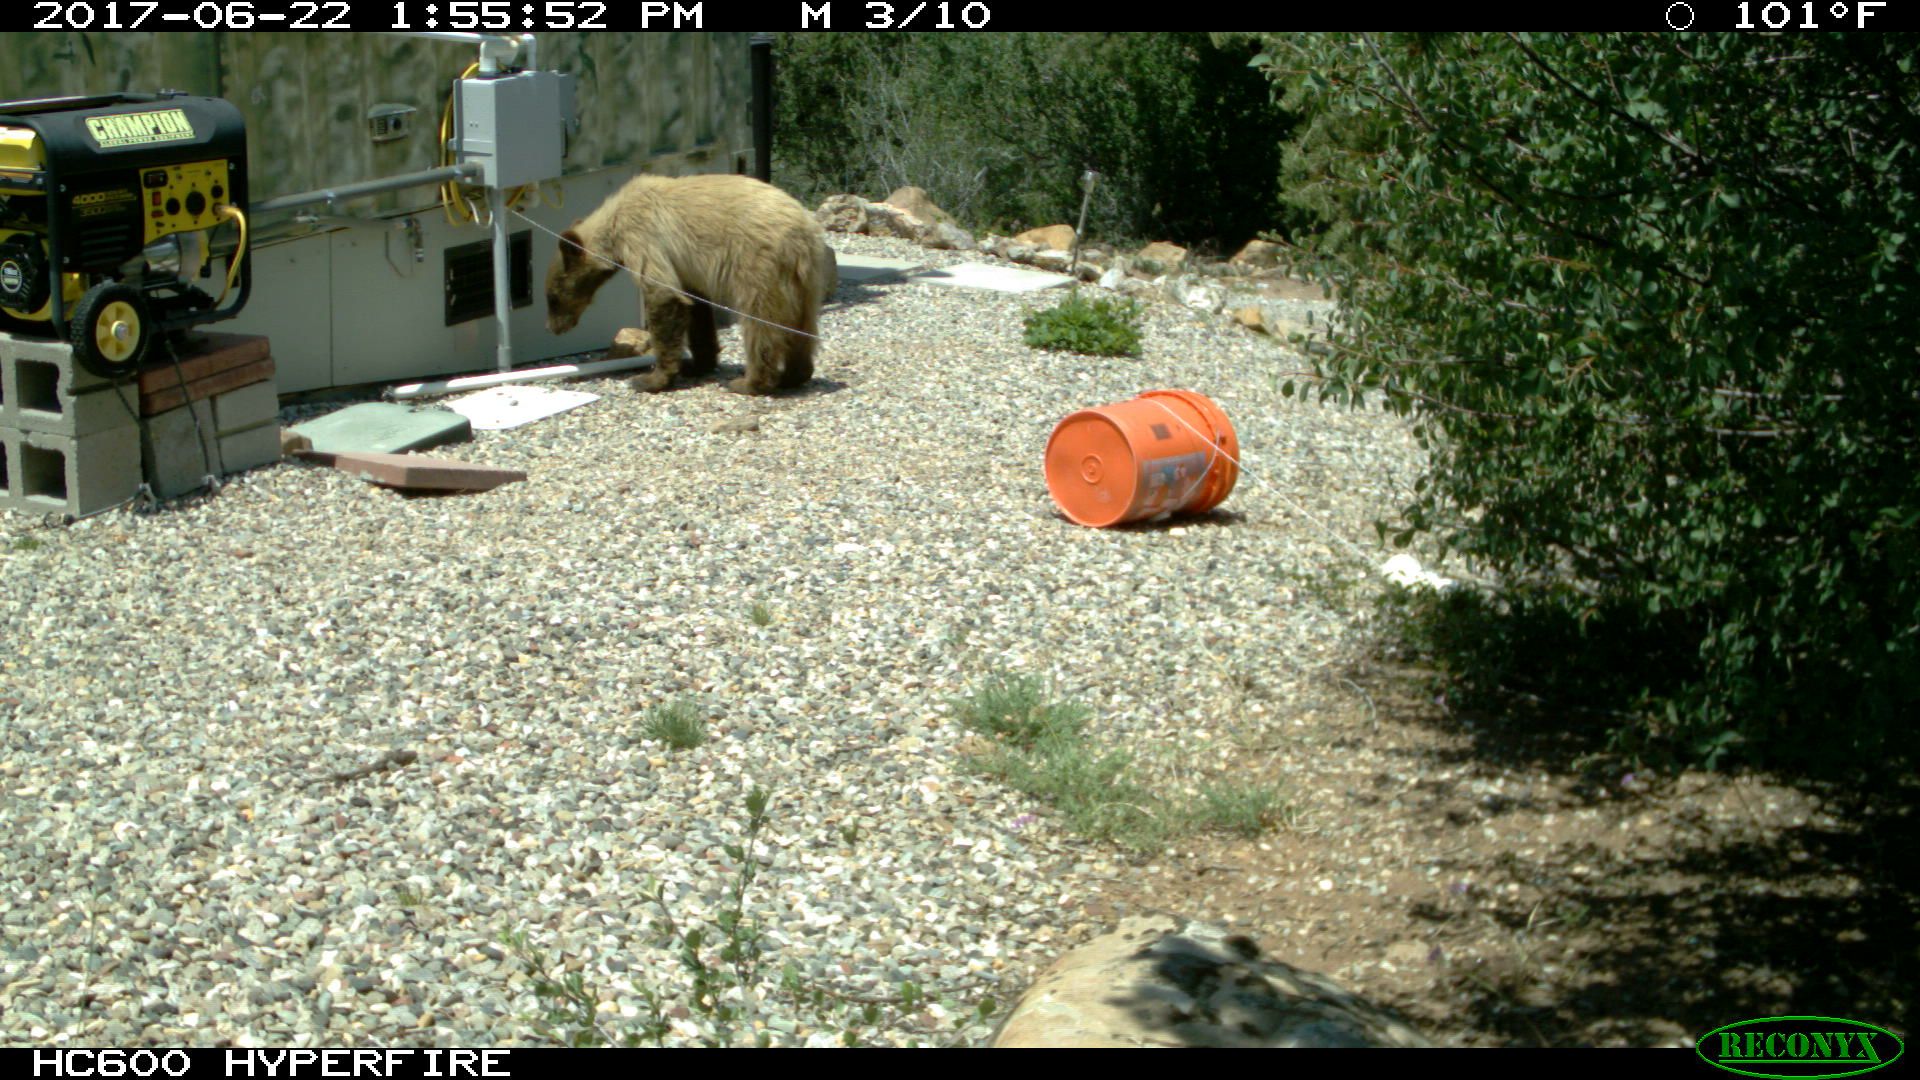
New remote start genny my SO loves for the convenience shown. It's electrical system is wired into the container's. No need for the whimpy genny battery that won't start it in the coldest days. Container solar system Rolls Surette batteries are in the 2 sprinkler boxes in front of the skirt, under ground. Complex drainage system underground. White PVC pipe is a prop to hold the left container door open for panoramic view from inside the sliding glass doors. Big NEMA box holds various high current fuses and buses for 12 volt connections/distribution... RV propane furnace vent to left of NEMA box. Thinking about making a genny stand out of 1 1/4" Acme threaded rods and steel top plate, to replace crappy cinder blocks. Not sure if this isn't the baby bear that was crawling into the water/trash can a few weeks ago... There's a big rock in the bucket to keep it from moving in high winds... I meant to put a 'bridal' string on the popper trip yesterday but forgot... |
|
|
|
[#36]
Just checked the popper from down here and it is still good to go...
Here's our pet kitty posing for a night time pix... He doesn't take well to strangers... 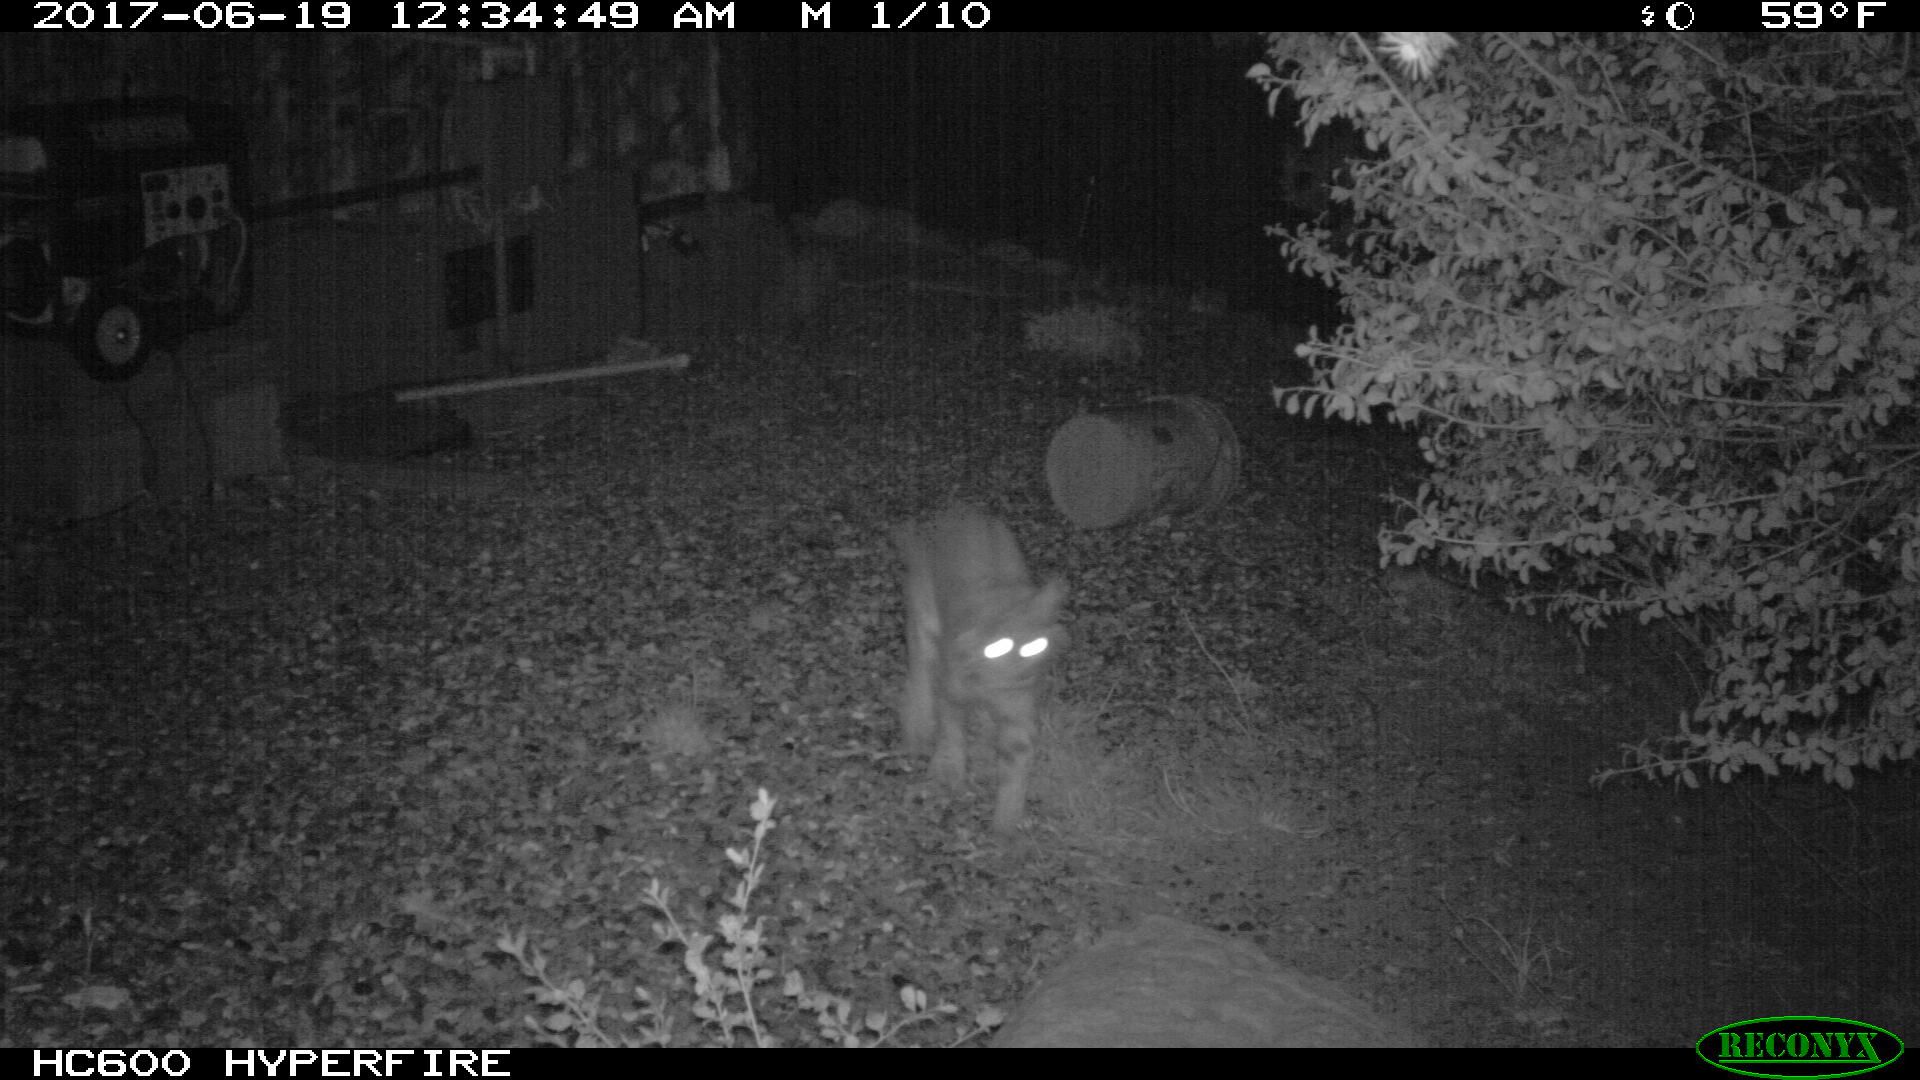
|
|
|
|
[#37]
Just blasted a squeaky that was outside the container door...
Last night walking from the container to the barn, walked up on a very tame rabbit that hopped a few feet in front of me a good way. I talked to it. Later, near dark, I was walking the same route and the same rabbit seemed to be waiting and hopped along in front of me again... Wonder if it will happen again? My SO noted we haven't seen any mice this year -so far... |
|
|
|
[#38]
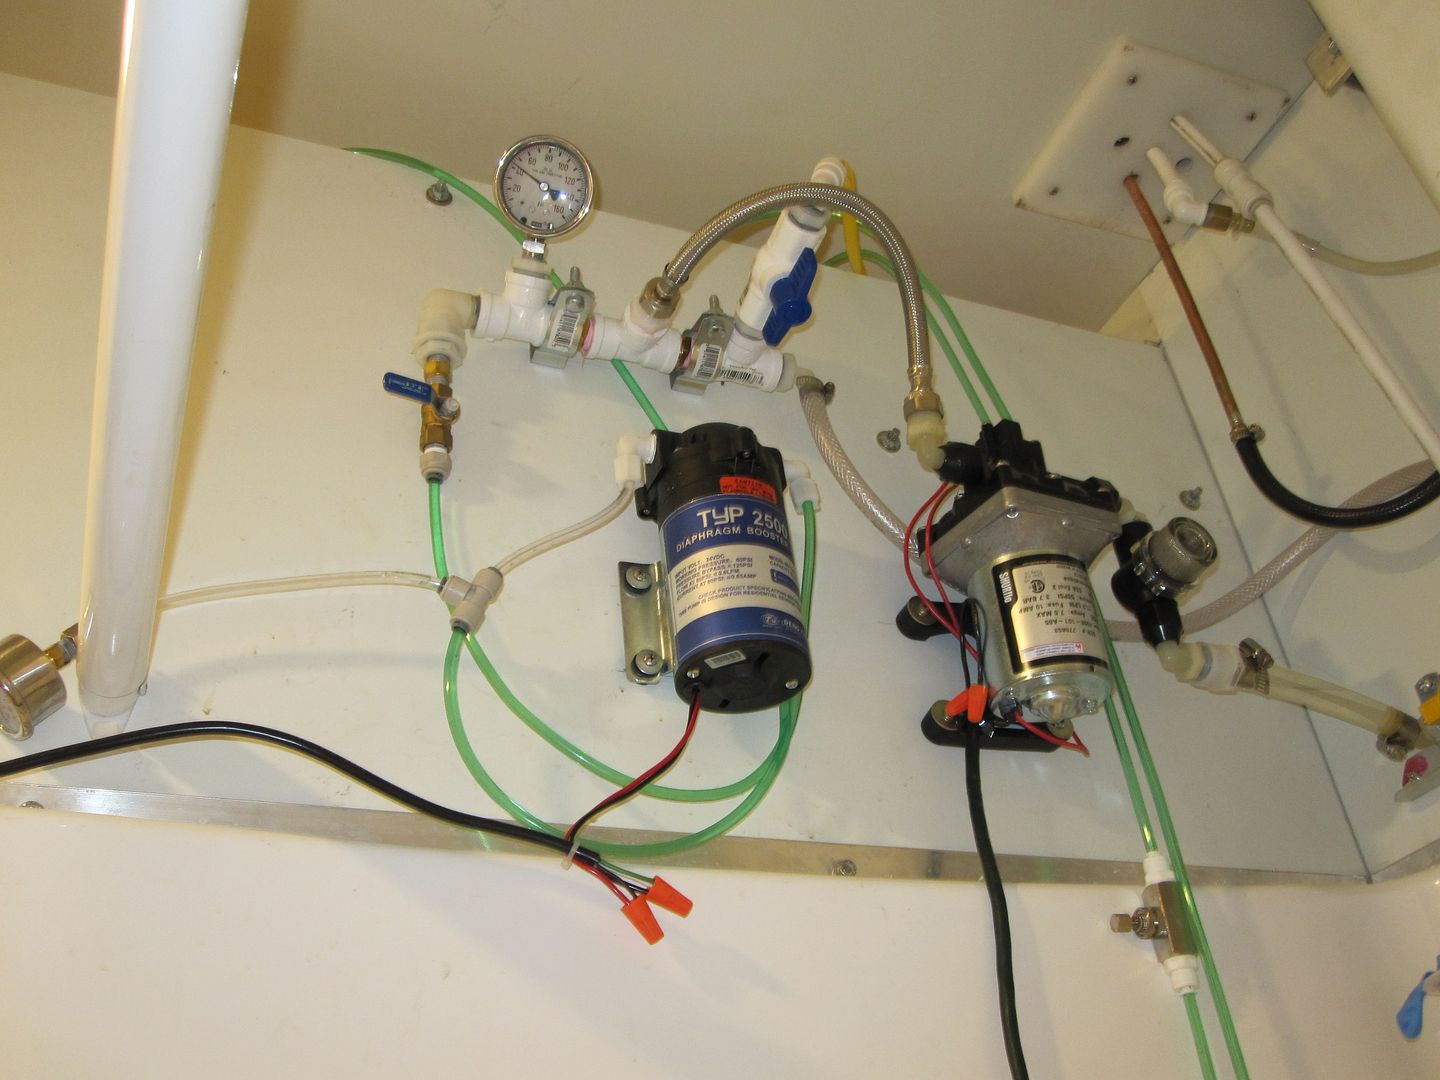
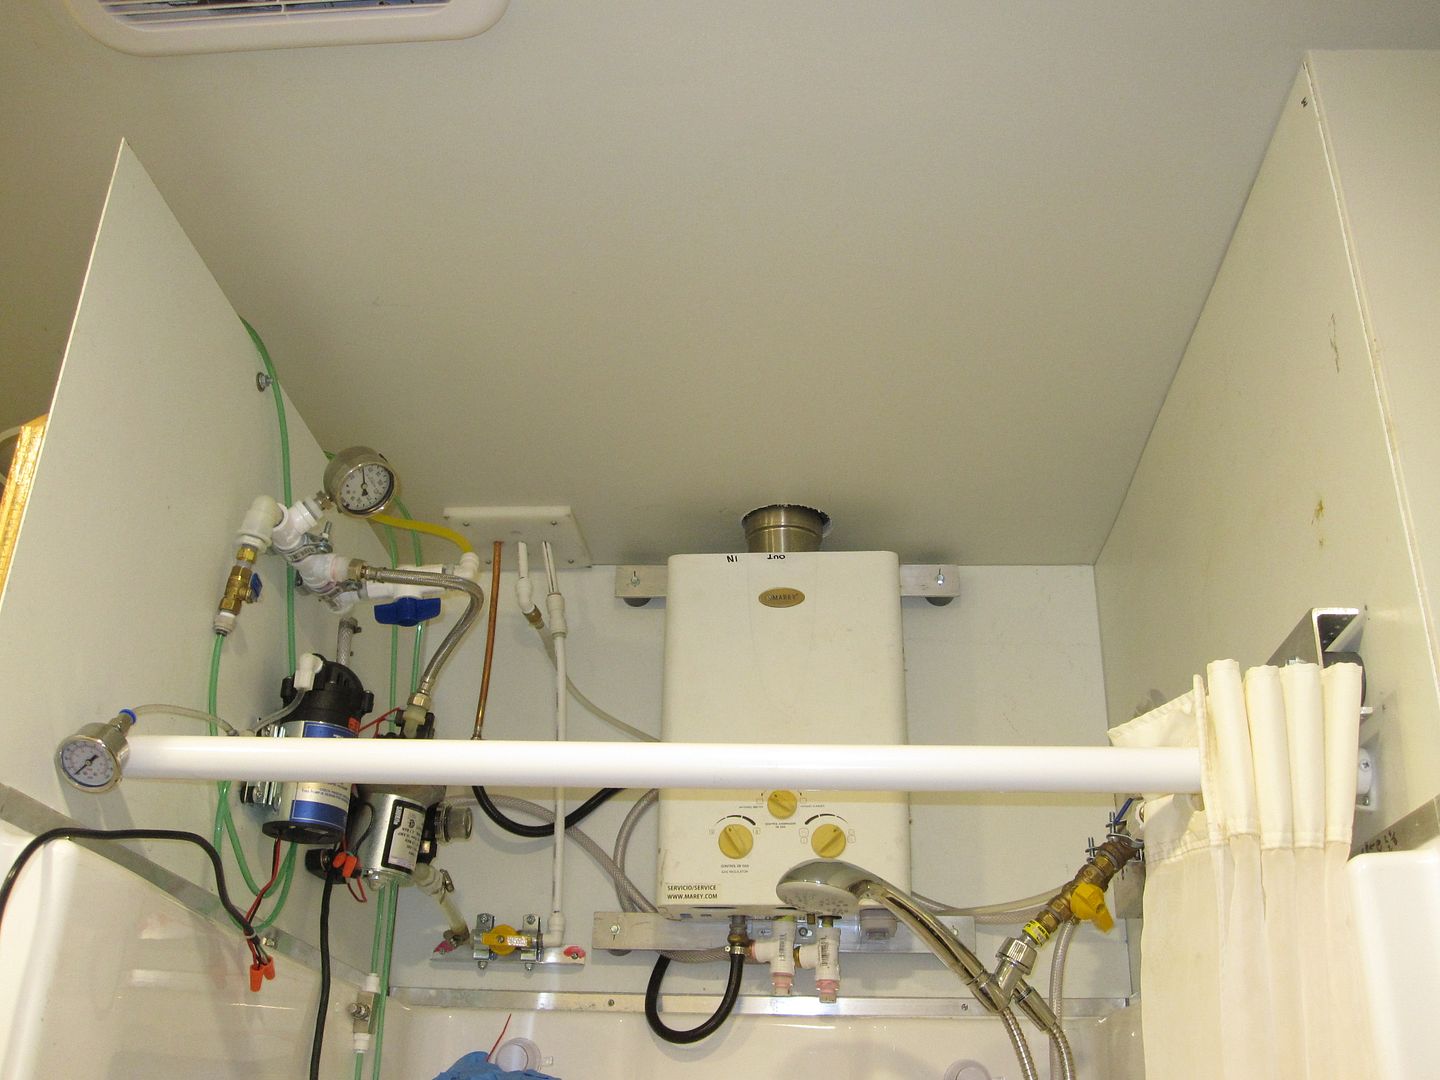
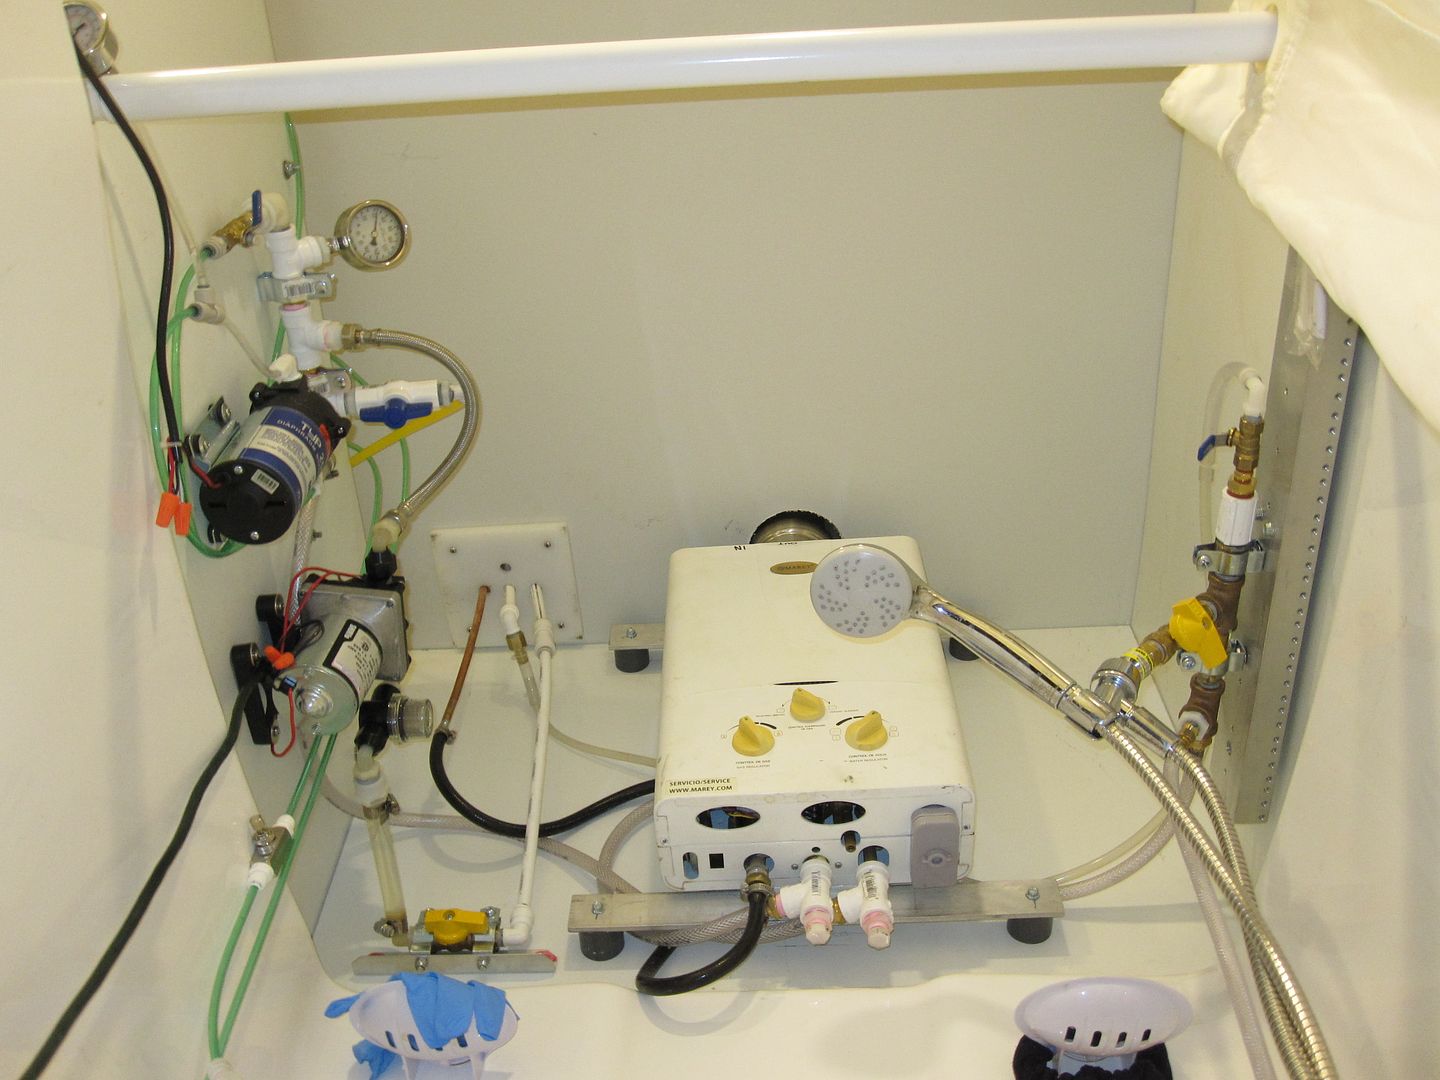
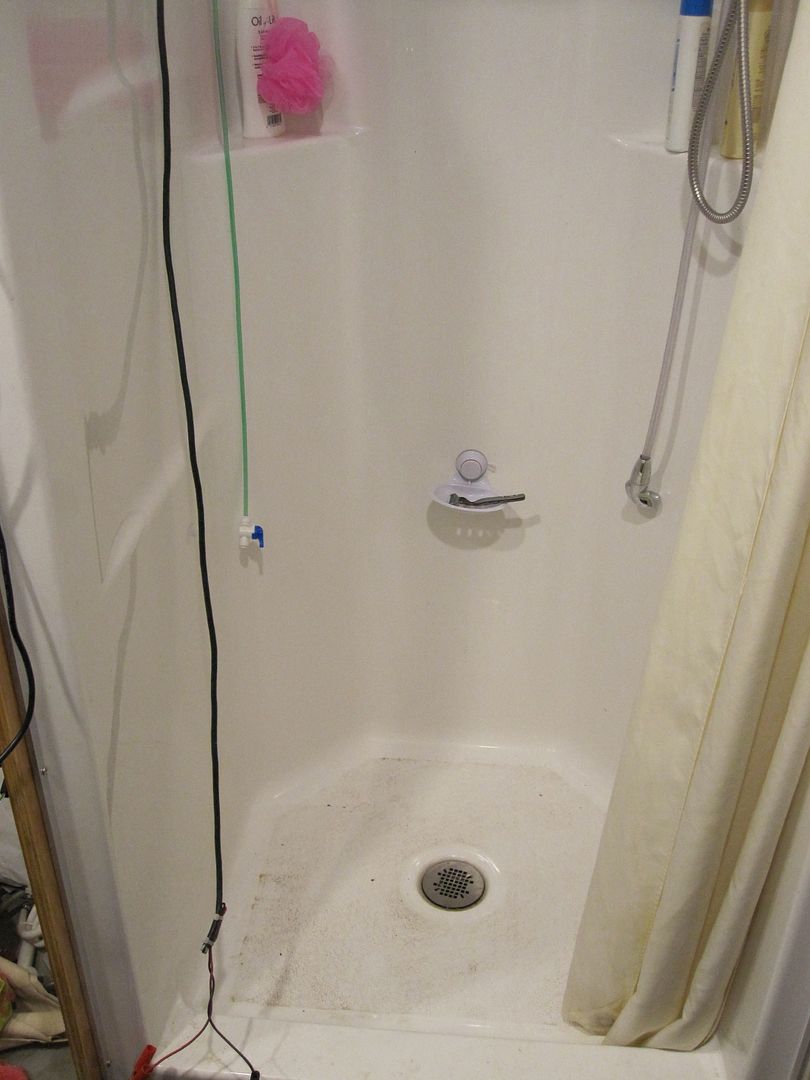
Have been wanting to experiment with a showering system/RO water source installed in the highly insulated room in the barn.
It isn't finished and the pix below are from 3 days ago... My SO and I have bathed in it and it is wonderful compared to the shower system I installed in the shipping container 6 or 7 years ago... Any questions as to how it operates, parts, etc., pls ask. There's one inexpensive removable shower head with an easily turned valve [yellow handle] to get wet with and wash hair, and a sink type hand sprayer with push button to directly apply water. With this system we can shower with a gallon of water or less --WHEN I connect up the excess pre-heat water return back to the storage tank ---from the manifold on the top right mounted to the aluminum channel. At the upper left is the pass-thru to bring connections neatly to the shower. The unused white tube is the return to the storage tank. I'll add the 3rd piece of Melonite to cover the left side plywood in a few minutes. The pressure gauge is liquid filled to prevent damage from pump pulsations. The RO BOOSTER pump will connect to the plugged port on the left PVC manifold. 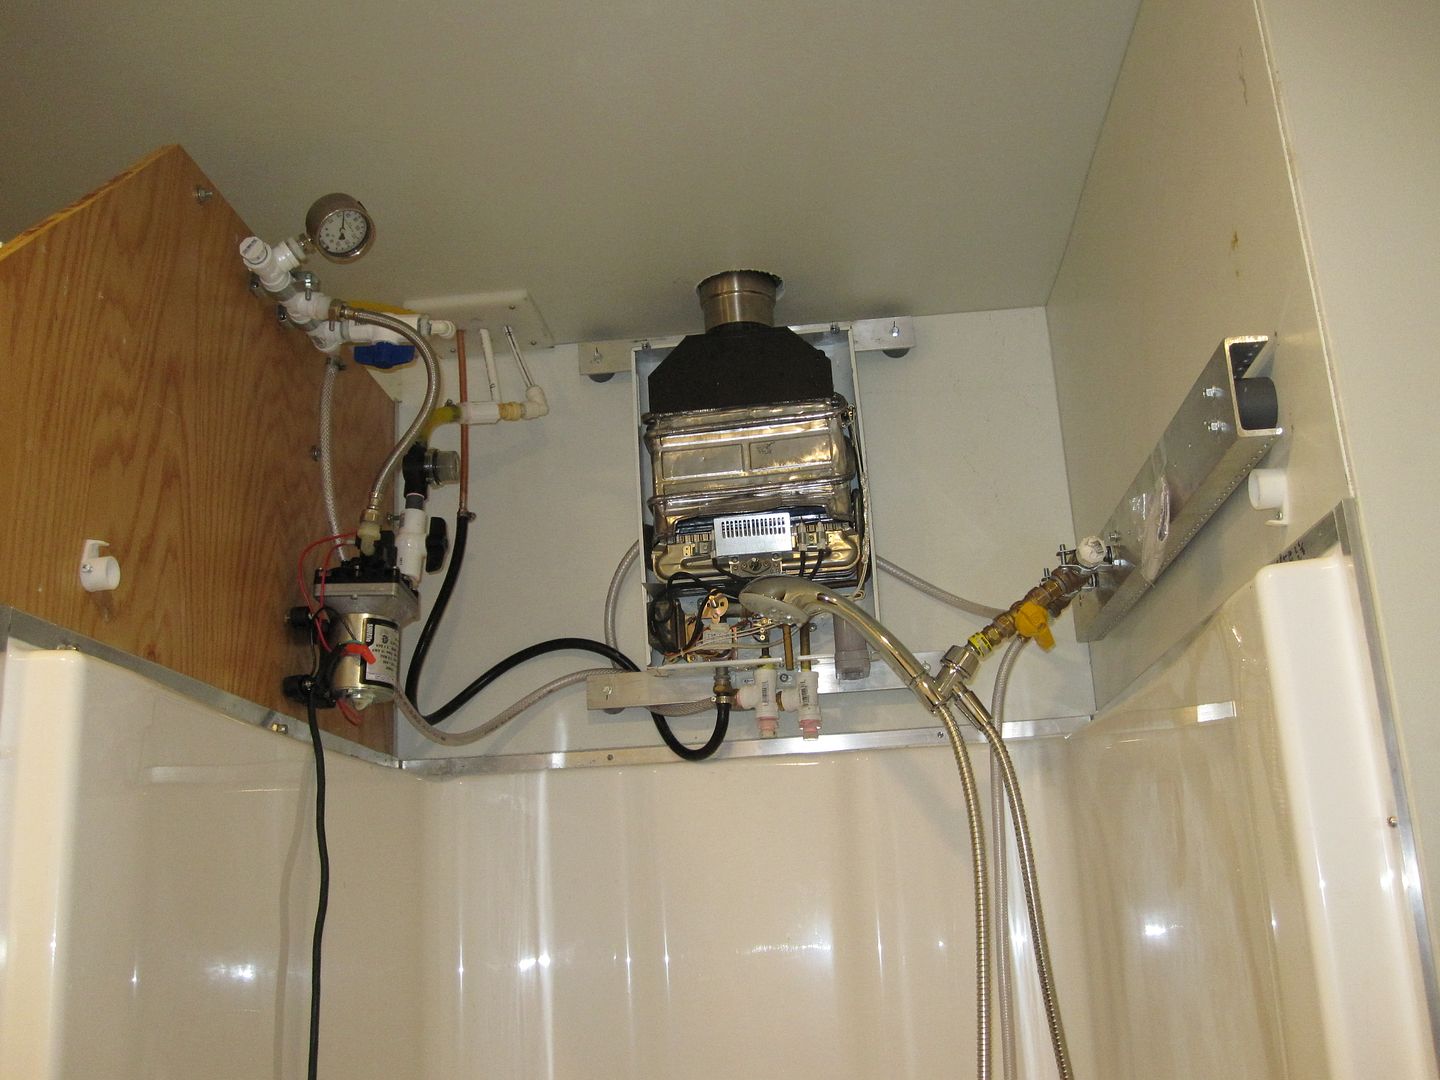
It's still being built at this point and not cleaned. I keep a folded painters cloth in the base to put a small stepladder on to work on the upper part without marking the base.... 
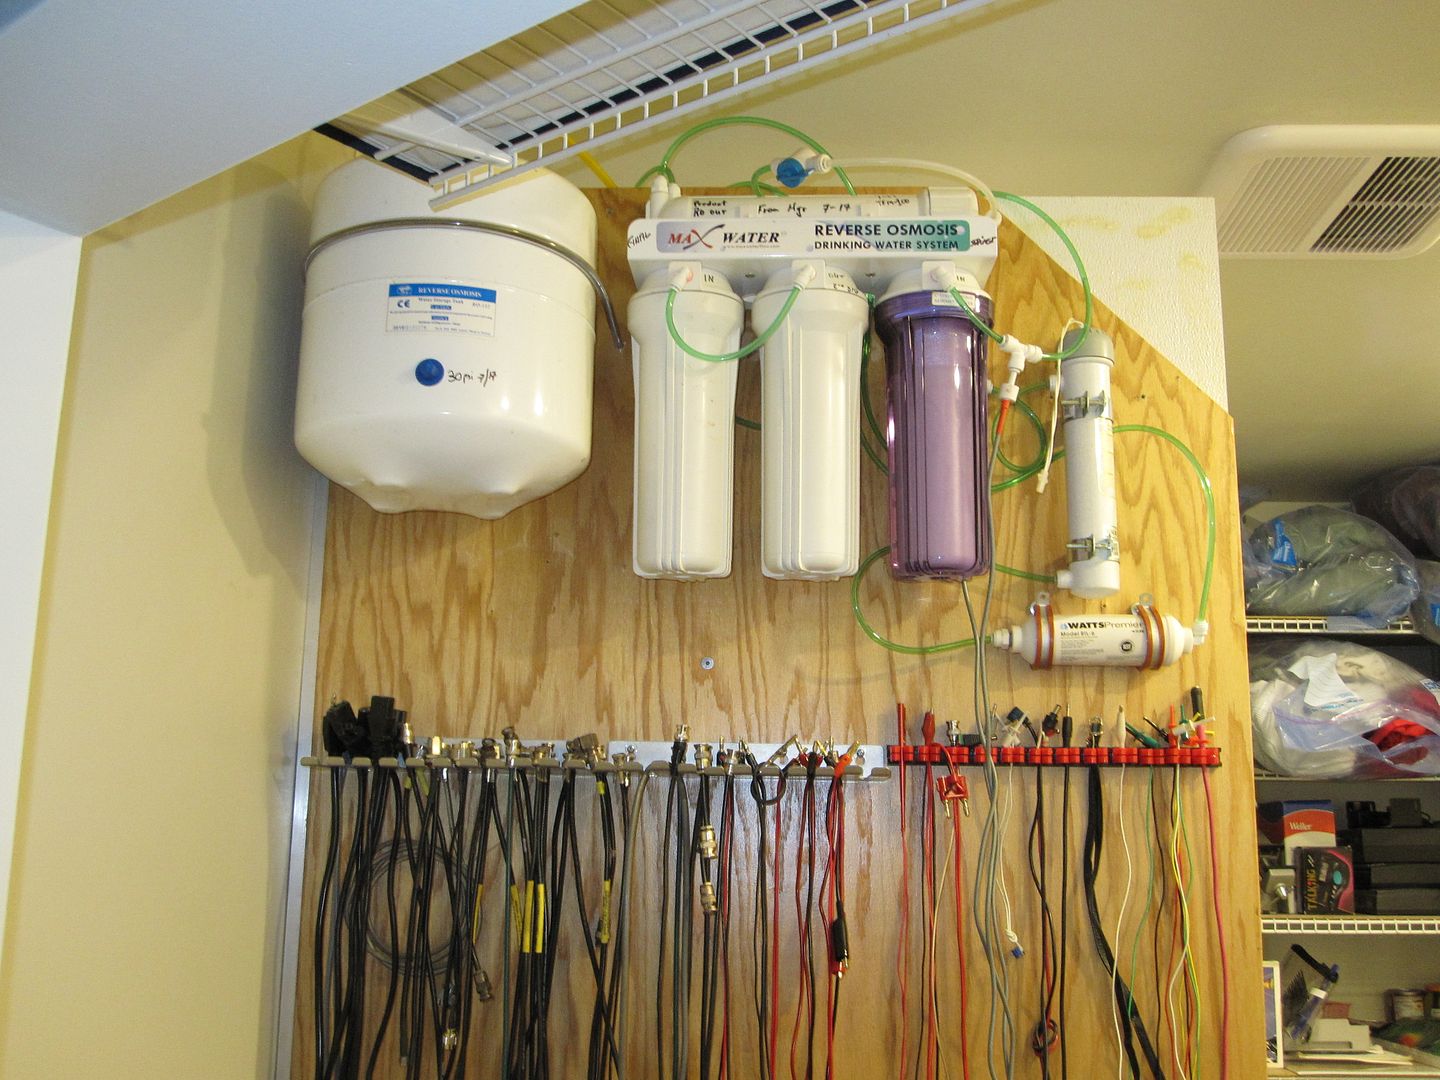
This is the RO water system, that I'm beginning to hook up now... It will have a booster pump and a UV sterilizer... The big accumulator tank that comes with a lot of under counter RO systems isn't used for RO (exactly), it serves to act as a buffer for the main 12 volt pump on the other side of the panel, so that water pressure is maintained and the pump only runs intermittently. A valve on the left manifold can isolate it. The UV sterilizer is on the right ---no more going to the hospital and almost bleeding to death... 
Everything will run on 12vdc, and I'll add a time delay timer to shut off power after a couple hours of non use. The 12 volt battery is temporary... |
|
|
|
[#39]
Popper went of a few days ago and split nicely, expect it made a lot of noise.
Have heard the bears 'calling' but they haven't been back. Now popper is deployed with extra bridle strings to ensure the bears can't get to the toileting system thru the vent. |
|
|
|
[#40]
Always interesting. I thought your hospital trip was C diff related? You believe it was in the water?
|
|
|
|
[#41]
Quoted:
Always interesting. I thought your hospital trip was C diff related? You believe it was in the water? Will expand later... Important for folks to be aware of this... |
|
|
|
[#42]
An inexpensive TDS meter can give early warning for contaminated water.
--------------------------- All my drinking water for the mountain location back then, was made in an RO system in the container. My SO made hers in the shop building or prime residence, cooled it and carried it up with us. It turned out after the fact--- my RO system was highly infected [saw rod shaped bacteria in saved samples] and the TDS was an unheard of ~20,000 vs. expected TDS of about 10 or 2. My SO checked it and I was completely shocked. This happened abt 7 days after I got out of the ER. Shipping container we live in and where that particular RO system used to be, gets over a hundred degrees some days when it is closed up. I almost bled to death, lost IIRC about 1/2+ of my blood, thanks to some slow thinking in the ER. I roughly measured it before going to ER and they did more exactly. Was losing consciousness [lost vision] and strongly insisted on a transfusion, and finally they did. It scares me to think of someone else like my SO and what might have happened. So, what caused the lower intestine bleeding issue? My docs couldn't find anything and I was scoped. Recovered quickly. Was talking to my scope doc earlier this year and he told me he told the ER doc to give a transfusion and can't figure out why he didn't order. He said they were scared. |
|
|
|
[#43]
Interestingly, I rebuilt the shipping container RO system a few weeks later with ALL NEW components.
Within a month the TDS reading was in the ~5000's. Reinfected. All I can figure is that some of the filters I stock were infected and I have a bunch of different ones so can't identify which ones. So I stripped it all out of the container and we just have the original system of carbon filter and ceramic filter units for prepping water to brush teeth, wash dishes, etc, and it's TDS is normal. Water TDS is frequently checked now at all systems. |
|
|
|
[#44]
Update on the compact showering and drinking water preparation experiment in the highly insulated metal stud room.
It's in service now and working great. We can make all the RO drinking water up here now and don't have to carry it up anymore. To minimize wasting water, all the preheated water is recirculated to the 130 gallon tank on top of the room. RO bypass water is recirculated the same way. That tank is replenished from others frequently. There's a cold water distribution manifold on the left and a warm water manifold on the right. The warm water manifold includes a valve to recirculate water back to the storage tank, avoiding waste. There's a TDS meter shown on the outer side and I'm thinking abt monitoring the TDS inter-stage on the RO system with another two probe meter --to detect any possible bacteria contamination and to identify where it started. We added a UVC sterilizer on the RO system output. There's two sprayers, a portable shower head and a sink sprayer, and both are handy. The accumulator tank buffers the water for the entire system. Hope others get some ideas from this work. Additional return water improvements have been made in the past few days since these photos were taken. Yet to be completed is the electrical system to manage the 2 pumps, the UVC filter and the timers. Everything runs on 12vdc incl an inverter to run the UVC lamp. More on this in a later post. The system is sort of complex and I and my SO get confused sometimes just taking a shower. 

|
|
|
|
[#45]
The toileting system had a problem last week.
The #1 macerator pump that empty's the pressure cooker under the toilet and transfers waste to the holding tank started slowing down and stopping. Turns out the pump has 4 brass threaded 10-32 studs about 3 and 4 inches long and 2 of them had corroded and failed. So I cleaned the impeller [hair], cut some new studs from a length of brass threaded 10-32 rod I had in spares, cleaned the housing that has cuts like long saw teeth to help the impeller chew up solids and semi-solids. Made a few engineering changes to the system while I had it apart and the pump runs like a scalded ape! Wish Photobucket could fix my pictures from coming and going. |
|
|
|
[#46]
Repaired macerator pump working well and pix are back.
Showering/RO systems have been revised upwards and are put to good use. Bear protection system put away. Happy days... |
|
|
|
[#47]
Added what I call a 'bubbler' altho there's no bubbles involved, to the showering system.
The RO portion of the system, has 'bypass' water that we don't want to waste. So, I connected the bypass [that normally would go down the drain] to a repurposed water bottle at the top and the bottom has a connector that goes thru a separate line to the storage tank on the top of the room. It's the cylinder with the red bottom... The bypass water restrictor is in the line to the top of the 'bubbler' and the flow is easily monitored and adjusted by watching the dripping in the cylinder. About 3 inches of water accumulates in the bottom due to the ~5 foot head pressure to the storage tank. 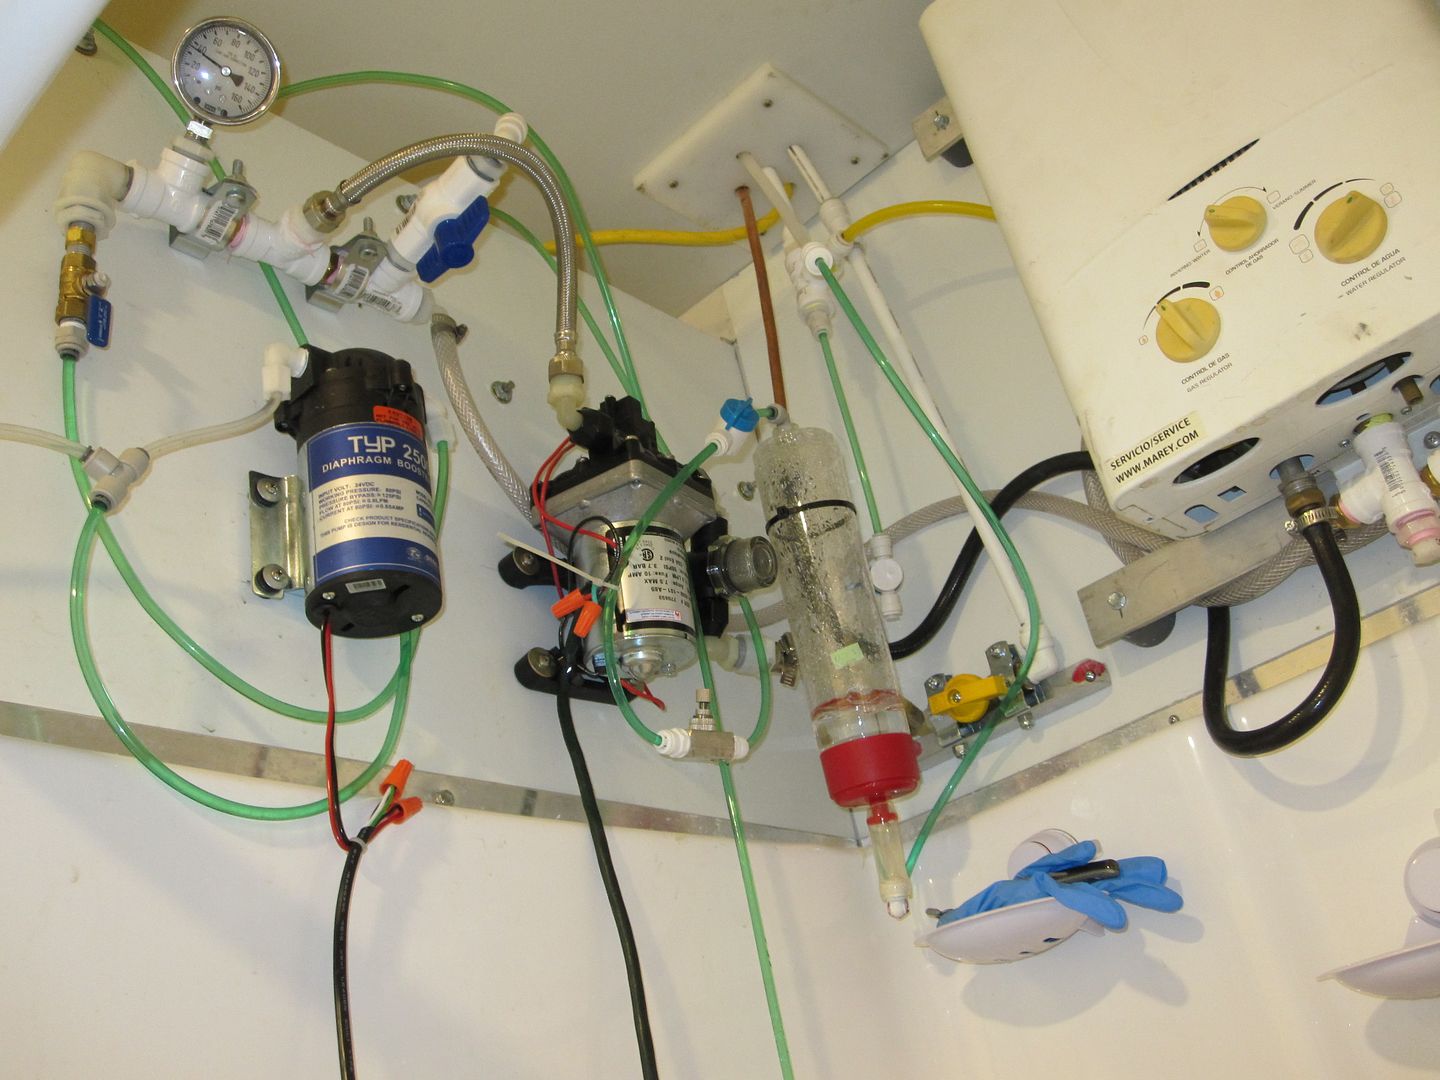
|
|
|
|
[#48]
I wondered how those 2 jerks in Boston built a bomb out of a pressure cooker...now I know
|
|
|
|
[#49]
Quoted:
I wondered how those 2 jerks in Boston built a bomb out of a pressure cooker...now I know This one has bombs dropped in it... |
|
|
|
[#50]
Have heard bears making their mooing noise for several days, but no tracks in our area I've seen.
Set up the electric fence around the toileting system to deter them from ripping the siding off the shipping container. SO has deployed Harbor Freight driveway alarms around the shipping container door so they can't surprise her at night like last time. |
|
|
 Win a FREE Membership!
Sign up for the ARFCOM weekly newsletter and be entered to win a free ARFCOM membership. One new winner* is announced every week!
You will receive an email every Friday morning featuring the latest chatter from the hottest topics, breaking news surrounding legislation, as well as exclusive deals only available to ARFCOM email subscribers.

AR15.COM is the world's largest firearm community and is a gathering place for firearm enthusiasts of all types.
From hunters and military members, to competition shooters and general firearm enthusiasts, we welcome anyone who values and respects the way of the firearm.

Subscribe to our monthly Newsletter to receive firearm news, product discounts from your favorite Industry Partners, and more.
Copyright © 1996-2024 AR15.COM LLC. All Rights Reserved.
Any use of this content without express written consent is prohibited.
AR15.Com reserves the right to overwrite or replace any affiliate, commercial, or monetizable links, posted by users, with our own.


