|
[#1]
Originally Posted By 4DAIVIPAI2K5:
Its molded for a retention hood to be added later if my buddy wants to add it later. [email=http://www.flickr.com/photos/40500049@N08/9497241773/]http://farm8.staticflickr.com/7382/9497241773_3c6ca8718a.jpg[/email] IMG_4448 by 4DAIVIPAI2K5, on Flickr That's pretty badass dude! |
|
|
|
IN, USA
|
[#2]
Originally Posted By Kirch:
Looking good! Do the above on the ejection port for sure. Just block those areas out in the furniture and you never have to worry losing definition from heating an area. Kirch Originally Posted By Kirch:
Originally Posted By 4DAIVIPAI2K5:
Originally Posted By LINK54:
Here is one that I made for a fellow officer. Still trying to perfect this but you guys have been a lot of help on here. <a href="http://s924.photobucket.com/user/masonmcneill/media/IMG_20130508_230325_278.jpg.html" target="_blank">http://i924.photobucket.com/albums/ad89/masonmcneill/IMG_20130508_230325_278.jpg</a> <a href="http://s924.photobucket.com/user/masonmcneill/media/IMG_20130508_230356_217.jpg.html" target="_blank">http://i924.photobucket.com/albums/ad89/masonmcneill/IMG_20130508_230356_217.jpg</a> I would take the retention off the ejection port and maybe pull some off of the trigger to make sure if over insertion happens the trigger wont move. Looking good! Do the above on the ejection port for sure. Just block those areas out in the furniture and you never have to worry losing definition from heating an area. Kirch OP you will also want to loosen the back side area above the slide lock/release to allow room for it to travel through that area. Kahr's are bad about catching there. Looks good though. |
|
|
|
[#3]
Originally Posted By millsusaf:
OP you will also want to loosen the back side area above the slide lock/release to allow room for it to travel through that area. Kahr's are bad about catching there. Looks good though. Originally Posted By millsusaf:
Originally Posted By Kirch:
Originally Posted By 4DAIVIPAI2K5:
Originally Posted By LINK54:
Here is one that I made for a fellow officer. Still trying to perfect this but you guys have been a lot of help on here. <a href="http://s924.photobucket.com/user/masonmcneill/media/IMG_20130508_230325_278.jpg.html" target="_blank">http://i924.photobucket.com/albums/ad89/masonmcneill/IMG_20130508_230325_278.jpg</a> <a href="http://s924.photobucket.com/user/masonmcneill/media/IMG_20130508_230356_217.jpg.html" target="_blank">http://i924.photobucket.com/albums/ad89/masonmcneill/IMG_20130508_230356_217.jpg</a> I would take the retention off the ejection port and maybe pull some off of the trigger to make sure if over insertion happens the trigger wont move. Looking good! Do the above on the ejection port for sure. Just block those areas out in the furniture and you never have to worry losing definition from heating an area. Kirch OP you will also want to loosen the back side area above the slide lock/release to allow room for it to travel through that area. Kahr's are bad about catching there. Looks good though. Good catch. I have blocks of wood that I cut then save for molding things like that. Sight channels, take down pins, slide release, ejection ports, lights. Would be surprised how many work for different pistols. I've got a dual mag appendix holster that I working on. Trying to figure out how I want to finish the bottom edge. It kinda neat been working on it for what seems like forever, been at least a month and a half lol Hoping to have it finished soon. Also have a single appendix that I think will be neato. |
|
|
|
|
[#4]
Originally Posted By 4DAIVIPAI2K5:
Good catch. I have blocks of wood that I cut then save for molding things like that. Sight channels, take down pins, slide release, ejection ports, lights. Would be surprised how many work for different pistols. I've got a dual mag appendix holster that I working on. Trying to figure out how I want to finish the bottom edge. It kinda neat been working on it for what seems like forever, been at least a month and a half lol Hoping to have it finished soon. Also have a single appendix that I think will be neato. Originally Posted By 4DAIVIPAI2K5:
Originally Posted By millsusaf:
Originally Posted By Kirch:
Originally Posted By 4DAIVIPAI2K5:
Originally Posted By LINK54:
Here is one that I made for a fellow officer. Still trying to perfect this but you guys have been a lot of help on here. <a href="http://s924.photobucket.com/user/masonmcneill/media/IMG_20130508_230325_278.jpg.html" target="_blank">http://i924.photobucket.com/albums/ad89/masonmcneill/IMG_20130508_230325_278.jpg</a> <a href="http://s924.photobucket.com/user/masonmcneill/media/IMG_20130508_230356_217.jpg.html" target="_blank">http://i924.photobucket.com/albums/ad89/masonmcneill/IMG_20130508_230356_217.jpg</a> I would take the retention off the ejection port and maybe pull some off of the trigger to make sure if over insertion happens the trigger wont move. Looking good! Do the above on the ejection port for sure. Just block those areas out in the furniture and you never have to worry losing definition from heating an area. Kirch OP you will also want to loosen the back side area above the slide lock/release to allow room for it to travel through that area. Kahr's are bad about catching there. Looks good though. Good catch. I have blocks of wood that I cut then save for molding things like that. Sight channels, take down pins, slide release, ejection ports, lights. Would be surprised how many work for different pistols. I've got a dual mag appendix holster that I working on. Trying to figure out how I want to finish the bottom edge. It kinda neat been working on it for what seems like forever, been at least a month and a half lol Hoping to have it finished soon. Also have a single appendix that I think will be neato. That's sounds cool and I can't wait to see it. I've been checking out your work and you put together some top tier holsters! |
|
|
|
|
[#5]
Originally Posted By bobapunk:
Yeah, just call and talk to Megaan or Danny. Just did a quick cleanup of all the Kydex dust in my garage. This is where most of my holsters come together. The measuring, cutting, heating, and pressing happens elsewhere. <a href="http://s603.photobucket.com/user/bobapunk/media/NICKydex%20Holsters/IMG_20130704_152928_zpse3379a8e.jpg.html" target="_blank">http://i603.photobucket.com/albums/tt117/bobapunk/NICKydex%20Holsters/IMG_20130704_152928_zpse3379a8e.jpg</a> Originally Posted By bobapunk:
Yeah, just call and talk to Megaan or Danny. Originally Posted By 4DAIVIPAI2K5:
for those ordering from index, are you simply calling them tell them what you want from looking at knifekits webpage for a reference? How much cheaper is their stuff compared to knifekits? Just did a quick cleanup of all the Kydex dust in my garage. This is where most of my holsters come together. The measuring, cutting, heating, and pressing happens elsewhere. <a href="http://s603.photobucket.com/user/bobapunk/media/NICKydex%20Holsters/IMG_20130704_152928_zpse3379a8e.jpg.html" target="_blank">http://i603.photobucket.com/albums/tt117/bobapunk/NICKydex%20Holsters/IMG_20130704_152928_zpse3379a8e.jpg</a> Dude, I want your work space. Wait until you see where I do my work. I'll post a pic when I get home so you all can laugh. |
|
|
|
|
[#6]
Had a big message typed... computer screwed up..... screw it lol
|
|
|
|
|
[Last Edit: bobapunk]
[#7]
Originally Posted By Kirch: Dude, I want your work space. Wait until you see where I do my work. I'll post a pic when I get home so you all can laugh. Originally Posted By Kirch: Originally Posted By bobapunk: Yeah, just call and talk to Megaan or Danny. Originally Posted By 4DAIVIPAI2K5: for those ordering from index, are you simply calling them tell them what you want from looking at knifekits webpage for a reference? How much cheaper is their stuff compared to knifekits? Just did a quick cleanup of all the Kydex dust in my garage. This is where most of my holsters come together. The measuring, cutting, heating, and pressing happens elsewhere. <a href="http://s603.photobucket.com/user/bobapunk/media/NICKydex%20Holsters/IMG_20130704_152928_zpse3379a8e.jpg.html" target="_blank">http://i603.photobucket.com/albums/tt117/bobapunk/NICKydex%20Holsters/IMG_20130704_152928_zpse3379a8e.jpg</a> Dude, I want your work space. Wait until you see where I do my work. I'll post a pic when I get home so you all can laugh. Yeah, its not bad. I am moving within a year though. I am looking for a good workspace and enough land for a shooting range!  Here is a property I am considering:   It has this in the backyard:  |
|
|
|
|
[#8]
Originally Posted By bobapunk:
Yeah, its not bad. I am moving within a year though. I am looking for a good workspace and enough land for a shooting range!
Here is a property I am considering: <a href="http://s603.photobucket.com/user/bobapunk/media/Location01_zps5f4bec7a.png.html" target="_blank">http://i603.photobucket.com/albums/tt117/bobapunk/Location01_zps5f4bec7a.png</a> <a href="http://s603.photobucket.com/user/bobapunk/media/Location02_zps7f0bb4d7.png.html" target="_blank">http://i603.photobucket.com/albums/tt117/bobapunk/Location02_zps7f0bb4d7.png</a> It has this in the backyard: http://p.rdcpix.com/v03/l72fd3144-m3x.jpg Originally Posted By bobapunk:
Originally Posted By Kirch:
Originally Posted By bobapunk:
Yeah, just call and talk to Megaan or Danny. Originally Posted By 4DAIVIPAI2K5:
for those ordering from index, are you simply calling them tell them what you want from looking at knifekits webpage for a reference? How much cheaper is their stuff compared to knifekits? Just did a quick cleanup of all the Kydex dust in my garage. This is where most of my holsters come together. The measuring, cutting, heating, and pressing happens elsewhere. <a href="http://s603.photobucket.com/user/bobapunk/media/NICKydex%20Holsters/IMG_20130704_152928_zpse3379a8e.jpg.html" target="_blank">http://i603.photobucket.com/albums/tt117/bobapunk/NICKydex%20Holsters/IMG_20130704_152928_zpse3379a8e.jpg</a> Dude, I want your work space. Wait until you see where I do my work. I'll post a pic when I get home so you all can laugh. Yeah, its not bad. I am moving within a year though. I am looking for a good workspace and enough land for a shooting range!
Here is a property I am considering: <a href="http://s603.photobucket.com/user/bobapunk/media/Location01_zps5f4bec7a.png.html" target="_blank">http://i603.photobucket.com/albums/tt117/bobapunk/Location01_zps5f4bec7a.png</a> <a href="http://s603.photobucket.com/user/bobapunk/media/Location02_zps7f0bb4d7.png.html" target="_blank">http://i603.photobucket.com/albums/tt117/bobapunk/Location02_zps7f0bb4d7.png</a> It has this in the backyard: http://p.rdcpix.com/v03/l72fd3144-m3x.jpg That would be perfect for all gun related hobbies. We I get out of Alaska and back down south I would love to find a place like that. I'll get my pics up soon. |
|
|
|
|
[#9]
Tagging this for later. Gonna be a new hobby because I can't get holsters for so,e of my stuff
|
|
|
|
|
[#10]
Originally Posted By Snaps:
Tagging this for later. Gonna be a new hobby because I can't get holsters for so,e of my stuff Welcome to the fold. Lot of good info here. |
|
|
|
OK, USA
|
[#11]
Finally figured out how to do the whole picture thing haha,
Second one I made, as you guys can see I left a lot of excess material on when I first started. This sucker almost had wings!http://i924.photobucket.com/albums/ad89/masonmcneill/ResizedImage_1363221521299.jpg And another early holster, also very wide. http://i924.photobucket.com/albums/ad89/masonmcneill/IMG_5105.jpg |
|
|
OK, USA
|
[#13]
Knocked these out today. Belt loops are something I just can't seem to get right, I think I will try ordering some of those pre-made ones you guys keep talking about.
http://i924.photobucket.com/albums/ad89/masonmcneill/IMG_20130821_173821_180.jpg http://i924.photobucket.com/albums/ad89/masonmcneill/IMG_20130821_173832_268.jpg I don't particularly like the open muzzle but the owner wanted it so that he could carry all of his Glocks with the same holster. Seems like a good way to unholster your pistol by accident if you bump the muzzle on a chair or something. |
|
|
|
[Last Edit: 4DAIVIPAI2K5]
[#14]
Originally Posted By LINK54:
Knocked these out today. Belt loops are something I just can't seem to get right, I think I will try ordering some of those pre-made ones you guys keep talking about. <a href="http://s924.photobucket.com/user/masonmcneill/media/IMG_20130821_173821_180.jpg.html" target="_blank">http://i924.photobucket.com/albums/ad89/masonmcneill/IMG_20130821_173821_180.jpg</a> <a href="http://s924.photobucket.com/user/masonmcneill/media/IMG_20130821_173832_268.jpg.html" target="_blank">http://i924.photobucket.com/albums/ad89/masonmcneill/IMG_20130821_173832_268.jpg</a> I don't particularly like the open muzzle but the owner wanted it so that he could carry all of his Glocks with the same holster. Seems like a good way to unholster your pistol by accident if you bump the muzzle on a chair or something. Make a simple jig for belt loops, and grab a can of compressed air. Mine is two pieces of furring strips mounted to a piece of plywood. They are set the width of my loops plus the thickness of the kydex apart. I heat the kydex then take another peice of wood cut to the size of the loop I want and wrap the kydex around it put it in the the jig. Then hit it hit compress air turned upside down to instantly harden the kydex. All done. Once I cut my strips and sand my loops, they take all of about 25 sec for 2 and most of that is just making sure I have them even, to mold then Im off to drilling. I did finished a neat little dual mag appendix rig. I dont have any good pictures but I'll post up some shitty cell pics sometime soon. Also in the process a light bearing ambidextrous with retention adjustment appendix rig for a fella. Hoping to finish it tomorrow afternoon. Just have to put it threw my 5 stages of sanding/polishing, and drill the ride height adjustments into the belt loops. |
|
|
|
|
[Last Edit: 4DAIVIPAI2K5]
[#15]
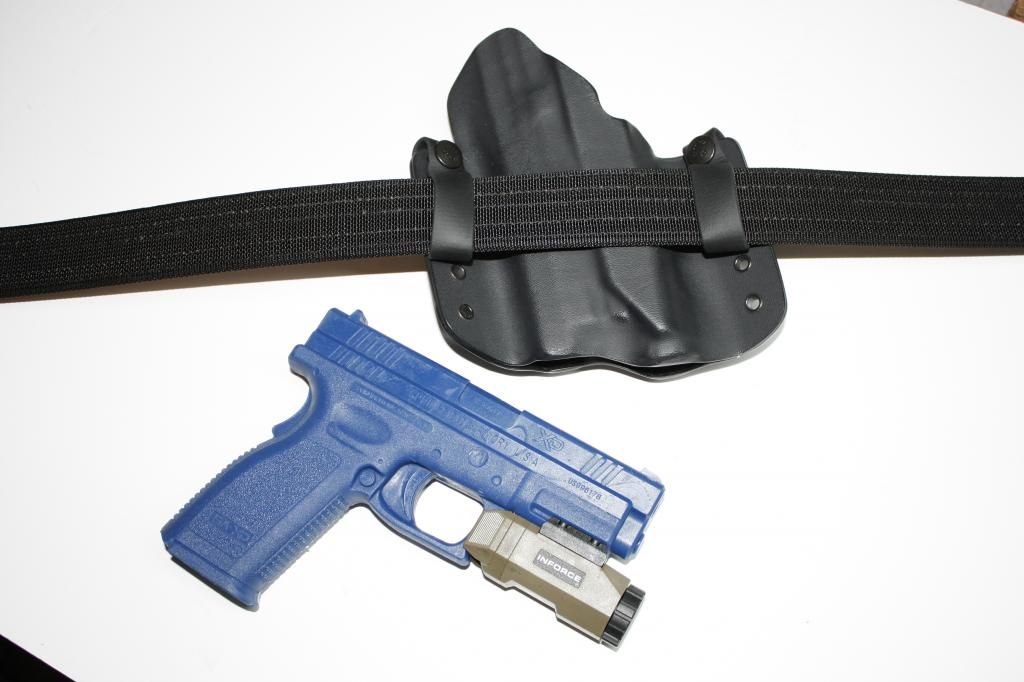
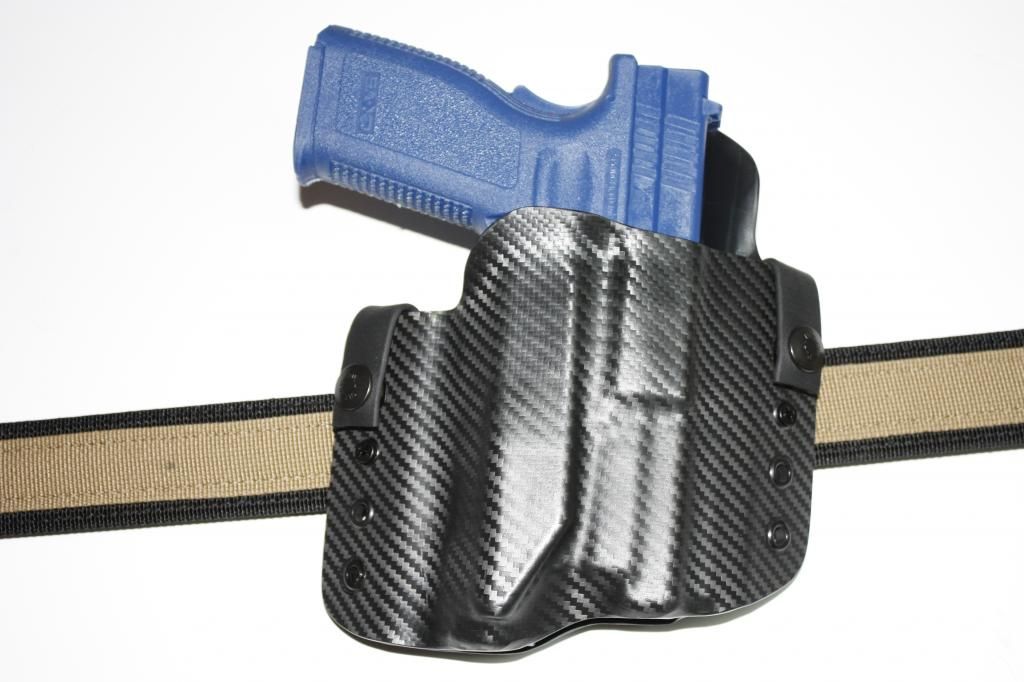
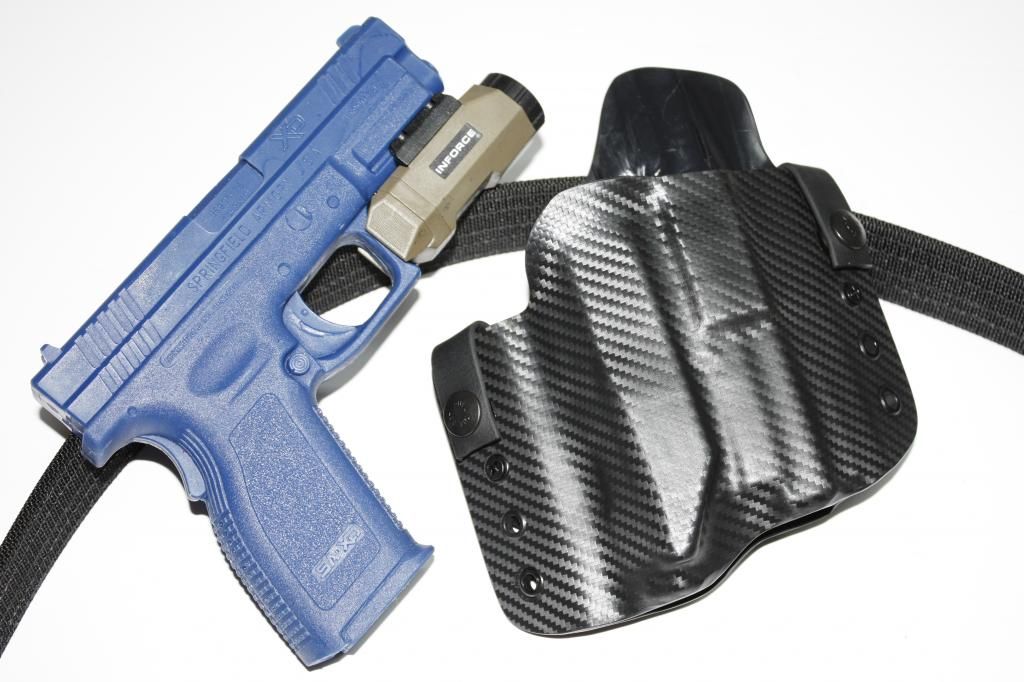
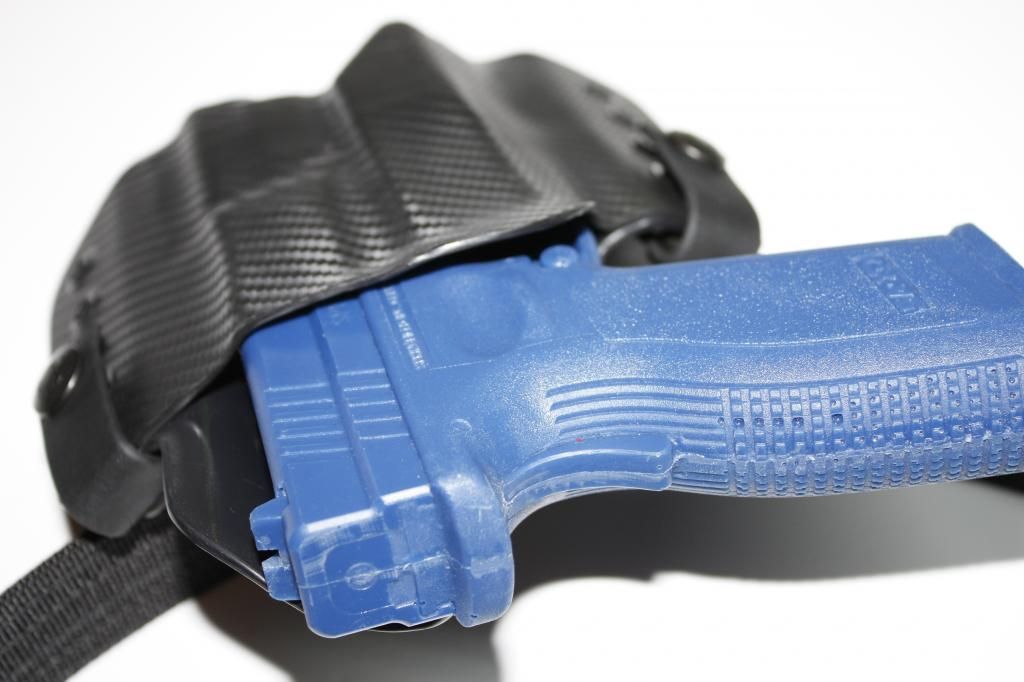
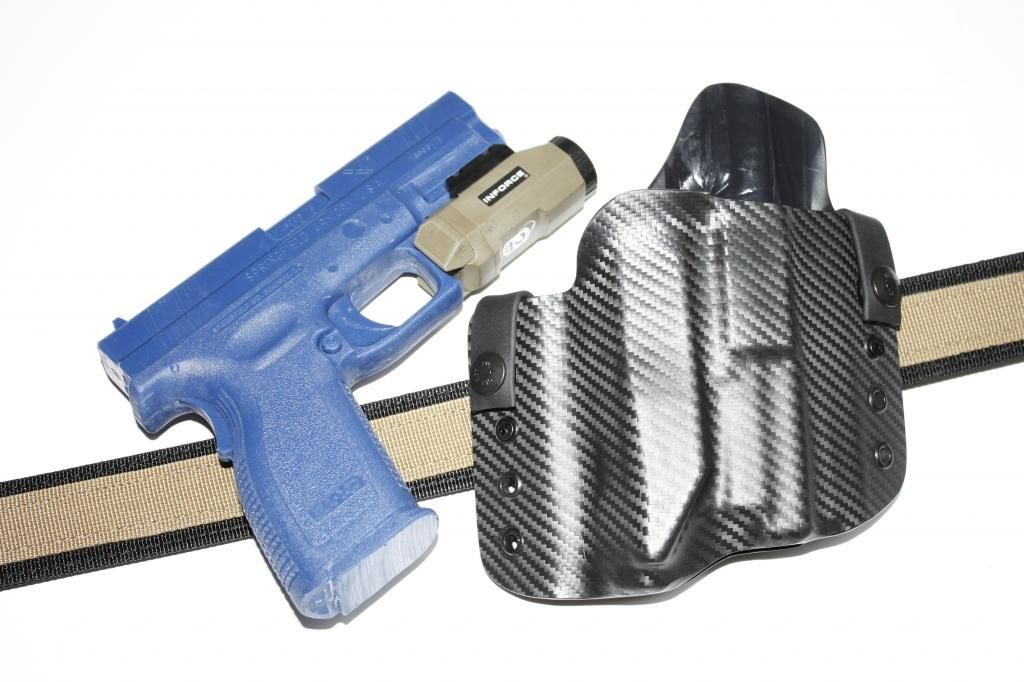
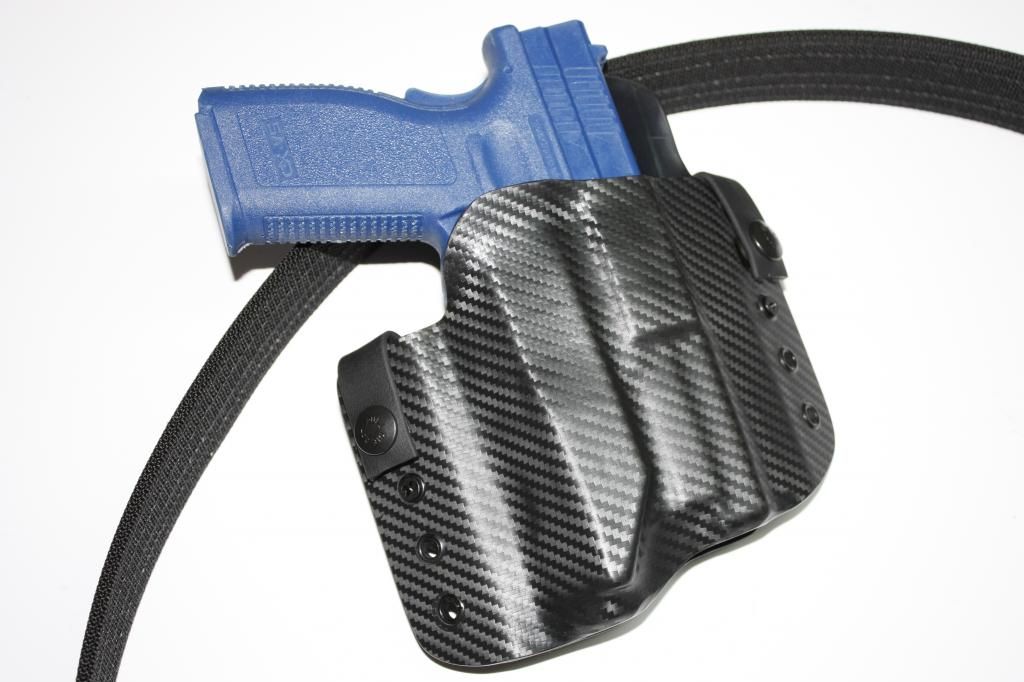
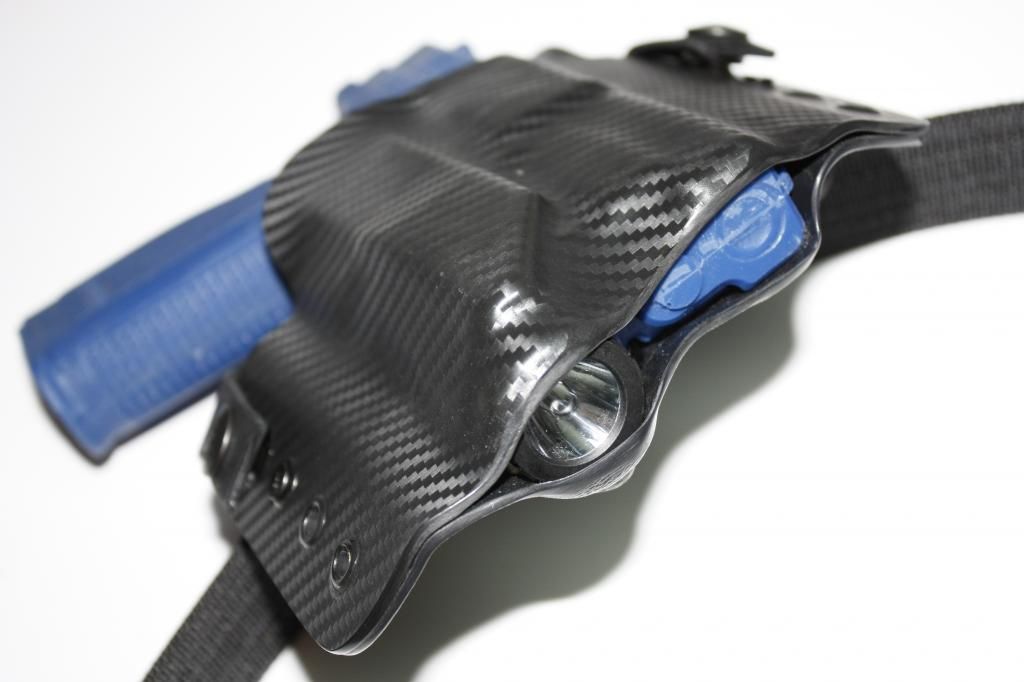
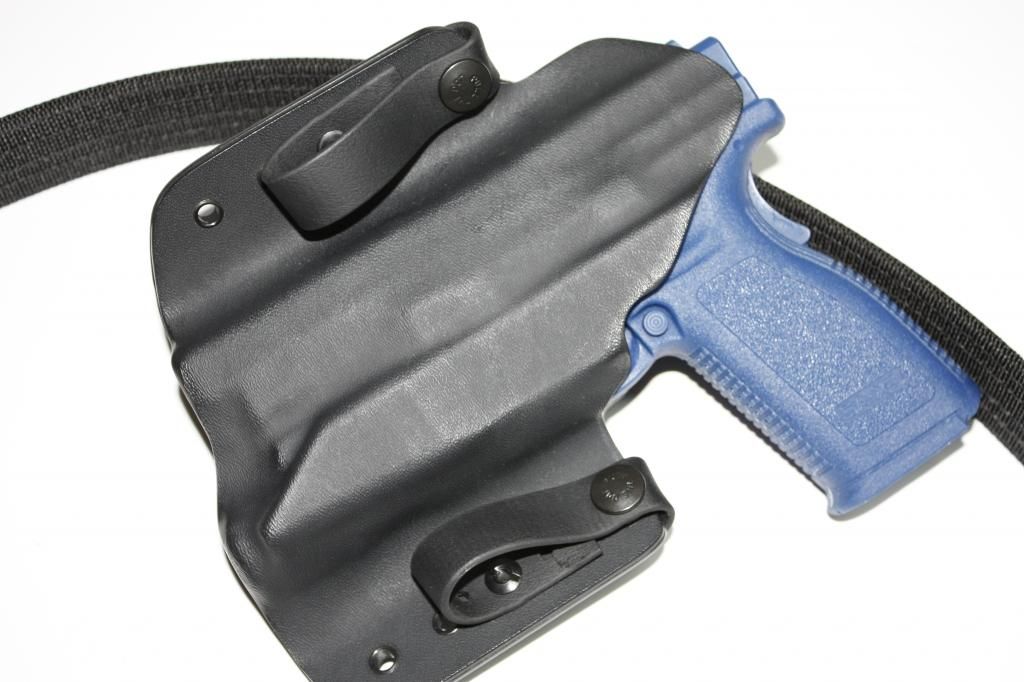
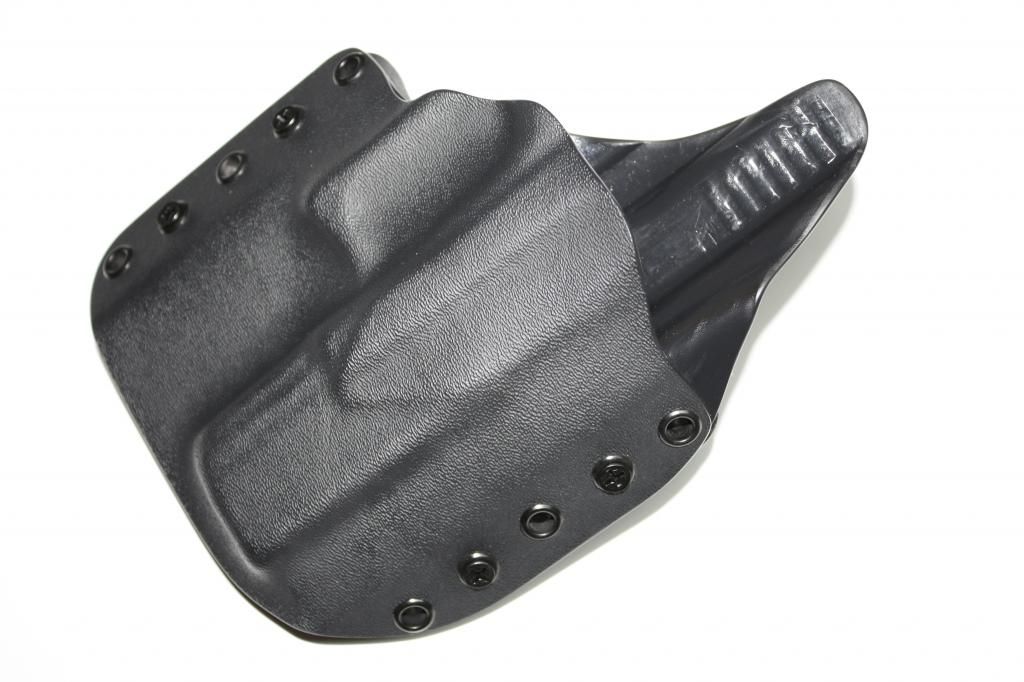
G19 appendix rig with Inforce APL. Adjustable retention, adjustable ride height. If I do my normal loops instead of this J hook style its made to wear OWB also.

_MG_4585 by 4DAIVIPAI2K5, on Flickr 
_MG_4589 by 4DAIVIPAI2K5, on Flickr Doesnt need to light to be holstered 
_MG_4586 by 4DAIVIPAI2K5, on Flickr |
|
|
|
OK, USA
|
[#16]
Originally Posted By 4DAIVIPAI2K5:
Make a simple jig for belt loops, and grab a can of compressed air. Mine is two pieces of furring strips mounted to a piece of plywood. They are set the width of my loops plus the thickness of the kydex apart. I heat the kydex then take another peice of wood cut to the size of the loop I want and wrap the kydex around it put it in the the jig. Then hit it hit compress air turned upside down to instantly harden the kydex. All done. Once I cut my strips and sand my loops, they take all of about 25 sec for 2 and most of that is just making sure I have them even, to mold then Im off to drilling. I did finished a neat little dual mag appendix rig. I dont have any good pictures but I'll post up some shitty cell pics sometime soon. Also in the process a light bearing ambidextrous with retention adjustment appendix rig for a fella. Hoping to finish it tomorrow afternoon. Just have to put it threw my 5 stages of sanding/polishing, and drill the ride height adjustments into the belt loops. Originally Posted By 4DAIVIPAI2K5:
Originally Posted By LINK54:
Knocked these out today. Belt loops are something I just can't seem to get right, I think I will try ordering some of those pre-made ones you guys keep talking about. <a href="http://s924.photobucket.com/user/masonmcneill/media/IMG_20130821_173821_180.jpg.html" target="_blank">http://i924.photobucket.com/albums/ad89/masonmcneill/IMG_20130821_173821_180.jpg</a> <a href="http://s924.photobucket.com/user/masonmcneill/media/IMG_20130821_173832_268.jpg.html" target="_blank">http://i924.photobucket.com/albums/ad89/masonmcneill/IMG_20130821_173832_268.jpg</a> I don't particularly like the open muzzle but the owner wanted it so that he could carry all of his Glocks with the same holster. Seems like a good way to unholster your pistol by accident if you bump the muzzle on a chair or something. Make a simple jig for belt loops, and grab a can of compressed air. Mine is two pieces of furring strips mounted to a piece of plywood. They are set the width of my loops plus the thickness of the kydex apart. I heat the kydex then take another peice of wood cut to the size of the loop I want and wrap the kydex around it put it in the the jig. Then hit it hit compress air turned upside down to instantly harden the kydex. All done. Once I cut my strips and sand my loops, they take all of about 25 sec for 2 and most of that is just making sure I have them even, to mold then Im off to drilling. I did finished a neat little dual mag appendix rig. I dont have any good pictures but I'll post up some shitty cell pics sometime soon. Also in the process a light bearing ambidextrous with retention adjustment appendix rig for a fella. Hoping to finish it tomorrow afternoon. Just have to put it threw my 5 stages of sanding/polishing, and drill the ride height adjustments into the belt loops. I will definitely try the compressed air. I have a jig already made but I still don't get quite the results I want. Thats some pretty good work. |
|
|
|
[#17]
Originally Posted By 4DAIVIPAI2K5:
G19 appendix rig with Inforce APL. Adjustable retention, adjustable ride height. If I do my normal loops instead of this J hook style its made to wear OWB also. [email=http://www.flickr.com/photos/40500049@N08/9571475637/]http://farm4.staticflickr.com/3804/9571475637_96ac62fc67.jpg[/email] _MG_4585 by 4DAIVIPAI2K5, on Flickr [email=http://www.flickr.com/photos/40500049@N08/9571468877/]http://farm4.staticflickr.com/3814/9571468877_0b40f70bea.jpg[/email] _MG_4589 by 4DAIVIPAI2K5, on Flickr Doesnt need to light to be holstered [email=http://www.flickr.com/photos/40500049@N08/9571472133/]http://farm4.staticflickr.com/3721/9571472133_a5a715c71e.jpg[/email] _MG_4586 by 4DAIVIPAI2K5, on Flickr That's a neat design |
|
|
|
|
[#18]
Originally Posted By bg10:
That's a neat design Originally Posted By bg10:
Originally Posted By 4DAIVIPAI2K5:
G19 appendix rig with Inforce APL. Adjustable retention, adjustable ride height. If I do my normal loops instead of this J hook style its made to wear OWB also. [email=http://www.flickr.com/photos/40500049@N08/9571475637/]http://farm4.staticflickr.com/3804/9571475637_96ac62fc67.jpg[/email] _MG_4585 by 4DAIVIPAI2K5, on Flickr [email=http://www.flickr.com/photos/40500049@N08/9571468877/]http://farm4.staticflickr.com/3814/9571468877_0b40f70bea.jpg[/email] _MG_4589 by 4DAIVIPAI2K5, on Flickr Doesnt need to light to be holstered [email=http://www.flickr.com/photos/40500049@N08/9571472133/]http://farm4.staticflickr.com/3721/9571472133_a5a715c71e.jpg[/email] _MG_4586 by 4DAIVIPAI2K5, on Flickr That's a neat design Thanks. Guy wanted it cut like an incog so thats what I did. |
|
|
|
|
[#19]
Originally Posted By 4DAIVIPAI2K5:
Thanks. Guy wanted it cut like an incog so thats what I did. That's a good looking stipple job. Did you do that? |
|
|
|
|
[#20]
Yeah. took the finger grooves off, under cut the trigger guard,flared the magwell and put a relief to rig the mag out then stippled it.
|
|
|
|
|
[#21]
|
|
|
|
|
[#22]
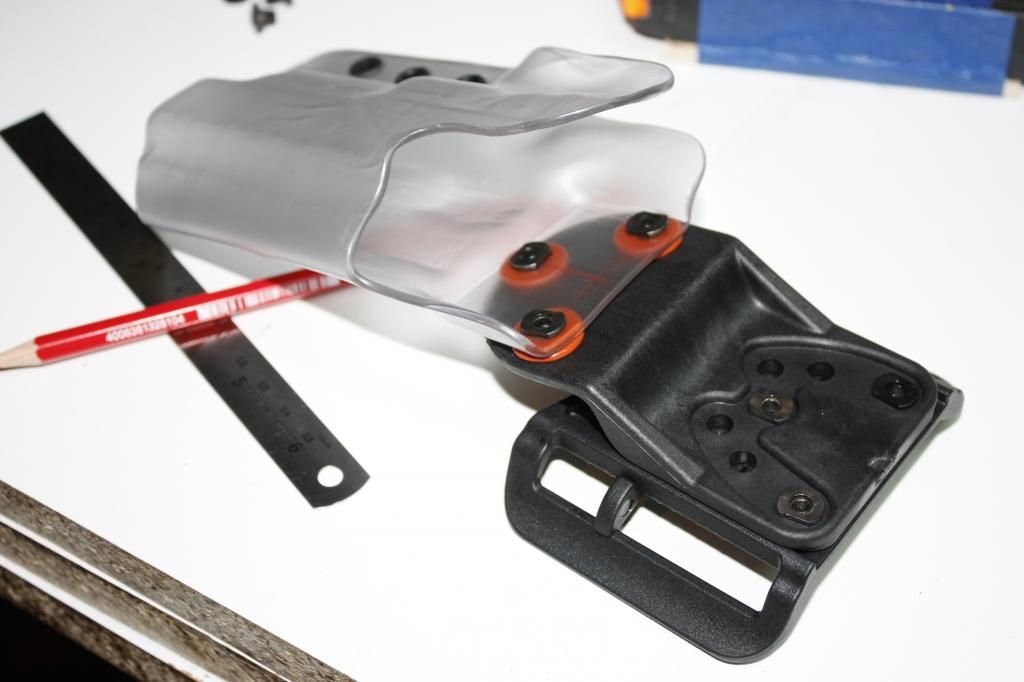
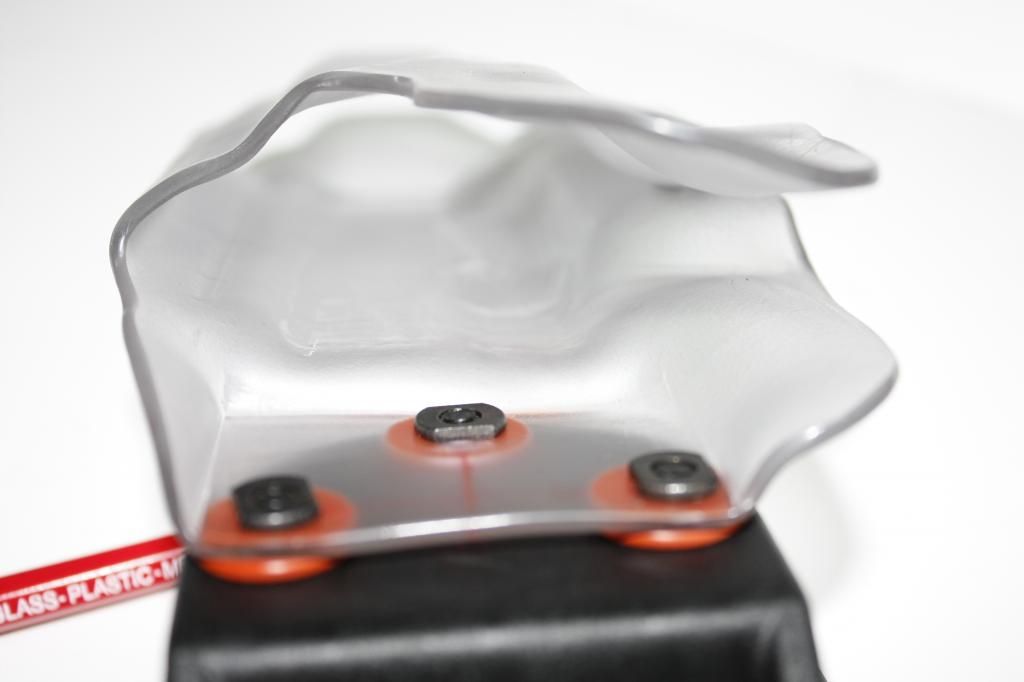
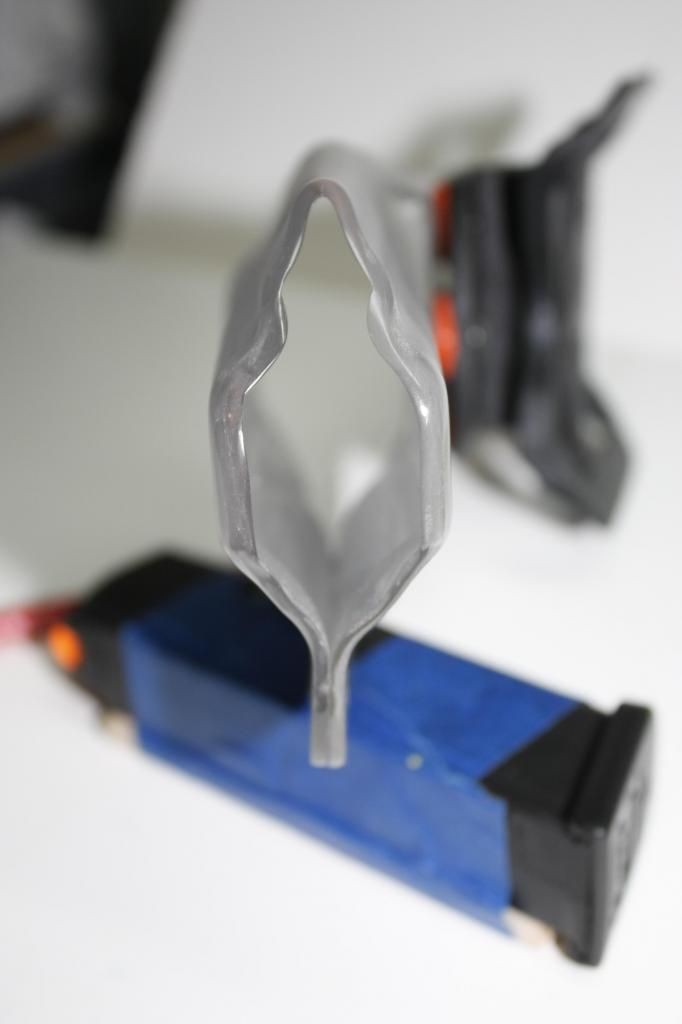
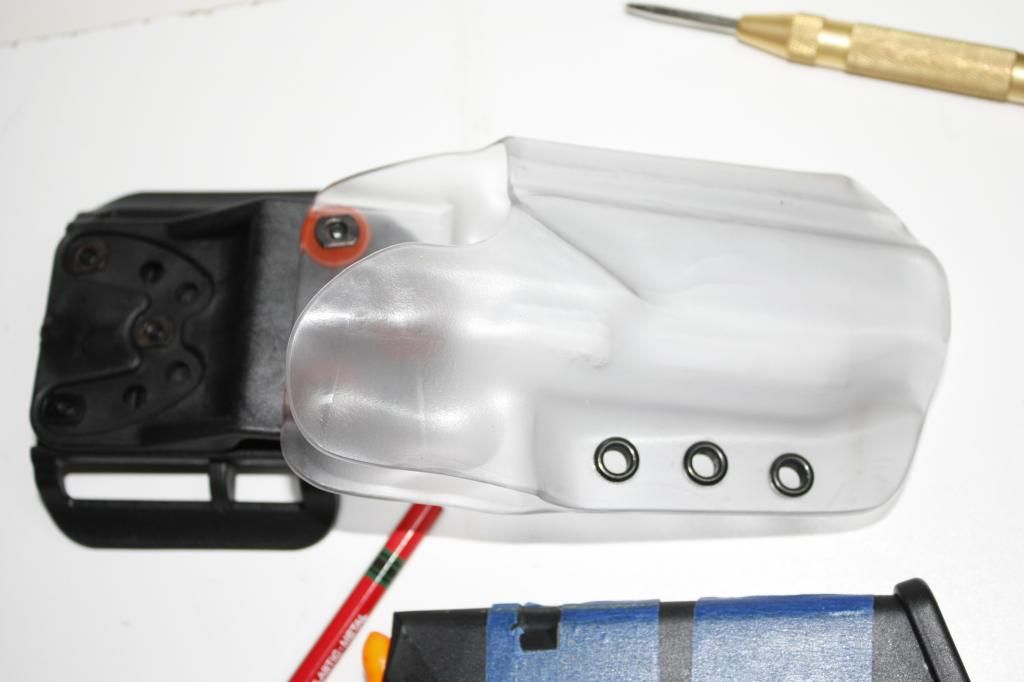
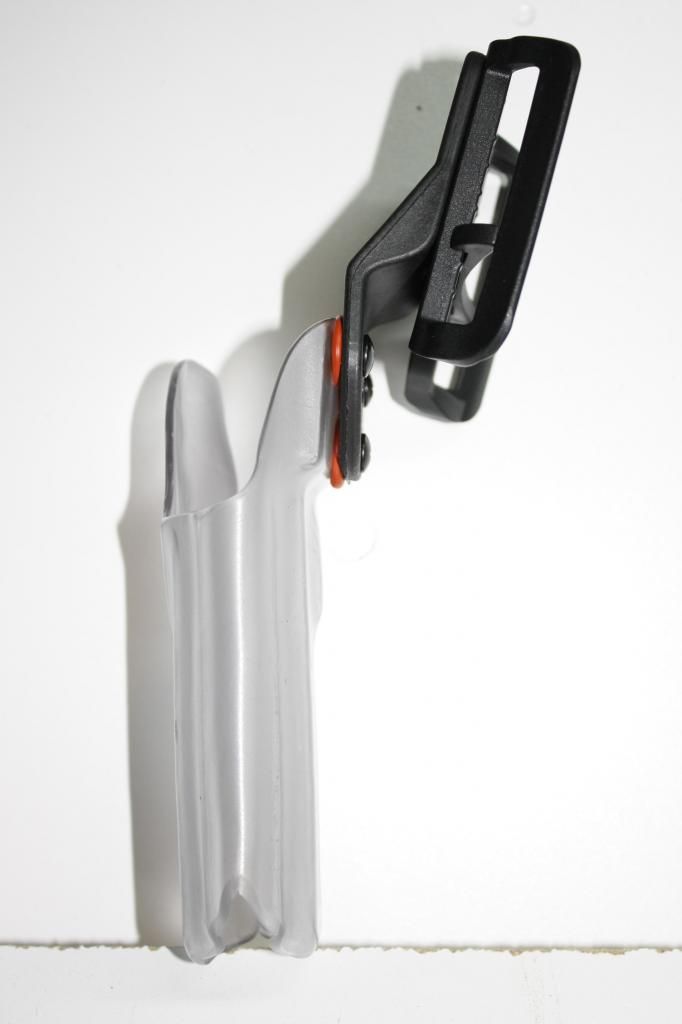
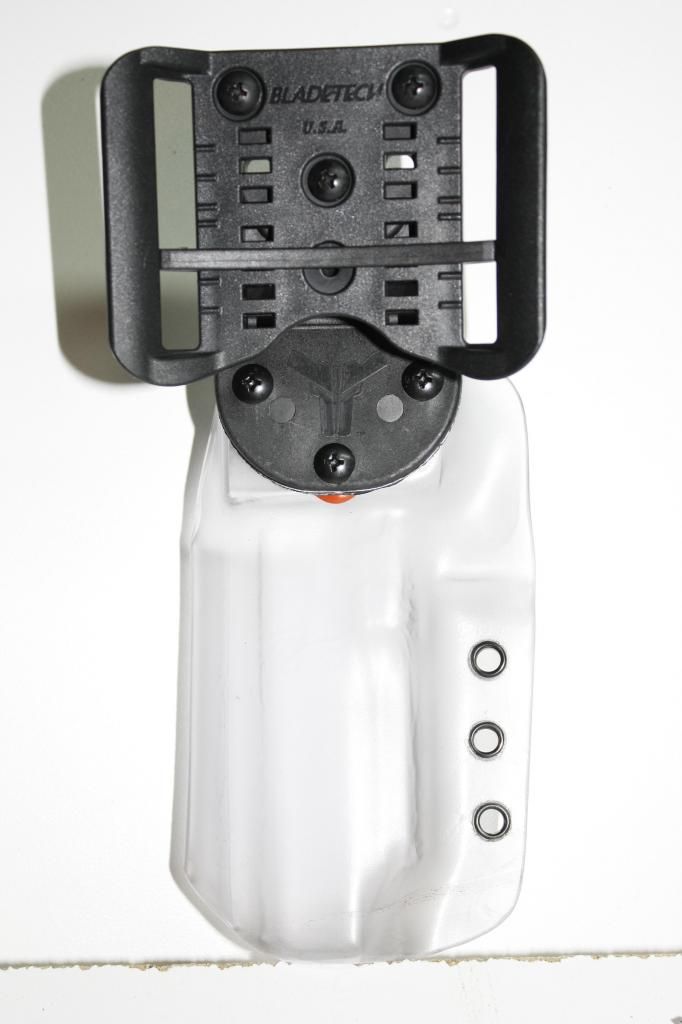
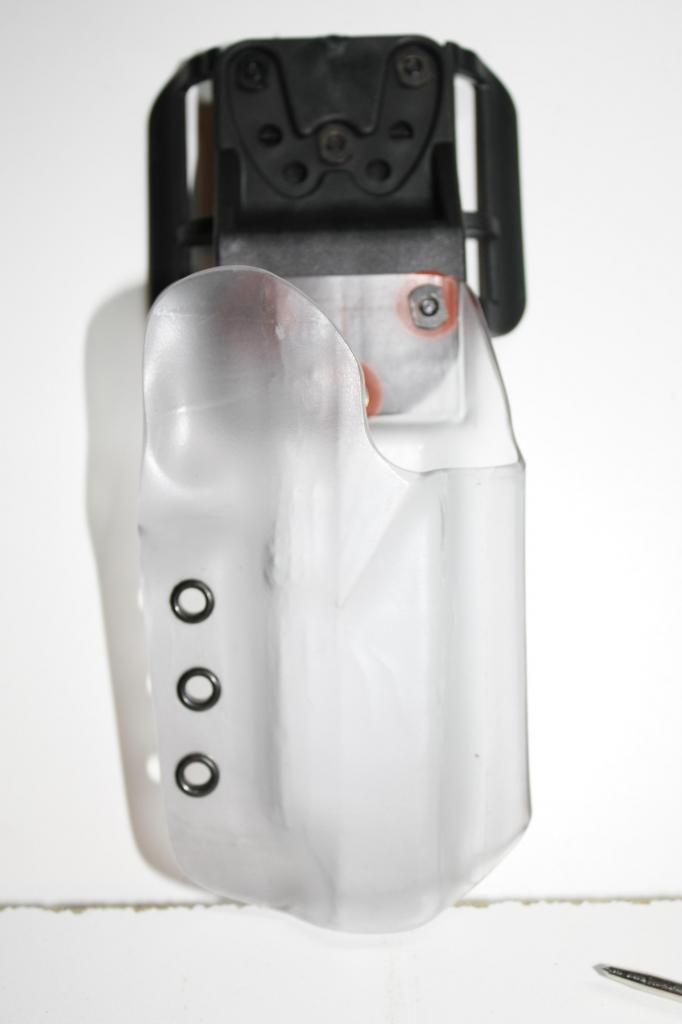
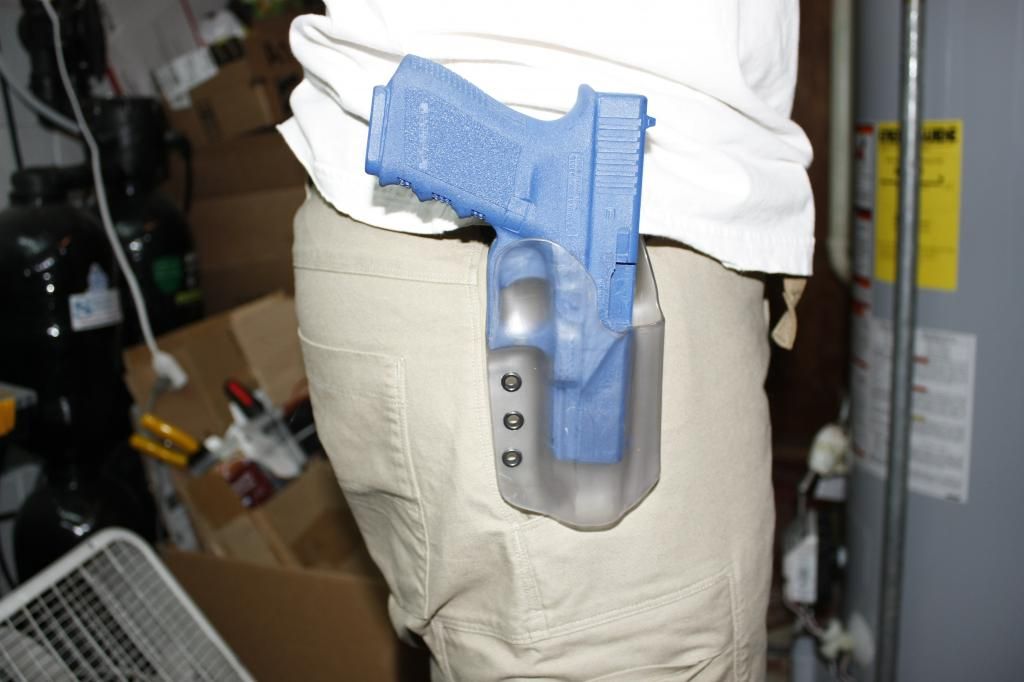
Originally Posted By bobapunk: "Mirage" competition cut holster for a Glock 34 on a Bladetech Drop/Offset: (Glock 19 Bluegun was all I had on hand to test...) Dude, that is badass!!!!!!
|
|
|
|
|
[#23]
how was the clear to work with?
Really looks like that bladetech will cause the kydex to break if and outward pressure was applied at all. |
|
|
|
NC, USA
|
[#24]
Guys I need help on setting rivets. Right now I have the hand setter, and well it sucks. http://www.knifekits.com/vcom/product_info.php?cPath=41_526&products_id=1565 Would I be better off buying this set and using a hammer? http://www.knifekits.com/vcom/product_info.php?cPath=41_526&products_id=2027 Or would I be better off buying this set and putting it in a drill press? (I have heard that works) http://www.knifekits.com/vcom/product_info.php?cPath=41_526&products_id=632 Here are a few things I have made thus far |
|
|
|
[Last Edit: bg10]
[#25]
Originally Posted By Badfish25:
Guys I need help on setting rivets. Would I be better off buying this set and using a hammer? http://www.knifekits.com/vcom/product_info.php?cPath=41_526&products_id=2027 Get the above^^^^, but I've got the 1/4" you use for setting the #8 rivets. And one of these: http://www.harborfreight.com/1-2-half-ton-arbor-press-3551.html And one of these: http://www.knifekits.com/vcom/product_info.php?cPath=41_526&products_id=2029 I've got the 1 ton model arbor press, but I'm sure the half ton would be more than sufficient. It's the best way I've found to set rivets. Allows you to apply consistent, steady pressure, unlike with a hammer. It's very very rare I'll split a rivet. This will take so much time out of your builds. |
|
|
|
|
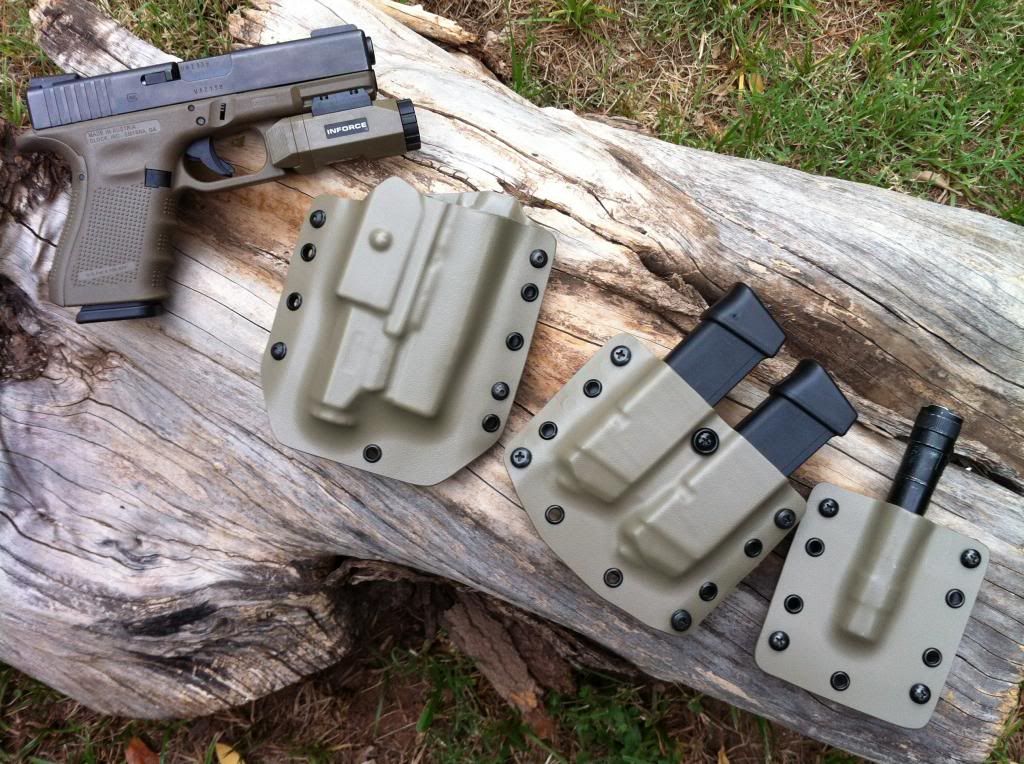
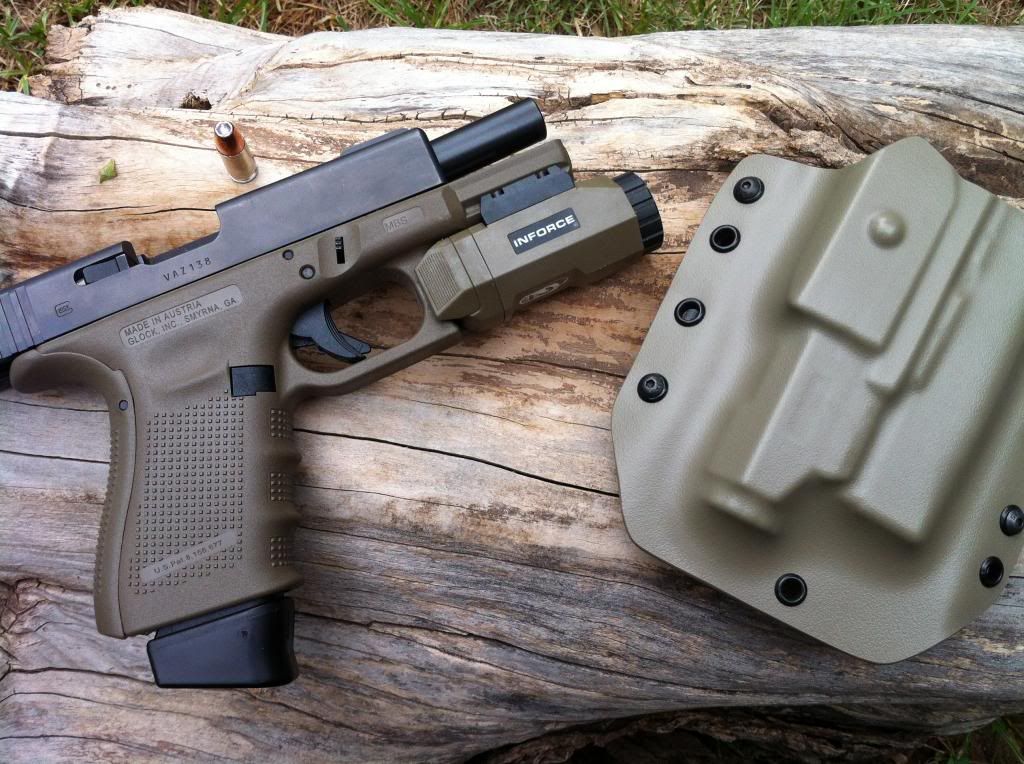
[#26]
New gun. Gen 4 G19 w/Inforce APL. Absolutely love it. I got the G19 because my business partner carries one and refuses to go to a daily carry .45. I'm liking it and love the new Inforce. It's so thin. The Kydex is a new Flat Earth color. I picked up half a sheet to try. Doesn't match the OD of the Glock, but I like the color.
   |
|
|
|
OK, USA
|
[#27]
Originally Posted By bg10:
Get the above^^^^, but I've got the 1/4" you use for setting the #8 rivets. And one of these: http://www.harborfreight.com/1-2-half-ton-arbor-press-3551.html And one of these: http://www.knifekits.com/vcom/product_info.php?cPath=41_526&products_id=2029 I've got the 1 ton model arbor press, but I'm sure the half ton would be more than sufficient. It's the best way I've found to set rivets. Allows you to apply consistent, steady pressure, unlike with a hammer. It's very very rare I'll split a rivet. This will take so much time out of your builds. Originally Posted By bg10:
Originally Posted By Badfish25:
Guys I need help on setting rivets. Would I be better off buying this set and using a hammer? http://www.knifekits.com/vcom/product_info.php?cPath=41_526&products_id=2027 Get the above^^^^, but I've got the 1/4" you use for setting the #8 rivets. And one of these: http://www.harborfreight.com/1-2-half-ton-arbor-press-3551.html And one of these: http://www.knifekits.com/vcom/product_info.php?cPath=41_526&products_id=2029 I've got the 1 ton model arbor press, but I'm sure the half ton would be more than sufficient. It's the best way I've found to set rivets. Allows you to apply consistent, steady pressure, unlike with a hammer. It's very very rare I'll split a rivet. This will take so much time out of your builds. I use my bench vise and haven't split a rivet yet. I think I will end up buying the arbor press as well though because I think it would be even quicker. I do agree that slow and steady pressure is the best way to go vs a hammer. Nice work on the shotgun shell holders, cool stuff OP. |
|
|
|
[#28]
What is the proper temp to heat my oven to to make some minor changes to a custom holster?
|
|
|
|
|
[#29]
Originally Posted By bradpierson26:
What is the proper temp to heat my oven to to make some minor changes to a custom holster? Brad, I wouldn't heat the entire holster. I'd use a heat gun to spot heat it. If you place the entire thing in there you can't control where the retention is lost. |
|
|
|
|
[#30]
Originally Posted By Impyman18:
Brad, I wouldn't heat the entire holster. I'd use a heat gun to spot heat it. If you place the entire thing in there you can't control where the retention is lost. Originally Posted By Impyman18:
Originally Posted By bradpierson26:
What is the proper temp to heat my oven to to make some minor changes to a custom holster? Brad, I wouldn't heat the entire holster. I'd use a heat gun to spot heat it. If you place the entire thing in there you can't control where the retention is lost. This heat gun or hair dryer to a specific area. |
|
|
|
|
[#31]
Originally Posted By 4DAIVIPAI2K5:
This heat gun or hair dryer to a specific area. Originally Posted By 4DAIVIPAI2K5:
Originally Posted By Impyman18:
Originally Posted By bradpierson26:
What is the proper temp to heat my oven to to make some minor changes to a custom holster? Brad, I wouldn't heat the entire holster. I'd use a heat gun to spot heat it. If you place the entire thing in there you can't control where the retention is lost. This heat gun or hair dryer to a specific area. hair dryer will have to do |
|
|
|
|
[#32]
Originally Posted By bradpierson26:
hair dryer will have to do If you decide to get a heat gun, you can find them in the $15-20 at harbor freight. Just be careful with the hair dryer that you don't allow the heat to spread too much. Don't want to ruin your holster. |
|
|
|
|
[#33]
|
|
|
|
MI, USA
|
[#34]
Originally Posted By MCR:
Ditto on not gluing down the foam. I've had moderate success just using woos screws in the corners and countersinking them into the foam. As long as the screw heads don't line up or the Kydex lays on top of them, so far good to go and an easy swap when the foam gets worn out. I had also thought about using aluminum channel on the sides and underlap the top. Just slide in and slide out when you need new foam. Quick Grip Clamps also work a little faster than C-Clamps, but don't put near enough pressure. I usually end up having to touch my stuff up by hand with a heat gun and a piece of foam. Oh, and if it hasn't been mentioned before, using a pair of tight fitting thin leather gloves helps to get the kydex out of the oven and molded before it cools down. Just make sure the gloves are fairly clean. Originally Posted By MCR:
Originally Posted By millsusaf:
As promised (or at least I think I did). I just pieced this together from scrap wood. 6" C clamps do the job of pressing. My only suggustion is to NOT glue your foam to the boards. I'll have some fun pretty soon scraping it off. Ditto on not gluing down the foam. I've had moderate success just using woos screws in the corners and countersinking them into the foam. As long as the screw heads don't line up or the Kydex lays on top of them, so far good to go and an easy swap when the foam gets worn out. I had also thought about using aluminum channel on the sides and underlap the top. Just slide in and slide out when you need new foam. Quick Grip Clamps also work a little faster than C-Clamps, but don't put near enough pressure. I usually end up having to touch my stuff up by hand with a heat gun and a piece of foam. Oh, and if it hasn't been mentioned before, using a pair of tight fitting thin leather gloves helps to get the kydex out of the oven and molded before it cools down. Just make sure the gloves are fairly clean. Glad I read this! LOL. I was planning on gluing mine down. Thanks for the tip. |
|
|
|
[#35]
Originally Posted By Pyzik: Glad I read this! LOL. I was planning on gluing mine down. Thanks for the tip. Originally Posted By Pyzik: Originally Posted By MCR: Originally Posted By millsusaf: As promised (or at least I think I did). I just pieced this together from scrap wood. 6" C clamps do the job of pressing. My only suggustion is to NOT glue your foam to the boards. I'll have some fun pretty soon scraping it off. Ditto on not gluing down the foam. I've had moderate success just using woos screws in the corners and countersinking them into the foam. As long as the screw heads don't line up or the Kydex lays on top of them, so far good to go and an easy swap when the foam gets worn out. I had also thought about using aluminum channel on the sides and underlap the top. Just slide in and slide out when you need new foam. Quick Grip Clamps also work a little faster than C-Clamps, but don't put near enough pressure. I usually end up having to touch my stuff up by hand with a heat gun and a piece of foam. Oh, and if it hasn't been mentioned before, using a pair of tight fitting thin leather gloves helps to get the kydex out of the oven and molded before it cools down. Just make sure the gloves are fairly clean. Glad I read this! LOL. I was planning on gluing mine down. Thanks for the tip. The aerosol spray on contact cement works pretty good. Holds the foam in place but can be pulled off easily if you need to change it out.. |
|
|
|
MN, USA
|
[#36]
Originally Posted By bg10: If you decide to get a heat gun, you can find them in the $15-20 at harbor freight. Just be careful with the hair dryer that you don't allow the heat to spread too much. Don't want to ruin your holster. Originally Posted By bg10: Originally Posted By bradpierson26: hair dryer will have to do If you decide to get a heat gun, you can find them in the $15-20 at harbor freight. Just be careful with the hair dryer that you don't allow the heat to spread too much. Don't want to ruin your holster. |
|
|
|
[#37]
Seems like that would get hot real quick
|
|
|
|
USA
|
[#38]
When I need to spot heat a specific area I just lay some welding gloves over the rest of the holster to mask it from the heat, leaving only the area to be heated exposed. Works great. Angle the heat gun so it's not blowing hot air up under the gloves and Bob's your uncle.
|
|
|
|
[#39]
^^^ this plus I made a little cover for my heat gun out of some tin I had to direct the heat to a smaller area.
|
|
|
|
|
[Last Edit: PFC_Dustin]
[#40]
Originally Posted By 4DAIVIPAI2K5:
^^^ this plus I made a little cover for my heat gun out of some tin I had to direct the heat to a smaller area. Just made this for my wife. 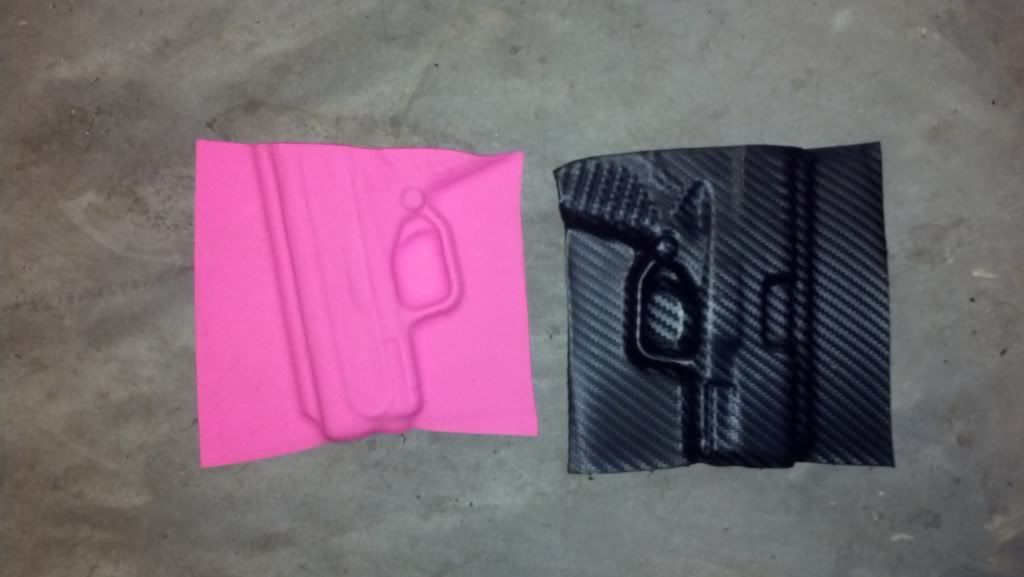

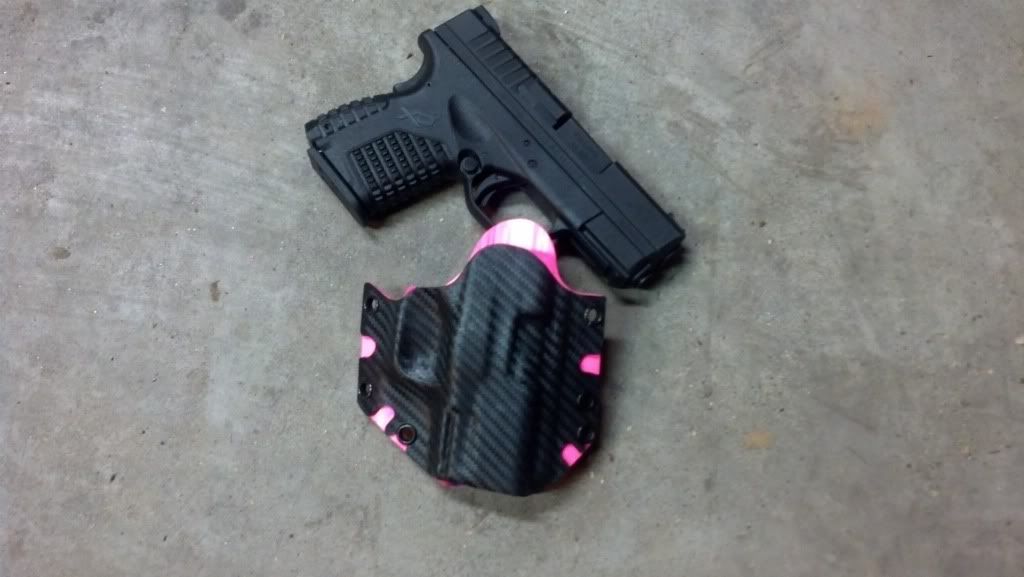
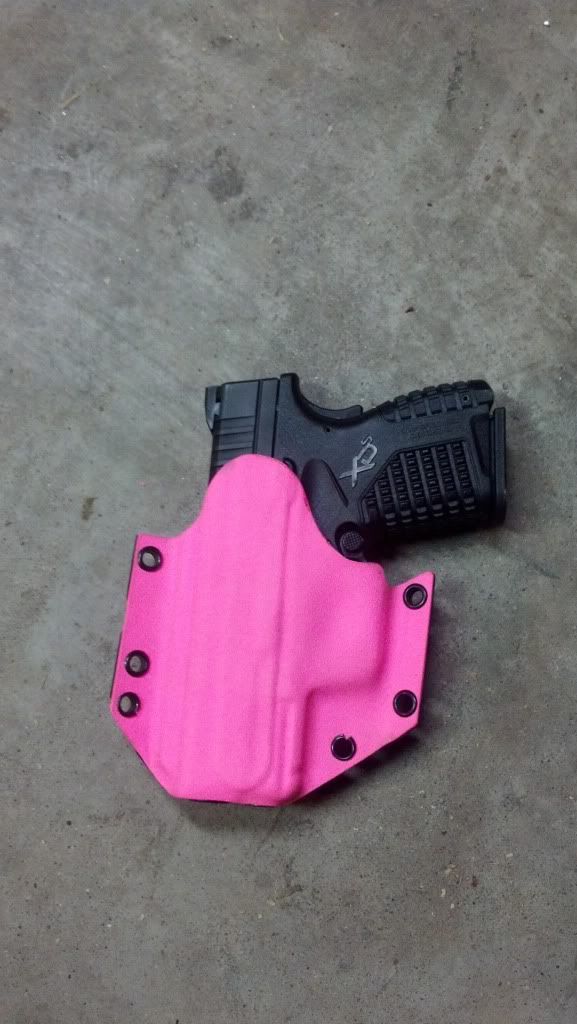
I'm trying to make some sort of clips since she doesn't wear a belt, and I've replaced the split rivets and re-polished the edges. I also cut a little too far on the CF side muzzle. But over all I like it; makes me want strawberry milk. |
|
|
|
|
[Last Edit: bobapunk]
[#41]
Originally Posted By PFC_Dustin: Just made this for my wife. http://i1137.photobucket.com/albums/n506/DDustin5/IMG_20130906_232314_061_zps906a6792.jpg http://i1137.photobucket.com/albums/n506/DDustin5/IMG_20130908_230752_670_zps672f4743.jpg http://i1137.photobucket.com/albums/n506/DDustin5/IMG_20130908_230838_959_zps3ee1e777.jpg http://i1137.photobucket.com/albums/n506/DDustin5/IMG_20130908_230820_438_zpsc3d70f52.jpg I'm trying to make some sort of clips since she doesn't wear a belt, and I've replaced the split rivets and re-polished the edges. I also cut a little too far on the CF side muzzle. But over all I like it; makes me want strawberry milk. Originally Posted By PFC_Dustin: Originally Posted By 4DAIVIPAI2K5: ^^^ this plus I made a little cover for my heat gun out of some tin I had to direct the heat to a smaller area. Just made this for my wife. http://i1137.photobucket.com/albums/n506/DDustin5/IMG_20130906_232314_061_zps906a6792.jpg http://i1137.photobucket.com/albums/n506/DDustin5/IMG_20130908_230752_670_zps672f4743.jpg http://i1137.photobucket.com/albums/n506/DDustin5/IMG_20130908_230838_959_zps3ee1e777.jpg http://i1137.photobucket.com/albums/n506/DDustin5/IMG_20130908_230820_438_zpsc3d70f52.jpg I'm trying to make some sort of clips since she doesn't wear a belt, and I've replaced the split rivets and re-polished the edges. I also cut a little too far on the CF side muzzle. But over all I like it; makes me want strawberry milk. That looks pretty good! Nice and crisp definition for sure! A few things I have learned that might help you out. #1, on a striker fired pistol, ALWAYS rack the slide before forming the Kydex. It looks like you formed the Kydex with the trigger to the rear (maybe not, hard to tell in the pictures). That can cause an ND while holstering if the kydex infringes on the inside of the trigger guard too much. #2 block out the ejection port - forming Kydex into the ejection port can create unneeded retention and cause excess wear on the slide and the inside of the holster. Once easy way to do that is to take a wooded shim, split it lengthwise, and then use an appropriate size section of it to lay over the ejection port. Secure with blue painter's tape and press as normal. Here is a sample of one I did for a Glock 19 using craft sticks to block off the controls and ejection port. #3 - try leaving an extra inch or so of Kydex past the muzzle when you press it. Then you can go back and cut and sand it to were you want. This gives you a lot more control over where the edge ends up AND allows you to have a much cleaner edge too. |
|
|
|
|
[#42]
Originally Posted By 4DAIVIPAI2K5:
G19 appendix rig with Inforce APL. Adjustable retention, adjustable ride height. If I do my normal loops instead of this J hook style its made to wear OWB also. [email=http://www.flickr.com/photos/40500049@N08/9571475637/]http://farm4.staticflickr.com/3804/9571475637_96ac62fc67.jpg[/email] _MG_4585 by 4DAIVIPAI2K5, on Flickr [email=http://www.flickr.com/photos/40500049@N08/9571468877/]http://farm4.staticflickr.com/3814/9571468877_0b40f70bea.jpg[/email] _MG_4589 by 4DAIVIPAI2K5, on Flickr Doesnt need to light to be holstered [email=http://www.flickr.com/photos/40500049@N08/9571472133/]http://farm4.staticflickr.com/3721/9571472133_a5a715c71e.jpg[/email] _MG_4586 by 4DAIVIPAI2K5, on Flickr What's the goal of using that shape with the little outrigger? |
|
|
|
|
[#43]
Originally Posted By bobapunk:
"Mirage" competition cut holster for a Glock 34 on a Bladetech Drop/Offset: <a href="http://"http://s603.photobucket.com/user/bobapunk/media/NICKydex%20Holsters/_MG_5541_zps0113cbb8.jpg.html"" target="_blank">http://i603.photobucket.com/albums/tt117/bobapunk/NICKydex%20Holsters/_MG_5541_zps0113cbb8.jpg</a> <a href="http://"http://s603.photobucket.com/user/bobapunk/media/NICKydex%20Holsters/_MG_5544_zps2daddbce.jpg.html"" target="_blank">http://i603.photobucket.com/albums/tt117/bobapunk/NICKydex%20Holsters/_MG_5544_zps2daddbce.jpg</a> <a href="http://"http://s603.photobucket.com/user/bobapunk/media/NICKydex%20Holsters/_MG_5542_zps8f630b88.jpg.html"" target="_blank">http://i603.photobucket.com/albums/tt117/bobapunk/NICKydex%20Holsters/_MG_5542_zps8f630b88.jpg</a> <a href="http://"http://s603.photobucket.com/user/bobapunk/media/NICKydex%20Holsters/_MG_5543_zpsc61b46ad.jpg.html"" target="_blank">http://i603.photobucket.com/albums/tt117/bobapunk/NICKydex%20Holsters/_MG_5543_zpsc61b46ad.jpg</a> <a href="http://s603.photobucket.com/user/bobapunk/media/NICKydex%20Holsters/_MG_5546_zps7361a00b.jpg.html" target="_blank">http://i603.photobucket.com/albums/tt117/bobapunk/NICKydex%20Holsters/_MG_5546_zps7361a00b.jpg</a> <a href="http://s603.photobucket.com/user/bobapunk/media/NICKydex%20Holsters/_MG_5545_zps133cd40c.jpg.html" target="_blank">http://i603.photobucket.com/albums/tt117/bobapunk/NICKydex%20Holsters/_MG_5545_zps133cd40c.jpg</a> <a href="http://s603.photobucket.com/user/bobapunk/media/NICKydex%20Holsters/_MG_5547_zps4be528b3.jpg.html" target="_blank">http://i603.photobucket.com/albums/tt117/bobapunk/NICKydex%20Holsters/_MG_5547_zps4be528b3.jpg</a> <a href="http://s603.photobucket.com/user/bobapunk/media/NICKydex%20Holsters/_MG_5548_zpsd09d8b9a.jpg.html" target="_blank">http://i603.photobucket.com/albums/tt117/bobapunk/NICKydex%20Holsters/_MG_5548_zpsd09d8b9a.jpg</a> <a href="http://s603.photobucket.com/user/bobapunk/media/NICKydex%20Holsters/_MG_5550_zps8a861e22.jpg.html" target="_blank">http://i603.photobucket.com/albums/tt117/bobapunk/NICKydex%20Holsters/_MG_5550_zps8a861e22.jpg</a> (Glock 19 Bluegun was all I had on hand to test...) That is awesome and would seriously screw with some people's heads at USPSA matches. |
|
|
|
|
[#44]
Originally Posted By mrozowjj: That is awesome and would seriously screw with some people's heads at USPSA matches. Originally Posted By mrozowjj: Originally Posted By bobapunk: "Mirage" competition cut holster for a Glock 34 on a Bladetech Drop/Offset: <a href="http://"http://s603.photobucket.com/user/bobapunk/media/NICKydex%20Holsters/_MG_5541_zps0113cbb8.jpg.html"" target="_blank">http://i603.photobucket.com/albums/tt117/bobapunk/NICKydex%20Holsters/_MG_5541_zps0113cbb8.jpg</a> <a href="http://"http://s603.photobucket.com/user/bobapunk/media/NICKydex%20Holsters/_MG_5544_zps2daddbce.jpg.html"" target="_blank">http://i603.photobucket.com/albums/tt117/bobapunk/NICKydex%20Holsters/_MG_5544_zps2daddbce.jpg</a> <a href="http://"http://s603.photobucket.com/user/bobapunk/media/NICKydex%20Holsters/_MG_5542_zps8f630b88.jpg.html"" target="_blank">http://i603.photobucket.com/albums/tt117/bobapunk/NICKydex%20Holsters/_MG_5542_zps8f630b88.jpg</a> <a href="http://"http://s603.photobucket.com/user/bobapunk/media/NICKydex%20Holsters/_MG_5543_zpsc61b46ad.jpg.html"" target="_blank">http://i603.photobucket.com/albums/tt117/bobapunk/NICKydex%20Holsters/_MG_5543_zpsc61b46ad.jpg</a> <a href="http://s603.photobucket.com/user/bobapunk/media/NICKydex%20Holsters/_MG_5546_zps7361a00b.jpg.html" target="_blank">http://i603.photobucket.com/albums/tt117/bobapunk/NICKydex%20Holsters/_MG_5546_zps7361a00b.jpg</a> <a href="http://s603.photobucket.com/user/bobapunk/media/NICKydex%20Holsters/_MG_5545_zps133cd40c.jpg.html" target="_blank">http://i603.photobucket.com/albums/tt117/bobapunk/NICKydex%20Holsters/_MG_5545_zps133cd40c.jpg</a> <a href="http://s603.photobucket.com/user/bobapunk/media/NICKydex%20Holsters/_MG_5547_zps4be528b3.jpg.html" target="_blank">http://i603.photobucket.com/albums/tt117/bobapunk/NICKydex%20Holsters/_MG_5547_zps4be528b3.jpg</a> <a href="http://s603.photobucket.com/user/bobapunk/media/NICKydex%20Holsters/_MG_5548_zpsd09d8b9a.jpg.html" target="_blank">http://i603.photobucket.com/albums/tt117/bobapunk/NICKydex%20Holsters/_MG_5548_zpsd09d8b9a.jpg</a> <a href="http://s603.photobucket.com/user/bobapunk/media/NICKydex%20Holsters/_MG_5550_zps8a861e22.jpg.html" target="_blank">http://i603.photobucket.com/albums/tt117/bobapunk/NICKydex%20Holsters/_MG_5550_zps8a861e22.jpg</a> (Glock 19 Bluegun was all I had on hand to test...) That is awesome and would seriously screw with some people's heads at USPSA matches. LOL! That is EXACTLY what it was made for! Hot pink throws them off too!
|
|
|
|
|
[#45]
Got a request to supply an FN specialty shop with holsters...                  |
|
|
|
|
[#46]
Originally Posted By bobapunk:
LOL! That is EXACTLY what it was made for! Hot pink throws them off too! Originally Posted By bobapunk:
Originally Posted By mrozowjj:
Originally Posted By bobapunk:
"Mirage" competition cut holster for a Glock 34 on a Bladetech Drop/Offset: <a href="http://"http://s603.photobucket.com/user/bobapunk/media/NICKydex%20Holsters/_MG_5541_zps0113cbb8.jpg.html"" target="_blank">http://i603.photobucket.com/albums/tt117/bobapunk/NICKydex%20Holsters/_MG_5541_zps0113cbb8.jpg</a> <a href="http://"http://s603.photobucket.com/user/bobapunk/media/NICKydex%20Holsters/_MG_5544_zps2daddbce.jpg.html"" target="_blank">http://i603.photobucket.com/albums/tt117/bobapunk/NICKydex%20Holsters/_MG_5544_zps2daddbce.jpg</a> <a href="http://"http://s603.photobucket.com/user/bobapunk/media/NICKydex%20Holsters/_MG_5542_zps8f630b88.jpg.html"" target="_blank">http://i603.photobucket.com/albums/tt117/bobapunk/NICKydex%20Holsters/_MG_5542_zps8f630b88.jpg</a> <a href="http://"http://s603.photobucket.com/user/bobapunk/media/NICKydex%20Holsters/_MG_5543_zpsc61b46ad.jpg.html"" target="_blank">http://i603.photobucket.com/albums/tt117/bobapunk/NICKydex%20Holsters/_MG_5543_zpsc61b46ad.jpg</a> <a href="http://s603.photobucket.com/user/bobapunk/media/NICKydex%20Holsters/_MG_5546_zps7361a00b.jpg.html" target="_blank">http://i603.photobucket.com/albums/tt117/bobapunk/NICKydex%20Holsters/_MG_5546_zps7361a00b.jpg</a> <a href="http://s603.photobucket.com/user/bobapunk/media/NICKydex%20Holsters/_MG_5545_zps133cd40c.jpg.html" target="_blank">http://i603.photobucket.com/albums/tt117/bobapunk/NICKydex%20Holsters/_MG_5545_zps133cd40c.jpg</a> <a href="http://s603.photobucket.com/user/bobapunk/media/NICKydex%20Holsters/_MG_5547_zps4be528b3.jpg.html" target="_blank">http://i603.photobucket.com/albums/tt117/bobapunk/NICKydex%20Holsters/_MG_5547_zps4be528b3.jpg</a> <a href="http://s603.photobucket.com/user/bobapunk/media/NICKydex%20Holsters/_MG_5548_zpsd09d8b9a.jpg.html" target="_blank">http://i603.photobucket.com/albums/tt117/bobapunk/NICKydex%20Holsters/_MG_5548_zpsd09d8b9a.jpg</a> <a href="http://s603.photobucket.com/user/bobapunk/media/NICKydex%20Holsters/_MG_5550_zps8a861e22.jpg.html" target="_blank">http://i603.photobucket.com/albums/tt117/bobapunk/NICKydex%20Holsters/_MG_5550_zps8a861e22.jpg</a> (Glock 19 Bluegun was all I had on hand to test...) That is awesome and would seriously screw with some people's heads at USPSA matches. LOL! That is EXACTLY what it was made for! Hot pink throws them off too! My one gun has the bright blue dawson grip tape and blur glitter on the grip just to screw with the dudes at my local clubs. I"d use a clear holster in a heartbeat. |
|
|
|
|
[#47]
Originally Posted By mrozowjj:
What's the goal of using that shape with the little outrigger? Originally Posted By mrozowjj:
Originally Posted By 4DAIVIPAI2K5:
G19 appendix rig with Inforce APL. Adjustable retention, adjustable ride height. If I do my normal loops instead of this J hook style its made to wear OWB also. [email=http://www.flickr.com/photos/40500049@N08/9571475637/]http://farm4.staticflickr.com/3804/9571475637_96ac62fc67.jpg[/email] _MG_4585 by 4DAIVIPAI2K5, on Flickr [email=http://www.flickr.com/photos/40500049@N08/9571468877/]http://farm4.staticflickr.com/3814/9571468877_0b40f70bea.jpg[/email] _MG_4589 by 4DAIVIPAI2K5, on Flickr Doesnt need to light to be holstered [email=http://www.flickr.com/photos/40500049@N08/9571472133/]http://farm4.staticflickr.com/3721/9571472133_a5a715c71e.jpg[/email] _MG_4586 by 4DAIVIPAI2K5, on Flickr What's the goal of using that shape with the little outrigger? Guy askedfor an INCOG cut on it to run two loops. So thats what I did. I ran it in day one of my Hackathorne class and my standard appendix rig in day 2. Both worked great. |
|
|
|
|
[#49]
Do you have a bench router?
That is the only way I have come up with to get reasonably clean slots cut. To sand, wrap your sandpaper around a flat file and take about 3 times as much time as normal... I feel your pain. I have 10 more exactly like this to make
|
|
|
|
|
[#50]
Originally Posted By bobapunk:
Do you have a bench router? That is the only way I have come up with to get reasonably clean slots cut. To sand, wrap your sandpaper around a flat file and take about 3 times as much time as normal... I feel your pain. I have 10 more exactly like this to make Nope, just a razor blade, plan on making a wood jig and cutting around it. |
|
|
|
 Win a FREE Membership!
Sign up for the ARFCOM weekly newsletter and be entered to win a free ARFCOM membership. One new winner* is announced every week!
You will receive an email every Friday morning featuring the latest chatter from the hottest topics, breaking news surrounding legislation, as well as exclusive deals only available to ARFCOM email subscribers.

AR15.COM is the world's largest firearm community and is a gathering place for firearm enthusiasts of all types.
From hunters and military members, to competition shooters and general firearm enthusiasts, we welcome anyone who values and respects the way of the firearm.

Subscribe to our monthly Newsletter to receive firearm news, product discounts from your favorite Industry Partners, and more.
Copyright © 1996-2024 AR15.COM LLC. All Rights Reserved.
Any use of this content without express written consent is prohibited.
AR15.Com reserves the right to overwrite or replace any affiliate, commercial, or monetizable links, posted by users, with our own.